Ways to tie your shoelaces
We are all familiar with the simplest way - to make a double bow.
It is suitable for children and those who do not like to bother with creating complex weaves. Unfortunately, it's not perfect, so check out the information below. bunny ears
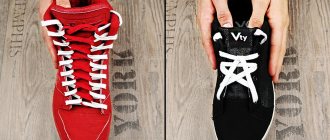
The lacing idea came from Ian Figen (a real ace in this matter). Despite its simplicity, the knot is considered very reliable. It cannot untie itself, so it can be used even in the most critical situations (for example, when you have to run a long distance).
The essence of the method is as follows:
- make a regular knot;
- we form the so-called ears;
- we thread them through each other;
- tighten it.
The result is a simple and reliable knot that will not come loose under any circumstances.
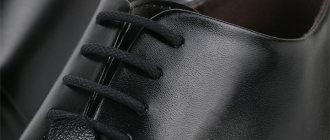
Surgeon's knot
This lacing is considered one of the most reliable. It received its name in honor of the nodes performed during operations. The purpose of such a knot is to fix the soft tissues and prevent spontaneous separation of the sutures. Therefore, shoelaces tied to this knot do not unravel on their own. It is difficult to describe this lacing method in words. It's easier to see everything with your own eyes.
Double slip knot
This type of lacing is the second simplest after “bunny ears”. To do this you need:
- to tie a knot;
- form the ears and, without tying them, thread them into the resulting loop (one at the back, the other at the front);
- pull tightly.
As practice shows, the laces are tied tightly. You can untie them only with your hands, that is, intentionally.
To prevent accidental untying, it is enough to master at least one of the above methods. If desired, this can be taught to a child.
Unusual and original ways
Knowing how to tie shoelaces in a non-standard way, as well as different types of lacing, you will be able to independently make your sneakers even more stylish. The lacing methods differ from each other, they can be changed even daily, adding your own “zest” to the image.
Checkered
Shoes laced with a checkered pattern look unusual and inimitable.
Lacing technique:
- The first cord is led through the lower holes with the eyelets inward.
- The second one is carried out from below, thus completing the “weaving binding” to the top, wrapping it around the first one and going further down.
- They do this until the cord runs out. The knot is hidden inside the sneaker.
Lightning
This is an unusual way to tie shoelaces. It is preferred by hockey players and figure skaters because it perfectly fixes the leg and looks very beautiful. This pattern looks most impressive if you use high-top sneakers or boots.
Lacing instructions:
- First you need to insert the laces into the lower holes from the inside.
- Cross the edges and thread them through the next holes.
Railway
This method looks original and is good for thin laces, since they are threaded through the hole twice. Begin lacing from the bottom, threading the eglets from the inside. Then they go parallel upward, threaded inside, pulled out and intertwined. Then there are vertical “strokes” again.
Reverse two-color loop
This is another lacing method using two cords, the ends of which are tied into a bow. Lacing technique:
- Take 2 shortened laces (red and blue).
- Pass the red through the bottom, leading out.
- Make a cross and pass the rope through the eyelets through the aiglet above.
- Continue lacing, skipping a few holes.
- Take the blue cord and start manipulating with the 2nd pair of eyelets, repeating steps 2 and 4 until the tip of the red one matches the blue one.
Five pointed star
You can tie your shoelaces creatively using this lacing option. The order is:
- The first line is made in the middle row, then the edges on the inside move perpendicularly down, cross, and return to the original row.
- Thread diagonally through the lower eyelets, forming a five-pointed star.
Tightened loops
Lacing will especially appeal to young and creative girls. Technique:
- Starting from the top, the rope is threaded into the 2nd eyelet.
- The aiglets are threaded right and left in order, resulting in long loops on the outside.
- At the bottom there should be one eyelet on one side and the other.
- Thread the aiglets into the resulting loops on both sides (see step 2) so that they look out.
Chess
This method involves using two pairs of laces, different in color. Take flat and wider laces, so the checkerboard will look more interesting. Technique:
- Thread lace A through the first holes from inside the boot. One end of the lace is short - it is required for the knot. Work is carried out with the second end.
- Pass the second eyelet into the 2nd eyelet from the inside, then from the outside into the hole opposite. Tuck the cord end B under the shoe trim near end A.
- Draw parallel lines with lacing to the very top.
- Pull cord B down, threading it alternately over and under A.
- Make a couple more waves with cord B, raise and lower it.
- Bring the eglet under the edge of the shoe near the first hole.
Rhombus
This traditional technique allows you to make patterns not only in the form of geometric shapes, in particular, a rhombus, but also other ornaments. It all depends on where the edges of the laced ropes intersect. The knots can be hidden or left outside.
Spiral
This is an easy way of lacing, which is interesting for its style and novelty. Technique:
- Thread the plastic eyelet of lace A into the top eyelet, only from the inside.
- Direct the other cord (B) into the hole in the adjacent row from the inside and up.
- Slide A through the opposite eyelet in the other row on the outside.
- Send B to the opposite hole on the next row.
- As a result, the first eglet is carried out into the grommet, located opposite in the top row on the inside, and the second - on the outside.
Wide crosses
This lacing looks quite fancy, but it is difficult to tighten and loosen. If desired, lace like this:
- Insert into the 1st eyelets from the outside.
- Cross and thread from the inside into 4ths.
- Cross again and thread through 3 eyelets.
- Throw it crosswise and thread it through the 6th eyelets from the inside.
- To tie a knot.
With a pass
If we lace our shoes correctly, there will be no pressure on the instep of the leg, and the mobility of the joint will remain normal. Technique:
- Insert the rope into the inner loops, cross them and thread them there again.
- Make a pass - stretch the egglets vertically into the next row, again forming a cross.
- If the rope is constantly untied, the pass can be performed lower or higher.
Ladder
Lacing with a ladder looks cool and fashionable. You can tie a ladder like this:
- Pass the ropes from the inside of the shoes through the bottom eyelets, pull both plastic eyelets up to create two identical parts.
- Thread one and the second part through the eyelet located opposite.
- Intertwine the ropes so that the second part is located above the first, and both pass under equal sides.
- Thread both eyelets into the eyelet opposite (from the outside) and intertwine as indicated in point 3, only now the first part should be located above the second.
- Continue to the top eyelets on the boot.
Fastening the ends
Tie ends make lacing easier and protect cuts. They are made mainly from metal and plastic, less often from rubber, leather, and thick cotton. Designer products are made from glass, semi-precious stones, brass, copper, alloys and even gold or silver.
If the tips have fallen off, you can strengthen the sections by wrapping them with tape or soaking them in glue (epoxy, wax). A more labor-intensive repair of laces is gluing a suitable metal sleeve or a piece of heat-shrink tubing (for insulating wires). The choice of method depends on the skills of the owner, the design of the shoes, the type of material, and the availability of a certain set of tools.
Sneakers are a versatile type of footwear that are predicted to have long-lasting popularity. They can be with laces or without laces - women's, children's and men's. Which option to prefer depends on individual taste.
Selection of equipment
When choosing a technique, you need to be guided not only by aesthetics and complexity of the work. The weave should provide a secure fit without sacrificing comfort. You should also consider the speed of execution and suitability for the type of shoe.
Depending on the number of holes
Sneakers are produced not only in different types, but also with an unequal number of eyelets. This also affects weave options. Some types of lacing are universal, others are designed only for a specific number of holes:
- To secure sneakers with 4 holes on your feet, the lacing methods are criss-cross, diagonal, or straight.
- For lacing sneakers with 5 holes - hidden straight lacing, knotted lacing, classic method (zigzag).
- If a shoe has 6 pairs of holes, it is considered universal. Lacing of sneakers or sneakers can be done using any convenient technique. The “railway” looks the most impressive.
- Sneakers with 7 holes fit most options. This is an ideal model for complex weaving, designed for an unpaired number of rows.
Depending on the shoe design
It is important for the owner of a classic pair to emphasize the style of the shoes and their own image. When choosing a method for sports models, you need to take into account the tightness of the fit on the leg and the uniformity of pressure
Sneakers and sneakers must be laced in such a way that the shoes can withstand the load when running and walking, and do not fly off the foot, do not squeeze or cause discomfort. As for children's and youth models, different tying is allowed.
In addition, you need to take into account the complexity of weaving. In some cases, you need a simple technique so that you can quickly put on and take off your shoes. To attract attention or provide a strong hold on sneakers - labor-intensive. By changing the way you tie the laces, you can adjust your shoe size, adjusting the fit for fullness and lift.
Top articles: DIY pen stand
The most preferred lacing options depending on the type of shoe are:
- sneakers, sneakers - double cross (for low speed), "railroad" (for high speed);
- winter sports shoes with a high top - “stairs”, “railway”, double cross;
- beautiful lacing of high women's sneakers with 5-7 holes - diagonal (symmetrical or mirror image), “spider web”.
Choosing a pattern for different types of shoes
When choosing the appropriate types of lacing, you need to take into account the style and height of the shoe. For sports boots, techniques are suitable that are in harmony with the design, ensure sufficient fit and uniform tension of the ties. Optimal schemes for footbag and other sports:
- straight;
- with knots;
- classic zigzag;
- "Railway";
- with side knot (for cycling).
“Checkerboard” is suitable for tall models with a large number of eyelets. A more accessible, but no less interesting method would be the “lattice”.
The ideal option for winter boots is “ladder”, it is optimal for high tops. Medium-height products are decorated with double spiral lacing, while low-height ones are decorated with “railroad” lacing.
For women's boots in a sporty or urban style, a diagonal pattern is suitable. The pattern can be the same or mirrored. Each option is created quickly and looks interesting. To decorate the boots, a “web” made of multi-colored laces is used. The technique is quite complex, but does an excellent job of decorative function.
For formal men's shoes, various patterns are used, straight and parallel. They do not require much effort and time, and are suitable for all occasions. More complex methods include techniques with hidden knots. They are not very comfortable to wear, but they are attractive. For an informal setting, you can choose more interesting methods: “wide crosses” or “stairs”.
Selection of quality laces
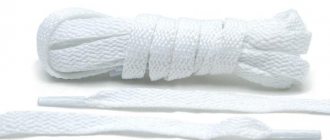
Shoe ties today are made from a variety of materials: from leather to synthetics. Replacing torn laces with new ones is not difficult if you are lucky enough to find identical ones. In other cases, you will have to take into account the properties of the raw materials from which they are made:
- Cotton is the most affordable and budget option. Gives a strong grip. If you need to tie the laces on sneakers or sneakers beautifully, cotton is an excellent solution, since they will not come undone for a long time.
- Jute and hemp are stronger than cotton and more wear-resistant. They hold the knot well and do not come undone even when running and doing physical exercises with emphasis on the feet.
- Natural leather - the products look expensive, do not tear for a long time, but often come untied, so they are not the most popular.
- Synthetics are more aesthetically pleasing than cotton or jute. Available in different colors. They are distinguished by a smooth surface, which is why they do not hold the knot well and often come undone.
An interesting know-how is silicone ties. They are elastic, stretch easily, but then return to their original shape. Because of this, they received other names - rubber (or anti-laces). Unusual in appearance: there is a loop on one end and a latch on the opposite end. Easy to fasten, making them ideal for children and people who have difficulty lacing. Disadvantages: they break under strong tension, are expensive, and are rare.
Cotton
LeatherSynthetic
JuteSilicone
"Lazy" without strings
"Hidden Node"
How to tie laces so that they don’t come undone and the shoes themselves look neat? To give your shoes a neat look while still looking stylish, you can try tying your laces using the “hidden knot” technique. To do this, you will need to start lacing the boots from the bottom holes and move the ribbons to the wrong side. The left end of the ribbon should be slightly shorter than the right.
We lead one lace into the top hole, bring it out and thread it through the hole on the opposite side. The manipulation is repeated for the ribbon on the opposite side and so on until the end. The end of the short lace should remain inside the boot at the level of the second hole from the top, that is, not laced. A long ribbon is passed through the top holes and tied with a short cord on the wrong side.
This pattern looks original and neat. The disadvantages include the inconvenience of tying a knot inside the shoe and a possible feeling of discomfort when walking.
Fashionable techniques for outdoor sneakers
Fashion trends have been affecting shoe lacing patterns for many seasons now. They didn't ignore street sneakers either. Popular brands usually use their own original methods:
- Fila. The manufacturer designs its own products using a quick lacing system.
- Reebok. They use the original method with a hidden knot.
- Nike. The sneakers are equipped with wide ribbons that harmonize perfectly with saw, European lacing, reverse loop or zipper patterns.
- Balenciaga. Branded models have 6 pairs of eyelets, the length of the laces allows the use of an athletic system.
- Adidas, New Balance. Manufacturers use a zigzag pattern. To add originality, you can use a European, straight parallel loop. Romantic people will like the butterfly pattern.
Adidas Balenciaga Fila New Balance Nike Reebok
To figure out how to lace shoes correctly, you need to pay attention to the style of the product and the number of eyelets. The color of the laces also matters. For black and brown boots, matching ribbons are optimal. The casual model can be interestingly decorated with contrasting shades according to the following principle:
- burgundy shoes - crimson laces;
- blue - blue;
- gray - white;
- brown - beige.
Bright ribbons that match the shade of the sole or accessories look beautiful: scarves, handbags, gloves, socks. White sneakers are complemented with laces of the same color. Fans of non-standard solutions will be able to use ties made in rich colors. The first option is classic, the second is creative.
Unusual ideas are very popular today. For example, it is fashionable to wear sneakers tied around the ankles. The idea is quite simple, but attracts attention.
If there is a loop on the tongue of the shoe, you can thread the laces through it after implementing the chosen pattern. This ensures that the boots are securely attached. If you don’t want to tie the ribbons, you can simply thread them through the upper holes, then hide them under the tongue.
Sneakers and sneakers often have side holes that serve for ventilation. They can be used for lacing, cross, and zigzag. This method is relevant in hiking conditions, as well as for fitting the model to a narrow foot.
Standard method
Where to begin? Everyone knows how to tie shoelaces beautifully. There's nothing complicated about it. Usually, after lacing up shoes, a person makes one knot, then makes a bow, from which a second knot is created. This is where the whole trick lies. Watch your hands
When making the first knot, pay attention to which part of the lace lies on top. The one in the left hand, or the one in the right
Let's say the left side is on top. After tying the knot, you hold it in your right hand and your right hand in your left. When tying a knot with a bow, the left side should also lie on top. That's all! The laces will not come undone.
The only moment. Practice at home first. Learning to make correct knots while bending over is not very convenient. Try it this way. Place your shoes on the table, laying a newspaper on it first. Begin tying your shoelaces slowly, carefully observing their position. Try doing it right and wrong to feel the difference.
Instilling a skill
Some actions are so simple and familiar for a person that not everyone thinks about how they are performed. Such manipulations include the usual tying of shoelaces on shoes, sneakers and any other footwear. No one is born with this skill. The first skills usually appear only in conscious childhood.
It would seem that what could be easier than tying your shoelaces? However, modern children cannot always boast of such a skill. Moreover, even teenagers do not succeed the first time. What can we say about a securely tightened knot! Most children prefer to simply put the laces into their shoes and not think about how to tie the laces correctly so that they do not come undone. In fact, everything is very simple. There are a huge number of different lacing techniques.
Basic rules and fashion trends
The main purpose of laces is to secure shoes on the foot. Elements can also serve as decoration. But in any case, it is necessary that the weaving be reliable. When choosing products with ties, you need to consider:
- While tying, keep your toes squeezed so that you can regulate the pressure and tension. This will allow you to wear the sneakers without slipping off your heel.
- When the laces are properly tied, pinching of the foot is eliminated, and therefore blood flow is not disturbed.
- If there are foot injuries, you need to skip rows when tying or loosen the weaving.
- The ties should be selected according to the style of the shoe.
Top articles: How to make a designer chandelier with your own hands
Modern sports fashion not only offers original tying patterns, but also recommends the use of original laces. Products in bright acid colors, as well as with prints or reflective elements, are popular. Textile ribbons made of satin, velor, and chiffon look impressive. They look stylish and unusual.
Fashionable techniques for outdoor sneakers
This season, the range of fashionable sneakers is replete with a variety of design ideas. Despite the sporty nature of the shoes, they are an integral part of looks in many styles. Popular model manufacturers use their own methods of tying shoelaces:
- Fila. The shoes of this brand are equipped with a quick lacing system.
- Reebok. Uses an original scheme with a hidden node.
- Nike. The shoes are complemented by wide ties that are tightened using several methods: “Saw”, “Reverse Loop”, “Zipper”, European lacing.
- Balenciaga. The brand's products have 12 holes and an athletic lacing system.
- New Balance, Adidas. Manufacturers use a zigzag pattern. To add originality, a European, straight parallel loop is used. Romantic people can decorate products with “Butterfly” lacing.
Fila Reebok Nike Balenciaga New Balance Adidas
When choosing suitable patterns, you need to be guided by the style of the shoe and the number of eyelets. As for color, the same tones are selected for black and brown models. Casual shoes are complemented with laces according to the following principle:
- Burgundy - light cherry.
- Blue - light blue.
- Gray - white.
- Brown - beige.
Those who like to experiment will be able to use bright ties, or ones that match the color of the sole. Let us select a shade to match gloves, scarves, scarves, bags, socks. To create sporty lacing for white sneakers, the same snow-white ties or rich, cheerful colors are used. In the first case, the image will turn out to be classic, in the second - original.
Today, non-standard solutions are in trend. One of them is tying laces around the leg, at ankle level. The idea is simple and unusual, attracts attention and looks interesting. The optimal pattern would be straight lacing.
If there is a loop on the tongue, the ties are threaded through it after using the pattern you like, which ensures fixation and prevents deviations to the side. To hide the laces without tying them, you need to use the top eyelets threaded in and tuck the ends between the tongue and the boot.
Side holes on sneakers and sneakers serve for ventilation, but can be used to securely support the feet. When using a cross or zigzag pattern, these eyelets are also used. The method is used in hiking conditions and is suitable for fitting shoes to narrow feet.
Lacing options for sneakers without a bow
Many athletes and people who prefer sports shoes in a casual style try to tie ribbons on their shoes so that the bow remains inside. It’s not very convenient when large “ears” of braid hang over a stylish sneaker.
Traditional
Convenient to tie on boots with 6 holes. An even number of holes ensures that the ends of the tape are aligned. The knot turns out symmetrical and neat. To make traditional parallel lacing, the tape is inserted into the first row from the top and pulled through to the last hole at the bottom. The tightening will be done from it.
The second part of the braid is moved higher and transferred to the other side of the boot. Fill the eyelets with lacing.
@amazon.com
Classical
Very similar to the parallel one, but in this version the knot is tied inside the shoe between the holes on the top of the sneaker. The free ends of the braid are cut off. This method is not suitable for people who do not know how or find it inconvenient to tie their shoelaces once. After all, sports shoes will then have to be put on and taken off without touching the braid.
@tkaner.com
Butterfly
Quite an original and attractive type of lacing. The crisscrossing of the tape looks unusual and seems to be glued to the tongue of the sneaker. To begin with, we place the rope in the lower eyelet on opposite sides. Then we thread the ends into the top holes on the same side.
Next, we cross them and thread them through the top holes.
It is important that the tape “looks” inside the shoe. Continue lacing in the same way until the last line of holes
@footwear.expert
Cobweb
With this lacing method, a dense weave is formed on the surface of the sneakers. It will be problematic to tighten, but it holds the foot perfectly. Suitable for people who prefer to wear loose sneakers without untying the laces.
The braid is threaded through the first row and crossed when released. Skipping two rows, they are again threaded through the eyelets and crossed diagonally. Raise the laces from the inside through adjacent eyelets. Then make a diagonal downward, threading the loose ends under the tongue and tying a knot.
@shelly.ru
Lattice
Looks good on sneakers with six holes. The rope is threaded through the lower eyelets parallel to each other. Next, they are crossed and pulled through two holes at the top. One lace in the same row is threaded from the inside out. The same manipulations are performed with the other free end.
The end of the lace on the left is threaded into the second free hole, which remains untouched. We mirror the manipulation with the right end of the lace. Finally, they are brought out through the upper eyelets into the sneaker. We tie it in a knot.
@footwear.expert
Snake
A simple and fun way to lace up your sneakers without a bow. It is enough to secure the braid with a knot in the upper part of the boot and lace it diagonally. The result should be straight lines on the outside and diagonal lines on the inside.
The free end of the braid is passed under the lacing and tucked inside the sports shoe. It does not carry a semantic load, but is able to complement the decor of shoes in an original way.
@samnasam.pp.ua
There are many opportunities to lace up sneakers without a traditional bow. Simple and complex types of weaving are used. It depends on the desire of the person and his ability to tie a beautiful braid.
Nuances depending on the number of holes
The fewer eyelets, the simpler the lacing method should be. Using voluminous, complex designs will require a lot of space, because only in this case will they look attractive. So, for shoes with 3 holes, a direct or parallel technique is optimal. For tying models with 4 holes, the traditional crosswise method and the original diagonal method are suitable.
To create lacing for sneakers with 5 holes, you can use any beautiful patterns, despite the odd number of holes. The optimal cross method is to remove the ties from the front or inside. Another suitable method is direct.
Shoes with 6 holes are most common, so this is the number most patterns are designed for. The chess method using multi-colored laces looks interesting. The combination of red and blue colors looks organic.
The 7-hole models look attractive with a cross pattern. For lacing shoes with more than 8 holes, various patterns are used. So, women's boots look interesting with Roman technology or “Butterfly”. For men, “Molniya” and military equipment are suitable.
For an even number of holes, any lacing pattern is suitable. For models with an odd number, you need to use some “tricks”: skipping holes, one diagonal tie at the beginning, cross and double stitches.
Alternative way
If you don’t like the usual type of laces at all, you should take a closer look at Salomon’s development – the QuickLace fast lacing system. The essence is the presence of laces, reinforced with carbon thread, and a plastic retainer. After tightening, the lock is hidden in a specially designated pocket. Thanks to this, you can be sure that they will not come undone or get caught on anything.
Top articles: How to make beautiful flower beds with your own hands: 55 inspiring photos + instructions
At first, they were used only by athletes - people for whom every second counts. Today, such lacing can be found even in everyday children's shoes. By the way, such laces can be purchased separately, for example, in the Chinese online store AliExpress.
“Surgical knot”: how to tie shoelaces correctly?
To prevent the ribbons (laces) from coming undone while walking, you can get used to making a “surgical knot.” This method is considered the most optimal, because the knot itself almost never comes undone. If you apply a little effort, you can dissolve it yourself in a few seconds. In order to make a “surgical knot” you need to:
- Tighten the laces first with a regular knot (wrap them behind each other).
- On the right lace you need to make a loop, the end of which will “look” to the left.
- Pull the second lace through the hole in the loop and make the same loop so that the end of the lace also “turns” to the left. The result should be two similar loops.
- Tie the knot tightly, pulling the laces in different directions.
Why are they untied?
So, what causes shoelaces to come undone? There are several possible reasons:
- Usually this problem occurs with synthetic laces, the loops of which are very slippery and easily fall apart. A small external influence, even light vibration, is enough. Flat laces are slightly less susceptible to this. But the round ones regularly create trouble.
- The second group of reasons is the human factor . Shoes may be laced with the wrong knot, it may not be tightened enough, or there may be very long loose ends that get caught when walking and get under your feet.
Choosing the right length
The easiest way to choose the length of the ties is by measuring old ones or taking them with you to the store. You can consult with a consultant. The table will also help you navigate:
| Number of hole pairs | Length with a distance between holes up to 2.5 cm | Length with hole spacing 2.6–5 cm | Length with distance between holes 5–7.5 cm |
| 2 | 60 | 70 | 80 |
| 3 | 60 | 80 | 100 |
| 4 | 70 | 90 | 110 |
| 5 | 80 | 100 | 130 |
| 6 | 80 | 110 | 140 |
| 7 | 90 | 120 | 160 |
| 8 | 90 | 130 | 170 |
| 9 | 100 | 140 | 190 |
| 10 | 100 | 150 | 200 |
You need to consider how tight the lacing will be. When, after tying, the edges of the underblocks are joined, you can get by with shorter ties. If it turns out that the length is too long, the tape can be cut, the agglets can be reinstalled, or the sections can be glued. The ends of synthetic products should be burned.
Double multicolor lacing
You will need two pairs of laces in different colors. Choose contrasting colors and fairly short laces so that the bows are not very large.
- Insert the first laces into the bottom holes from the inside.
- Cross and pass through the third holes from the inside.
- Repeat the first steps with the second laces, only insert them into the second holes, and after crossing - into the fourth.
- Cross the first laces and thread them through the fifth holes from the inside.
- Do the same with the second ones, just insert them into the sixth holes.
- Now you have four ends, you can tie one creative knot or two regular ones.
Lacing with ladder
Another way. This lacing has very good strength. True, at the very beginning it may not look too beautiful. The reason for this is that the gap between the holes is too wide. Therefore, for this type of lacing, you should choose shoes with small gaps between the holes.
At the very beginning, the lace must be passed through the lower holes, after which the ends must be brought out. Next, the first end is threaded crosswise through the top hole and passed to the side. The second one is also threaded crosswise through one hole and is also pulled to the side. Thus, lacing is performed - first at one end, then at the other alternately. It turns out that you are making a ladder in the gap between the holes. Well, you already know how to tie a knot on your shoelaces. This was mentioned above.