Renewal of shine
The following will help restore the lost shine of a product:
- Whipped egg white. It is applied in a thin layer to the surface of the skin. After complete absorption, it acquires a bright shade, becomes softer and begins to shine.
- Lemon juice. Dissolve 5 ml of alcohol and a little juice in 1 liter of water. The product is treated with the composition and then wiped with a clean cloth. At the end, it is recommended to apply glycerin and dry the jacket in natural conditions, hanging it on hangers.
- Castor oil. The skin is cleaned with a soap solution with the addition of ammonia and wiped with castor oil.
- Coffee grounds. It is wrapped in a napkin, flannel or woolen fabric and the resulting tampon is used to treat the jacket.
When applying any of the available products to the skin, it is necessary to distribute it evenly and carefully over the surface, without missing any areas, so as not to spoil the appearance.
Fatliquoring or softening the skin
After each treatment of leather with an organic solvent, it is advisable to fatten it to restore softness and shine. There are several more recipes based on castor oil.
Technology:
For better absorption, add a little ammonia to castor oil, or beat 50 ml of castor oil with the white of one egg. Avoid excessive fatting to prevent the skin from becoming greasy and heavy. After applying the mixture, carefully remove excess with a clean, damp cloth.
- If the nitro coating is completely destroyed, the leather can be scraped. To do this, remove the remaining nitro coating with a scraper. You can check for the presence of paint or varnish residues by wetting the skin with water - when the coating is completely removed, the entire surface gets wet evenly.
- If the contamination is not severe, but still requires wet treatment, soak the skin in warm water for 3-5 minutes, gently rub the contaminated areas with a soft washcloth or brush. You can use soap foam, which contains almost no alkali. Or wash the leather with a mild detergent, rinse in water and vinegar, and press dry.
- If you are working with a large piece of leather, lay the still damp leather on the board, wrong side up, and secure along the edges with small nails. Leave your skin to dry naturally without using heating devices. If the holes from the nails stretch out as they dry, refill them closer to the center. Sand dry leather along the face with coarse sandpaper, then use fine-grit sandpaper or a glass nail file.
Removing scratches and abrasions
If the clothing is worn out and the leather is damaged, it can be restored. Scratches on a jacket can be easily removed using the following methods:
- The damaged area is treated with baby cream or restorative wax, and after some time the scratch disappears.
- Rub with orange peel.
If deep tears and scratches appear, use liquid leather. This product is sold in stores. When using it, you must strictly follow the instructions.
There are several options for removing scuffs on a leather jacket:
- Problem areas are treated with shoe polish or paraffin.
- Use rubber glue, applying it to the skin with a clean and dry piece of cloth. After the product is completely dry, it is processed again.
An old leather jacket can be easily restored using a special product (liquid leather).
Removing cracks from skin
Many modern leather products have a nitro coating, which protects them from moisture and masks minor defects.
This film covers the surface of the skin and gives it shine. However, nitro coating has a drawback - its instability to bending. Because of this, cracks often appear on jackets and boots at the folds. Acetone will help deal with cracks. Small cracks or scratches are removed using a swab soaked in acetone. The work must be carried out quickly, with light pressure, without lingering in place, covering the entire surface of the product at once. Do not rub acetone into the skin. The top layer of nitro paint will be slightly washed out. This is enough to mask minor defects. Before completely treating the item with acetone, try cleaning a small, inconspicuous area. Remember that organic solvents should be used in well-ventilated areas, observing fire safety regulations.
Removing dirt and salt stains
Dirt is easily removed from the surface of the material using a wet method. If a greasy stain appears, you should try glycerin oil or a colorless cream.
A frequently used method is to use purified gasoline or acetone. It is recommended to first test this method on an inconspicuous area of the product.
Salt stains are removed in the following ways:
- treat the contaminated area with vinegar;
- A mixture of ammonia, soap and formaldehyde (1:1:4) is used.
Cleaning a leather product
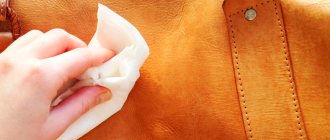
Begin the restoration by removing any remaining cream and stains. It's no secret that fresh stains are removed better and faster than old ones, so don't put off cleaning leather products for too long. To clean the surface, use a lint-free cloth swab soaked in burdock oil or turpentine. If dirty, take a new one. You can use an old, proven remedy - clean dirt from the leather surface with warm, unboiled milk. The fat contained in the milk will be absorbed into the skin, and will save you from the need to additionally fatten it after cleansing.
Color restoration
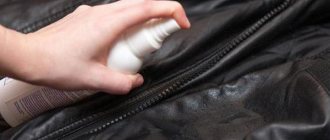
To renew a leather jacket at home, use products to restore leather color. Select paint of the same shade. When using an aerosol, proceed according to the following scheme:
- Degrease the surface and, hanging the jacket in a vertical position, evenly distribute the product from a distance of 20 cm.
- Excess paint is removed with a sponge.
- Leave the product to dry for 1.5-2 hours.
When using an aerosol, it is recommended to use respiratory protection.
The color can also be restored using powder paints. It is dissolved in water (2 l) and boiled for several minutes. Clothes are immersed in the composition at a temperature of +45°C. The coloring process takes place within 2-3 hours.
After this, the item is rinsed well several times and to consolidate the effect, treated with a solution of 1 liter of water, 1 cup of vinegar and 1 tbsp. l. salt. Dry the product naturally on hangers.
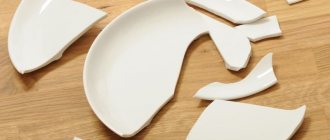
How to fix a gap with your own hands
It is believed that leather is a fairly durable material, but it can also tear. Although, of course, holes appear less often on such products than on fabric and canvas ones. If this has already happened, then the instructions for bringing the jacket into proper shape depend mainly on the form of damage that has occurred. There are situations when the material is torn by a “corner”, and there are situations when a piece of skin flies off completely.
In the first case, the sequence of actions is as follows:
- Provide access to the tear from the inside of the leather jacket. It is necessary to rip the jacket lining along one of the seams.
- Carefully, as far as possible, smooth out the torn corner. Now you need to fit it back and secure it with tape on the front side.
- We glue a patch made of leather, thick fabric or suede from the inside. We make sure that the overlay is larger than the tear site and protrudes beyond each of its edges by 10-15 mm.
- Having smoothed the surface from the inside, we install something heavy on the front side. Leave the load until the patch is completely dry.
- We remove the tape. Apply a thin layer of glue along the entire joint of the gap from the outside (it is convenient to use the tip of a toothpick for this).
- We mask the damaged area with a special leather paint to match the product or a regular cream.
- Sew up the inner lining.
Important: Please note that the tape you take is initially very sticky. It may leave marks on the surface of the jacket. It's better to "weaken" it. To do this, glue it to the surface of your leg, peel it off, and then use it for its intended purpose.
In a situation where the hole in the jacket is obvious and a piece of material is completely torn out, repairing the product is somewhat different.
- We rip the lining from the inside in order to get to the place where the skin is torn.
- We level the damaged area as much as possible, glue a patch from the inside, and place a weight on it.
- After the glue has completely dried, we repair the front part of the product. If the “original” torn piece is lost, you need to cut another one from a flap of leather, which is as similar in characteristics as possible to the material of the jacket. We make sure that it is identical to the shape of the hole. We put this piece into the hole.
- Carefully fill the resulting joint with glue along the entire perimeter of the outer patch.
- After everything has dried, paint over the damaged area. Sew up the ripped lining.
If the gap is large and is in plain sight, then repairing it with your own hands will be quite problematic. It is better to contact qualified craftsmen for help in the studio. If an area of skin needs to be replaced, specialists will be able to select the most suitable flap and carefully stitch it in the right place.
Tip: Alternatively, you can seal the jacket yourself and add leather patches. Particular attention should be paid to masking the damage. For example, you can install additional decor in this place. This approach will not only hide traces of the tear, but will also give the jacket originality.
Tips for care and storage
In order for the item to serve for a long time and maintain its appearance, it is necessary to use products that restore the structure of the leather, disinfect and give it shine.
Ingredients for regular product care:
- water repellent spray;
- conditioner for leather products;
- leather wax;
- soft sponge.
Following these recommendations will help maintain the appearance of your jacket:
- Hang clothes on hangers to prevent cracks and scuffs.
- Do not wash things in a washing machine.
- Dry clothes only at room temperature, away from heating devices.
- To store the product, purchase a special cotton bag with good ventilation.
If your clothes are heavily soiled or damaged and you cannot remove them yourself, you should take the item to the dry cleaner. Specialists will select an effective and safe remedy to eliminate the problem.
How to restore and prepare old leather for work
Today we will talk about how to restore and prepare old leather for use.
When you hold worn-out old boots in your hands, the most sensible thing to do is throw away this trash as soon as possible. There is nothing to say about broken heels, battered soles, peeling toes.
The tops are no better ironed: wrinkled like an accordion, lost color, deformed. How old are these boots? Two, three years? Or five, ten? In any case, this is not an age for the skin.
In Altai, archaeologists have found elegant leather and suede products - bags, cases, jewelry.
They are well preserved, although they were made about 2500 years ago. Of course, the durability of leather largely depends on the workmanship, and ancient craftsmen knew its secrets. But even our boots will make good things. You just need to be patient.
First, let's rip the zippers and lining out of the boots. Zippers, if they are in good order, will still come in handy. Faux fur lining is also a useful item, although it can look terrible.
Wash it and you can create a coating for a paint roller. Faux fur, due to its texture and good absorbent properties, allows you to apply paint quickly and evenly. After finishing work with adhesive paint or whitewashing, the fur cover of the roller can be removed and washed.
Carefully cut off the heads of the boots with a shoe knife.
As a result of all these operations, you will have quite large pieces of leather from the boots at your disposal. They are usually cut from several almost rectangular parts. Open the connecting seams.
Sometimes it makes sense to simply cut the old product along the seams, and sometimes it makes sense to leave some seams to use in a new design.
The front surface of leather products is usually smooth and shiny because it is coated with nitro paint. Tanners call the front side of the leather “face”, and the back side “bakhtarma”.
Try peeling off layer by layer on the underside of an unnecessary scrap of leather with a sharp knife, and you will see the peculiarities of the leather structure: bakhtarma has a loose and fibrous structure, while the face has a denser and more uniform structure.
Possible damage
Direct sunlight and excessive heat will dry out leather trim. It dries out, cracks, and tears.
The most common defects in leather upholstery:
- punctures;
- burns;
- cuts;
- spots;
- ingrained dust;
- ruptures;
- abrasions;
- scratches;
- loss of color;
- cracks.
Fixable upholstery problems are caused by the leather losing its elasticity due to drying out.
Recommendations for caring for the coating
To prevent the formation of abrasions, drying out of leather drapery, and drying out of upholstery, regularly care for the covering. In modern cars equipped with a sunroof, leather trim is used not only for seats, but also for decorating the dashboard, ceiling space, and door cards.
Follow these guidelines:
- Do not allow the interior to freeze. At low temperatures, the leather becomes tanned and may crack under stress. Turn on heated seats or park the car in a heated garage in winter;
- use conditioners for the leather upholstery of your car;
- when repairing leather trim yourself, carry out a test restoration on a fragment or start restoration from invisible places;
- After painting leather upholstery, wait for the product to dry completely. A freshly painted area may vary in color. After drying, the shade will change;
- choose liquid leather that is as close in color as possible to the general range of salon drapery;
- When operating a car with leather seat covers or leather upholstery, wipe with products containing a high content of oily substances;
- Regularly clean the seat upholstery from dirt, sand, and dust;
- do not leave the vehicle in the open sun;
- polish the upholstery with a lint-free material;
- Clean the leather interior with frequency depending on the period of use of the car. The older the vehicle, the more often the upholstery needs maintenance.
To extend the service life and maintain the cleanliness of the car, restore the leather of the car interior with your own hands, taking into account the peculiarities of repairing leather coverings on seats or interior trim. Over time, the material becomes discolored, cracks, and loses elasticity. Simple methods and modern tools allow you to quickly update your upholstery.