A phone case is not only a means of protecting equipment from damage and chips due to impacts, but also a decoration for the device. Many people pay great attention to the choice of this accessory. At the same time, not everyone has the opportunity to buy exactly the copy that would suit them in all respects. Therefore, many are interested in how to paint a silicone case so that it pleases for a long time, is beautiful and practical. In this article we will look at the most interesting ideas for decorating a phone case, and also reveal all the subtleties when preparing it for painting.
How to color a phone case
The article contains 5 ways to paint a case yourself, as well as 2 cool alternative personalization options for artists.
Is it possible to paint a smartphone case with watercolors? Yes and no. In general, the mission is feasible if you know the nuances. In this case, you can use smartphone cases as a personal art gallery. Further in the article - 5 ways to paint a case yourself, as well as 2 cool alternative personalization options for artists.
Painting a silicone transparent phone case step by step
A transparent bumper for a smartphone quickly gets dirty and becomes ugly. The stains can no longer be washed or cleaned. How can you paint a silicone case with your own hands? How to paint and decorate mono? These questions periodically arise before everyone. With a minimum amount of time, you can update the product by changing its shade.
Painting phone cases has become a form of modern art. Let's look at how this process works.
What you will need
If you only want to change the color and not make any decorations, then you need to take:
- Hair dye. The cheapest one will do. Only it should not be a tinted shampoo. Whatever color of paint you choose, this will be your new cover color.
- Plastic bag.
- Disposable rubber gloves. To protect your hands, you will need to wear silicone gloves.
- Soap solution.
- Paper napkins.
Surface preparation
Before starting work, make sure that the surface of the phone case is clean. There is no dust or traces of dirt on it. To clean, use an alcohol solution and cotton pads. You can use nail polish remover. Just check first on the inside of the case to see if the acetone will corrode the surface.
Carefully wipe the case on all sides so that no mechanical particles remain. If you do not clean it, the result of the work will be unsatisfactory and will not bring joy to the owner.
Coloring
Let's first look at a simple paint job on a clear silicone fixture.
- Remove the contents from the hair dye box. You don't need the included balm.
- For protection, wear gloves on your hands.
- Squeeze the paint into the bag.
- Mix the paint.
- Place the product inside the bag.
- Roll up the bag, carefully distributing the suspension over the surface.
- Wait at least an hour, stirring the contents occasionally.
- Take out the device.
- Rinse under running tap water.
- Once you see that the water is no longer stained with paint, wash the device with soap.
- Wipe the accessory dry with paper napkins.
You now have a new accessory. Depending on the color of the paint, the case may turn out to be black, brown, golden, pink, or blue. It all depends on what kind of paint you bought.
Now you don't have to throw away your old worn out case. Using a hair dyeing composition, a new unusual design is obtained.
Decoration
In addition to painting, you can decorate your device in other ways. For this you will need:
- Acrylic paints.
- Tassels.
- Masking tape.
- Ear cotton swabs.
Work order
Let's consider the simplest option.
- Place tape on the inner surface. As a result, the cover is divided into two zones.
- We paint the inner half with paints.
- Using a stick and cotton wool, carefully remove any excess paint that gets on the outside.
- We wait until the first layer dries.
- Apply the second layer. Again, let the paints dry for 2-3 hours.
- If necessary, apply a third layer.
- After the accessory has dried, remove the tape.
The simplest decor option is ready!
Shutdown
After finishing the work, let the cover dry thoroughly. Otherwise, all the work will go down the drain. And, instead of a new design, you will receive a damaged product.
Simple option
This variation of decor is rightfully considered the simplest.
To perform it you will need the following set of tools and materials:
To begin, glue a strip of masking tape to the inner surface of the accessory in the desired location to divide it into two zones.
Next, paint the inside surface of the phone case with acrylic paints, painting the parts between the strip of tape in different colors. Use a cotton swab to remove excess paint from the edges of the product.
Let the accessory dry completely, and then apply two more layers of each paint in the same way from the inside. When the last layer has dried, remove a strip of masking tape - and the simplest, but very stylish design is ready.
How to paint a plastic case with your own hands
We suggest painting the cover with watercolors.
- Watercolor paints.
- White paper.
- Scissors.
- The handle is waterproof.
- Stationery knife.
- Paint brushes.
- A printer.
Sequencing
- Watercolor will not stick to silicone, so you need to paint on a sheet of paper.
- Download your favorite coloring page from the Internet and print it out.
- You can come up with it yourself by drawing a pattern on a piece of paper with a waterproof pen.
- Color the pattern with watercolors.
- Let it dry.
- Use scissors to cut the template to the required size of the device.
- Use a utility knife to make holes for the camera.
- Insert the leaf into the clear silicone.
Watercolor
This technique is based on the use of watercolors.
To bring your design to life, you need to prepare:
Since watercolors on a silicone surface will flow to one point, painting a mobile phone case with your own hands will be done on paper.
Print out a template with a design on a white sheet of paper, or create one yourself using a pen with waterproof ink.
Paint the image with paints and leave until completely dry. Then cut out the template to the size of the accessory, use a utility knife to make a hole along the outline of the camera, place the sheet with the design in a transparent case, insert the phone into it - the design is ready.
Interesting coloring and decorating ideas
Let's consider several options for painting and decorating the accessory.
Nail polish
Girls can be asked to decorate the case with nail polish.
In this case you will need:
- Silicone Case.
- Nail enamel.
- Wooden toothpicks.
We take the varnish and paint the outer surface of the accessory depending on your fantasies. You can make droplets in the form of rain. To do this, carefully apply the varnish with a toothpick. You can lightly shake the brush, and you will get a beautiful scattering of drops.
Important: do not forget to let the accessory dry at the end of the work! Otherwise, all your work will be smudged and lose its beautiful appearance.
Neon stickers
You can buy it at office supply stores and decorate your gadget.
Rhinestones
- PVA glue;
- rhinestones.
Carefully apply glue from the reverse side to the rhinestones and glue it to the case. We start work from one edge, gradually moving towards the center. We try to glue large rhinestones first. Then we attach small ones to the formed “bald spots”. Give the solution time to dry.
Stickers
You can decorate with colorful stickers, which are sold in kiosks and bookstores. You will have flowers, stars, fish.
Whatever your heart desires! The selection of stickers is huge!
Beads and pearls
This is suitable for advanced users who have skills in working with small parts. Pearls and beads are carefully glued to the body. The work is delicate and jewellery. Suitable for professionals.
Holographic tape
Stick ribbons on the cover. Cut strips as many as you like and attach them at different angles. Budget and original.
Option for the completely “armless”
If you are really bad at drawing and are not good at painting, then you can simply download the picture you like from the Internet. Print on a color printer. Cut to the size of the gadget and paste. If you don’t have a printer, you can find a beautiful picture in a glossy magazine. Using scissors, carefully cut to the size of the case and insert. The new design solution is ready! If you put in the effort and desire, you can quite simply transform your silicone case into something extravagant and shocking.
Good luck! Dare and create! Fantasize, everything is in your hands!
Nail polish
For young girls who love glamorous things, it will not be difficult to design a case for their own smartphone using nail polish. The set of required tools and materials needed for dot painting of a mobile phone case is in this case narrower than in the previous one, and you will have to spend an order of magnitude less time.
So, for work you will need:
Cover the outside of the accessory with multi-colored dots of varnish in the sequence as your imagination dictates. Let the decor dry and you can use the cover.
Another variation of this decoration is the so-called “confetti” motif. It is necessary to visually divide the surface of the cover diagonally into two parts. In the lower zone, do some spot painting on the phone case using the same nail polishes in different colors.
Just place the dots not with brushes, but with toothpicks so that they are miniature. You can make them the same size, or you can make them different - it all depends on your individual preferences. Let the varnish dry and use the accessory as intended.
How to paint a silicone phone case with your own hands
With constant use, a colored or transparent silicone bumper quickly becomes dirty and becomes unattractive in appearance. Stains cannot be removed either by cleaning compounds or by other methods. With a minimum investment of time and using available materials, you can update an outdated product by painting it in any chosen shade.
How can I fix the paint on the case?
Apply a water-based transparent fixing varnish on top of completely dry paints. Pros. The image turns out to be relatively durable - lasts up to 2-3 months (high durability compared, for example, with gouache, which is washed off upon first contact with moisture).
Interesting materials:
How to make a beautiful font on Android? How to make a beautiful font in Word? How to make beautiful text in a presentation? How to make a curveball? How to make a pie chart in Excel 2003? How to make the font on the monitor larger? How to make CS Go brighter than Nvidia? How to make your kitchen bigger? How to make your kitchen cozy and beautiful? How to keep kitchen towels clean?
How to clean a silicone phone case
Various gadgets play an increasingly important role in our lives. But mobile phones confidently hold the lead, because they include a camera, organizer, video camera, media player, not to mention their main function as a means of communication.
In order for this faithful human companion to serve as long as possible, it needs protection from dust, dirt and minor mechanical damage. The case guarantees such protection. In addition, it allows the phone to look more elegant and allows its owner to express his style.
There are many cell phone cases on sale made from different materials, the most popular of which is silicone . The silicone product pleases with its price and variety of shapes and colors, but for all its advantages it has a couple of negative qualities - it gets dirty quickly and requires care when cleaning.
- Methods for cleaning a silicone case
- Soap or dishwashing detergent
- School eraser
- Baking soda and toothpaste
- Alcohol and nail polish remover
- Returning whiteness and painting silicone
- Tips for use
Methods for cleaning a silicone case
Before starting any cleaning, the case must be removed to avoid damaging the phone inside it. This is not difficult to do. Silicone products have a special edge. It goes along the edge of the screen, preventing the gadget from falling out. Carefully and smoothly take the corner of the edge and bend it, then carefully pull off the cover. Now you can start cleaning.
Soap or dishwashing detergent
Regular soap or dishwashing detergent can remove surface stains. Pour warm water into a small container, put soap there or add a few drops of detergent, and whip up the foam. Place the silicone case in soapy water for about half an hour. Then, as necessary, gently wipe off the dirt with a sponge. We rinse the product well in clean water. All that remains is to wipe it dry.
School eraser
Marks from a ballpoint pen can be erased with a light-colored school eraser. Take a clean, dry eraser and rub it against the dirt. After this, use a cotton pad dipped in any alcohol-containing liquid (balm, cologne) to wipe the product.
Baking soda and toothpaste
You can clean dirt from silicone using baking soda. Pour a teaspoon of soda into a small container and add a little water to it to get a paste. Gently apply the mixture to the contaminated surfaces of the case and allow to dry. There is no need to wipe off dirt from the product; this may damage the silicone. After complete drying, shake off the soda and rinse the product in cold water.
Toothpaste can also help remove ballpoint pen marks. Apply toothpaste to the dirty area. Leave it for 20 minutes, then wipe with a cotton pad or soft cloth. If necessary, repeat cleaning.
Alcohol and nail polish remover
Regular alcohol (vodka) has proven itself to be no less effective as a cleaning agent. Apply a little alcohol to a cotton pad or soft cloth, and then carefully rub the contaminated parts of the case with it. The specific unpleasant odor will quickly disappear.
Before using nail polish remover as a cleaning agent, it is better to test its effect on the silicone on the inside of the product. If the test result is satisfactory, then you need to soak a cotton pad in nail polish remover and gently rub the contaminated surface, rinse with water, removing any remaining cleaning agent, and wipe dry. This cleaning method must be used with extreme caution if the phone case is colored or has a pattern on it, as there is a risk of ruining the appearance of the product.
Washing a silicone case is not difficult, but sometimes just making it clean is not enough for the product to regain its former appearance.
Returning whiteness and painting silicone
If the initially white cover has darkened or turned yellow during use, you can try to return it to whiteness using aggressive cleaning agents.
Before using them, you need to keep in mind that low-quality products will not withstand such cleaning , and expensive silicone cases must be bleached extremely carefully. To work, we need any solvent: acetone, gasoline, chlorine bleach or citric acid. Apply solvent to a cotton pad or soft cloth and wipe the product. Then we rinse it well and wipe it dry.
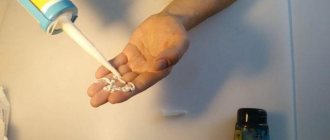
To paint a silicone product you will need iodine and a permanent marker of the desired shade. The next steps are simple:
- dip cotton swabs in iodine and very carefully apply the substance to the seams;
- carefully and carefully paint over the entire surface of the cover with a marker.
Don't be afraid of the results you get. After a few days, the iodine will evaporate, and the color applied with the marker will be reliably absorbed into the silicone of the product.
Tips for use
To prevent the case from losing its transparency, you need to regularly wipe it with a damp cloth or cloth. This will remove dirt from the product before it is absorbed into the silicone. A good alternative that requires less maintenance would be a case made of matte silicone. It only needs to be washed occasionally in a soapy solution, then rinsed in running water and wiped dry.
Useful tips
Simple rules that you can follow to get the desired result:
- choose the cheapest hair dye, since the cost of the product does not affect the quality of coloring,
- choose the appropriate color of the paint composition - for bumpers of bright colors, black or other dark colors are best; a transparent product can be painted in any tone,
- wash the freshly painted cover thoroughly with soap, so it will not leave marks,
- choose permanent dye; do not purchase ammonia-free formulations or tint hair balms.
Scuffs and dirt on the bumper cannot be removed using either professional or improvised means. In this case, it is not necessary to throw away the worn-out product and purchase a new one. Using hair dye, you can transform your case beyond recognition by choosing any new shade for it.
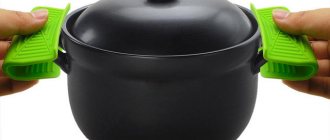
Painting a silicone bumper (detailed instructions)
Anyone who has a glamorous, bright silicone bumper for their phone eventually faces the problem of soiling it, which can no longer be eliminated by any cleaning products.
2. Information on the Internet about painting silicone is extremely scarce, and all advice boils down to one thing - buy a new one.
3. Buying a new bumper is not our method; a decision was made to reincarnate it in a different color.
4. For this we need. hair dye (black). I took the cheapest one for 50 rubles.
You can buy such a case on Ali for about the same money.
5. Dump out the contents of the box with instructions. We leave the necessary bags (we won’t need the balm after coloring, though.)
6. Prepare a packaging bag - one piece.
7. Don't forget about personal protective equipment.
8. Squeeze out the cracking paste and mix by squeezing the bag.
9. Place the bumper in the bag.
10. Mix and wrap.
11. After some time, a reaction occurs, the bag turns black and warms up a little. I let it sit for about two hours (to be sure), stirring periodically for a more uniform coloring of small parts and holes.
12. We extract the test subject.
13. Rinse in running water. When all the nasty stuff is washed off, wash it again with soap.
14. Wipe and enjoy the result.
15. Issue price - 50 rubles. The advantages of the method are that the silicone is impregnated, it can be washed, scratched, and wrinkled; the paint does not fall off or fade. Disadvantages - not noticed yet. Z.Y. Using the same method, I painted bright (but already darkened) straps on children’s watches. All the best!
Decor of objects Crafts product Painting Masters need your advice Paint
Good day to all, Masters and Craftswomen!
I want to hear your advice, criticism and further parting words)
I have accumulated quite a lot of phone cases, I want something new, but I’m too scared to buy new ones. So I decided to apply a little creativity to them, but I lack experience and brainpower.
The question is: how to cover the covers after painting? I tried several varnishes (including aerosol) but in the end they all stick or fly off and do not hold the design.
I use acrylic paints for painting. I dry all layers well. Tell me how best to complete your crafts! After all, I really want to walk around with my beauty)
I apologize in advance for the quality of the photo)
- Blog Paradiso
- Comment
- Report a violation
- Print page
try using acrylic varnishes from a hardware store. for baths and saunas they are good on wooden and plastic surfaces, but each layer must be dried for at least a day, and for everyday use, it is better to leave it for three or four days. Yacht varnish is also very strong and wear-resistant, but also takes a very long time to dry, and is suitable for all surfaces except silicone. I used these varnishes myself in my works, and I can answer for them! If you're interested, I can send you photos of the companies I use. I really like the spray varnish from Krylon! does not turn yellow, lasts a long time, dries quickly, the item can be used (if it does not have 5 layers of varnish) within a day!
Did you use acrylic varnishes? One leatherette cover I had with acrylic reacted, it dissolved on it
Since the surface of the covers is dark and the colors of the outlines are bright, you can try alkyd varnish, it is more durable. But I don’t know how he reacts to leatherette. Or splurge on glassy varnish.
Or don’t cover it - the contours, as they polymerize (about 20 days), stick well on their own.
Yes, I tried acrylic varnish, but then the case would stick in my hands (and the paint would come off a little bit.
I'll try alkyd varnish and write about the results)) Thank you)))
I covered it with glassy and simple acrylic - everything holds up perfectly and does not stick. what kind of varnish do you have? I think that the problem is not in the leatherette, but in the varnish - it sticks.
No fabric was used in these cases. Regular plastic body with acrylic paint applied. When I get home I'll look up the name of the polish. What brand of varnish did you use?
I have glassy ferario and matte acrylic titicurilla jassya. I made leatherette covers - I have them on my blog. and there is also a post about varnishes - neighbors recommended a lot of interesting things there)))
Now I’ll run and be curious)))
It’s not clear from the photographs ((((
Don't be offended.
And why this comment?)
it seems there are no photographs so blurry that it is impossible to understand what is shown
I'm just tired of your comments. Don't write to me anymore.
Mistake
Today, everything that brings us closer to Mother Nature is in fashion. That is why covers decorated using the oshibana technique will look original and relevant. This unusual name for our ears hides the art of creating paintings from flowers and leaves dried under a press. To prepare the raw materials you will need 10 days or even more, but the result will be unique. To get beautiful dried flowers, they must be carefully laid out, for example on the page of a thick encyclopedic volume, and then left for 2 weeks. After complete drying, carefully lay out the leaves and flowers in the desired pattern on the case and cover the top with transparent nail polish. All that remains is to wait for everything to dry thoroughly. Admire how this decor looks. Wonderful, isn't it?
Now you know many ways to decorate a phone case and you can choose among them the one that will make your device unique and attract the attention of others.
Source
How to paint a silicone case black
How to paint seams treated with silicone? Regular oil paint just doesn't want to stick. Maybe there is some trick?
Everything said above is correct, however, there is one way to paint silicone, suggested to me by an old amateur fisherman, a chemical engineer by training, who successfully uses it to coat silicone baits.
For this simple operation, you will need iodine and a permanent marker of the blue shade you need.
- using regular cotton swabs, carefully apply iodine to the seams;
- carefully go over the entire surface with a marker.
Don't be alarmed that your silicone will turn out gray-brown in color. In just 2-3 days, the iodine will evaporate without a trace, and the alcohol-soluble type of filler applied from the marker will last for at least several years, except that it will become slightly lighter over time.
I myself am an avid fisherman and often use silicone baits; there is a wide variety of them. So, many fishermen know that you can paint silicone, you just need to know what to use. So we painted the silicone with an alcohol solution of iodine, this is a proven method. If you apply the silicone yourself, you can sprinkle it with, for example, tooth powder or other similar material while it is not yet hardened, and then when the silicone dries and the powder sticks to its surface, paint yourself with any paints to your health. Actually, this method is quite old and has been used by old masters for a long time, and it is also very cheap, but everything needs to be done very carefully.
You won’t be able to simply paint the silicone on top, but there is a way out, although it’s not that simple, the first thing was to initially buy silicone of the required shade (it costs much more than transparent), but if the result is so important, then it’s worth it. You can also go along the seams, cutting them off with a blade not completely, so that you get a recess and apply a second layer of colored sealant, that is, correcting the appearance and saving on buying a colored one.
And the third option for painting silicone seams is latex paint (very expensive and quite difficult to find, especially in the required shade!), but let’s say you got it, now you need to use tape, not masking tape, but plastic tape , to seal the surfaces around the seam that you will paint , the paint is very caustic (like printer ink) stretches and smears everything around and is no longer possible to wash off; it will end up on the bathtub or tiles forever! Use a thin brush to paint the seams, and then follow the instructions, you just need to wait, and then you need to treat it with a fixative so that it stops smearing.
I promised a post about how the paint holds up on a painted silicone case.
Well, here he is, a pink shameless man in an updated case, blacker than the night itself.
And he looked something like this, almost like a young official:
So, immediately after painting, I noticed that the cover was a little, barely noticeable, but dirty on my fingers.
Unpleasant, but expected, since the paint dissolves a little under the influence of sweaty hands. Is this scary? Who knows. It seems like the paint is non-toxic, which means you can grab the yum with your palms and put it in your mouth. I need to read about this. But TS is still alive, because he is naging a post for you. However, the phone does not leave any traces on other surfaces because there is no contact with water. I think we can forget about this.
But a more unpleasant moment is that the cover has stretched. Many people know that “shalomi” skimps on thick cases, and instead of a normal bumper, you get silicone snot out of the box. Well, this is exactly until the arrival of the new normal bumper from Ali. In the meantime, after two hours in reactive paint, the case began to fit loosely on the smartphone. It was cured by boiling for seven minutes. After cooling it returned to its previous shape. And yet, an unpleasant lump formed in the area of the power button, which could not be cured
Well, actually, that's all. From observations, there is also the fact that the cover is not completely black, but seems to be very faded. Pay attention to the photo below.
And here are a couple more screenshots from people who supported the trend. @pigment, @NeoHimera, @kotofeidze, welcome to the community