Whether you take long showers and scrub your hands like a surgeon every time you get ready to sit down at your keyboard, the simple truth is that over time, your keyboard will get dirty. Items like hair, dead skin cells and other things that are not part of the keyboard will accumulate under your keys, and the keys themselves will also become sticky (due to the accumulation of sweat and other skin oils) after prolonged use.
Therefore, it is a good idea to clean your keyboard from time to time. How often you need to clean it will depend on your environment and a variety of other factors, but I like to give my board a thorough cleaning at least once a year. This is how I do it.
Note. This method is recommended for most consumer keyboards and their keys. If your keyboard contains any special or non-standard materials, it is best to do some research online first.
What you need:
- Keyboard key remover
- Several cotton swabs
- A container of warm (not hot) water and soap
- Vacuum cleaner (handheld or regular, both will do)
- Towel
- Cleaning cloth/microfiber cloth
Preparation
First things first: disable your keyboard.
I always take my keyboard to another room where there is more space. You can do all this at your desk, but I wouldn't bother with water and all that dust while I'm sitting in front of my precious gaming equipment.
Gather all your tools (it's always good to be prepared) and get out your key puller. These things often come standard with most keyboards, and they're not expensive at all, so you shouldn't have a hard time getting your hands on one.
Take a photo of your keyboard if it's a custom or obscure layout, or make sure you can find the layout online. You don't want to end up with a completely clean keyboard with the wrong keys.
Caring for your mechanical keyboard
Hi all! My name is Lera and I work at Geekboards. Today I decided to share with you how I and our guys from GB take care of our and your claves. If you want an extensive guide on how to deep clean your keyboard, go here.
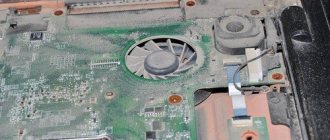
Let's start with the fact that the keyboard really needs care to maintain its service life and original appearance. Dust, hair, crumbs - all this accumulates under the keycaps and inside the case, thereby gradually clogging not only the plate and board, but also the switches themselves. Most often this is the cause of double clicks and sticking.
Here is an example of a regular cleaning client:
Today, together with you, I will clean my keyboard. Her condition is quite neglected (not for the faint of heart :D)
I think everyone has a vacuum cleaner, a rag/napkin, any detergent and, of course, water in their arsenal. And if everything is done perfectly, then you can add distilled water and a puller to the list. This speeds up the work a little, I’ll explain why in the process.
First, unplug the keyboard, this is very important. One unfortunate drop of water can shorten the life and kill the clavus.
Remove all keycaps using a puller. If it is not there, then simply pry them off with improvised means, even with a plastic card. But the puller greatly speeds up the process, it’s better to get this magical thing.
You can wash them in different ways. The most successful way, in my opinion, is to soak them in a container of water and throw denture cleaning tablets in there. Yes, yes, exactly them. You can buy it at any pharmacy, I most often use “Protefix”. They leave no residue and really clean. Soapy water makes keycaps sticky and with unpleasant streaks, so after washing they need to be rinsed with water several times. It takes longer and is not worthwhile for routine care. And from the tablets, most of the dirt will fall off on its own and you don’t need to wash anything off. But at the moment I have neither one nor the other, so I put it in regular tap water. It will cope with dust. Let it float for 15 minutes.
Tap water most often leaves white streaks on keycaps, because... it has all sorts of impurities. If you bathe your mouthguards in distilled water, there will be no streaks.
If you don’t want to bother, just wipe each tray individually with a cloth. But it's a little longer.
There is one caveat: if dirt has become embedded in the keycap, it should be cleaned separately with soap or any detergent. Just pour the product onto the sponge/brush and clean it, then rinse with water. I have blue Tai-hao caps - they are rubberized ABS plastic, they get very dirty, so I definitely clean them extra. Toothbrush + fairies, a couple of minutes and you're done.
While the mouth guards are freshening, let's work on the plate and body.
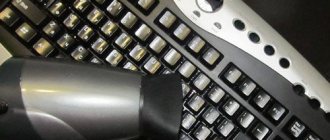
We take a vacuum cleaner, put on a small attachment with a brush (if you don’t have one, you don’t have to put it on) and start cleaning the plate. If you don’t have a vacuum cleaner, but you have a can of compressed air, you can use it. There is an option to check your lungs and simply blow out all the debris. It's not as effective, but it will do. The disadvantages of using the last two methods are the subsequent removal of debris from the table, cabinet, floor, etc. Everything will just fall apart
If you have alcohol lying around at home (from 60% or at least vodka), then you can drip each switch, 2-3 drops are enough. This is necessary so that the dirt that has penetrated into the switch is cleaned out a little. This especially helps if you have double clicks or minor sticking. Be sure to click all the switches after digging in order to have an effect.
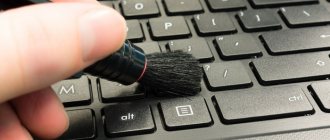
Wipe the plate with a damp cotton swab or toothbrush. I do this with the same brush, it perfectly removes stuck dirt and collects cat hair stuck in the switches (pet owners will definitely understand). I moistened the brush with technical alcohol.
Also, don't forget about the body. Everything is the same: water, a rag/sponge and detergent, if necessary.
After all the procedures, the mouthguards must be dried perfectly so that water does not accidentally get into the switch itself. Place them on a napkin and leave to dry. If you place them on the battery or direct a fan at them, drying will go much faster.
Personally, I just wiped it with a cloth and “blown out” all the water from the back of the mouth guards. It takes longer, but is more familiar.
We put the dried mouthguards on the keyboard and rejoice at the result. Everything is elementary and simple. The main thing is not to forget that most often keyboards break due to dirt.
If there are stains that cannot be removed with detergent, you can try wiping with alcohol, but there are exceptions: ABS plastic, body/mouth guards, plate. PBT plastic with impurities, body/burls, plate. You can erase the top layer and it will be very ugly. Therefore, if in doubt, don’t take the risk. Or dilute the alcohol well with water.
And now a little advertising. We have ]preventative keyboard cleaning[/anchor]. In general, we do the same thing, but for money. If you are very lazy, then come to us
Cleaning the Keycaps
I collect my "extra key set" in a separate small box.
Use a key remover and start removing the keys. Keycaps are very easy to remove, so it should be a quick and easy process. Just pull up and they should come loose.
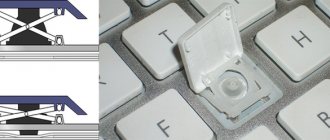
You will find that some of the large keys (Space, Enter, ...) do not release, this is because they are located on the stabilizers. If you don't know how to remove them, it's best to just leave them in place. You can easily clean several stabilizer buttons by hand.
Once your buttons are removed, it's time to assess the damage. If there is a lot of accumulated oil on the lids, I personally give them a quick wipe with a cleaning cloth to get rid of the more stubborn bits of dirt before submerging them in a bowl of soapy water. If they are not very dirty, you can either simply clean them with a napkin or throw them straight into the container.
Once the buttons are in the container, I recommend leaving them in there for at least a couple of hours to give the soap time to do its job. If you're just using a cleaning cloth, at this point you can lay the buttons out on a towel to dry.
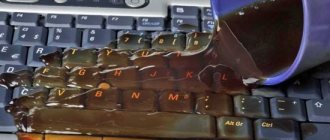
Spills
Spills are a particular problem - sticky and destructive, causing short circuits. Water is not too dangerous if the keyboard is soaked in it. However, other drinks such as beer or sweet, sour drinks may be detrimental. There's no guarantee that you'll be able to get your keyboard back, but there are a few things you can do if one does.
- First, don't flip or tilt your keyboard. Further spillage inside is critical.
- Remove the keycaps and immediately assess the extent and quantity of the spill.
- If the spill seems localized or localized to one area, or the switches appear to be unstained, you can clean the affected areas with alcohol and cotton swabs, or simply follow the deep cleaning guide above.
- Once your keyboard is clean and dry, reconnect it to your computer and test it.
Cleaning the board and keyboard
By removing the keycaps, you can see how much dirt has collected under your keyboard over time. Take a vacuum cleaner and simply place it over your keyboard, sucking up larger pieces of dirt and debris.
There is no need to try to move the vacuum cleaner between the switches as this may damage them.
After the initial cleaning cycle, take cotton swabs and lightly walk along the “paths” between the switches to pick up small particles. Don't try to stuff cotton swabs into the switches themselves.
If you're now happy with how the keyboard base looks, you can leave it as is. If there is still too much debris, you can make another pass with the vacuum cleaner. Repeat this process until you are satisfied.
After cleaning the board, I usually turn the keyboard upside down and lightly tap the back side to remove the last of the small particles.
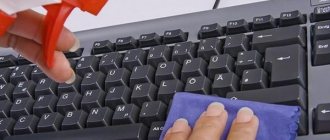
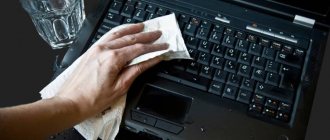
Now it's time to clean the rest of the keyboard. Take a damp cleaning cloth and wipe down the entire keyboard (not the circuit board where the switches are - that's already cleaned and you don't want to get the switches wet), paying particular attention to the areas where your fingers rest/hands usually rest, as these are often the dirtiest areas .
You can also lightly go around the bottom of the keyboard, but since there's not much action to be taken here, there's really no need to do a very thorough cleaning there.
Is it possible to wash the keyboard with plain water under the tap?
There is no definite answer to this question: some wash it and say that this does not affect the performance of the device in any way, while others categorically state that it is impossible to clean the periphery in this way, since there is a risk of water getting under the board.
The best option is to rinse only the keys under running water. To be more effective, you can add detergent to the water and go over each button with a brush. This way you can remove greasy deposits and sticky layers from the keys.
Let's finish
Leave your keyboard somewhere at room temperature to dry. You can cover the empty button spaces if you are in a dusty room if you don't want that part to quickly become dusty again. Now all that's left to do is wait for everything to dry before putting the keyboard back together.
If you decide to put the buttons in soapy water, it is extremely important that you take your time and that they dry thoroughly after you take them out of this “bath” after a few hours.
I usually lay them one side down on a towel, turn them over after a couple of hours, and repeat this process until they are completely dry.
Cleaning the keyboard after exposure to liquid
If we are talking about the need to clean the keyboard after liquid has come into contact with it, be it tea, cola or plain water, you should follow slightly different rules to prevent possible damage. Read more about them in the manual below.
Read more: What to do with a liquid-filled keyboard
We are glad that we were able to help you solve the problem. In addition to this article, there are 12,722 more instructions on the site. Add the Lumpics.ru website to your bookmarks (CTRL+D) and we will definitely be useful to you. Thank the author and share the article on social networks.
Describe what didn't work for you. Our specialists will try to answer as quickly as possible.
Bottom line
Cleaning your keyboard isn't the most fun thing in the world, but the feeling you get when you use that brand new keyboard will more than make up for the rather tedious cleaning process.
Your gaming equipment, like any other type of equipment, needs to be properly maintained to get the most out of it, so be sure to clean your items from time to time.
Enjoy your clean mechanical keyboard!
Author of the publication
offline for 3 days
Preparatory actions
Before you start cleaning your keyboard, you need to prepare for this process so that you don’t miss anything during it and don’t look for missing tools. All you need is a few simple aids, some of which can be replaced or even dispensed with.
- Look at the packaging of your keyboard or remember where you put the ring that came with it. It is necessary to pry off the caps and remove them. This makes it much easier to clean all parts of the device, even in cases where it is not completely disassembled. You can remove keycaps with your hands, but you need to do this carefully, and this procedure will take a little longer.
- You will need a special brush or any other brush whose bristles are suitable for cleaning a mechanical keyboard from dust and foreign objects. Ideally, purchase a special brush, but you can easily replace it with any other similar one you have at home.
- You will also need a lint-free cloth. This could be, for example, microfiber. This tool is also not necessary, but with its help it will be much easier to remove dust from the surface or the board itself if the keyboard is also disassembled.
About additional devices that may be useful during cleaning. It will be discussed further. They will be good helpers, but they are rarely used and it is quite possible to do without them, so they are not included in the list above.
Conclusion
We've just covered all the ways to clean a mechanical gaming keyboard. Remember, unless you spill something on it, a light cleaning every few days and a deep cleaning every couple of months should prevent major problems with your keyboard.
If you're prone to spilling liquids on your equipment, choose a keyboard that's water-resistant. Keyboards are rarely completely waterproof, but water-resistant models have mechanisms to protect important parts of the keyboard and ensure that any water drains away after a spill.
How to find out what kind of keyboard you have
All computer keyboards are marked. If the model name is not on the front panel of the keyboard, then similar information will certainly be presented on the back side - with a sticker or engraving. Therefore, turn the keyboard over and rewrite the data.
We go to a search engine or to APORT and look for a technical description of the model. It will tell you exactly what type of keyboard yours is. For example, look at APORT:
Keyboard A4Tech Bloody B314. Type: mechanical.
Important!
The stereotype that “gaming keyboards” are the same as “mechanical” keyboards is not true. Yes, a mechanical keyboard for gaming is the best choice, but this does not mean that every gaming keyboard is necessarily mechanical.
What you need for cleaning
Before starting to disassemble and clean a mechanical keyboard, the user must prepare and place on the desktop all the necessary tools and aids:
- microfiber cloth;
- cotton swab;
- furniture cleaner or any other liquid that contains alcohol;
- special jelly for cleaning the keyboard;
- puller (key) for keycaps (can be replaced with a screwdriver or other sharp object);
- a can of compressed air (replaced with a vacuum cleaner or a medical bulb);
- brush.
The advantage of mechanical keyboards is that they are easier to clean due to raised keycaps and wider spaces between keys. However, the user should still approach the process of cleaning the keyboard with the utmost care, and, if possible, resort to methods that do not require complete disassembly of the device.
Discussion
© 2011 – 2022 GikBoards
Best IT Imports LLC OGRN: 1125262007771 Legal entity. address: 603089, Nizhny Novgorod region, Nizhny Novgorod, Garazhny proezd, 3-11 Privacy policy | User Agreement | Contract offer
Every joke has a bit of truth. Here comes the bearded “Wipe off the keyboard - collect a cookie!” based on real events. If you've ever turned your keyboard upside down, you know what we mean. There is no need to clean your keyboard every month, but when the keys start to sink, rattle or won’t press, it’s time!
Let's start with the fact that keyboards are different. There are membrane keyboards, and there are mechanical ones. Both can be disassembled, cleaned, and put back together
. But membrane keyboards are more common because they are much cheaper, and many users, when buying a keyboard, are guided by the principle “whatever is cheaper, I’ll take it.” You need to disassemble these two types of keyboards a little differently, because if you cannot determine by the response of a key or by the sound of pressing which keyboard you are using, there is only one solution - “Google it!”.