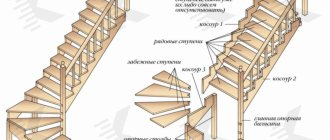
Types of baguette for suspended ceilings
There are several main types of baguette, each of which has its own advantages and disadvantages. To choose the best option, you must consider the following features:
- profile design;
- fastening type;
- ease of operation.
Sometimes you need the help of a specialist.
PVC baguette for suspended ceilings
The peculiarity of the production of PVC baguette for suspended ceilings is its low cost: plastic is relatively cheap, and transportation costs for transporting such products are minimal.
The second advantage of PVC structures is flexibility. They can be mounted on walls with curved planes - a flexible strip will repeat small irregularities. But at the same time, this product is quite rigid in order to securely hold the canvas.
Another advantage is the ease of installation. Screwing self-tapping screws into the strip does not require preliminary drilling, so the work can be done with just one screwdriver. Also, soft plastic does not scratch surrounding furniture and interior details.
Advice! Sometimes the plastic baguette for installing suspended ceilings is fragile. Therefore, it is necessary to screw screws into such a profile at the minimum speed of the screwdriver so that cracks do not appear.
Aluminum baguette for suspended ceilings
The main advantage of an aluminum baguette is its high strength; it is almost not deformed. Due to its good rigidity, the product can be installed in spacious rooms. Along its entire length, the plank does not bend and remains strictly horizontal.
Another advantage of an aluminum baguette is its cost-effectiveness. The metal structure does not require frequent fastening, so you can save on dowels. Another feature of the plank is the high reliability of the design and its durability.
Wall molding for suspended ceilings
The product is a strip that is mounted on the wall. Typically, this type of construction is used where it is necessary to make a large indentation from the main ceiling. A similar situation arises when it is necessary to place electrical boxes or other electrical devices in the interceiling space.
Installing a wall structure is similar to installing drywall, so it will not cause difficulties even for inexperienced finishers. The canvas is attached to the product using a straight spatula.
Ceiling molding for suspended ceilings
Ceiling molding for suspended ceilings is not used so often; you rarely see its photo in a designer’s portfolio. The type of device involves fastening directly to the ceiling, at the point where it adjoins the wall. In most cases, the use of this product is justified by the high curvature of the walls of the room.
Installation of the structure can be difficult, since you will have to drill into the floors, and there is a risk of getting into the reinforcement or slab void. The fabric is fixed with straight blades, and the gap between the baguette and the wall is masked with decorative tape.
Universal baguette for suspended ceilings
For special tasks, a gapless, universal baguette for suspended ceilings is used; it can take complex curved shapes. This is usually necessary when the room has a non-standard geometry or is designed in the form of a semicircle. This device can be mounted to both the ceiling and the wall.
Installing a universal profile requires certain skills. The canvas is fixed in it with straight blades.
Types of ceiling profiles for suspended ceilings
The active use of suspended ceilings has contributed to the emergence of different methods of fixing them, and, consequently, to the production of various types of profiles for suspended ceilings. The main materials for their manufacture are aluminum and plastic. As for the location of fixation, the following options can be distinguished:
The ceiling profile allows you to maintain the maximum height of the room
- Wall profile. Fixed to the wall around the perimeter of the room. The height loss when using this type of profile is 3-12 cm.
- Ceiling profile. It is attached to the main ceiling. Often this method of stretch ceiling is called invisible. It is this installation option that allows you to preserve the height of the room as much as possible, since the ceiling “steals” only 2-3 cm.
- Universal. This profile can be installed both on the wall and on the ceiling. It is used when installing various non-standard structures: multi-level, with complex geometry, etc.
- Dividing. The profile is used when stretching large canvases when there is a risk of sagging, as well as when installing combined ceilings, canvases of different colors, textures, etc.
To have a complete understanding of what profiles there are, you need to become familiar with the methods of fixing tension films. More details about this in further material of the article.
The dividing profile is used when installing combined ceilings
Aluminum profile for suspended ceilings
There is no point in rushing to the conclusion that preference should be given to a metal profile rather than a plastic one. It is better to understand the advantages and disadvantages of both types. As for the positive characteristics of the aluminum ceiling profile for suspended ceilings, these include the following:
- Durable, withstands significant loads. The area of the tension fabric (at a certain weight of the film) can reach 100 m2.
- Does not deform during operation.
- It has a wide fixation step (30-45 cm), which allows you to save time on installation and money on purchasing fasteners.
- Can be used to make a frame with broken lines, after making cuts at the bend points.
A profile made from this type of material has many disadvantages:
Aluminum profile for suspended ceilings can withstand heavy loads
- Price. Even the lightest aluminum profile costs 3 times more than a plastic one.
- It has significant weight, which causes problems during transportation. During movement, deformations are also possible that cannot be fully restored.
- Difficult to use as a ceiling profile for plasterboard. Many people use gypsum panels for wall cladding. If an aluminum profile is used, it must be perforated frequently, otherwise a strong connection will not work.
It is also worth noting that dismantling a ceiling mounted using an aluminum profile is quite difficult.
PVC ceiling profile for suspended ceilings
One of the main advantages of a plastic profile is its flexibility. Modern ceiling designs are distinguished by a huge variety of lines. It is impossible to make rounded areas from an aluminum ceiling profile; in such situations, only polymer material is applicable.
The advantage of the PVC profile for suspended ceilings is its flexibility
Flexibility does not in any way affect the strength of plastic products. They can be used for a frame that holds fabric up to 50 m2 in size. This profile is easy to transport: it is lightweight and does not leave any traces of bending. The price of this building material is low, overhead costs are insignificant, which has a positive effect on overall repair costs.
Self-tapping screws easily fit into the plastic profile; no drilling is required. It is excellent for fixing into plasterboard and wooden walls.
However, the disadvantages of plastic profiles are also significant:
- Not every frame can be made from such material. The popular contour profile for suspended ceilings (with lighting) is not made of plastic; when creating zigzag lines, it breaks at bends; it is not recommended for heavy fabric.
- When fixed to the wall with self-tapping screws, pieces of plastic may break off.
- When stretching the fabric, the edge of the front shelf often breaks off.
When fixing a PVC profile to the wall with self-tapping screws, pieces of plastic may break off
The above problems are not only the characteristics of plastic as a material, but also the result of low quality products. An active dumping company on the domestic market has provoked the emergence of a large number of products of extremely low quality.
Types of baguettes
An attractive and high-quality stretch ceiling is not only a good canvas, but also a good frame. The baguette will hide the gaps between the wall and the canvas. Thanks to it, the structure will retain its strength and will not sag after a certain time. Plastic and aluminum frames are used for tension fabrics. Each has its own pros and cons.
Profiles are divided into the following types:
- Ceiling mounted (attached directly to the ceiling surface).
- Dividing (used if not one, but several tension fabrics are used to arrange the ceiling).
- Angular (it is used exclusively for curved structures).
- Wall-mounted (used to fix the canvas near the walls, around the perimeter of the room).
potolohnyi rasdelitelnyi uglovoi stenovoi
Decorative profiles
Also, owners often use decorative profiles. They come in different lengths and widths, so you can choose an option for any room. By choosing the right profile for decoration, you can create an original and attractive design.
Such frames are attached to the wall after the installation process is completed. It is necessary to take into account that the fixation occurs directly to the wall, and not to the ceiling. It is prohibited to attach it to the ceiling surface. Before starting work, the product must be degreased and the walls must be primed.
Fixation is carried out using glue designed specifically for such products. You can purchase it at any hardware store. The standard color of the product is white, but you can repaint it in any shade that suits the interior. Decorative wall molding for suspended ceilings will help you create a unique and inimitable design.
Content
When they tell you the cost of turnkey PVC stretch ceilings, know that the price of materials in the estimate never exceeds 30%. Therefore, it is not without reason that some craftsmen decide to do the installation themselves. The currently most popular harpoon-baguette technology for installing suspended ceilings is not a secret, but there are a number of nuances that are worth paying attention to. Even if you are not one of the cohort of such daredevils, the article will help you properly prepare for installation and competently supervise the work of invited specialists.
Preparation
First of all, let's decide what tools we need to install the baguette.
- hammer drill
- screwdriver
- hammer
- hacksaw
- painting cord
- ladder
- screws and dowels, a drill with a diameter of 6 mm and a drill with a diameter of 6 mm
Let's prepare the room. To do this, we will need to free up all the space around the perimeter of the room at a distance of 1 meter from the walls. There should be no plants or pets left in the room. All furniture that could not be removed must be covered with a special covering material. Also, to make it more convenient to attach the baguette, we need to prepare it: drill holes for the dowels. The distance between the holes should not exceed 15 cm, and the distance at the ends of the whip from the edge should not be more than 2 cm. It is not recommended to make the distance larger, since the profile will begin to pull and bend in the areas between the fastenings. The plastic baguette is drilled into a special stiffening rib; when viewed from the end, it looks like a cube. And the aluminum one goes into a special shelf. The photo shows how to prepare the profile for installation.
When preparing a room, it is worth considering another important point: where the electrical cable runs in the walls. This is especially true for brick houses built by Khrushchev. You need to navigate by the boxes, sockets, and switches located on the wall. In most cases, the wire runs at the level of the distribution boxes and runs vertically above each outlet or switch. The location of the wires should be taken into account at the stage of measuring the canvas.
Pipe bypass
As a rule, pipes run from heating radiators to the ceiling. To bypass them during the process of tensioning the web, you need to prepare a plastic outlet of the required diameter, which is equal to the diameter of the pipe itself.
After this, you need to measure the distance from the pipe to the wall and subtract the percentage of pipe shrinkage from the resulting value. The resulting distance must be marked on the material itself from the edge of the harpoon. After this you need:
- Cut off the plastic elbow and try it on the pipe. There should be a gap of about 4-5 mm from the profile to the outlet.
- If the plate fits, then you need to remove it from the pipe and glue it to the canvas from the wrong side.
- Inside the resulting plastic ring, make cuts in the shape of a sun and glue the resulting rays to the inside of the circle.
- We cut the material from hole to edge.
Methods of fastening suspended ceilings
The frame for the canvas or PVC can be mounted to the wall or to the ceiling. Let's look at each method in detail and figure out which one is better.
To Wall
Attaching a stretch ceiling to a wall is the most popular option. The wall molding is installed along any vertical surfaces of the room and fixed with dowel nails every 15-20 cm.
Aluminum profiles are most often used due to their high strength, load-bearing capacity and resistance to deformation. The significant cost is offset by an almost indefinite service life. Plastic products are cheaper and more flexible, able to follow all the curves of the surface, but are short-lived.
Advantages of wall mounting:
- the deviation of the base ceiling from the horizontal is easily corrected;
- unevenness of vertical surfaces are smoothed out;
- Installation is quick and convenient to work with.
Difficulties:
- marking using a laser level is required;
- it is necessary to determine the presence of hidden electrical wiring in the wall so as not to damage it when installing the profile.
To the ceiling
Now let’s figure out whether it is possible to attach a suspended ceiling to an existing base ceiling. The most attractive aspect of this method is the minimal loss of height - only 1-2 cm. Technically, this is achieved by installing a special ceiling profile. The fastening plane of such a baguette is made horizontally, and the lock is located perpendicular to it. The covering is stretched using a harpoon or clip method; for the glazing bead version, the ceiling profile is not available.
In what cases is ceiling mount used:
- installation of multi-level structures;
- arrangement of a hidden niche under the cornice;
- saving room height.
Difficulties in mounting to the ceiling:
- it is difficult to set the horizontal level if the base base has an uneven surface or a stepped transition between floor slabs;
- it is difficult to carry out installation, since the hands are raised up all the time;
- holes take longer to drill;
- the work is expensive.
Which way is better
The ceiling installation method is chosen in the following cases:
- room height less than 2.5 m;
- the surface of the floor slabs is smooth and level;
- the wall material is fragile and does not allow securely attaching the baguette;
- at the level of the future ceiling there are wall curtains;
- the area of the room is too large and in order to avoid sagging of the canvas, it is necessary to connect two pieces of material using a ceiling separating baguette;
- the room has a tall wardrobe and no access to the wall;
- Only a chandelier is used as a lighting source and there are no plans to install built-in lamps.
In all other cases, for single-level structures, a wall mounting scheme is best suited. The gain in the form of a distance of several centimeters in the height of the room is incomparable with the cost of labor and time.
Arrangement of embedded elements
At the next stage, they begin to fix the platforms, onto which the lighting fixtures are then attached. A perforated tape with a certain length reserve is screwed to the platforms with “bugs” in advance (so that this embedded element can then be adjusted in height).
The platforms are installed in specified locations and adjusted in height using a laser level or cords stretched between the starting profiles.
Adhesive for plinth moldings
When choosing glue, do not purchase silicone sealants. They are not covered with paint.
- If the planks are not white, they can be glued using “liquid nails.”
“Liquid nails” are applied in a continuous line to the furrows on the back side. Apply enough glue so that when you press the strip, a small part comes out - remove it with a damp cloth. The disadvantage is the high cost. - You can buy polyurethane glue.
- The finishing putty left over after finishing the walls is well suited for baguettes: it is fine-grained, it fills the cracks, the residue is easily removed with a damp sponge, leaving an even seam.
- Satengips. Applies like “liquid nails”, but is cheaper.
Installation of aluminum baguette and PVC for suspended ceilings
Aluminum baguettes are heavier and more expensive. Typically used on straight sections. Plastic ones have an excellent balance between cost and strength. They are lighter, easier to drill, and cheaper. But if they are made of low-quality plastic, then bends are possible when stretching the ceiling fabric.
- Measure and cut the strip to the required size using a hacksaw.
- If you are using an aluminum profile, make holes for fastening with a drill in advance.
The distance between the holes is no more than 20 cm, from the edge to the first hole - 4–6 cm. - Mark the mounting location using a level.
- We attach the strips with dowels or self-tapping screws.
Another mounting option is without making holes in the wall: the slats are adjusted to the plane with staples using a special gun. This type of mount is less durable.
Baguettes will help you make the ceiling beautiful by hiding cracks, insufficiently level ceilings, and hiding the borders of the wallpaper. As you can see, attaching them is not difficult, the main thing is to follow the recommendations to avoid unevenness and cracks.
Video on how to attach a baguette to the ceiling:
https://youtube.com/watch?v=d74c20774Dk
Loose walls
Unfortunately, in our profession, cases of loose walls are not uncommon. What to do if the self-tapping screw screwed into the wall does not hold the profile well? There are two ways out: use spacers (jibs) or screw additional screws into one mounting hole. The second method in most cases saves the situation. One or two additional screws can securely fix the baguette. Well, if they didn’t help, then you should resort to using spacers. Take a 15 centimeter piece of baguette and drill a hole in one of the ends. Open the jib into the molding and the ceiling and place a mark through the hole in the ceiling. Drill under the dowel and drive it there. Take the jib and, tightening it with a self-tapping screw, open the baguette. The spacer should be rigid, and the profile should not move up and down and be pulled away from the wall.
Stretch ceiling. How to attach a baguette Tips for installing a profile
Fastening the profile is one of the most important parts when installing ceilings. You will learn how to attach it correctly in this article. Attaching a baguette for suspended ceilings is a mandatory and very important task, because without the correct installation of the frame, it will not be possible to install a suspended ceiling in a high-quality and beautiful manner. There are several types of profiles and they all have different purposes, and also differ in the material from which they are made and installation features.
What types of baguettes are there?
- Ceiling - used for installing tension fabric directly to the ceiling.
- Universal – specialized in fastening to vertical and horizontal planes.
- Wall - fastening a stretch ceiling to a wall or other vertical planes.
- Separating and connecting - used to connect two stretch ceiling sheets.
- Chipper - used for installation of multi-level suspended ceilings; the profile provides curved transitions and kinks in the structure.
- Structural – designed for installing a multi-level spatial curvilinear structure.
Profiles are made from two materials: aluminum or PVC. Baguettes are also distinguished by shape: narrow frame, wide and flat.
How to attach a baguette?
Fastening a baguette for suspended ceilings is a task on which the strength and durability of the entire structure depends. You need to approach such a matter responsibly and carefully, because the quality of the final result will depend on this. First you need to prepare the tools: profile, fasteners, screwdriver, hammer drill, dowels with self-tapping screws, hammer and hacksaw. There are several options for attaching a baguette for suspended ceilings.
First way
- First you need to drill holes in the frame in increments of 10-15 cm.
- To speed up and simplify the work, screw the dowels (6x50) onto self-tapping screws (5x50).
- Mark the line along which the profile will be aligned. To do this, you need to find the lowest level place in the room, then draw a line along the baguette model and put marks on the walls.
- You need to start installation from a corner. To do this, you need to file the back wall of the profile so as not to damage the front, and bend it. After this, we apply the profile to the drawn line and screw in the screws with dowels with a screwdriver - the inner corner is ready.
- For the outer corner, you need to cut the back side of the profile at an angle of 90º, then bend and secure it in the same way as the inner corner.
- Installation of straight sections is carried out in the same way, but without sawing the baguette. For curved sections, you should make cuts on the back side of the profile.
Second way
- The beginning is the same as in the first two points of the previous method.
- To mark the line along which the baguette will be leveled, you need to find the highest place in level and draw a line according to the profile model, then put marks along the perimeter of the room.
- Drill holes under the line and insert dowels with self-tapping screws, make marks with a pencil above each hole.
- Attach the profile and, focusing on the marks, screw in the screws.
Important points to emphasize:
- durable installation;
- precise fastening of the baguette according to the level;
- do not leave gaps;
- The joints must be connected level.
Tips for fixing moldings for suspended ceilings
If the wall is loose, then you should screw several screws into one section of the profile. This way the baguette will hold tighter. You can also use corners or place emphasis on the rail. In an area with a large number of wires, it is better to use an aluminum baguette, because it can be attached at smaller intervals. On a curved surface it is more convenient to use a plastic profile, as it fits tightly to the wall. To avoid the appearance of moisture between the base ceiling and the tension fabric, holes should be made in the profile for ventilation. When installing light in a regular suspended ceiling, you should reduce the power of the lamps.
When installing the baguette, you should strictly follow the above instructions, because fastening the profile is the most important part in installing the tension fabric. Not only the beauty, but also the strength of the stretch ceiling depends on the correct installation of the frame. To make the room cozier, the canvas can be supplemented with a curtain or decorative light.
Do-it-yourself profile installation
Preparation
In order for the installation of baguettes to be carried out efficiently, you need to clear the room of furniture and other interior items. If this cannot be done, then cover them with film. If the repair is done from scratch, the installation of the molding for suspended ceilings begins after all the work on leveling the walls has been completed.
You also need to have the following materials and tools:
- screwdriver;
- perforator;
- ladder;
- hammer;
- roulette;
- level;
- marking cord;
- Boer;
- drill 6 mm;
- screws, dowels;
- baguettes.
Installing profiles
First, a line is drawn along the perimeter of the room, which will serve as a guide for installation. The angle located at the lowest point is determined, and relative to it, marks are placed along the level in the horizontal direction at other points in the room. This marking is the basis of the ceiling structure.
Fastening the baguette begins from the corner of the room in a hard-to-reach place. Holes in the wall are drilled through the holes in the profiles and dowels with self-tapping screws are driven in. All profiles are sequentially attached around the perimeter of the room. They must fit together exactly.
When going around the outer corner of the room, a new strip is attached to the end of the installed profile and a cut line is marked on its back wall. Towards the fastener, 2 cm away from the first vertical, mark the line of the second cut. Incisions are made and excess pieces of material are removed. In the resulting recess, the baguette is screwed to the wall.
Installation of a frame for a stretch ceiling
Let's consider the installation of the most common type of profile - a wall profile with a harpoon fastening system. In general, the technology for installing plastic and aluminum baguettes is the same. There are differences in some points, we will definitely explain them. The process includes three main stages: marking, attaching the baguette and processing the joints. Let's look at each of them in more detail.
Marking
At this stage it is convenient to use a laser level. The tool is installed so that all nooks and crannies are shot through. Sometimes this is not possible due to the complex configuration of the room. Then the level is moved and new marks are made, focusing on the old ones.
The work is carried out as follows:
- First you need to determine the height of the walls, and to do this, take measurements from floor to ceiling in each corner.
- The required distance is set aside from the lowest one. The minimum is 5 cm; when installing built-in lamps or large differences in height, the future ceiling may drop by 10-15 cm.
- Next, make marks at the same level in all corners.
- Then you need to draw lines along the walls. It is convenient to use a painting cord for this. The ends are held near the marks, the rope is pulled back and abruptly released. There will be a straight line on the wall.
- The hydraulic level is filled with water, trying to prevent air from getting into the hose.
- To check, combine the flasks - the liquid should be at the same level.
- Then one of them is held so that the boundary of water and air is located near the mark.
- The second flask is placed against another wall, lowering and raising until the liquid is at the same level. When the vibrations stop, make a mark.
- The procedure is repeated for all angles. Marking is done in the same way as with a laser level.
Fastening the baguette
Installation begins from the corner, and from the most inaccessible or complex one. In such places the profiles are never joined. When stretching the ceiling, the heaviest load is in the corners, and at the junction the canvas will tear over time.
First, holes are made in the profile, and only then they are screwed to the wall, since drilling while hanging is inconvenient. PVC baguettes are drilled into the stiffening rib, and aluminum ones into the shelf.
The fastening step is from 10 to 15 cm; if it is less frequent, the plastic profile will bend due to the tension force. Aluminum baguette has greater rigidity, so the distance can be increased to 20 cm. A perforated profile with ready-made holes for fastening is also available for sale.
The next one is attached to the corner profile and mounted end-to-end. The wall is drilled through the prepared holes and fasteners are installed. Sometimes they first put marks through the holes in the profile, then drill and insert dowels, after which they put the molding back and tighten the screws.
When installing a frame for a suspended ceiling, it is important to adjust the horizontal connection as best as possible. Level helps to achieve this
Installation of baguette in corners
To install the inner corner of a suspended ceiling, you must first prepare the profile and only then attach it. The technology is as follows:
- Measure the fold and place a mark on the back of the baguette.
- The rear wall of the profile is filed down so that the front remains intact.
- Bend and attach to the wall.
For the outer corner, preparation is more difficult:
- Mark the place of the bend.
- Having retreated 1 cm on each side, make two cuts (i.e. there will be 2 cm between them).
- Remove the rest of the profile between the cuts. The excess is cut out of a plastic baguette with a construction knife, and from an aluminum baguette it is removed with pliers.
- Then you need to bend the frame so that the sawn area is inside.
- Turn the baguette with the back side facing you so that the groove for the film is located at the bottom.
- They are applied to the wall along the line, overlapping the already fixed profile, the end is set flush with the corner.
- A mark is placed at the intersection of two baguettes - at this point you will need to bend the profile.
This method is faster and more accurate.
Correct profile joining
This is an important point on which the durability of the ceiling depends; let’s dwell on it in more detail. Baguettes must be attached close to each other, without gaps or overlaps
It is important to maintain horizontal position at the connection points
The joints must be glued so that sharp edges do not damage the fabric. For an aluminum profile, metallized tape is used, and for a plastic profile, masking or household tape is used.
Marking
To mark the mounting plane of the baguette, use a special device - a laser level. The normal height for mounting is considered to be a distance from the ceiling of at least 5 cm. With this mark you will avoid getting into technical seams in the wall. Fix the laser level firmly and place marks at each corner of the room. You should choose a place to set the level from which all nooks and crannies can be shot. If the room has an intricate shape and it is not possible to highlight all the corners from one place, then after making all the available marks, the level can be moved further, focusing on the existing drawings.
If you don't have a laser level, don't worry. You can use a hydro level. This marking will take more time, but the result will be quite accurate. Fill the level with water at room temperature, preventing air from entering the hose. Combine the two flasks to check - the water boundary should be in the same plane in both flasks. Important: do not use hot or cold water, it should be as close as possible to the room temperature. Also, do not allow the hose to bend, this can lead to large errors in the readings. The marking technology is as follows. One installer stands in the first corner, the other installer stands in the second. Fix both flasks in the corners with one hand, and with the other make marks on the border of the water in the flask. After this, the first installer moves to the next unmarked corner, and the second remains in place. Next, the first installer approximately positions the flask to the corner, and the second, by lowering or raising his side, ensures that the water boundary coincides with his mark. When the vibrations stop, the first one puts his mark. The procedure is repeated sequentially with all angles. Next, we take a tape measure in our hands and measure all the distances from the marks to the ceiling. We subtract 5cm from the smallest one - this will be the total height. Then we mark from each mark, measure this value upward and put the final marking.
Now we need to draw straight lines from one mark to another - this will be the plane of our stretch ceiling. To do this we use a painting cord. We hold one end of the thread on one mark, the other end on the other. We pull it back with a pinch and release it; the click will leave a straight line on the wall. And so on in a circle.
Baguettes for cam mounting
Installation of suspended ceilings using this method is considered the most unpretentious. After completing the work, such a baguette will not need to be covered with a decorative strip, and it is not difficult to install the panel into it. It has a mount, which consists of a fixed and movable cam. These elements are designed to fix the film.
When the blade is placed between the cams, it pulls back one of them - the movable one. As a result, it begins to press harder and harder against the stationary element, fixing the polyvinyl chloride material even more firmly.
But this fastening method does not provide sufficient rigidity, so experts do not recommend installing cam baguettes on a surface whose area exceeds 20 “squares,” since large sizes will cause wrinkles to accumulate on the surface.
If, when deciding how to attach a baguette for suspended ceilings, the cam method is chosen, the bar must be further strengthened. To do this, you can use an overhead chandelier; for it, a console is pre-installed in the ceiling cavity.
Using a baguette does not mean that you should not use a decorative plinth. A similar product made of foam or plastic in the form of an elegant edging will be an excellent addition to a suspended ceiling structure.
Warming up the room and canvas with a heat gun
At this stage, it is necessary to close the windows and doors so as not to lose valuable heat. Using a heat gun, without pointing it directly at the hanging canvas, you should heat the room to about 60-65 degrees, after which the folds and wrinkles on the canvas will begin to straighten.
Fastening
Installing a baguette should start from the most inconvenient or hard-to-reach corner. It is not allowed to join the profile in the corners, even if it is cut at 45°. When the canvas is stretched at an angle, the greatest load is applied, and the film will simply tear at the joint. Therefore, the baguette on the inner corners is sawed as follows: only the back wall is sawed, while the front wall remains intact, after which the profile is bent at the place of the saw.
Having secured the first baguette whip, we move on to the second
It is mounted end-to-end with the first one, and it is important to adjust the joint horizontally as best as possible; you should not get any steps. Having reached the next inner corner, we need to measure the distance
This can be done in two ways: using a tape measure or using a whole strand of baguette. The second option is more convenient and much faster. Turn the profile with the back wall outward, so that the groove for the harpoon is located at the bottom. Place one end against a corner, and direct the other along the level line, overlapping onto the secured baguette. Place a mark at a distance of 1 cm from the future joint, you need to move it towards the corner. Follow this mark and file the back wall. It is also not difficult to prepare the outer (or outer) corner. Press the end of the profile against the end of the already secured baguette and draw a line along the back wall, right at the corner. This will be the first cut. Further along the fastening path, place another mark at a distance of 2 cm from the first one. This will be the second cut. Saw through the back wall along both marks. Now we need to cut out the remainder between the cuts. For PVC profiles this is done with a regular construction knife; for aluminum it is easily broken off with pliers. After all this, fold the baguette exactly in the middle of the resulting recess.
After you have securely fastened the entire sheathing, be sure to seal the joints with tape. You can use gray utility tape sold at any hardware store. Metallized tape is also suitable for aluminum profiles
It is important to be careful at all stages of installing a stretch ceiling
Temporary fixation of the canvas under the ceiling
Plastic clips are hung in the corners of the room. After this, the canvas is carefully unfolded (it is better to do this with an assistant) and hooked to the harpoon with clamps.
It is important to correctly position the canvas relative to the walls of the room. To do this, the manufacturer marks the “starting angle” on the drawing (web passport), and also makes a corresponding mark on the canvas itself.
Glue skirting boards to the ceiling
The first step is to decide what mixture will be used to fix the ceiling plinths. There are several options:
- Acrylic mounting adhesive. It is not cheap, but its consumption is low. If during work the glue gets on the outside of the baseboard, ceiling or wall, it can be removed with a damp sponge.
- Finishing putty (gypsum or universal) + PVA glue. It is better to use construction glue rather than office glue. Both components are mixed together in a ratio of 1:4 immediately before use. This is the most budget option.
- "Liquid Nails". For rooms with high humidity, choose a mixture based on neopropylene, for all others - acrylic. With the help of “liquid nails,” the plinth is literally firmly glued to the wall, and if in the future you want to remove it, it will not be easy.
- Acrylic putty. By the way, like acrylic mounting adhesive, it can be used to fill the gaps between the baseboard and the wall.
Next you should prepare the tools:
- two spatulas (large and smaller);
- roulette;
- stationery knife.
Step-by-step instruction
Before gluing the skirting boards to the suspended ceiling, check whether they fit together correctly. To do this, simultaneously attach adjacent pieces of baguette to the walls. If you are satisfied with what you see, proceed to further work:
- Take a spatula and apply the selected adhesive to the part of the molding that is adjacent to the wall. Do not apply it to the upper part - stretch ceilings must “breathe”, so you cannot attach plinths to them. Don't skimp on glue, but don't put too much of it on, because you'll have to spend time removing the excess later.
- Place the baguette against the wall and gradually press it along its entire length, starting from the joint. Control the pressing force, otherwise dents may remain on the baseboard.
- Run the edge of a putty knife under the baguette to remove excess adhesive. If a gap has formed between the wall and the baseboard, fill it immediately.
- Take the next piece of baguette. If it fits entirely, glue it end-to-end with the previous one. If the piece is too long, first cut the corner, then attach the baguette to the wall so that the corner cut takes its rightful place. On the other hand, where the second piece of baguette overlaps the first, make a mark with a pencil. Use the vertical template on the miter box to cut off the excess. Next, apply adhesive to the baguette and repeat the steps described in step 2.
- After the adhesive has dried, the baguette can be painted.
Preparation
First of all, let's decide what tools we need to install the baguette.
- hammer drill
- screwdriver
- hammer
- hacksaw
- painting cord
- ladder
- screws and dowels, a drill with a diameter of 6 mm and a drill with a diameter of 6 mm
Let's prepare the room. To do this, we will need to free up all the space around the perimeter of the room at a distance of 1 meter from the walls. There should be no plants or pets left in the room. All furniture that could not be removed must be covered with a special covering material. Also, to make it more convenient to attach the baguette, we need to prepare it: drill holes for the dowels. The distance between the holes should not exceed 15 cm, and the distance at the ends of the whip from the edge should not be more than 2 cm. It is not recommended to make the distance larger, since the profile will begin to pull and bend in the areas between the fastenings. The plastic baguette is drilled into a special stiffening rib; when viewed from the end, it looks like a cube. And the aluminum one goes into a special shelf. The photo shows how to prepare the profile for installation.
When preparing a room, it is worth considering another important point: where the electrical cable runs in the walls. This is especially true for brick houses built by Khrushchev. You need to navigate by the boxes, sockets, and switches located on the wall. In most cases, the wire runs at the level of the distribution boxes and runs vertically above each outlet or switch. The location of the wires should be taken into account at the stage of measuring the canvas.
Preparing the tool
Hammer. To install a stretch ceiling, you should prepare holes with a diameter of 6 mm. The lightest and most compact models are best suited for work.
In a living room with a fine finish, drilling for the installation of suspended ceilings is best done using a construction or household vacuum cleaner.
Screwdriver. The ideal option is a high-torque battery model. It is highly advisable to have a spare complete battery.
Bulgarian. Basically, angle grinders are used to cut the starting profile at the corners and adjust it to length at the junction of the rods. But in principle, you can also get by with a rotorizer, a “drill” with a cutting disc, or even a hacksaw for metal.
Gas heat gun. This is an expensive and high-tech tool that is worth renting, since it will only be needed for one-time work. Ceiling installers usually use devices with a thermal power of about 18-30 kW.
An important element of a heat gun for installing a stretch ceiling is a reliable hose 1.5-5 meters long and a special gearbox, which will provide the necessary efficiency. The minimum parameters of equipment adapted for the installation of suspended ceilings are gas consumption from 2 kilograms per hour and gas operating pressure from 0.7 bar.
Propane-butane cylinder . The container can be used composite or steel. The volume of the gas cylinder must be at least 12 liters, but it should not be filled more than 80%. For reference: the weight of one liter of liquefied propane-butane is about 520-560 grams.
Laser level. Ideally, you need a plane builder to cut out the full perimeter for attaching the starting profile. For one-time work, you can use a water level and a tapping cord.
Ladder. A simple aluminum ladder of 4-5 steps will be enough.
Basic hand tool . During the installation process, you will probably need a tape measure, a hammer, a paint knife, a pencil, pliers, a screwdriver, metal scissors, etc.
Spatula for driving a harpoon into a baguette . Another special tool, it is a curved spatula with a smooth and relatively thick blade.
Plastic clips for pre-hanging the canvas . It is advisable to have 3-4 of these “clothespins”.
Equipment . A hammer drill requires drills with a diameter of 5 or 6 mm. To drill ordinary wall tiles, you will need a pen with a diameter of 6 mm; for porcelain stoneware, purchase a tubular drill with diamond coating. Profiles are cut using abrasive cutting discs.