Modern home economics › Technology › Technology FAQ ›
The meat grinder is jammed, but physical effort is not enough to disassemble the device? The means at hand that can be found in every home will help. Start with boiling water, immersing the entire structure in a container for half an hour. To soften food residues, add baking soda or detergent. Unscrew the washer using a clamp, hand vice, hammer, or adjustable wrench. WD-40 also activates the jammed device.
There are a lot of reasons why the meat grinder mechanism can jam. These include a long stay in assembled form, rusty, unlubricated parts, improper assembly or violation of operating rules. But, no matter what the provoking factor is, it is necessary to solve the problem. A proven algorithm of actions will help you unscrew a jammed device yourself.
Installation of additional components
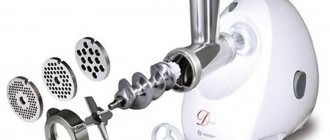
Most modern meat grinders come with additional knives, grates with various holes and attachments for preparing sausages or kebbe.
If it is necessary to use them, the order of assembling the meat grinder may vary, which is also usually specified in detail in the instructions for the device from the manufacturer. In this case, you should adhere to the following algorithm for assembling an electric meat grinder:
- installation in the middle of the auger body;
- attaching a ring with the largest holes to the auger (their number may vary depending on the meat grinder model and manufacturer);
- installation of a double-sided knife;
- installation of a grille with medium-sized holes;
- fastening the remaining knife;
- installation of the last grate;
- securing the clamp nut.
In the case of preparing sausages, instead of knives and grates, you will need to attach a special attachment to the auger, which is secured with a clamping nut. And for the purpose of making cookies or pasta, you can use metal or plastic shaped rings.
Often, such household appliances include a nozzle for juice and pasta. Usually they are already assembled and you just need to attach them to the main body of the meat grinder.
When assembling an electric meat grinder, it is better to follow the factory instructions from the manufacturer. If a household appliance malfunctions, it is recommended to contact a service center for diagnostics and repair if necessary.
How to properly assemble a manual meat grinder if you need to install an attachment
Most meat grinders are equipped with various attachments and grates for making sausages, sausages, juice and many other delicacies. But not everyone knows how to correctly insert an attachment, knife or grid into a meat grinder. After all, the procedure for assembling a meat grinder with an attachment is slightly different:
- Insert the screw shaft into the main body
. The wide part of the shaft is placed in the place where the handle is attached. The thin one should be in the place where the grille is attached; - then install the grate
. It can have very large or medium holes. It all depends on the recipe and your preferences; - then install the nozzle
. Just make sure that there are no chips or roughness on it. Otherwise, you risk tearing the intestine, which is put on the nozzle when making sausages and kebbe; - secure the structure with a clamping nut
, and now all that remains is to screw the handle. That's all. Nothing complicated. Is not it?
ATTENTION!
When making sausages and kebbe, no knife is used. And all because ready-made minced meat is put into a meat grinder with such attachments;
What types of meat grinders are there?
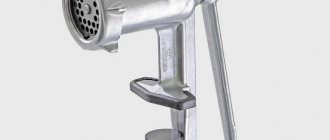
Manufacturers offer a large selection of models, however, there are only two types: electrical and mechanical.
A distinctive feature of a mechanical meat grinder is:
- Small size.
- The quantity of serving product is small.
- Made from cast iron, tin or coated stainless steel.
- Simplicity and accessibility in operation.
- Manual control.
- Low cost.
- Consists of: body, meat receiver, auger shaft, special knife, grid, clamping nut, handle, fastening screw. Instructions on how to assemble a manual meat grinder can be found on the Internet.
Unlike a mechanical device, an electric meat grinder has a number of advantages:
- Grinding tough parts of raw meat.
- High speed allows you to grind a large amount of product in a short time.
- They have various settings. You can choose any minced meat format.
- The gratings are made of stainless steel, and the presence of a knife with four blades makes the work highly efficient and productive.
The fundamental difference between a mechanical and electrical device is in the control method. A mechanical meat grinder is controlled by a handle. It is she who sets all the details in motion. In an electric meat grinder, this function is performed by an electric motor.
General principle of operation: at the top of the device there is a reservoir for loading pieces of meat, a loading hopper. From this funnel the meat is lowered into the screw compartment. Rotating, the rotating mechanism pushes the product along the shaft to the knives. The final grinding takes place using a knife and a grid. The texture of the finished product, its graininess, depends on the holes in the grate.
In terms of functionality, there are three types of devices: traditional (grinds only meat products), universal (in addition to meat products, it can grind and cut vegetables, squeeze juices, etc.), food processors (have many functions, but are low-powered).
Key points
The removable meat receiver is removed from the neck of the body.
The clamping nut is unscrewed counterclockwise, and to fully grasp it by hand, cover it with a dry cloth. The knife and grid are removed from the screw shaft finger.
Then the fastening screw that holds the handle of the machine is unscrewed, and after that the handle itself is removed.
The knife and other parts are completely cleaned of minced meat residues and washed in warm water - with a special dishwashing gel or by adding a small amount of soda. At the end, everything is rinsed and laid out on a clean cloth or napkin to thoroughly dry all the parts.
Experts recommend storing the mechanism disassembled, and before assembling it begins, you need to lubricate the auger with vegetable oil. This storage technology helps to securely hold all the components together and prepare good minced meat.
Even with great care during disassembly work, it is possible that problems will arise when the need to assemble the manual meat grinder again arises.
There are often complaints from consumers that absolutely no instructions are attached to the pile of parts, including the knife. In this case, you have to essentially engage in invention, trying out the assembly possibilities in different ways. To do this, a certain sequence is followed.
- A screw shaft is installed inside the housing. You need to be extremely careful: one side of it is characterized by the presence of a thickening, and the other is a thinner finger for the knife and grate. When assembling the structure, you need to make sure that the thickening comes out from the side where the handle is attached. After this, the handle is put on. A screw is used for strengthening.
- The knife is installed on the back side of the unit - on the shaft pin. Again you need to show maximum attention: on one side the knife is convex, on the other it is flat. When installing, the flat side should extend outward and fit snugly against the grille, which fits onto the rod pin after the knife. If the knife is a circular one, when placing it, you need to ensure that the cutting edges peek out. This stage is one of the most important, since the accuracy of the knife placement determines the quality of cutting the meat.
- When inserting the grate into a manual meat grinder, you need to use the notch to get to the tubercle on the body. If you ignore this requirement, the user will not be able to properly tighten the clamping nut.
- The finished mechanism must be secured with a clamping nut, rotating it in a clockwise direction.
In general, it is necessary to adhere to the same algorithm of actions. However, it is worth paying attention to a number of distinctive points.
First of all, the housings of the device and the gearbox must be connected to each other. Next, the first of them is inserted under the groove of the cover. To check the quality of the steps taken, you need to make a counterclockwise turn.
“Installation” work with the grille, clamping nut and knife is carried out in the same way as with manual models.
The final stage of prefabricated work: installation of the loading bowl in the neck of the housing.
Assembly and operation of a manual meat grinder
Before starting the main work, it is necessary to thoroughly wipe all components. Carrying out such actions will increase the service life of the device. Moisture and food residues will cause rust to appear on the body.
How to properly assemble a manual meat grinder
Now we’ll find out how to assemble a manual meat grinder step by step:
- We take the auger and insert it into the housing. The wide part of this device should be located near the handle, the narrow part - in the place where the knife is secured.
- We insert the handle into the ledge of the auger and fix its position using a special screw.
- In another part of the auger we install a cross-shaped knife, its flat part should face outward. The disc-type cutting element must be in contact with the grate with its edges.
- After the knife is installed, put on a metal round mesh (the protrusions on the body and the mesh must match).
At the final stage of work, we tighten the fixing round nut and check the functionality of the equipment by several rotations of the handle.
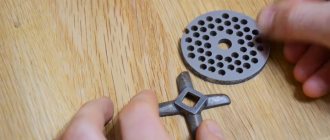
How to properly place a knife in a meat grinder
Previously, we got acquainted with the process of assembling a manual meat grinder, now we will learn how to correctly insert a knife into a meat grinder. You can find two main types of knives in stores, with a single-sided or double-sided blade. When the auger is installed, a part with a one-sided blade is fixed to the device so that the cutting part slides along the surface of the grate. If secured incorrectly, meat or other foods will squash but not shred. Elements with a double-sided blade are installed on either side.
How to use a manual meat grinder
The device in question has a manual drive. The principle of its operation is based on the pressure created by the screw. The meat from the loading hopper falls onto the auger, which presses the product against the body and moves it towards the outlet. When moving along the shaft, part of the meat falls under the knife, which cuts off small fragments from the piece and pushes the product through the grate into a substitute container.
The grinding of raw materials occurs constantly along with the rotation of the device handle. If the user wants to get fine minced meat, it is recommended to use racks with small holes or pass the product through a meat grinder again. If large pieces of meat are stuck or a product jam occurs, then the handle is rotated in the opposite direction.
The reason for improper operation of the device is most often the winding of meat films around the cutting part. In this case, you need to disassemble the meat grinder, clean the knife from stuck parts and put it back together. It is recommended to disassemble the device after each chopping of meat or other products. This will increase the service life of the device.
How to unscrew a meat grinder
There are times when it is very difficult to unscrew the clamping washer of a meat grinder. This occurs due to the dullness of the knife, which leads to accumulation of meat near the cutting part. In such a situation, proceed as follows:
- Turn the device over and place it in a container of hot water for about 10 minutes.
- We take a small hammer and make light taps in the center of the grille, as well as on the ribs of the clamping nut.
- We unscrew the part, after the manipulations it should quickly give in.
If you have an assistant nearby, you can try to unscrew the meat grinder together. In this case, one person holds the device, and the second unscrews it.
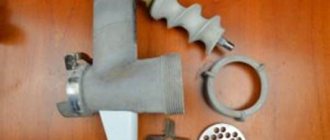
What does a meat grinder consist of and what is the purpose of the parts?
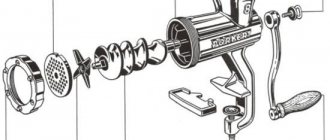
What does a classic hand-held device consist of:
- Building: A. Meat receiving area; B. Fastening clamp;
- Lever;
- Auger with left-hand thread;
- Bearing bushing;
- Cutting knife with 4 blades;
- Lattice;
- Union nut;
- Eye bolt for attaching the handle
Meat grinder disassembled
The device can also be supplied with additional grates with different hole diameters, knives, attachments for making sausages, frankfurters and freshly squeezed juice.
IMPORTANT
!
The attachments must be sharpened regularly and should not be used for cutting too hard or stringy semi-finished meat products.
The screw shaft is an important and basic part. It has the appearance of a spiral, which during operation grinds excess meat, moving it towards the nozzles with knives. It is this mechanism that requires the use of durable metal.
Screw shaft - conductor of products inside the device
Knife and special cutting attachments. They do all the work of grinding, cutting and crushing meat or any other products. It is made mainly from stainless materials. It is necessary to sharpen knives for better and high-quality work, even though the steel is sharpened on the grate during rotation.
The knife must be installed correctly, otherwise the device may jam
IMPORTANT
!
The structure of the knife and its shape affect the grinding of the product. For example, if a knife has a curved blade, it means that it will easily chop the veins and fibers of meat, while preventing the auger shaft from clogging.
The grid has three types of hole diameters:
- Very large - 12 mm
. Grille with three or four holes. Used for stuffing sausages. Not always included. - Large holes - 8 mm
. This rack is ideal for preparing sausage mince. - Middle holes - 4-4.5 mm
. Universal grid. Suitable for preparing minced meat for cutlets. Included. - Small holes - 3 mm
. Pate lattice. It is ideal for making pate or puree.
Using these grates you can get coarse or finely ground minced meat. It all depends on your preferences
The nut (fixing ring) clamps and secures the grid, knife and auger shaft. Sometimes it can be difficult to unscrew it after finishing work. But this problem can easily be solved with the help of ordinary cloth thrown over the nut. So, the hand does not slip, and the part can be easily unscrewed.
A manual cast iron or aluminum meat grinder, especially from Soviet times, is attached to the work surface using a threaded device (foot). And therefore, in order to prevent the device from moving on the table, you need to place something under the metal base. This can be a newspaper folded several times. In modern models, the mounting base is plastic or rubber, and therefore the device is attached to the table much more securely.
The meat grinder does not grind the meat well, what should I do?
We have detected suspicious traffic originating from your network. Using this page, we can find out that you are sending the requests specifically, and not a bot.
A meat grinder is an indispensable tool in every kitchen. It allows you to quickly and easily grind meat for its upcoming production. Now many people use electronic meat grinders, but no one remembers about manual, old units. They can help out in any situation.
Many people still use these types of kitchen devices. Many famous chefs believe that meat rolled through a mechanical device has the best taste.
But what to do if a manual meat grinder does not grind the meat perfectly? How to solve this problem?
Why does the meat grinder not rotate or twist the meat poorly?
The indisputable advantage of such a unit is its components. These are mechanical parts. Naturally, they do not last forever. But their service life is longer than the parts of electric meat grinders. With each disassembly, you can immediately see the breakdown and simply replace the suitable part with a new one. In addition, you can easily find all the parts on sale.
All components of a manual meat grinder, indicated in the correct sequence
- Iron body. Often this is a cast container.
- Spiral shaft. Delivers the meat to the knives for chopping.
- Knives. They can be disc-shaped or cross-shaped with a hole in the middle and sharpened edges.
- Grate with holes. Some models may have several disc-shaped parts, with different diameters of holes in them to adjust the degree of grinding of minced meat.
- Clamp cover. It looks like a wide nut, tightly presses the shaft, grille and knife. Prevents free play.
- Pen. Place on the protruding part of the screw shaft.
- Latch. Secures the meat grinder to the work surface.
Fundamentally! Any housewife should know that after each use, a kitchen appliance must be thoroughly washed. After drying, the instrument must be properly assembled and stored in this condition until further use.
The meat grinder “refuses” to grind the meat for various reasons - in the article we looked at more common ones. If you use our advice, you can solve the problem without the help of others. If the breakdown cannot be fixed, you will have to seek help from experts.
Grinding the cutting surface on knives
Correcting this problem in a timely manner can prevent a more severe problem. Knives are sharpened at home or given to a craftsman.
Common causes of breakdown
You can avoid the circumstances due to which the meat grinder jams and it stops turning the meat without the help of others, having previously examined them.
Engine overheating
Since there is no hole for ventilation in the sealed housing of electric meat grinders, a common cause of engine combustion is its overheating, as evidenced by the sudden appearance of an unpleasant burning smell.
To avoid overheating, do not use the device continuously for more than 3-5 minutes (the exact time is indicated in the instructions for the specific model). Repair in this case is possible only at a service center.
Mechanism overload
If you undertake to repair the device yourself, then when disassembling, in order to avoid incorrect reassembly, carefully remember or record (on paper, photos and videos) the location of small parts. After removing the case, carefully inspect the mechanism. If during inspection a minor defect is discovered - “sticking” of the gears (do not mesh), this can be eliminated yourself.
After eliminating the malfunction, turn the device over and check the operation of the mechanism at low speed. After verifying proper operation, install the housing. In case of more serious damage, take the meat grinder for repair.
How to disassemble a jammed meat grinder
This situation happens often. The knurled nut of the meat grinder sticks together at the junction with the pipe and does not want to unscrew. There are two reasons for this situation:
- After use, the device was washed poorly and then assembled.
- Parts of the device are rusty.
Insignificant pieces of stuck together dirt or grease, a little rust are enough for the meat grinder to jam.
There are ways available to solve this problem.
Soaking in water
It is necessary to get rid of organic food residues that have dried on the nut. To do this, soak the device in warm water, after adding dishwashing detergent or soda. Immerse in boiling water, after putting gloves on your hands to avoid scalding.
After this, you should lightly tap the clamp with a meat hammer, wrap the clamp with a towel and try to unscrew it.
Advice! It is better to use a wooden hammer; it will not damage the metal from which the meat grinder is made.
Using special tools
If soaking does not help, you can use special tools: an adjustable wrench, a clamp or a vice.
As a last resort, try tapping the knurled nut with a hammer or chisel to get it to move. However, this method can lead to damage to the threads and final failure of the unit.
Use of chemicals
This method will help if the cause of the blockage is rust. You can use WD-40 lubricant, which is safe for humans and reduces the coefficient of friction in mechanisms. The aerosol should be applied to the grill and threads of the meat grinder, wait about half an hour, and then try to unscrew the device. If the attempt is successful, the parts and mechanisms should be thoroughly washed and wiped.
If all methods have been tried and the goal is not achieved, you should contact a service center for help.
Some assembly features after repair
If, to repair an electric meat grinder during operation, it is necessary to remove the reduction gears located in the transmission unit, then you need to know that one of them is fitted with an interference fit and will require a vice or heating of the parts to work with it. The second method is used less frequently, since there is a risk of damage to the motor rotor winding.
There can be two or more gears and each of them is mounted on its own shaft. The gearbox parts are cleaned of dirt from old grease using a rag, the gear seating areas are lubricated with Litol, and a special silicone compound is used. After this, they are installed (the power must be turned off) and rotated manually to control the functioning of the mechanism.
The shaft is installed first, and then the brushes, after which the motor can be fixed to the housing.
Tools
If it was not possible to spin the meat grinder using boiling water and soda, you will need male strength and the use of a tool. To unscrew the washer, a clamp, an adjustable wrench, and a hand vice are used. If attempts are unsuccessful, they resort to the risky method of “tapping” the puck with a hammer and chisel. Carry out the work very carefully - there is a high risk of damaging the thread.
The best option is a wooden (not metal) meat mallet, which you can use to tap the auger from the back after removing the entire attachment.
Advantages of meat grinders with reverse function
The reverse function is used in manual as well as electric meat grinders. However, unlike any mechanical device, where reverse motion can be performed by starting to rotate the handle in the other direction, in electrical products the auto-reverse function is considered an additional operation. The manufacturer must indicate the absence or presence of such a function in the product passport.
An electric meat grinder with reverse is very different from manual products. It has a number of advantages that make the work of the kitchen housewife easier.
Benefits of Reverse Motion
- It doesn't take much time to prepare minced meat. The operation is very easy and does not require physical effort.
- The screw is cleaned of twisted particles automatically. The product is not disassembled.
- It becomes possible to grind the meat with a small amount of remaining tendons. When loading product into return motion models, it is not necessary to completely remove all cores in advance.
- Thanks to the quick cleaning of the auger, the device continues to operate evenly, eliminating idle speed. Therefore, sharpening knives is performed much less frequently.
- Devices with reverse are easy to maintain.
- The service life of the product is greatly increased.
Mechanical meat grinder
A meat grinder may not spin the meat, but squeeze it out for several reasons.
The knife has become dull
Diagnosis and troubleshooting:
- Assemble the meat grinder as usual, but instead of a grate to release the product, put on a grinding wheel. Such devices are sold in any hardware stores.
- Rotate the handle clockwise for a few minutes, just like when processing food normally.
How to quickly sharpen a meat grinder knife
Screw play, insufficient fit of the knife to the grate
Sequencing:
- Adjust the position of the clamping nut. The fit of all parts to each other should be maximum. If you feel that the meat grinder handle is turning with some tension, the problem is solved.
- If tightening does not help, you need to remove the handle and inspect the shaft. Most likely the reason is the condition of the bushing. Over time, the plastic wears off and the grille does not adhere well to the knife.
- A circle should be cut out of a thick nylon cover, and a smaller hole should be drilled inside it. Adjust according to the size of the meat grinder. The outer diameter of the resulting washer should coincide with the edges of the sleeve, and the inner diameter with the shaft.
- Place the washer on the shaft, strengthen the resulting gasket with a sleeve and assemble the meat grinder.
- If a small gap remains, you can make several gaskets. A heavily worn bushing is easier to completely replace. Craftsmen can use scrap materials or simply buy a suitable spare part at a hardware store.
Build errors
Diagnosis and troubleshooting:
- Unscrew the clamping nut and make sure that the knife is installed with sharp edges towards the grate.
- If the position is incorrect, turn the knife over and reassemble the meat grinder.
- The clamping nut should not move. It has a fastening function, so it should be tightened at full strength.
Video - correct installation of the knife when assembling the meat grinder
Delicious and healthy dishes on weekdays and holidays
If all the described steps are strictly followed, the user has the opportunity to quickly and easily grind meat and other products - to obtain high-quality minced meat for preparing various dishes from the cuisine of the world.
If any problems arise, you just need to carefully re-read the “instructions”, pay attention to the most difficult points and painstakingly complete each step again, achieving the desired result - flawless operation of the machine.
Mother of two children. I have been housekeeping for more than 7 years - this is my main job. I like to experiment, I constantly try different means, methods, techniques that can make our life easier, more modern, more fulfilling. I love my family.
Dear Larisa!
Such situations occur frequently. And especially often if the meat grinder has been lying unwashed in assembled form for some time or some parts of the device have rusted. And even if there are no visible meat particles, there are still contaminants on the knife and grate, due to which the meat grinder washer can simply stick together at the joint, so unscrewing this part can be difficult. Fortunately, craftsmen have found ways to cope with this task using available means.
Causes of breakdowns
The main reasons why electric meat grinders of all brands fail is their improper use. Only a small percentage is due to poor quality workmanship. The quality of the parts themselves depends on the reliability of the manufacturer. You shouldn’t skimp on it, as repairs can be much more expensive, and parts are not so easy to find on sale.
If the cause is defective gears (which is very likely, since they are made of plastic), you should replace the damaged parts with new ones. It is not so easy to find new gears on sale; for most models they are not sold separately. You may have to contact local services to buy the necessary used part from another device or try spare parts from other models.
In some rare cases, the cause of interruptions in turning the auger may be wear of the socket for its fastening or misalignment of the shaft. This can happen from constant increased load on the device or improperly made socket from too soft metal. Loosening of the auger and licking of the rotational mechanisms is a very big problem. To eliminate this, you will need the help of specialists.
Meat grinder screw
If the meat grinder works, but does not reach the required speed, there is most likely an overload. This problem most often occurs in Kenwood mg devices.
The device should be disconnected from the power supply, disassembled, cleaned and cut the meat before feeding it into the meat grinder into smaller portions.
The main cause of extraneous noise and knocking in the operation of devices is the ingress of unnecessary objects: small bones or veins. They can get stuck and clog the connections between different parts of the device. Also, food particles may dry out on parts that have not been washed sufficiently after previous use, which can cause blockages.
In such cases, the device should be disassembled, cleaned, and all foreign objects removed.
Sometimes the cause of extraneous noise and sharp sounds in the operation of an electric meat grinder can be scattered bearings. They are easy to find on sale and replace.
If you hear burning or smoke from a running meat grinder, most likely the cause is a motor failure.
To repair the motor yourself, you will need some knowledge of electrical engineering, the direction of alternating current, and adjusting the operation of a synchronous and asynchronous motor. If there is no such knowledge, it is better to immediately contact the service center
But, at the same time, the importance of repairs should be assessed
The price of motor repair is usually very high, so sometimes it is easier to buy a new device under warranty rather than repair an old one.
If you have some knowledge, you should take into account that both spirals of the electric motor winding are offset from one another by 90 degrees. In the second winding, the currents are different in phase. As a result of this difference, the rotor starts. The current difference is created by the capacitor. It is used to provide initial acceleration of the rotor.
Motor and rotor of an electric meat grinder
The motors of electric meat grinders for home use are asynchronous. In them, the rotor rotation speed lags behind the stator magnetic field. A damaged capacitor can be the main reason why a meat grinder breaks down.
If the capacitor fails, it should be replaced with a new one.
If one of the windings burns out, the motor must be rewinded.
In any case, before repairing a meat grinder at home, you should evaluate your strength and knowledge so as not to aggravate the breakdown.
In order for the meat grinder to function fully, you need to be able to assemble it correctly. If the meat is not chopped and the device “chews” the food, this indicates that some parts are not attached as they should. If such a problem occurs, it is recommended that you familiarize yourself with the internal design of the device and read the detailed instructions that will help you understand how to properly assemble the meat grinder.
Why does a meat grinder crush meat?
The reason why a meat grinder may not grind meat well may lie in the product itself. Experienced housewives recommend choosing meat without veins. They still won’t be able to grind, but will only screw onto the metal shaft, preventing other meat from grinding. If you have already purchased such a product and you need to grind it, you should clean the device from the veins more often. After cleaning, you can start grinding again, removing all unnecessary elements.
Many housewives know that a meat grinder chews soft, too melted meat. It is recommended to grind a product that is not completely defrosted. This will make the knives cut easier and better.
And, of course, it is better to initially purchase good meat intended for making minced meat. Before processing it must be cut into small pieces.
Properly selected meat is the key to high-quality work of the meat grinder
Before chopping meat, be sure to remove all cartilage and bones. They will not only prevent the product from being properly chopped, but will also become an unpleasant surprise in an already prepared dish.
Tips for using a meat grinder
- The minced meat should not be completely defrosted, then it will be easier for the meat grinder to work.
- If the meat is too fatty, after finishing work, roll in crackers or raw potatoes; they will absorb the remaining fat and it will be much easier to clean the device.
- Cut the meat into small pieces.
To avoid damage to the meat grinder, you should wash the device thoroughly after use, do not dry it in the open air, but wipe it dry with a towel. It is best to store parts in a paper bag.
Household appliances Meat grinder
The process of assembling and disassembling a manual meat grinder
The principle of assembling and disassembling an electric and manual device is similar. There is a slight difference in the method of fixing the structure: manual models are equipped with a foot at the base of the body, which allows you to attach the device to the table. To prevent the meat grinder from sliding on the countertop, it is recommended to place a dry cloth.
Assembly
The further operation of the meat grinder depends on the correct installation of the knife.
Before assembly, you need to make sure that all necessary parts are clean and dry. This will avoid device malfunctions.
Algorithm of actions:
- 1. Insert the screw shaft horizontally into the housing with the narrow part facing outwards and the wide part towards the side where the handle will be fixed.
- 2. Place the handle on the thickened auger rod and fasten it with the fastening screw.
- 3. Attach the knife to the auger on the other side so that the blade faces outward and the convex side is turned inward. This is an important point, because if you mix up the sides of the knife, the food will not be chopped.
- 4. Place the rack on top of the knife. There is a small notch on the part that should align with the protrusion on the body. If the structure is assembled correctly, the grille will not protrude much outward. Otherwise, the clamping nut will not be able to secure the entire structure.
- 5. Screw the clamping nut clockwise, tightening the thread tightly. It should not dangle, otherwise during work it may fall along with the mesh, knife and minced meat.
- 6. Fix the meat grinder on the countertop by tightening the claw tightly.
After such manipulations, you can check the correct operation by turning the knob several times. If it jams and the shaft does not rotate or moves with difficulty, it is recommended to reassemble it. Ideally, the handle should rotate easily, as should the auger.
Disassembly
To extend the life of the meat grinder, it must be washed after each use. It is impossible to clean all the parts in the assembled state, so the structure must be disassembled.
The operating principle is simple:
- Remove the device from the tabletop by unscrewing the tab.
- Unscrew the fastening screw and disconnect the handle.
- Unscrew the clamping nut counterclockwise. For convenience, you can hold the part with a rag so that your hands do not slip.
- Take out the knife, grid and auger.
All parts must be treated with dishwashing detergent using a sponge. You can clean the grill using a toothpick, pushing out any remaining food from the holes. Then carefully place the parts on a dry kitchen towel or paper towel. The meat grinder must be stored disassembled.
Main details of the device
A manual meat grinder consists of several parts, which are shown in the photo.
- The main all-metal body is made of durable metal (cast iron or steel). It has ribs inside it designed to separate pieces of meat of a size that can pass through the auger.
- Meat receiver for storing products. It can be removable or stationary.
- Auger shaft. With its help, the grinded products move from the bowl to the cutters, and then to the outlet. The screw has a spiral shape and is made of durable metal.
- A knife that grinds everything that gets into the meat receiver. There is a square hole in the center for fitting onto the auger. Can be with four cutting blades or disk type. It is important to install the knife correctly so that the mechanism does not jam.
- A mesh ring or grid (called a fixed knife). The standard hole size for minced meat is 4-4.5 mm. There are protrusions on the grille that help secure it firmly between the body and the nut.
- An external knurled nut that securely holds the working tool on the shaft: the knife and the grid. It is made of durable metal, with a thread cut inside that matches the threads on the body.
- The handle that drives the shaft. The hand grip area is usually made of plastic or wood.
- A locking screw for clamping the handle and securing it to the shaft.
The unit can also come with additional grates, replaceable knives, attachments for kebabs, tomato and fruit juice.
To ensure that the operation of a mechanical meat grinder does not cause problems, it is important to make sure that all its parts are clean. It is also important to assemble it correctly, performing the following steps step by step.
- Insert the screw shaft into the rear hole of the housing with the narrow side facing inward. A handle is put on the thicker end, and a knife is put on the small square protrusion. Usually the narrow part has a square cross-section, and the place for the handle is round with one flat side.
- Place the handle on the wide rod and secure it with a screw.
- Place the knife with the flat side facing out, pressing it tightly against the shaft. This is the most important point in assembling the entire structure. The correct operation of the unit depends on the correct positioning of the knife. If you install it on the opposite side, the meat grinder will push the product and not chop it.
- Place the grid so that it is pressed as tightly as possible against the plane of the knife.
- Screw on the clamping nut, turning it to the right until it stops. After securing with a nut, the grille must be fixed motionless - not fall out or rotate. If you cannot tighten the nut tightly, it means the grille is skewed. You need to unscrew it to adjust the parts and screw it back on.
Once you remember the nuances of the location of knives and fasteners, you will no longer have to face difficulties when assembling any model of meat grinder. You will always be able to assemble the device correctly.
Steel knives require regular sharpening, because the quality of grinding depends on their sharpness.
The manual version of the meat grinder has the following structural elements:
- body equipped with a clamp;
- a helical auger that helps move the product to the knives;
- tightening ring;
- pen;
- knife;
- lattice.
The body is most often made of steel, although cast iron can be found. The knife is made on one side with a convex surface. The second side is flat and has cutting edges. To ensure a secure fit, the central hole is shaped like the tip of an auger onto which the knife fits.
Terms of use
In order for an electric meat grinder to please you with flawless operation for a long time, you need to follow simple recommendations for proper operation:
Before starting work, always carefully check the correct assembly and secure fixation of all parts; pay special attention to the contact between the cutting tool and the grille - they must fit tightly, the fixing nut must be tightened with force; cut the product into pieces not exceeding the diameter of the loading cylinder to avoid getting stuck;
disassemble, clean and rinse all parts and the internal volume of the meat grinder after each use; store all parts of the mechanical part of the product only in disassembled form.
Do not turn on the meat grinder without loading, do not try to push stuck pieces of product with your hands - there is a special pusher for this, never overload it. If you thoroughly fulfill all the requirements, then the product will work flawlessly for the entire period assigned to it by the manufacturer, and it will not need repairs yourself.
Are you here
Home » The meat grinder does not turn the meat, what is the problem and what to do in this situation? Repair of electric meat grinders.
11.11.2016 – 21:47 Service center
Sometimes the operating time of equipment does not in any way affect the frequency and number of its breakdowns. Many users encounter the fact that the meat grinder does not grind meat the first time it is started or after a certain period of successful use of the device. In this situation, as a rule, repair of electric meat grinders becomes inevitable. Why does this happen? The fact is that malfunctions of this kitchen appliance can occur for several reasons - it could be wear of parts or possibly incorrect assembly.
In order to understand what to do, it is necessary to understand in more detail why the meat grinder does not turn, and also when the electric meat grinder will need repair.
When the device does not rotate well, you can try loading slightly frozen meat into it. As practice shows, this little secret saves many housewives. If she still does not want to scroll through the meat, then you need to look for the cause of the malfunction. The knives may have become dull. In this case, the device does not refuse to function completely, but does not produce full minced meat, but crushed pieces of meat. Now is the time to sharpen the knives and grill. You can contact the service center, and professionals will repair electric meat grinders there, or you can try to deal with the problem yourself. If you still decide to fix the defect yourself, then we will give you some tips on how to do it. It is necessary to place the grate on a block and grind off the top layer of metal with light movements, then place it on the table and check whether it lies evenly. It is necessary to continue sharpening until the grate lies as evenly as possible on the table. Next, sharpen the knife on the flat side, and it must adhere very tightly to the grate. After completing these manipulations, the parts can be lubricated with vegetable oil to prevent rust from appearing on them. If you are not sure that you can do everything correctly, it is better to entrust the repair of electric meat grinders to specialists.
It happens that the knife does not fit well to the mesh. To fix the problem, you need to assemble the meat grinder and hold it by the shank. When the parts are loose, you will have to select the right size washer and install it near the shank or between the auger and the knife. Everything will depend on the size of the washer. As a result, you will be able to tighten the parts so that they do not dangle. The meat grinder will not grind the meat if it is not assembled correctly. The most common mistake is incorrect installation of the components, namely the knife, which is turned in the wrong direction. For the equipment to function properly, the convex part must be visible from the outside. In this case, no repairs to the electric meat grinder will be required.
Quite often, service center technicians are faced with a situation where, when turned on, the meat grinder does not spin the meat, but when started independently, without food, it works normally. To fix this problem, you will need to check the performance of the motor and gears. It may be necessary to disassemble the device, since there may be an overload key in it, which breaks off when overloaded.
An electric meat grinder may refuse to grind meat for various reasons; we have looked at the most common ones. Using our advice, you may be able to solve the problem yourself. If the breakdown cannot be eliminated, then you will have to seek help from professionals who repair all models of electric meat grinders in Kyiv, regardless of the complexity of the breakdown.
How to properly assemble a manual meat grinder step by step with photos of the process
So, how to properly assemble a manual mechanical device? The easiest way is to follow the assembly procedure according to the product's operating instructions. But if the instruction is lost then follow the step by step assembly method. So here we go.
The first stage is to prepare all the elements and carefully lay them out in front of you
Installation of auger shaft
| Illustration | Description of action |
| For models with a collapsible body, it is necessary to install a meat feeding cylinder. | |
| Next, we insert the screw shaft into the housing so that the wide part of the shaft is at the place where the handle is attached. That is, in the narrowest hole of the meat grinder. The thin side of the auger should end up in a wide and round hole. The knife will also be attached there. |
How to properly insert a knife into a meat grinder
There are two types of knives: with a single-sided and double-sided cutting part.
| Illustration | Description of action |
| Once the auger is installed, take the single-edge blade and install it onto the auger shaft. ATTENTION! The flat part of the blade should face the grate and slide along it. But not the other way around. |
IMPORTANT
!
It happens that the knife is installed incorrectly. And then such a meat grinder is of little use. The meat is not ground, but only choked. And in this case, the device may simply jam.
A knife with a double-sided cutting part can be placed on either side. There is no difference. You can see how to properly install a knife in a meat grinder, and what they are like, in this video.
Installing the grille and screwing the handle
| Illustration | Description of action |
| After the knife is in place, you need to install the grill correctly. It's easier than a knife. The main thing is to install it so that the recess on the grill coincides with the protrusion on the body of the kitchen assistant. | |
| Then simply secure the entire structure with a locking nut, also called a union nut, on the body of the meat grinder. | |
| Next, we secure the meat receiver. |
Now all that remains is to screw the handle from the back using a screw. All. The meat grinder is assembled. You just need to install it on the work surface, and you can start working.
Installing the meat grinder on a work surface
The meat grinder should be as stable as possible, otherwise you will have to make efforts to hold the unit in place while working on it
It is easy to screw the meat grinder to the work surface. You need to attach the device to the table using a “claw”. And to firmly fix the kitchen unit, you can put newspaper or soft cloth between the table top and the “foot”. Thick rubber is even better suited for this role.