Design and principle of operation of a meat grinder
Almost every home has such a simple device as a meat grinder. This is an electrical or mechanical device for grinding pieces of meat. It can also be used for processing other food products: fish, mushrooms, fruits, vegetables.
The mechanical meat grinder has already outlived its usefulness, and more and more housewives prefer an electric meat grinder. The latter will be discussed in the article. Let's look at the design of this device and the principle of its operation.
Design of meat grinders: types and features
These devices are produced in a wide range, however, they come in only two types: manual and electric.
The versatility of the devices is created using a large number of different attachments. Electric analogues are especially popular at the moment. In order to process the ingredients, it is enough to place them in the meat receiver compartment, press the start button, and the products will begin to be processed. However, in addition to the advantages, this design has disadvantages:
- there is no way to control the presence of bones, and if they are caught, the device may deteriorate;
- in the absence of electricity, it is impossible to cook minced meat on such a device;
- If the engine burns out, processing of the ingredients will not work.
The design of electrical devices consists of the following parts:
- Housing made of durable plastic material;
- A motor that performs manipulations when the start key is pressed;
- Lack of handle and clamp;
- Most models have a removable meat receiver, which is installed before food processing begins;
- The presence of convexities on the surface of the knife for gentle chopping;
- At the screw end there is a plastic corrugated rod to ensure high-quality fixation.
Electric meat grinder device
Useful! Plastic may pose some health hazards. To avoid this negative phenomenon, the composition of the plastic material should be clarified.
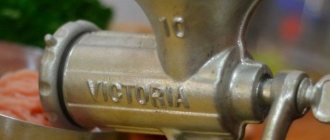
Many housewives claim that mechanical analogues are already outdated, but they continue to delight users with their reliability and durability. This type of device almost never fails; the only unfavorable factor is the dullness of the knives. These working elements can be easily sharpened with your own hands, with a minimum of effort. The body of manual meat grinders is made of reliable stainless steel, cast iron, and, less commonly, aluminum.
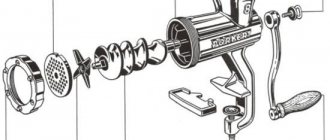
The design of a mechanical product includes the following components:
- The case is made of reliable metal, has a clamp to install the unit on various surfaces;
- Screw element - screw rod;
- A knife for chopping components, can be disk or with wings;
- Tightening ring for fixation;
- Handle attached with a screw;
- Grids having holes of different diameters.
Manual meat grinder device
Healthy! Mechanical devices are not very functional, but will last a long time without breakdowns. Such devices can handle any type of meat and will not be damaged if a bone gets in.
Additional components of the meat grinder
Manufacturers equip the units with standard parts and elements, but depending on the model, they may differ in additional attachments.
Manual designs are equipped with grates with different hole diameters to obtain different grinding ingredients. Cutting parts may differ in shape - with wings, disk.
Electric meat grinders are equipped with a removable meat receiver and a pusher for moving ingredients to the grinding element.
How to properly place a knife in a meat grinder
The assembly process itself is very simple, but it is important to know how to install the knife correctly so that the device effectively processes food. The cutting part consists of the main elements:
- Convex smooth surface;
- The flat part having cutting edges;
- A hole in the center, which is made in the form of a screw tip.
When assembling a manual meat grinder, you should follow the main rule - the knife is installed with a flat surface outward. If you miss this criterion, the device will press on the meat without chopping it. In a circular knife, the edges are clearly visible, so they should also be with the cutting surface on top. In cases where problems arise with the processing of ingredients, it is necessary to check the correct installation of the cutting part and other working parts.
Position the blade with the flat side facing outward
In electric models, the assembly of the structure is more difficult, because two knives are used simultaneously. The double-sided element must be installed on the auger, after which the grid is fixed, a second knife and a grid with small holes are installed on top, and the structure is secured with a fixing ring.
Important! In order for the unit to grind food efficiently, all parts must be accurately installed. If processing fails, you need to re-check all working elements for correct assembly
What types of knives are there?
First of all, knives are classified:
- by type and method of seat (physical features of the knife that allow you to put the knife on the auger) - tetrahedral (square) and hexagonal;
- according to the shape and sharpening of knives - double-sided and single-sided, straight and “saber-shaped”.
Let's take a closer look at the shape of the knives:
- saber-shaped - characterized by the best gliding and best cutting quality;
- direct - the processing of the product in this case is also carried out by the sliding type, but the efficiency of chopping the product is somewhat lower than in similar models of blades, which, by and large, is not important, since specific manufacturers use certain types and types of knives in different models.
Advice!
Knives from meat grinders are not universal and absolutely interchangeable, and specific models of knives are suitable only for certain brands and models of equipment.
The number of blades of a meat grinder knife can vary from two to six. But, the most popular and optimal solution for household meat grinders are four-bladed knives. The number of blades determines the size of the grinding fraction. The fewer blades, the larger the pieces of the ground product.
In addition, the blades can be sharpened on one side or both. Single-sided sharpening can be right- or left-handed, and when choosing one model or another, one should take into account the direction of travel of the screw shaft, which can move clockwise or counterclockwise. Double-sided sharpening is relevant when the knife is universal and can be installed on either side of the grill. This solution will significantly extend the life of the knife.
Assembling a meat grinder
In general, the design of the working part is simple enough to master assembly and disassembly the first time
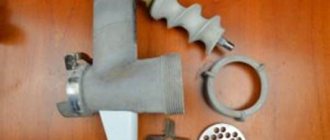
But you need to pay attention to certain important nuances that are often forgotten. The disassembled meat grinder is shown in the picture below, and various grating options are also demonstrated there.
How different parts should be inserted
Disassembling the meat grinder
You need to disassemble and clean the meat grinder after each use. To get the grate, screw blade and auger, it is usually enough to unscrew the clamp, since it is this that holds the entire structure, and the internal elements are often no longer secured in any way. The knurled nut can fit very tightly, so you have to apply force to unscrew it.
After removing all internal components and unfastening the tray, wash the parts thoroughly. Often all surfaces become greasy, especially if vegetable oil was used to make the appliances easier to operate. To remove fat, you can use alcohol, as they destroy lipids.
Assembling a meat grinder
The procedure for assembling the meat grinder is as follows:
- Before assembly, you need to make sure that all parts of the meat grinder are clean.
- First, the auger is installed. Before doing this, you need to place a rubber plug on its back side, which will prevent liquid from getting into the device from the working chamber. Then you need to connect the auger to the gearbox.
Connecting the auger to the gearbox bushing
Then the knife is mounted. It is placed in such a way that the flat part of the blades is on the grate side. An exception is the circular knife; it should be placed with the grooved surface closer to the grate.
Correct installation of the knife
- Then the grate is installed.
- Then the clamp is tightened. Place it tightly enough so that the entire structure is securely fixed.
- At the end, the meat receiver tray is attached to the body.
Mechanical sausage grinder
In addition to an electric meat grinder, healthy sausage can be made using a manual meat grinder.
Design
A manual meat grinder consists of the following elements:
- a housing with a clamp that allows you to firmly install it on a table;
- auger feeding food to the knife;
- knife and mesh, chopping meat;
- a nut that presses the grille to the knife and auger;
- a handle with which the moving parts of the apparatus are set in motion.
The body, screw and handle are made of aluminum, the knife and mesh are made of high-alloy steel.
Self-guided step-by-step assembly
Before starting work, you need to assemble the meat grinder and install the attachment for making sausages on it:
- Insert the auger into the housing.
- Install the knife and grid.
- Attach the nozzle to the mesh and press it to the body with a nut.
- Secure the body with a clamp to the edge of the table.
To make it easier to feed minced meat into the intestine, it is allowed to use a device without knives.
Assembling a mechanical meat grinder
How to stuff sausage
The procedure for stuffing the casing is similar to preparing sausages using an electric meat grinder:
- Assemble the device and secure it to the table.
- Place the sheath on the nozzle.
- By rotating the handle and auger, feed the minced meat into it.
- When the sausage reaches the required length, tie it with a rope.
- Repeat steps 3-4 until the intestines are completely filled.
The calorie content of smoked sausage is high, which makes it a highly nutritious product that can replace a regular meat dish.
Stuffing a sausage product with a mechanical meat grinder
Care
Caring for a mechanical meat grinder consists of washing all elements, drying and assembling the device after drying. It would be correct to do this immediately after completing the work, while the remaining products have not dried and can be easily washed off with hot water and dishwashing detergent with a sponge.
Additional accessories
Sometimes it happens that the owner of an electric meat grinder wants to expand the functionality of his device, perhaps by equipping it with some elements that were not originally included in its package.
In this case, we offer you attachments for cooking sausages, which will easily allow you to prepare excellent sausages, sausages and other types of products for boiling, frying and barbecuing at home.
That's all for now! It's time to take stock.
Now you know that if the efficiency of the meat grinder decreases
or in the worst case of its breakdown, replacing the necessary component will save you from purchasing a new meat grinder and will significantly save your family budget!
The range of spare parts for meat grinders we offer can satisfy almost any demand, and the quality of the products will leave only positive impressions!
We really hope that this review has answered some of your questions and brought clarity to the world of meat grinder spare parts.
Source
Meat grinder device
First, you should understand the general principle of the design and operation of a meat grinder, and then pay attention to its working part, where the grinding of meat occurs
General device
The meat grinder consists of several elements:
- control unit, where buttons and indicators are located;
- an electric motor that converts electrical energy into mechanical energy
- the working part where the meat is ground.
Meat grinder device
Meat grinder structure: the body consists of a metal part (3), where the working part is located, and a plastic part (6), where the meat grinder motor is located. At the back of the electric motor there are grilles (13) through which heated air exits. There are often rubberized feet (8) at the bottom that prevent the device from sliding on the table.
On the control unit there is a button to start work (12) and stop it (11). Most models have a screw reverse button (10), which must be pressed when the shaft is clogged with something and needs to be cleaned. There is also often an operation indicator (9) that turns on when the device is operating.
The motor has an input for the electrical cable (14), usually a ground clamp (15) is located nearby. The motor itself (7) converts electrical energy into mechanical energy. The gearbox (5) transmits rotational motion from the electric motor to the shaft (4), which is directly connected to the auger.
Working part
The working part includes a meat grinder and a device for receiving meat. The meat receiver consists of a tray or cup and a pusher - a long plastic and narrow tube that is used to push the meat onto the augers. The key elements are the same for all models.
The simplest meat grinder scheme
The entire structure is housed in a metal casing, which prevents the product from falling apart due to the pressure inside the working chamber. On top there is an oblong or round tray with a narrow hole. A plastic pusher is inserted into it, where you need to squeeze the meat onto the augers. Processable products are placed in the tray. It itself is usually made of stainless steel or plastic.
Stainless steel oval tray
In the meat grinder pipe there is a screw, which is attached to the rotation shaft. When assembling the model, you need to ensure that the fastening is as reliable as possible, otherwise during operation the electric motor will not be able to effectively control the auger. A rubber bushing is used for the connection, which prevents moisture from the working chamber from entering the gearbox. The meat grinder pipe itself is made slightly wider than the auger so that the meat does not come out through the blades, but at the same time the axis rotates freely, not restrained by friction.
Auger with rubber plug at the end
The auger is one of the key parts of the meat grinder. It looks like a drill with high spiral blades. The screw is made from an alloy of various metals, which give the structure strength and at the same time resistance to air, water and other compounds. During movement, it pushes the meat onto the knives and grill, and also creates a high enough pressure to grind and chop cartilage.
Various knife shapes
The knife onto which the products fall from the auger looks like a screw with four sharp blades. It cuts and shreds the meat so that it passes through the grill better. The knife is made from a metal alloy, as it needs to be durable and resistant to moisture. Often the blades have a special curved shape for better cutting of products. The entire design is made so that the knives self-sharpen when rubbing against the auger and last longer.
Various grill sizes
The grille is made in the form of a thick steel plate, in which fairly large holes are made. Their size determines the consistency of the minced meat. The grille can have holes of different sizes:
- 3-3.5 mm – small;
- 4-5 – average;
- 8-9 – big.
Clamp or knurled nut
The last part is the clamp, which looks like a large knurled nut. It fixes the grille, preventing it from coming off during operation. In addition, all other attachments (knives, auger) often also do not have reliable fastenings, so it turns out that the clamp secures not only the gratings, but the entire structure in general. Typically, the knurled nut is tightened in the same direction that the auger and blades rotate, so it does not fly off due to the rotation of the internal elements.
How does a meat grinder work?
Before you start using a meat grinder, you need to prepare the meat. A meat grinder is a device of a mechanical or electromechanical type, the purpose of which is to grind meat.
It is used to grind other products, as well as prepare noodles, sausages, cookies, and juices from fruits and vegetables. The first meat grinder was invented by Baron Karl Drèze in the 19th century.
The principle of operation of kitchen appliances is not complicated, but you should immediately make a reservation - before you start using a meat grinder, you need to prepare the meat, namely, cut it into small pieces. They should easily fall into the meat receiver without getting stuck.
Using a pusher, a piece of meat is pushed into the sleeve, from where it enters the augers. Having passed through them, the product is “pressed” against the nozzle in the form of a lattice and at this time it is cut by a knife sliding smoothly along the surface.
The meat receiver shaft is additionally equipped with ribs that reduce large pieces of meat caught in the mechanism. The product is “cut” into smaller pieces, and they are fed to the auger.
If the task is grinding, then the meat is placed in a tube. The output is finished minced meat. The pictures show a working meat grinder and a diagram.
Additional accessories
Various additional attachments are available for both types of meat grinders, designed to perform work not related to grinding conventional minced meat. Such devices are included when the device is delivered or can be purchased separately.
Juicer
To extract the juice, you can use the grill with the largest holes. But in this case, the final product will have pulp. And a special nozzle, in which an additional screw directs the raw material onto a fine grater, allows you to obtain liquid without the admixture of solid particles. At the same time, losses of raw materials are minimal.
Shredders
Using a set of various shredders, you can quickly cut food for any salad. The device easily copes with the work of a food processor.
For sausages
The peculiarity of this attachment is that it specially distributes ground minced meat into sausage casings. With the help of the device you can make not only sausage, but also sausages and sausages.
For the test
A device for working with dough is capable of forming original cookies from the dough. There is also an attachment that will help you make homemade pasta.
Advice! Additional accessories turn an ordinary meat grinder into a device that can facilitate the preparation of dishes of any complexity. Therefore, a set of attachments purchased separately will not be superfluous in the household.
Design
A modern electric meat grinder is equipped with the following basic parts and components:
a device made of durable plastic for pushing products inside the device; tray or bowl; metal alloy meat grinder body; drive by electric motor; gearbox; main body of the product made of plastic; Electrical engine; rubber feet to prevent slipping on the table while working; LED indicating that the meat grinder is on; reverse; emergency stop button; start; grille for the exit of heated air; clamp block; retainer; input for power cable; ground clamp.
The body of the meat receiver, where the products are processed, consists of similar parts as the manual version:
metal case; receiver and tray or bowl; screw shaft; knife; lattice; fixation nut.
Depending on the model, the main parts may include:
- gratings with holes of different diameters;
- additional knives;
- original attachments or graters for processing vegetables and fruits;
- devices for forming dough;
- conical attachment for making homemade sausages, frankfurters and sausages.
All of the above parts are the working parts of the meat grinder. For housewives to visually familiarize themselves with the configuration and purpose of various additional devices, there is a video using the example of the Belarusian electric meat grinder KEM 36 “Assistant”:
Industrial electric meat grinders
Industrial electric meat grinders, unlike domestic ones, differ primarily in size, performance, and of course price.
For a rough idea, here are some device parameters:
— Dimensions: 68×40x44 cm
— Productivity: 75 – 600 kg/hour, i.e. by the standards of household meat grinders - from 1.25 to 10 kg per minute.
— Prices: 3500 – 13 000 UAH, or 430 – 1600 USD
The purpose of industrial electric meat grinders is catering and meat production.
Principle of operation
The operating principle of an electric meat grinder is simple and understandable to anyone who has ever used its mechanical counterpart.
The power button starts the engine, which rotates the screw shaft. Portion-cut products intended for processing are placed in the receiving tray. Getting from the neck of the meat receiver onto the turns of the rotating auger, the products move to the knife mounted on the end part of the shaft. Rotating with the shaft, the knife fits tightly to the fixed grid, due to which the products are crushed and pushed by the auger through the holes in the grid.
Details
How does a manual meat grinder work?
Manual meat grinders have a fairly simple design. They operate on a manual drive and mechanical pressure created by a screw. The process of grinding products occurs as follows:
— meat or other product must be placed in the receiver, from where it will fall onto the screw shaft;
- after this, the product must be pressed against the grate, where it is cut using a four-bladed knife sliding along the surface of the grate;
— the grinding of products occurs continuously, you just need to put meat or fish into the receiver, and it will come out in the form of minced meat through the grate.
Design
A modern electric meat grinder is equipped with the following basic parts and components:
- a device made of durable plastic for pushing products inside the device;
- tray or bowl;
- metal alloy meat grinder body;
- drive by electric motor;
- gearbox;
- main body of the product made of plastic;
- Electrical engine;
- rubber feet to prevent slipping on the table while working;
- LED indicating that the meat grinder is on;
- reverse;
- emergency stop button;
- start;
- grille for the exit of heated air;
- clamp block;
- retainer;
- input for power cable;
- ground clamp.
The body of the meat receiver, where the products are processed, consists of similar parts as the manual version:
- metal case;
- receiver and tray or bowl;
- screw shaft;
- knife;
- lattice;
- fixation nut.
Depending on the model, the main parts may include:
- gratings with holes of different diameters;
- additional knives;
- original attachments or graters for processing vegetables and fruits;
- devices for forming dough;
- conical attachment for making homemade sausages, frankfurters and sausages.
All of the above parts are the working parts of the meat grinder. For housewives to visually familiarize themselves with the configuration and purpose of various additional devices, there is a video using the example of the Belarusian electric meat grinder KEM 36 “Assistant”:
Adaptations
Many models of electric meat grinders are equipped with additional attachments and devices that help squeeze juice, chop vegetables, make homemade pasta, original-shaped cookies from shortcrust pastry or deli meats in the form of sausages or sausages.
For squeezing juice
Almost any model of a modern electric meat grinder is equipped with devices for producing juice, the only difference is in their location:
- the auger squeezes out the juice along with the pulp through a grid with large holes;
- the auger rotates inside a cylindrical grater, and almost the entire vegetable or fruit is ground into juice.
For shredding
A meat grinder can replace a food processor, which is good for cutting vegetable salads when you are expecting guests, while a lot of the product remains inside the product. When you need to cook the same thing, but in smaller quantities, the electric assistant will handle it.
There are special attachments for shredding; you can quickly and efficiently prepare vegetables for salad for the whole family, saving time and effort.
For sausages
What man would refuse homemade aromatic sausage with pepper and finely chopped lard? To do this, you don’t need to go to the market or run to the nearest supermarket - do it all at home with your own hands using a special Kebbe attachment.
For cookies
Homemade cookies of various shapes can be made using an electric meat grinder; there are special devices for this, and every experienced housewife has a dough recipe. Delight the whole family and guests with original shaped pastries that you can’t buy in a store.
Classic meat grinder
The first mention of a meat grinder dates back to the pre-colonial era, the prototype of which was a double-blade knife with wooden handles, with which the butcher literally cut the carcass into pieces. Having undergone many external changes and safely reaching the nineteenth century, the knife was completely changed and redesigned by Karl Drais. The concept of cutting meat into small pieces was taken as a basis, and later it appeared to the world - a machine that uses a mechanism for feeding knives perpendicularly, relative to the bottom of the barrel, until it stops, thereby dividing the carcass into small pieces.
An alternative to this device was a barrel with parallel feeding and scrolling at an angle of rotation of the knives, thereby separating the pieces of meat on the canvas. The clear advantage was speed, reduction in percentage depreciation and the number of products issued.
For the household, there was a minimized unit with a diamond-shaped drum (to optimize the flow of meat and drainage of blood through special holes) and sharp knives arranged vertically.
Over the next decades, neither the meat grinder nor the feeding method changed fundamentally, with the exception of the design and material used to create meat grinders.
With the onset of the nineties of the nineteenth century, due to high competition in the market, the meat grinder underwent a number of fundamental changes, namely: replaceable reusable knives, an electric motor, a redesigned cylinder with longitudinal grooves and a sharpened screw tightly adjacent to the walls of the cylinder, an iron shaft, a mesh on the output part meat grinder, fastening mechanism.
Its further popularization in households and industry led to the optimization of energy costs, weight, texture and division into categories:
Category A: powerful, productive tools for preparing minced meat; Category B: multi-purpose meat grinders, equipped with attachments for grinding vegetables and fruits; Category C: low-power, having purely utilitarian functions.
This categorization was dictated solely by the huge demand for meat grinders and the simplification of the description; it did not in any way imply that category A included good meat grinders, category B included slightly worse ones, and category C included very bad ones.
Present time
At the moment, the meat grinder market offers a huge number of units for processing meat into minced meat, which are radically different from their ancestors. Most of them are fully capable of satisfying consumer demand.
How to assemble a meat grinder correctly
The assembly principle is quite simple - you can figure it out without any problems if you have assembled a conventional manual meat grinder of an old modification at least once.
For clarity, I will give you a photo with a diagram of how to assemble a meat grinder:
How to properly assemble a meat grinder - instructions:
First, connect the gearbox housing to the auger housing, its end should be immersed in the gearbox groove. Once the parts are in the desired position, turn the auger clockwise until you hear a click. If you installed the parts incorrectly, you will not be able to turn the auger. When you put the auger in place, make sure that the protrusion coincides with the hole in the housing
Otherwise the shaft will not work. You need to put a blade and a grid on the other end of the auger so that all the holes and protrusions match, and it is important to install the knife with the correct side of the blade. The photo shows how to correctly place a knife in an electric meat grinder.
Now the structure can be fixed with a clamping nut. Install the loading tray and check the build quality
If you hear uncharacteristic knocking or clinking noises during operation, disassemble the meat grinder and try again.
At the time of buying
When you purchase an electric meat grinder, you need to perform a couple of steps:
— Check for functionality. Many sellers like to say the phrase: “Already verified.” Don't listen, it will save your nerves if the device doesn't work.
— Check the stability of the device. The meat grinder must stand firmly on a flat surface and not wobble.
— Complete set according to the passport for the device. And then suddenly someone “borrowed” a knife to their home or a net from the kit.
— See if the outlet height is conveniently located; you may have to immediately purchase a special bowl for minced meat. From this point of view, the higher the “exit” is located, the better and more convenient. But this is not a reason to refuse an electric meat grinder that is suitable in terms of characteristics, design and price.
Basic rules of use
How to use a household electric meat grinder so that it serves its owner for a long time without expensive repairs and replacement of important elements? There are several simple rules, the observance of which guarantees long-term and safe operation of the device:
- When preparing products for processing, carefully remove the tendons, free them from bones and hard-to-grind parts that can cause failure of the knives and power drive;
- Cut the meat into pieces that can easily fit into the neck of the meat receiver;
- Always keep your knives sharp. A sharp cutting tool will provide higher productivity in the production of minced meat, pates, etc.;
- After use, you should immediately disassemble the grinding mechanism, thoroughly rinse and dry all its elements, and then place it in storage;
The grinding mechanism must be washed immediately - Before assembling the device, lubricate the surface of the grid adjacent to the knives and the auger shaft with oil. This will reduce friction and ensure better passage of the product through the mechanism;
- Do not overheat the device. Household models are not designed for long-term continuous operation in intensive mode;
- For safety reasons, use the standard pusher to push food toward the auger. The length of the pusher corresponds to the depth of the meat receiver, which avoids jamming of the auger and failure of the power part of the device.
An electric meat grinder is a simple and useful device that can significantly simplify the process of preparing minced meat and diversify your diet with original homemade delicacies and dough products.
Watch a video on how to properly mince meat
The advantage of an electric meat grinder
— an electric meat grinder has more power than the hand of an ordinary person and than a food processor in meat grinder mode;
— an electric meat grinder grinds meat much faster than a human, so you save your time;
— an electric meat grinder does an excellent job of removing veins from meat. In a regular meat grinder, you sometimes have to unscrew the grate, remove the knife, remove the wires from the knife, and put it back together...
— electric meat grinders do not require a tight attachment to the table to operate, nor do they require a free corner of the table. They are manufactured in tabletop or floor-mounted versions;
- for safety, household electric meat grinders usually have a narrower and longer neck of the meat receiver, and they come with a pusher - which prevents fingers from getting into the auger.
Operating rules
Before you start processing meat or other product, you need to cut it into pieces so that they pass freely through the cylindrical part of the receiver. The pusher is used to push the product towards the auger, which moves it towards the cutting tool.
The auger of any meat grinder has special ribs that direct the product to the outlet, grinding it as it moves. This process, like the actions of the knife, occurs continuously: new portions placed in the meat receiver squeeze the already ground product through the grate into a container placed at the neck. Using electric models, it is easy to make delicate pates: grinding is done several times, passing the finished product through finer meshes and adding the necessary ingredients.
In order for the meat grinder to work efficiently and for the product to function as long as possible, it is necessary to strictly follow the manufacturer’s recommendations and simple operating rules.
- Check the meat carefully when cutting it into portioned pieces to put into the receiver; if a small bone gets in, it will cause the knife to break.
- The knife in the product should always be sharp - this facilitates quick processing of any product.
- Immediately after use, the product must be disassembled, all parts must be washed thoroughly, and after drying, put into a storage box.
- Before assembling, experts recommend wiping the shaft, knife and grid on the side where the knife is located with sunflower oil - this will ensure better passage of products inside the meat grinder and high-quality performance of the rubbing parts.
As you can see, the design of an electric meat grinder and the principle of its operation are extremely simple, but it has many advantages, because with the help of simple attachments you can prepare original homemade delicacies, aromatic dough products and many other delicious dishes.
Installation of additional components
Most modern meat grinders come with additional knives, grates with various holes and attachments for preparing sausages or kebbe. If it is necessary to use them, the order of assembling the meat grinder may vary, which is also usually specified in detail in the instructions for the device from the manufacturer.
In this case, you should adhere to the following algorithm for assembling an electric meat grinder:
- installation in the middle of the auger body;
- attaching a ring with the largest holes to the auger (their number may vary depending on the meat grinder model and manufacturer);
- installation of a double-sided knife;
- installation of a grille with medium-sized holes;
- fastening the remaining knife;
- installation of the last grate;
- securing the clamp nut.
In the case of preparing sausages, instead of knives and grates, you will need to attach a special attachment to the auger, which is secured with a clamping nut. And for the purpose of making cookies or pasta, you can use metal or plastic shaped rings.
Often, such household appliances include a nozzle for juice and pasta. Usually they are already assembled and you just need to attach them to the main body of the meat grinder.
When assembling an electric meat grinder, it is better to follow the factory instructions from the manufacturer. If a household appliance malfunctions, it is recommended to contact a service center for diagnostics and repair if necessary.
Assortment of goods in the “Spare parts for everyone” store
We supply only original spare parts for meat grinders, which are of high quality and wear resistance. The product catalog is constantly updated with new components, which increases the opportunity to choose the right part specifically for your equipment.
Spare parts in our catalog are compatible with brands such as: Bork, Bosch, Braun, Cameron, Kenwood, Elenberg, Panasonic, Philips, Polaris, Rolsen, Scarlett, Tefal, Vitek, Moulinex, Redmond, Saturn, Siemens, Zelmer and others. If you have not found a part of your brand, contact our manager - he will help you choose the right model.
If your meat grinder is broken, but you don’t know which part is broken and how to replace it, contact the manager using the feedback form on the right side of the website. Our consultant will study your problem and offer a detailed algorithm of actions to check the functionality of the main working units. You can also call a technician from our store to carry out a comprehensive diagnostics of the device.
The main components of an electric meat grinder
Let's look at the main components and components of electrical models and explain the tasks they perform in the device.
Housing with motor and gearbox
The main components of any electric model. The engine is necessary to transmit movement to the working parts of the meat grinder (auger). The gearbox reduces engine speed and increases torque (the force with which the shaft rotates). Its mechanism consists of several gears of different diameters (plastic or metal). A gearbox with plastic gears is the most common option. It costs less and weighs less, however, if the motor jams (sudden stop due to overload), the gear teeth may break. The design with metal gears is considered more reliable, is less common, weighs more and costs slightly more.