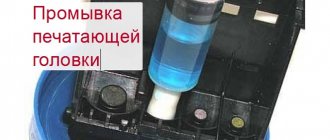
The print head is one of the most problematic parts in an inkjet printer. Over time, the paint on it dries and the part may fail. That is why cleaning should be carried out regularly, without waiting for possible malfunctions. You can clean your Canon printer manually or using hardware cleaning. This function is provided in all devices of this company.
Possible causes of blockage
Many users encounter various problems when printing pages on a printer. The most common cause of this is the print head. The following problems may indicate this:
- Horizontal white stripes appear when printing.
- Missing one or more colors.
- Produces a blank page when printing text or graphics.
produces high-quality equipment that rarely fails. However, you should wash the head at least once a month, even if there are no problems. The malfunction may occur in one of the following cases:
- Long printer downtime. If you haven't printed for a long time, the ink in the device may have dried out. In this case, cleaning the printer using a special program can help. If necessary, cleaning can be done twice.
- Printing in the absence of inks. You should absolutely not try to print if there are no inks in the cartridges or are running low. This may damage the print head. In this case, a complete replacement of the part will be required.
- Mixing ink. Water-based and pigment-based paints should not be mixed. They leave a residue that clogs the nozzles. In addition, it is better not to even use the same paints from different manufacturers. Cartridges should only be filled with one type of consumable. When purchasing a printer, you should immediately replace the original cartridges with those that will be used for further printing.
Over time, even if all the rules are followed, the nozzle will still clog. Then you will have to clean the Canon printer head. However, proper operation of the device will help extend its service life.
Prevention
It is recommended that you perform regular maintenance checks on the entire printer and at the same time clean the head as a preventative measure. Make sure that the devices are free of dust or dirt, jammed paper, paper residue, or any other foreign objects. If found, they must be removed immediately.
If your printer has a continuous ink supply system, regularly check the condition of the hoses that pump the ink from the reservoir to the head. There should be no blockages, air plugs, kinks or mechanical damage. The amount of ink should be kept above the average level. This precaution will prevent air from being sucked into the CISS. It is not recommended to leave the printer idle for a long time without printing. Ink can dry out quickly, especially if it is of poor quality. Once every 1-2 weeks, do preventive printing of several sheets. Otherwise it will dry out and there will be problems:
- dirty print;
- the appearance of stripes or even white sheets when printing.
With regular program cleaning, physical cleaning will not be necessary for a long time. To prevent the paint from drying out, you need to print a color page at least once a week.
4.6 / 5 ( 5 votes)
Cleaning with the program
With all inkjet printers, the ink dries over time. Therefore, the problem with a dried head is quite common. In this regard, printers have a special program that automatically clears the device of blockages. This can be done using a computer.
First you need to connect your printing device to your computer. Typically, drivers are installed automatically. If this does not happen, you can install the program yourself - using the disk that comes with the equipment. After this, you should perform the following steps:
- Make sure the printer has enough ink to print.
- Load paper.
- Connect the device to the computer.
- Open “Start” - “Control Panel” - “Devices and Printers”.
- Right-click on the desired printer and select “Properties”.
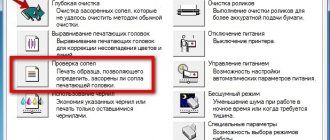
- Go to the "Maintenance" section.
- Choose standard or deep cleaning.
- After this, wait until the printer cleans itself. The paints will be applied under high pressure to break through the resulting blockage.
- At the end of the procedure, the program will offer to print a test page. If this does not happen, you should select the “Check Nozzles” function.
List of current models
The article is relevant for devices:
- Canon PIXMA E404, E414, E464, E474, E484, iP1200, iP1300, iP1600, iP1700, iP1800, iP1900, iP2200, iP2500, iP2600, iP2700, iP2840, MG2140, MG2240, MG 2245, MG2440, MG2450, MG2490, MG2540, MG2540s, MG2545, MG2545s, MG2550, MG2940, MG2950, MG3010, MG3050, MG3080, MG3140, MG3240, MG3540, MG3640, MG3640s, MG4140, MG4240, MP140, MP150, MP160, MP1 70, MP180, MP190, MP210, MP220, MP240, MP250, MP252, MP260, MP270, MP272, MP280, MP282, MP450, MP460, MP470, MP480, MP490, MP492, MP495, MX300, MX310, MX320, MX330, MX340, MX350, MX360, MX374, MX394, MX410 , MX420, MX434, MX454, MX474, MX494, MX495, MX514, MX524, MX534, TR4540, TS208, TS304, TS308, TS3110, TS3140, TS3150, TS5140
- HP Deskjet 1000, 1010, 1015, 1050, 1050a, 1055, 1115, 1510, 1512, 1515, 2000, 2020hc, 2029, 2050, 2050a, 2054a, 2130, 2135, 2510, 2512, 2514, 2515, 2520hc, 2529, 2540, 2545, 2620, 2630, 2645, 3000, 3050, 3050a, 3515, 3545, 3635, 3636, 3639, 3775, 3785, 3787, 3788, 3835, 4515, 4535, 46 0c, 4645, 4675, 4729, 5075, 5275, 5740, 5743, 5940, 5943, 6540, 6543, 6623, 6843, 6940, 6943, 6983, 9800, 9803, 9803d, d1660, d2563, d2660, d2663, d4263, d43 63, d5560, f2420, f2480, f2483, f4210, f4280, f4283, f4580, f4583,
- HP ENVY 100, 110, 120, 4500, 4504, 5530,
- HP Officejet 100 mobile, 150 mobile, 2620, 4500, 4630, 6213, 6310, 6313, 7110, j4580, j4680, j5783, j6413, k7100, k7103,
- HP Photosmart 2573, 2613, 325, 335, 385, 475, 8053, 8153, 8453, b8353, c3180, c3183, c4180, c4183, c4283, c4343, c4483, c4583, c4683, c4780, c528 3, d5060, d5063, d5160, d5363,
- PSC 1600, 1610, 1613, 2353, 2410,
- and other two-cartridge ones.
Flushing liquids
In order to wash the Canon inkjet printer cartridge manually, you need to use washing liquid. It can be purchased at a specialty store. The main disadvantage of a purchased product is that it is quite expensive, and cleaning requires a large amount of liquid . make a special solution at home. For this you will need:
- Distilled water.
- Ammonia.
- Isopropyl alcohol.
- Glycerol.
Water should be mixed with other ingredients in a ratio of 7:1. Mix thoroughly and strain.
Another analogue of flushing liquid is window cleaner. For example, "Mr. Muscle" has a similar composition and is good for cleaning the printer. You can also use other products that contain ammonia.
Method 3. Steaming
You take a dead, dead cartridge from an inkjet printer, which has been lying around no matter how long and has dried up tightly and all sorts of soaking, blowing, and ultrasonic baths do not help and everyone says throw it away and buy a new one - try this method and everything will work. This method applies to HP, Canon, Lexmark cartridges with a built-in print element. Take a kettle, boil water, when it boils and pour it into some bowl, the water depth is about 1 cm in and immediately lower the dried cartridge into this boiling water with the nozzles downwards, just before that remove the top sticker covering the holes as the paint will expand greatly and can flow out through top filling holes, hold in boiling water for 30 seconds and do this three times (carry out all operations with a refilled cartridge). Then you wipe the cartridge nozzles with a napkin and put some photo into the printer to print at the best quality, it will immediately turn out to be anything, then you make 4 main color sheets completely of the same color and print to run each color, the quality will still not be very good for In order to eliminate this, print any photo and in the printer settings set the quality to normal (not fast, not draft, but REGULAR). I would be most grateful if you leave a review here; I would also be grateful if you recommend this site to your friends.
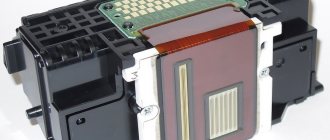
Removing the print head
On different printer models, the steps to remove the PG may vary. For example, washing the Canon pixma mg2440 or mp250 print head is carried out a little differently than in other models. In this regard, it is better to read the instructions that come with the device.
In order to disassemble the printer and remove the head, you need to lift the cover of the device. Turn it on and wait until the cartridges come out to the middle of the device, where they can be easily reached. They should be removed carefully, one at a time. If there are no special markings on the device, you need to remember how they were located before removal.
The head is located under the lock. Usually there is a special lever on the right that provides access to the PG. In some models, the latch does not rise, but pulls out towards itself. Once you have managed to open it, you will have access to the head. You should carefully remove it from the device.
Extreme methods
So, in fact, we have run out of methods that still have a high chance of saving the print head. If the goal cannot be achieved, you can use several more much riskier methods:
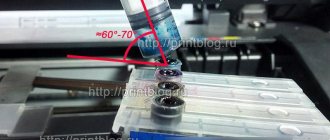
- Press out the liquid with a full syringe without an air cushion. The pressure on the nozzles will increase significantly, as will the risk of damaging them. Do not press the head against the fabric, but lift it slightly. Press the piston carefully, as before, the pressure is much greater due to the lack of an air cushion.
- Hold the steam generator nozzles over the steam for several minutes and push through the flushing heated to 40–50 degrees.
- Place the head on the surface of hot water for a few minutes, without dipping more than a millimeter, and draw the liquid through the nozzles.
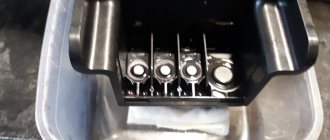
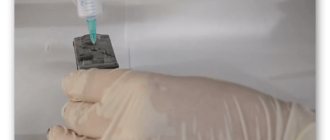
The print head is washed (picture taken from www.chernila.com) (Click to enlarge)
- Use a more aggressive product: mix 9% vinegar and distilled water in a ratio of 1:9. This composition cleans well, but has a destructive effect on internal parts, and after using it, it is necessary to rinse with an alkaline solution to neutralize the acidic environment. Do not use this method if you are not prepared for the fact that the print head will fail in two to three months.
If one of these extreme methods helped achieve the desired goal, do not rush to return the PG to the printer. After such extreme measures, be sure to dry it with a hairdryer. Do not overheat the head: take breaks for about twenty minutes. If you doubt that everything has dried well enough, leave it near the battery for two days, and before installation, drop a little flushing liquid into each gateway.
- Error codes for Canon MP240, MP250, MP260, MP270, MP280.
- Software for Canon printers and MFPs.
Have fun typing.
Serious blockage in the head
If the blockage is severe, liquid may not penetrate through the sluices. In this case, it is worth trying to repeat the procedure several times. If this does not help, flush the pipes with a large amount of liquid.
To do this, take a thin tube and cut it into several small pieces. After that, put them on the intake holes and fill them with a special liquid. The length of each tube should be no more than 6 cm. If the liquid begins to penetrate the head, you can continue the procedure and add liquid within two days.
In case of failure, you can use the following technique. Pour some liquid into a plastic container, place a cloth or napkin and press the P.G. to it. After that, using a syringe without a needle, draw the liquid out of the tube. Repeat the procedure several times, adding cleaning agent to the tube.
In the same way, you can try to pump the liquid in both directions. To do this, repeat the previous steps, pressing the nozzle against a damp cloth. Then draw in the cleaning liquid with a syringe. After this, fill the pipe and squeeze the extracted product back out. This should be done slowly and carefully so as not to damage the part.
Installation and configuration
In order to reassemble the device, you need to dry the cleaning head and place it in its rightful place. After this, lower the latch and return the cartridges to their place. You can now print a test page. Don’t worry if, when printing, curved lines appear on the sheet or the drawing (text, stamp) is poorly printed. The head may have moved and needs to be realigned . Calibration instructions:
- Make sure there are sheets in the tray and the cartridges are full. After that, connect the device to the computer.
- Go to “Control Panel”, then “Devices and Printers”.
- Open the context menu and select “Properties”.
- Go to the “Advanced” tab.
- Oh, save and go to the Maintenance tab.
- Perform the “Print Head Alignment” procedure.
- Follow the instructions to answer the questions and complete the calibration.
Manual cleaning
If cleaning via a computer does not produce significant results, you will have to resort to working with your hands.
What you need to clean the nozzles
- Gloves to avoid getting your hands dirty.
- Syringe with a needle.
- A container where the head and cleaning fluid will be placed. A rubberized jar lid works well. You can take a saucer or any container with sides.
- Lint-free napkins or paper towels. If you don’t mind, take full-fledged lint-free rags.
- Small diameter tubes, for example, from droppers.
- Scissors.
- An eraser for removing old stains that cannot be cleaned with solutions.
What liquid to use
It is recommended to use cleaning fluid from the same company that produced the printer and cartridge. Ideally, find out the model of the printer, or better yet, the cartridge, and look for the cleaning agent by name.
Otherwise, the most suitable composition will be any original cleaner. It must match the ink you are using. Additionally, make sure that the model of your cartridge is written in the list of cartridges to be cleaned.
Cleaning with flushing liquids in containers that are all in Chinese characters is strongly not recommended.
To clean the print head working with water-soluble inks, the following can be used:
- water with zero salt content (W01);
- distilled water (regular tap water is not suitable);
- self-made composition (ammonium is added to distilled water, the proportions are determined depending on the size of the blockage).
If the printer prints with pigment ink, then the printer head is cleaned with a specially designed solvent or isopropyl-based alcohol.
Products from WWM have proven themselves well in the cleaners market.
- W01 – water without salt impurities, copes well with clogged nozzles;
- CL-04 – the product copes with water-soluble inks, the composition is intended for working with the external parts of the printing unit;
- CL-06 - similar to the previous composition, but is used to remove dyes with pigment;
- CL-08 – liquid is indicated for washing and soaking;
- CL-10 – the solution has an enhanced effect.
Many “specialists” practice using household cleaning products. For example, the word “Mr. Muscle” is popular. If you need to wash the ink with water, you need green or pink “Mr. Muscle”. And to clean the inkjet printer head, which passed pigment ink through itself, you need a blue or orange household solution. Many people recommend the blue liquid.
Heating the liquid to +40 °C allows you to increase the cleaning efficiency.
Before using any homemade or household products, it is recommended to experiment with a separate amount of ink.
- Take the dye you are using and the intended cleaner.
- Apply cleaner to the ink in a separate container.
- Leave it on for a few hours and then evaluate the result. There should be no precipitation, no transformation of the mass into a thicker or even jelly-like one. The ink should become more liquid, that is, dissolve. If clots form, they should be loose.
Printers from Epson, Hewlett-Packard and Canon, depending on the model name, contain different parts. There are heads that are attached to the carriage and can be removed. Some models have a cartridge with a non-removable head. Both situations require a different approach. First, let's look at how to clean the built-in head on devices with inkjet printing technology.
How to clean the removable head
You can use two methods:
- dismantle the head, i.e. completely remove it from the printer;
- clean without removing the PG, taking out only the cartridges.
Both options work, but the method of removing the head is more effective. This will allow you to visually monitor the condition of the plate with nozzles and control the washing process.
How to remove the head
- The top cover of the device rises.
- If the equipment is multifunctional, then you may need to disconnect the scanner unit, which will complicate the disassembly procedure a little.
- All cartridges are received.
- The cable that connects to the contact pad is disconnected.
- By removing the latches, the contact pad is pulled out.
- The large cable is disconnected from the head.
- The screws that secure the head inside the carriage are unscrewed.
- With a gentle movement, the head is pulled out.
Immediately place the PG in the container so as not to stain the clean surface. Now you can wash the part using one of the suggested methods below.
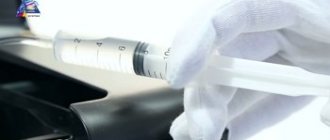
Flushing through fittings
First of all, it is recommended to get rid of any remaining ink that is in the head channels. Place a tube of suitable diameter onto the tip of the syringe. Place the second end on each fitting one by one and gently move the piston towards you, pump out the remaining substance.
When you remove the tube, be careful not to spill ink back onto the head. To do this, the tube can be pressed firmly with your fingers.
Washing instructions:
- Fill a separate clean syringe with cleaner (cleaner).
- Connect the tube to the fitting.
- Using smooth, light pressure on the piston, begin to flush the channel along with the filter, which is located under the fitting.
- As a result, a “water” colored wall should come out under pressure from the back of the head. It is necessary to rinse until the wall is complete without gaps, and the color of the emerging liquid becomes clear. You need to do it over a container of sufficient size.
- Place the head inside the printer and reassemble in the reverse order of disassembly. Before printing documents, do cleaning through the driver (see above). Then print a sample sheet through the nozzle check option.
Cleaning should be done without long breaks. Otherwise, there is a risk of the cleaner drying out on the filter or in the channel, which will greatly aggravate the situation.
Therefore, after completing all the actions, it is better to immediately insert the head back, connect it, and put it into operation.
Broach
The method helps with severe blockages. It is recommended for use as the first stage of cleaning to remove ingrained plugs and proceed to standard, gentler cleaning.
- Add 1-2 mm of cleaner to a saucer or other container with a flat bottom.
- Place the head directly into the cleaner with the nozzle plate facing down.
- Place the tube from the syringe onto the fitting.
- Systematically begin to pull the piston in the opposite direction. The flow of cleaner into the tube will indicate that the nozzles are being cleaned.
The cleaning should be completed either by washing (described above), or by leaving the head with the nozzles down for the whole day in the cleaner. When the nozzles are cleaned, the printer is restored to its original state and a 2-time cleaning in Windows is required.
Maceration
You need to periodically drip cleaner onto each fitting using a syringe. In a natural way, the cleaner will soak the channel and the dirty filter. It takes more than one hour to clean, but it is better to devote most of the day to the process.
In order not to constantly monitor and repeat the digging of the fittings, you can put tubes on them. Liquid is poured inside. The print head is left alone for the whole day if the print is very bad, and for several hours when the contamination is insignificant.
Video
Flushing and cleaning without disassembling the head
It is not necessary to remove the part from the carriage. But this is less effective and increases the risk of dirtying the inside of the printer. For severe problems, flushing may not provide any improvement, but it will remove weak blockages.
Before all actions, you must first move the carriage out of the parking lot. To do this, turn on the device with the button on the case. Wait for the carriage to start moving and when it is approximately centered, unplug the power cable from the outlet.
Next, fold a lint-free napkin or paper towel several times.
Place the napkin in the parking area.
Carefully push the carriage into the parking lot so that the napkin is underneath it and does not crumple.
Next, clean all the fittings one by one. Using a syringe through a tube or rubber adapter, carefully inject the rinsing solution.
If the liquid does not come out, it is possible that a plug has formed inside. In this case, you can put the tubes on the channels and leave them for the whole day to try to soak them. Or try to destroy the plug with minimal movements of the syringe piston back and forth.
Washing should be done for all flowers. After each wash, you need to move the carriage and change the napkin.
A satisfactory result will be considered if after washing the napkin is clean or close to this condition.
At the end, the napkin is removed and the cartridges are inserted. Additionally, you should rinse the printing machine nozzles two or three times using the program.
How to wash the head built into the cartridge design
You can verify that washing is necessary by analyzing the print. Take toilet paper or a napkin. Remove the cartridge from the carriage and place the nozzles against the selected material.
- If the print is clear, then the dye passes through the nozzles well and no washing is required. An exception is if, despite the high-quality print, there are defects on the paper.
- If the trace is blurry, unclear, practically or completely absent, although there is paint inside the container, then it should be washed.
When testing a color cartridge, three clear marks of red, yellow and blue should be visible on the napkin.
First try to soak the nozzles in a gentle way. Turn the cartridge over so the nozzles are facing up. Using a syringe, apply a few drops along the entire hole.
Wait up to 10 minutes, dry the surface well, and check the print again. If it helps, return the ink tank to the carriage and do a software nozzle test.
The next step is soaking in a container with cleaning liquid.
- Take a regular lid for screwing on jars.
- Take a few millimeters of cleaner.
- Place the cartridge with the nozzles down.
- Do not touch the container for about one and a half to two hours.
- Afterwards, wipe the cartridge dry and check the print on a napkin or paper.
If the result is still not satisfactory, ink is pumped through the nozzles with excess pressure.
- You will need a syringe with a shortened needle. Make the last one about 1.5 cm long.
- Find a small piece of rubber. It should be put on the needle and moved to the beginning. The rubber band will act as a sealing gasket.
- Fill the medical syringe with air.
- Insert the needle into the hole in the cartridge. Located on the back side of the head. Press the syringe firmly so that the previously put on rubber band fits as tightly as possible and closes the hole.
- Start pressing on the piston. Ink should flow out of the nozzles.
See the video for more details.
Canon laser printer
produces not only inkjet, but also laser printers. The difference is that laser printers use a special powder for printing, while inkjet printers require liquid inks. In a laser printer, printing problems most often arise from the cartridges. The appearance of white streaks on the paper may indicate that the drum is damaged. As a rule, this part cannot be repaired; it can withstand about four cartridge refills. After this it must be replaced.
Another cause of the problem may be the habit of shaking the cartridge after it runs out of toner. This makes it possible to print another 20 pages, but leads to a serious malfunction and the purchase of an expensive part ahead of schedule.
Incorrect refilling of cartridges can also lead to malfunction Before filling them, a specialist must clean the cartridge. There is no point in doing this yourself for the following reasons:
- Cleaning and refilling cartridges is inexpensive and is carried out using special equipment. After this, there are enough colors for 1700-2000 pages.
- The toner, due to its powdery state, very easily enters the respiratory tract and causes harm to the body.
- Disassembling, cleaning and assembling cartridges yourself is a very difficult and time-consuming job. In the process, you can easily break the cartridge or lose small parts.
This is why it is better to contact a specialist to clean cartridges in a laser printer rather than doing it yourself at home. With proper use, the device will last for several years.
Method 3. Steaming
You take a dead, dead cartridge from an inkjet printer, which has been lying around no matter how long and has dried up tightly and all sorts of soaking, blowing, and ultrasonic baths do not help and everyone says throw it away and buy a new one - try this method and everything will work. This method applies to HP, Canon, Lexmark cartridges with a built-in print element. Take a kettle, boil water, when it boils and pour it into some bowl, the water depth is about 1 cm in and immediately lower the dried cartridge into this boiling water with the nozzles downwards, just before that remove the top sticker covering the holes as the paint will expand greatly and can flow out through top filling holes, hold in boiling water for 30 seconds and do this three times (carry out all operations with a refilled cartridge). Then you wipe the cartridge nozzles with a napkin and put some photo into the printer to print at the best quality, it will immediately turn out to be anything, then you make 4 main color sheets completely of the same color and print to run each color, the quality will still not be very good for In order to eliminate this, print any photo and in the printer settings set the quality to normal (not fast, not draft, but REGULAR). I would be most grateful if you leave a review here; I would also be grateful if you recommend this site to your friends.