Sometimes a small detail can ruin the whole look for us. For example: a torn button, a loose zipper, a broken elastic band. Such seemingly trifles not only spoil the appearance, but sometimes create great inconvenience. We can eliminate all these minor troubles ourselves. A number of such inconveniences include a stretched neck on a jumper, sweater or T-shirt.
Remaking and narrowing a stretched neckline on your favorite knitted (knitted) item is not difficult.
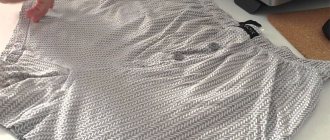
We'll show you how to easily fix a wide neck.
We will need a piece of not very thick elastic band.
Let’s make a reservation right away - this method of solving the problem is suitable for things with a round neck. With finishing having a cavity inside. Most often, this is exactly what happens in various knitted, knitted jumpers, sweatshirts and T-shirts that are now fashionable. It is this feature that we use to solve our problem.
We turn our item inside out. We find the seam on the trim on the inside.
Carefully unravel the seam. A small hole on the inside of the trim piece will be enough for us.
And then, using a safety pin, we will tuck our elastic inside.
For our purpose, the elastic band should not be too tight.
We determine its width based on the height of the trim on the neck.
It should freely pass through the volume into the cavity. We measure the length of the elastic band by draping it around the neck so that the ends meet in the dimple between the collarbones.
Add 1-2 cm for stitching. Usually this is enough for free dressing.
The length can be adjusted after the elastic is tucked inside. In some cases, if you are not sure what neck size will suit you, you can fill the part without cutting it off from the main piece.
Then, we put the item on and adjust the length as we like, secure it with a pin at the desired level, and only then can we cut off the remaining end.
This way we can quite easily fix the appropriate girth at the level we need.
In any case, the elastic should not pull the head opening too tight. It doesn’t look nice from the outside and it will be difficult to wear such a thing. So we try to adhere to a sense of proportion.
We sew the two ends of our elastic band together, folding them at an angle of 45 degrees.
This way it won’t bulge and will lie flat inside the finish. We sew up our hole with thread of the appropriate color.
Upon completion of the work, it is advisable to smooth out the area of alteration by steaming so that the material takes on a new, more compact shape.
Using our example, we showed how with minimal effort and the least amount of money and time you can remake (reduce) the neck of a jumper or T-shirt. In general, in any thing with a round neck that has a cavity.
We showed that you shouldn’t throw away your favorite thing if a separate part of it has simply stretched out and it has lost its original appearance. Our advice offers a solution to the sewing problem with a minimum of sewing work.
Of course, we do not pretend to have the most correct solution to such a problem, but our advice is quite suitable for the simplest way out of the situation.
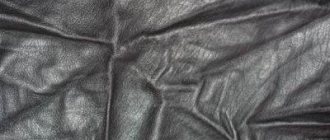
It’s not at all difficult to save a stretched wool product by reducing its shape and size. However, it should be borne in mind that you can change the appearance of such an item by no more than one or two sizes and only if the composition contains natural wool with a small admixture of synthetics. Fully synthetic items, such as acrylic, will be quite difficult to change, especially by washing, which is considered the most popular and convenient method today.
By washing
Wool fibers are very susceptible to high temperatures, due to which the item “shrinks” easily and quickly, so this method is the most effective and safe:
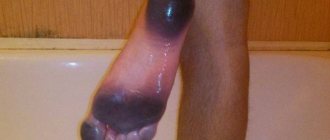
- in order to give the item its previous appearance and get rid of stretchiness, you should place the item, previously turned inside out, in a container with hot water;
- Having kept this item in hot water for a quarter of an hour, you can proceed to the next stage : add a little liquid powder for washing wool items or a special washing gel to the water and achieve the formation of foam. Regular granular powders are not suitable for such things;
- carefully wash the product, being careful not to stretch , rub or squeeze the material too much;
- prepare in advance a container with ice water , in which after washing you should rinse the item until the foam completely disappears and the soap solution is washed out;
- hold the clean product in cold water for about 15-20 minutes , adding pieces of ice from time to time to maintain the desired temperature;
- remove the product from the water and immediately send it to dry, without squeezing or twisting it . It is recommended to dry the item unfolded in a horizontal position on a terry towel, which will absorb moisture. If necessary, the towel should be changed from time to time, and the item should be turned over;
- when the item dries slightly, it can be hung on small hangers , however, in the case of an item made of thick, bulky yarn, it is advisable to leave the item to dry in a horizontal position.
This method is ideal for items of any style and model - from shortened options made of fine knitting to bulky oversized items made of thick yarn.
Advantages and disadvantages of the noodle dress, who suits the style
Most women at least once in their lives have a question: how to shorten a dress? There can be many reasons for this. Here are some of them.
- On a thinner figure, the item fits looser, making it longer.
- An outdated model can be revived by making it shorter.
- Boring length of the product.
- Change of style.
If you have chosen a dress to shorten and made a firm decision to modify it, you need to know the main points, using which you will get an excellent result. This is especially true when you need to shorten quickly. We'll tell you how to turn a long dress into a short one.
What to combine with
The noodle dress is a universal option for almost any occasion: be it a date, workdays or a holiday celebration. You just need to know a few rules that will make combining such an outfit with other clothes much easier.
In order not to make a mistake and choose a dress that will look good on your figure, follow these recommendations:
- A noodle dress made of fabric with added elastane is perfect for pregnant girls. This fabric has excellent stretch, is pleasant to the touch, and very soft;
- A long noodle dress below the knee is contraindicated for girls with short stature or disproportionately short legs. It visually “cuts” the leg just above the ankle, making it 4-5 centimeters shorter, which reduces height;
- A noodle dress with a slit at the back or side is perfect for a romantic date or photo shoot and will add a sexy, feminine feel to your look. For a winter outfit, the cut should not be more than 10-15 centimeters. Bare thighs will look out of place in winter weather;
- For girls of short or medium height, it is better to choose an outfit that is knee-length or slightly higher in order to balance the figure and make it more proportional;
- A short-sleeve noodle dress is suitable for autumn-spring or summer; it will look beautiful with heeled sandals, pumps or platform sandals;
- A dress with long sleeves is perfect for the winter period; it will look appropriate both at a business meeting and at a birthday party.
If you don’t have much time to choose an outfit, and the desire to conquer everyone with your sense of style is endless, you can draw inspiration from ready-made looks using a noodle dress as the main element:
- To create an office look, a noodle dress can be combined with jackets or blazers made of thick, textured fabrics. Pumps and mid-heeled sandals are perfect for this combination. Accessories include stud earrings or a watch on a wide strap;
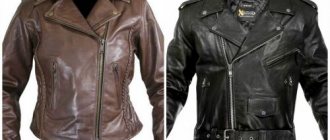
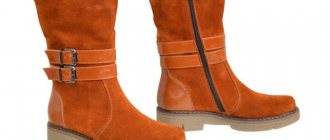
- For a bold, unusual look, a noodle dress is combined with a leather jacket, flat boots, and massive jewelry in the form of chains or bracelets;
- For an autumn look, you can add a wide belt to match the dress or a contrasting one, high-heeled boots, a coat with a zipper or buttons. A shawl or scarf, originally tied around the neck, will look beautiful;
- For a winter look, you can add leg warmers or thick leggings to the dress if the dress is above the knee length. Leather gloves will be an original addition.
Using these simple rules, choosing a noodle dress and creating a wonderful look with it will not be difficult!
Beautiful colors and shades
The choice of noodle dress color directly depends on the woman’s color type, her figure and taste preferences. But there are also classic options suitable for almost any occasion:
Whimsical silk
Products made from silk fabric require a special approach. An automatic machine is clearly not a help here. To shrink something made from such a delicate fabric, only manual mode and low temperature are suitable. It is better to dry silk in the open air to avoid deformation.
If this method does not bring the desired result, the shirt and other items can be placed in warm soapy water for 20-30 minutes, washed, and then dried in a draft.
How to mark the hem line of jeans?
According to tailoring experts, you can shorten jeans without cutting the bottom, but before work you need to make careful markings. Determine the length of the trousers and the width of the hem of the bottom edge depending on the chosen hemming method. It is advisable to use outside help for marking to secure the bottom with pins in a straight standing position. When marking the bottom of the product yourself, you need to look in the mirror from the front and from the side, checking the length of the product on each leg.
Methods for marking on denim:
- pin and iron the lapel line;
- mark with chalk: first, with strokes from the back and sides, and then, using a ruler, draw a straight line, laying out the product on the desktop;
- “grandmother’s way” - mark a line with a piece of soap (take a soap with a thin edge and draw with it like chalk);
- apply a contrast marker on the fabric - a felt-tip pen, which will disappear after heat treatment (wet ironing or washing).
After marking, before working on a sewing machine, it is recommended to sweep the seam by hand and carry out a test fitting. This can be done with threads that you plan to use in your work; it will be possible to evaluate how a contrasting seam will look on the fabric.
Resizing by suturing
An option that is suitable for products evenly stretched around the entire perimeter. This method will only take a few minutes and will allow you to significantly modify the item, giving it the desired shape and adjusting the size.
To implement this method, you will need, first of all, a needle with a thick thread in the color of the product, as well as pins with which you will need to highlight the silhouette:
- turn the item inside out and try it on yourself in front of the mirror;
- determine the desired shape and, using pins, carefully secure the desired shape on the sides , trying to release the material evenly. If necessary, you can baste the resulting silhouette with a thread with a contrasting, brightly eye-catching color;
- select a thread of sufficient density and a suitable shade that would blend in with the yarn, and use wide stitches to sweep away the future shape obtained after trying on the product;
- try on the item again, turning the item right side out . After making sure that the product fits as it should, sew the basted stitches on a sewing machine, selecting the standard stitching program and making the stitch length medium - about 0.7 cm;
- Carefully trim the excess material with scissors , not forgetting to leave about 1 centimeter for finishing the edges. This must be done so that the fabric does not begin to crumble and fall apart;
- finish the edges along the entire product using an overlock stitch or zigzag , then turn the item inside out and try it on again.
This method is recommended to be used to reduce the item by no more than two sizes, since too much suturing can warp the item, after which it will need to be completely altered and recut.
Goat
The finishing seam “Kozlik” is also considered strong and reliable. Its disadvantage is the ability to catch on something sharp. The stitch should be done from left to right.
- Finish the bottom of the sleeves with an overlocker.
- Turn the hem allowance inside out and press.
- Hem with a goat stitch.
To do the job correctly and accurately, use a needle to grab one or two threads of the fabric above and below from the edge of the overlock stitch. The distance between the grips is approximately 1 cm, but no more. Before fastening the thread, stretch the fabric slightly.
Required Items
Before starting work, you should prepare all the necessary tools so as not to be distracted from the process.
You will need:
- needle;
- 15-20 pins;
- threads of a suitable color;
- sharp scissors;
- soap or colored chalk;
- sewing machine. It will greatly facilitate the process;
- measuring tape.
How to make decorative stitching
To decorate a dull project, you can highlight the hem stitches with a different color thread using a double or triple decorative stitch. The optimal stitch width is 2.5 cm.
Finish the bottom of the sleeves with an overlocker. Turn the hem allowance inside out and press.
Use a blind stitch on your sewing machine. Adjust the stitch width so that the needle lightly catches the fabric at the fold. Try it on a separate piece of paper first.
Then sew a seam along the exposed edge of the hem allowance. The best stitch length is 1 mm.
Shrinking a sweater by dry cleaning
The simplest and fastest method to get rid of this problem is to go to a dry cleaner, where there is a special service for reducing stretched wool items. Using heat treatment or washing, specialists will return the product to its original appearance and desired size in a matter of minutes. However, this method can negatively affect the softness and brightness of the item , making the item scratchy and the shade dull. Therefore, when changing the shape of a colored or colorful wool item, it is advisable to ask dry cleaning specialists to add a product to soften the fabric, and also to use a gentle method to maintain color saturation.
How to lengthen and transform clothes
How to lengthen clothes. This is probably one of the most common methods. He looks simply great. Openwork inserts are placed not at the bottom, but in the middle of the product. To enhance the effect, you can decorate your pockets and belt with lace. Personally, I really like this option.
Promo code OZONMG1D43 gives a discount of 300 points for the first order (1 point = 1 ruble)
- Download the Ozon mobile application and log in to your account.
- 300 points for the first order are awarded immediately after entering the code word OZONMG1D43
in the mobile application. - You can use points to pay up to 25% of the purchase price.
- Attention ! Points are valid for 5 days after activation.
Reasons why a sweater may stretch
Old items may become deformed due to prolonged use. Even with proper use, clothes will not look new within 10 years of constant wear. Other reasons that cause thread stretching include:
- non-compliance with temperature conditions during hand washing;
- incorrectly set program on the washing machine;
- knitting features (large perforated pattern);
- habit of pulling on sleeves;
- improper storage;
- inappropriate detergent;
- improper drying, etc.
How to hem a T-shirt yourself?
Every girl at least once in her life has wondered how to hem this or that item on her own, be it a dress, trousers or a T-shirt. Today we’ll look at several ways to hem a T-shirt, both by hand and by machine. This article will be useful both for beginners in this business and for those who have already practiced sewing before. For all T-shirts, the algorithm of actions will be the same and may differ slightly depending on the fabric from which the product is made.
Various fabrics
As mentioned above, the technique of work and the choice of tools depend on the fabric. So, for linen, synthetics and cotton, you need to carefully consider the choice of scissors due to the high cutting resistance of the fabric, while for wool it is several times lower.
For thick fabrics, thicker threads and needles are used, and for thinner ones, vice versa.
The color of the fabric and thread should be as similar as possible so that the seam is not so noticeable.
There are fabrics that shrink after washing, so the product or only the area where it will be cut must first be subjected to a wet-heat treatment.
For silk and other fabrics that tend to fray, you need to leave a larger allowance, which will require an overlocker to process. Many professionals say that the edges of such fabrics should be finished at the basting stage.
Hemming on a sewing machine
Hemming a T-shirt, sweatshirt, top or anything else using a sewing machine is very easy. Need to:
- Measure the required length, mark and cut.
- Fold the T-shirt at the bottom, determining the distance at which the seam will be.
- Place the folded product under the machine foot with the wrong side up.
- Straighten and align so that the edge of the T-shirt is under the left needle.
- Install the stopper and start stitching so that the fabric does not tighten.
- Tie an end knot and hide it.
Manual hemming method
The fastest and cheapest option is to hem the T-shirt yourself at home.
If your product is made of dense fabric that does not fray, then you can safely trim it. And if there is a risk that the fabric may “move” or fall apart, then it is better to pre-process the edge with an overlocker.
After cutting, the bottom of the T-shirt must be finished with a hidden cross-shaped seam, which is usually called a “goat”.
Goat seam
This type of seam is quite simple to make; even a novice seamstress can handle it. One or two threads (at your discretion) are grabbed with a needle from below and above the cut allowance. In this case, you need to carefully ensure that the seam is not visible from the outside.
The item you are going to trim and hem must be clean and ironed.
How to hem a neckline
Sometimes, due to prolonged wear and frequent washing, the neck of a T-shirt can stretch and look different than when purchased. On the Internet you can find a lot of tips on how to hem a neckline. We will talk about several below.
- pins;
- hand needle for knitwear with a blunt tip;
- or a sewing machine.
Collar hemming method No. 1
- Turn the T-shirt inside out.
- Fold the edge of the collar and pin it with pins.
- Sew by hand or on a sewing machine.
It is important that in the end your seam is elastic!
Collar hemming method No. 2
There is another option for hemming a T-shirt collar, which involves cutting it off and then re-sewing it back on.
- Pull the collar away from the T-shirt.
- Spread the shoulder collar about two centimeters.
- Carefully smooth out the entire fabric.
- Cut the seam from the trim strip.
- Stretch the bar by ironing it.
- Finish any of the long edges with an overlocker.
- Place the T-shirt and placket with right sides facing each other.
- Baste so that the neckline and raw edge match.
- Cut off the rest of the strip.
- Sew the placket to the fabric.
- Unscrew the bar and baste.
- Sew the strip and topstitch it at a distance of half a centimeter.
- Sew and finish the shoulder seam area.
How to hem a T-shirt on the sides
Without using a sewing machine, a topstitcher and an overlocker, it is very difficult to hem a T-shirt on the sides. The last two tools can be replaced with a sewing machine that has an overlock stitch.
- Mark on the sides the places where the seams will later be.
- Trim the overlock seam at the sides and armhole, but do not cut the fabric.
- Mark the place where the seam will be (it is better to use a template).
- Fold the product in half, align the cutting lines and pin everything together.
- Mark the future armhole line.
- Pin together the back, hem and armhole.
- Fold the T-shirt along the seams at the shoulders and pin it in place.
- Cut off the excess fabric, leaving an allowance of about 0.7-0.8 centimeters.
- Fold the sleeves together, pinching them at the bottom.
- Mark the highest point on the rim line with chalk or soap.
- Make marks on the front and transfer them to the second sleeve.
- Remove the pins.
- Align the cuffs and armholes, as well as the cuff point and shoulder seams.
- Sew all seams.
It is better to sew the seams on the sides and sleeves in one go.
How to hem a T-shirt at the shoulders
Sewing a T-shirt at the shoulders is easy, since you don’t even have to rip the fabric.
How to make a jacket smaller?
When a sweater is stretched, how to return the product to its original appearance - a few simple procedures will help. In order not to completely ruin the clothing, before trying to restore it, it is recommended to pay attention to the manufacturer’s recommendations, which are indicated on the label. The problem is that some procedures will help reduce the size of the sweater, but may ruin its color.
When trying to repair warped clothing, you should consider what material it is made from. For example, 100% viscose is not very susceptible to shrinkage, but in most cases another thread is additionally woven into clothing. It can be synthetic, wool, cotton, etc. Therefore, such things will be easier to reduce in size.
Washing machine
Clothes made from acrylic or wool can be restored by washing them in a washing machine. It is recommended to select a mode that matches the product. The water temperature should not exceed +40°C. If the system device of the household appliance allows you to completely remove the spin cycle, then you should disable this function (draining the water will be enough). When it is completely impossible to disable this function, you should reduce the number of revolutions to a minimum. Automatic tumble drying should be abandoned.
To return the shape of a stretched item, it is necessary to remove excess moisture from it after washing it. You cannot twist the jacket like a doormat. It is necessary to squeeze lightly.
Handwash
Hand washing is a delicate process, but even this method does not exclude the possibility that the product may become deformed. To avoid damaging your clothes, it is recommended to choose a powder that does not contain alkali. The water temperature should be +30°C. Do not rub the product too hard. It is better to soak heavily soiled items in warm (not hot) water for 15-20 minutes.
When rinsing, you can add vinegar to the water. You cannot twist the jacket. If the product is made of thin threads, i.e. It does not absorb a lot of water; after washing, it is laid out on a horizontal surface. When a sweater has absorbed a lot of liquid, you can speed up the process of its release by compressing the fabric into one lump.
Drying correctly
Drying should not take place on a clothesline. The jacket should be laid out on a table (or other horizontal surface), straightened out all the folds, and then try to place all the rows of knitting as close to each other as possible. It is necessary to compress the product, but so that there are no kinks left on it. In this position, the clothes are left to dry. When all the moisture has evaporated, the sweater will retain its shape when dried.
Drying after washing by hand should be carried out according to the same principle as when restoring a deformed product using a washing machine.
Using a towel
If the sweater has stretched after washing, you can try to restore it with a towel. To speed up the drying process, it is recommended to change bath accessories several times. The towel is laid on a flat horizontal surface. The deformed clothing is placed on top and then stretched in the opposite direction from where the stretching occurred. As the towel becomes soaked, it is replaced with another, i.e. dry At each replacement it is necessary to level the jacket.
How to shorten the length of a factory sleeve
Unravel one row in the middle of the fabric, carefully pulling the thread out of each loop. Gradually gather the opening loops of the cuff one by one with a needle onto a thick thread. This will separate the cuff from the main fabric.
When the cuff has completely separated, I try on the sweater and once again determine how long to shorten the sleeve, and only then separate the excess part in the place where the mark was made, just like the cuff.
If the sleeves are long, what should I do?
Every person has knitted items. They are comfortable, practical, and keep you warm in cool weather. But the problem is that their sleeves often stretch or sag.
It's okay, they can be carefully hemmed. Knitted fabric differs from ordinary fabric in its structure, so you need to be patient in order to beautifully process the bottom of this part.
If a machine-knitted sweater has long sleeves, then we will do this work.
Operating procedure:
- On the product with cuffs, mark the new length. For example, you need to shorten it by 10 centimeters, measure 10 centimeters upward from the cuff with a ruler, draw a cutting line with chalk, leaving 1-15 cm for sewing on the cuff.
- Cut off the cuffs and sleeve along the marked line.
- We put a needle on the machine for sewing knitwear, selecting the “knitted stitch” function. If there is no such needle, then we leave the same needle, put a “zigzag”, the width of the step is 1-2, and the length is 2-3 to get an elastic seam.
- We remove the front part of the car and put the sleeve on the protruding part. We process the cut part.
- If the sleeve is too wide, step back 1 cm from the edge, sew a line in wide increments, and tighten it to the required size.
- Place the cuff face to face on the finished edge and sew with a zigzag stitch.
- We process the cuts using an overlocker or by hand.
Trimming the sleeves of a sweater
If the sweater is knitted with a large knit, then we will do the following manipulation:
- Measure the required length on the sleeve of the sweater.
- Clinging to one loop, we pull on it until the part in this place gathers “into an accordion”.
- We cut the drawn thread on both sides.
- The part splits into 2 parts.
- We wind the lower part into a ball.
- On the top part we put all the loops on a knitting needle or hook. Close as with normal knitting.
You can crochet new cuffs to finish off the sleeve beautifully.
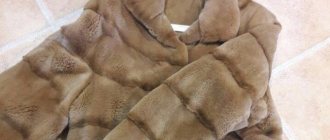
Reducing individual elements
If the elastic band on a sweater has stretched, i.e. not the entire product, but its separate part (sleeves, neckline), then it can be restored separately without subjecting the entire fabric to water procedures. The jacket should be laid out on a flat horizontal surface. Use a spray bottle to moisten problem areas. When the fabric gets wet, it should be pulled so that the threads move in the opposite direction from the stretch. You can secure this position with a pin or rubber band. The sweater is left in this position until completely dry.
If the cuffs or other parts of the product have not stretched much, after moving the threads to the center, you can speed up the process of removing excess moisture. You can dry the sweater using an iron. To avoid damaging the fabric, it is recommended to iron the product through a piece of gauze folded several times. You can use a terry towel, but with each new ironing you should cover the jacket with the dry side.
Another method that cannot always be used to make a sweater smaller; in most cases, it is suitable for those products that were independently knitted. You can unravel the stretched part and then bandage it. To avoid having to unravel the entire sleeve if only the cuff is stretched, it is recommended to give preference to a needlework style that involves knitting from the elbow to the hand. There are fewer problems with the neck. In most cases, it is knitted separately from the body of the sweater and then sewn on.
How to shorten the sleeves of a jacket with cuffs
As with lining and buttons, cuffed sleeves are often found on denim jackets. To shorten such a sleeve, follow these steps.
The presence of a cuff makes shortening the sleeve somewhat more difficult, but even a beginner can cope with this procedure
- Measure the required length on the sleeves of the jacket using a chalk.
- Remove the cuffs from the sleeves using scissors.
- Pin the sleeves of the jacket along the shoulder and side seams.
- From the control mark at the bottom of the sleeves, subtract the width of the cuffs and add 1 cm to the seam: cut the sleeves at this mark.
- Pin the sleeves at the bottom just above the marked line.
- Trim the excess, straighten the cut line.
- Open the cuffs of the jacket, iron them and cut them along new contours.
- If the cuffs have elastic, leave a small hole for it.
- Fold each cuff in half lengthwise and machine stitch the layers of fabric together.
- Finished cuffs are attached to the new sleeve line using a sewing machine.
- Finally, insert the elastic into the cuffs, sew the ends together and straighten the cuffs.
Sewing the shirt at the shoulders
There are two ways to change the shoulder size.
Without using ripping
You need to do the following:
- Step 1. Using a measuring tape, measure the required length from the collar to the far shoulder line, draw a line here.
- Step 2. Draw with chalk a place for the future seam, which should end at the edge of the armpit line.
- Step 3. Fold the item in half and cut the fabric along the drawn line. If the instructions are followed correctly, the sleeves and body of the shirt should become separate pieces.
- Step 4. Pin the cut sleeve with the back and front. It is necessary to connect the parts so that there are no holes. Remember that the armhole size has become larger.
- Step 5. Sew the joined parts and iron. The product is ready to wear.
By tearing
You need to do the following:
- Step 1. Determine your desired shoulder length and mark it on the fabric. It is also necessary to draw a line that will be parallel to the seam of the sleeve.
- Step 2. Remember to check for symmetry, otherwise the sleeves will be different sizes.
- Step 3. At this stage, you need to open the seams and carefully flog the sleeves.
- Step 4. After cutting off the excess fabric, connect the sleeves and openings for them. Then the parts need to be double stitched.
For more precise instructions, use this video tutorial.
In order to rip the seam correctly and accurately, use a special seam ripper. To do this, insert its thin tip under the thread and pull it up. Do this operation with each stitch.
Remember that you can only rip a seam on one side.
Seam, needle forward
You can hem this part with a seam similar to machine stitching. This is the most reliable of the hand stitches:
- Insert the needle into the tissue, then after 5 mm bring it forward.
- Insert the needle again, stepping back from the needle exit point by 3 mm.
- Pull the needle out at a distance of 6 mm (= double stitch length).
- Then bring the needle to the point of the first needle withdrawal and bring it out again at a distance equal to twice the length of the stitch, continue in the same way from right to left, as in the figure.
Another type of stitch, which is performed from right to left, will help to hem unnoticeably.
How to prevent things from stretching?
Delicate fabrics should be washed according to the manufacturer's recommendations. Do not increase the water temperature and the number of spin speeds. When washing by hand, it is recommended to avoid prolonged soaking, for several hours. It is better to remove difficult stains using special products designed for delicate fabrics.
When washing, you can add conditioner to the water. It will make the fabric soft and less susceptible to deformation. Additionally, it is recommended to use water that has passed through a purification filter.
In addition to spinning at high speeds in the washing machine, delicate items are afraid of twisting. Fabric stretching also occurs if items are dried vertically. For this reason, sweaters and cardigans should not be hung on trempels or secured to a clothesline with clothespins. In a closet, it is recommended to store such things on a shelf, especially if they are heavy.
To avoid having to make the sweater smaller, when wearing it, it is recommended to give up the habit of pulling the sleeves, trying to cover the hands with them. In this case, it is recommended to immediately purchase a product whose style implies a lowered (elongated sleeve).
You need to take off your sweater correctly. To prevent it from stretching, it is recommended to take the product by the bottom edge and, using the method of turning it inside out, lifting it up, remove it over the head at the same time as the sleeves.
Unraveling the knitted item from the bottom
The structure of knitting fabric with knitting needles is such that it can be unraveled not only from the top of the knitting, but also from the bottom. If you need to unravel the knitting at the top, then this is easy. Remove the knitting from the knitting needles and pull the thread, unraveling the fabric to the desired location. But what to do if you need to unravel the bottom of the product? There are two ways to bloom from below.
To unravel the product, it is better to use circular knitting needles. The product is strung on knitting needles and moved onto a flexible cable. It is more convenient to work with a flexible cable than with a rigid straight knitting needle. The needles should be approximately 1 number smaller than the needles you used to knit the main fabric.
1 way. Cut one thread from the bottom.
Using this method, you don’t have to catch the loops and you can continue knitting with the thread remaining after unraveling. With this method, thread damage is minimal. So, let's look at this method in more detail.
1. Determine the place to which we want to dissolve.
2. We string the loops of the row to which we want to unravel onto a knitting needle. This must be done very carefully, without missing a single loop. We insert the knitting needle into the loop from front to back and bring it out from back to front between the loops.
This is what should happen in the end. All loops are cast on a knitting needle.
3. We cut the thread before reaching the beginning of the strung row. You need to leave a little thread so that you can later tie the ends of the thread for later work.
4. Carefully unravel the product, loop by loop. If you have a small canvas width, then you will not have any problems with unraveling. If the width is large enough, then during the unraveling process the end of the thread will become large and will complicate the unraveling process. In this case, you can trim the thread periodically. Of course, in this case there will be losses in the yarn, but they will not be as significant as if you cut the product. If you don't want to cut the thread, you will have to put a little more effort into separating the top of the fabric from the bottom.
5. After you have completed separating the upper part of the fabric from the lower part, you have the upper part on the knitting needle and you can continue working with it.