Share on social media networks:
It's hard to believe now that mobile devices were the easiest way to connect with other people. Now an ordinary mobile phone has turned into a high-speed smartphone with enormous multimedia functionality, and the case has begun to store the power of a good computer inside it. Using devices is very addictive and some people don’t even take a break for at least a short time. This kind of use takes a toll on charging, and constant recharging can damage one of the phone's most important connectors. You will learn how to fix the phone charging socket if it is broken in today's article.
Is it possible to repair the charging module socket?
How to fix the charging port on your phone at home? You need to figure this out thoroughly, then everything will work out. Careless use of a mobile device very often ends in some kind of breakdown that needs to be fixed. Sometimes the breakdown lies in the connector for connecting the power cable. In this case, you need to find out how to fix it, and for this you should familiarize yourself with the main causes of the defect.
The main reasons for device socket failure:
- You can spill some liquid on the device or simply drop it thoroughly to disable this module.
- Constant mechanical stress deforms the socket, which can make charging the gadget simply impossible - the plug will not fit into the connector or will dangle in it, in which case the socket will need to be replaced.
- The contact pads may also bend, which will completely block access to electricity.
Let's talk right away about the worst thing - moisture.
Contact of a mobile phone connector with moisture is the most dangerous damage. Corrosion will start a chain reaction and all neighboring components will oxidize. This kind of defect can also damage the speaker, which is most often located in the lower part of the device. Also, the speaker itself allows moisture to enter the cable or connector. Therefore, even light rain can damage your phone.
Important! Find out what can be done, whether it is possible to revive the gadget if a more serious problem befalls you - the phone fell into the water and does not turn on.
The most important thing is to assess the complexity of the damage, since not all cases allow for home repairs. The best option is to use the services of a qualified specialist from a service center. This way you won’t risk breaking your device.
Is it possible to repair the device at home?
Very rarely restoration work can be carried out independently. It is best to find an alternative charging method for a while until you decide for yourself whether to repair it yourself. While you are saving the necessary amount for repairs in the workshop, read the instructions for charging a phone with a broken socket:
- Insert the charger into your smartphone and plug it into the network.
Important! This method is only relevant for devices that have suffered from mechanical stress, and not from moisture.
- Carefully move the cord and device in different directions. You may be able to close the contact and charge the device.
- If the mobile phone nevertheless detects the presence of a charger, then it is worth recording the found position. Books and other items can be used that can install the phone so that the power continues.
- Before carrying out all these actions, you should make sure that the problem is in the socket and not in the battery. Using your phone for a long time causes it to no longer hold a charge. In this case, you will have to get a new battery rather than deal with a “phantom” breakdown.
- If the problem is still in the nest, then repairs cannot be avoided. If the socket is moving away from the tablet or the USB input is loose, try changing the socket itself or replacing the cable.
Important! Remember that all these manipulations can further loosen the socket, so do not use too much force during the work.
If everything is fine with the connector now, but the problem of lack of energy in the battery still does not disappear, read about what to do if the phone does not charge when charging.
Consumables
In addition to tools, you will need consumables. For soldering we will use acid-free (neutral) flux and solder paste. They are easy to buy in the appropriate store or order online on Ali.
Neutral flux (left) and solder paste
To dismantle the socket part using a soldering iron, you will need thin lead-tin solder with a lower melting point. To remove solder residue from the tracks, copper braided shielding is useful. If we work with a hair dryer, we will have to additionally buy thermal insulating (Kapton or foil) tape to protect nearby parts from overheating and spontaneous desoldering.
Important! Very often, instead of conventional solder, many people use low-melting alloys Rose or Wood. I would really not recommend doing this even when dismantling the socket, since these alloys are too fragile, and it will not be possible to completely clean them from the tracks after removal. Soldering, even with a minimal admixture of these alloys, will crack within the first week of operation of the gadget.
We will do the washing with Galosh gasoline, isopropyl or ethyl alcohol, having previously sealed the critical components that are afraid of liquids (microphone, camera, etc.) with ordinary tape. Just in case, we’ll stock up on single-core copper wire with a diameter of 0.2–0.3 mm. He will help us if the fault lies in broken tracks. You can get such a wire from a regular stranded wire by simply removing the insulation from it. Of course, in this case you will also need a scalpel or a sharp knife.
A core of such wire will be useful for solving the problem of torn tracks and contact pads
Healthy! Enameled winding wire should not be used, since in order to tin it, you must first mechanically clean off the enamel. But doing this more or less efficiently is very difficult, especially if you are not a specialist.
Alternative charging method
If the design of your phone allows you to remove the battery, then you can use a universal charger. Such devices are called “Frog”. It is, of course, not very cheap, but sometimes you urgently need to charge your phone. This gadget has special grooves into which you need to insert and secure the battery.
But this method also has a number of obvious disadvantages:
- While charging, the smartphone will not work and cannot be used until the battery is charged.
- The purchase price of “Frog” is quite high and does not always justify its purchase.
- If the manufacturer's reputation is very dubious, then you will only harm your device.
Portable speaker does not charge: reasons
First of all, I would like to dwell on the reasons why the device may not charge. These include:
- Damage to the Micro-USB cable. Portable speakers use a cord that combines several outputs: Micro-USB, USB and 3.5 mm mini-jack. For this reason, one of the main wires can easily become bent or detached. As a result, current will not be transmitted through the cable and supplied to the device’s battery. To perform the test, just use another cord of a similar purpose - they are found in all modern chargers.
- Damage to the Micro-USB input on the speaker. First of all, you should make sure that no foreign objects or dirt get there. You may need to bend one of the pins to make it fit better on the plug. If such manipulations do not help, then you will have to seek help from a technician or a service center under warranty.
- The battery is damaged or has exceeded its service life. This reason is very easy to identify: when the cord is connected to a power source, the speaker works, but immediately after disconnecting it stops. This means that the built-in battery does not hold a charge and should be replaced. Depending on the design of the device, the battery may be removable or non-removable. In the first case, the replacement is easily carried out independently, in the second, you will need to contact a specialist.
In addition to the reasons listed, it is possible that the power controller or other internal element may fail.
We charge the device directly
How to fix the phone charging connector? You can try to replenish your energy reserves by disconnecting the power port itself from the phone.
Important! This method is very complex and requires the user to have basic knowledge and skills in working with equipment and electricity.
The essence of the work is as follows:
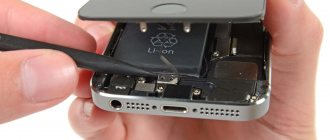
- We remove the battery from the smartphone.
- We unplug the charger from the outlet, arm ourselves with a sharp object and remove the insulation from the wire about five centimeters.
- Strip the wires and determine where the plus is and where the minus is.
- Determine the polarities on the battery and connect the wires to it.
- Fix the improvised terminals and supply power from the network.
Important! It is not recommended to resort to this method, since you may get hurt even while charging. Do not work with wires without insulation if you have never done this before and do not know how electric current behaves.
Video: how to replace the power connector on your phone
Found an error in the text? Select it, press Ctrl + Enter and we will fix everything!
Good day! Please tell me how can I charge the non-removable battery on the Alcatel One Touch Pop 5 smartphone?
They refused to repair the nest because... The display is cracked, and I need to get the information out of it.
No duplicates found
There, the board with the socket is removed very easily, the display is not affected. maybe contact another service?
I will support my friend. The display on this model does not sit on the body frame, but on the main frame, onto which the battery is glued and the motherboard is screwed on. If the service is not accepted, find another service where your hands are not out of your ass. Well, or wherever I applied - they just don’t want to deal with minor repairs.
Thank you, it’s easier to just take it apart yourself and give the board back
I’ve had this situation happen a couple of times, the first time I got it out with pins (I pushed it under the cambric), the second time it was completely banal - two alligator clips.
I charged without desoldering the battery.
Py. Sy. With this charging method, it is strictly forbidden to turn on the phone gadget while the charger is connected.
Thank you all so much!
I live in a village, so to speak, there are 2 craftsmen, both refused and said that there was a high chance of breaking the display. I want to send the information to Yandex disk
Thank you very much, the video was very useful. With coming.
Give it to normal specialists? Or is such an extreme method not considered?
Well, this is not necessary, the main thing is that Wi-Fi or 3G works
laboratory worker or frog
well it's natural =)
Do-it-yourself repairs
You need to act very carefully if you decide to fix the phone charging socket with your own hands.
To disassemble the case and remove the socket we will need:
- A small set of screwdrivers.
- Technical tweezers (ordinary tweezers will do).
- A stationery knife or a regular sharp one.
- Soldering Station.
Now you need to do the following:
- Unscrew all the screws that secure the housing.
- Carefully remove the cover by prying it off with a utility knife.
- We ground the soldering iron, solder the wire to the negative (device body). The second end of this wire must be connected to the body of the soldering iron itself.
Important! These measures are necessary to ensure that the mobile phone does not suffer from the accumulation of static electricity, which can damage parts. It would also be a good idea to make an antistatic wrist strap and ground it.
- Now we unsolder all the wires from the socket. This is necessary to prevent short circuits.
- Next, you need to remove the screws from the board that hold it in place. Now we have access to the microUSB connector.
- We take out the old socket, solder a new one in its place, assemble the device in reverse order and check its functionality.
You might also find our instructions on how to clean your phone's headphone jack useful.
Share on social media networks:
It's hard to believe now that mobile devices were the easiest way to connect with other people. Now an ordinary mobile phone has turned into a high-speed smartphone with enormous multimedia functionality, and the case has begun to store the power of a good computer inside it. Using devices is very addictive and some people don’t even take a break for at least a short time. This kind of use takes a toll on charging, and constant recharging can damage one of the phone's most important connectors. You will learn how to fix the phone charging socket if it is broken in today's article.
What tools are needed
To replace the connector yourself, we will need the following tools:
- thin tweezers;
- tools for disassembling a mobile device (depending on the type and model of the gadget);
- soldering hair dryer (if the connectors will be replaced with its help);
- holder for boards of one design or another (preferably);
- head lens or tripod lens;
- soldering iron with a power of 25 W with flat thin (diameter 0.8 mm) tips.
Healthy. It is better to buy a set of tips of different shapes for a soldering iron for such work. They are inexpensive, but allow you to perform a variety of operations.
Is it possible to repair the charging module socket?
How to fix the charging port on your phone at home? You need to figure this out thoroughly, then everything will work out. Careless use of a mobile device very often ends in some kind of breakdown that needs to be fixed. Sometimes the breakdown lies in the connector for connecting the power cable. In this case, you need to find out how to fix it, and for this you should familiarize yourself with the main causes of the defect.
The main reasons for device socket failure:
- You can spill some liquid on the device or simply drop it thoroughly to disable this module.
- Constant mechanical stress deforms the socket, which can make charging the gadget simply impossible - the plug will not fit into the connector or will dangle in it, in which case the socket will need to be replaced.
- The contact pads may also bend, which will completely block access to electricity.
Let's talk right away about the worst thing - moisture.
Contact of a mobile phone connector with moisture is the most dangerous damage. Corrosion will start a chain reaction and all neighboring components will oxidize. This kind of defect can also damage the speaker, which is most often located in the lower part of the device. Also, the speaker itself allows moisture to enter the cable or connector. Therefore, even light rain can damage your phone.
Important! Find out what can be done, whether it is possible to revive the gadget if a more serious problem befalls you - the phone fell into the water and does not turn on.
The most important thing is to assess the complexity of the damage, since not all cases allow for home repairs. The best option is to use the services of a qualified specialist from a service center. This way you won’t risk breaking your device.
Is it possible to repair the device at home?
Very rarely restoration work can be carried out independently. It is best to find an alternative charging method for a while until you decide for yourself whether to repair it yourself. While you are saving the necessary amount for repairs in the workshop, read the instructions for charging a phone with a broken socket:
- Insert the charger into your smartphone and plug it into the network.
Important! This method is only relevant for devices that have suffered from mechanical stress, and not from moisture.
- Carefully move the cord and device in different directions. You may be able to close the contact and charge the device.
- If the mobile phone nevertheless detects the presence of a charger, then it is worth recording the found position. Books and other items can be used that can install the phone so that the power continues.
- Before carrying out all these actions, you should make sure that the problem is in the socket and not in the battery. Using your phone for a long time causes it to no longer hold a charge. In this case, you will have to get a new battery rather than deal with a “phantom” breakdown.
- If the problem is still in the nest, then repairs cannot be avoided. If the socket is moving away from the tablet or the USB input is loose, try changing the socket itself or replacing the cable.
Important! Remember that all these manipulations can further loosen the socket, so do not use too much force during the work.
If everything is fine with the connector now, but the problem of lack of energy in the battery still does not disappear, read about what to do if the phone does not charge when charging.
If the tracks are broken
Often the conductive paths or contact pads under the connector are broken. This can happen both during operation of the part and during dismantling. In the first case, the tracks come off in attempts to “find contact” by pulling the plug in the socket. In the second - in case of underheating (the pads break off along with the connector) or overheating (the foil simply flies off the textolite substrate).
How to be in this case? Most often, the problem can be solved using a soldering iron with a thin tip and a single-core wire with a diameter of 0.2 mm (see the “Consumables” section). We strip the installation wire and extract one core from it. We service it carefully. We install the new connector with a hairdryer or soldering iron. Then solder one end of the wire to the socket contact, and the other to the place closest to the break. Here we are lucky - there are spots nearby that are easy to solder to. If they are not there, then you will have to clean the torn tracks from the varnish, tin them and solder to them. A little more complicated, but also possible.
We wash the “Galoshes” and study our work. If everything is visually beautiful, then we strengthen the nest with compound. Apply it from a syringe and heat it with a hairdryer for a minute at 180 degrees. The compound will strengthen the entire structure, since several contacts practically do not hold onto anything, which means the connector will have play.
Expert opinion
Alexey Bartosh
Specialist in repair and maintenance of electrical equipment and industrial electronics.
Ask a Question
Healthy! If you need to dismantle the connector, the compound can be easily removed by heating it with the same hairdryer at a temperature of 300 degrees Celsius.
Alternative charging method
If the design of your phone allows you to remove the battery, then you can use a universal charger. Such devices are called “Frog”. It is, of course, not very cheap, but sometimes you urgently need to charge your phone. This gadget has special grooves into which you need to insert and secure the battery.
But this method also has a number of obvious disadvantages:
- While charging, the smartphone will not work and cannot be used until the battery is charged.
- The purchase price of “Frog” is quite high and does not always justify its purchase.
- If the manufacturer's reputation is very dubious, then you will only harm your device.
How to charge a gadget via USB
In many cars, hotels, cafes and shopping centers, USB connectors are located next to regular outlets. They are designed for charging phones, tablets and other modern devices.
The advantage of charging terminals in shopping centers is that they do not require a mandatory order, as in a cafe, and are able to connect a large number of devices simultaneously
There is only one big “but”: this way the gadget charges very slowly. If we talk about a specific time ratio, then using a socket, you will speed up the process three times.
However, if you left home with a laptop and a smartphone, and now you need the second one much more than the first, you can use USB charging. Just connect your devices and let your computer share power with your mobile phone.
We charge the device directly
How to fix the phone charging connector? You can try to replenish your energy reserves by disconnecting the power port itself from the phone.
Important! This method is very complex and requires the user to have basic knowledge and skills in working with equipment and electricity.
The essence of the work is as follows:
- We remove the battery from the smartphone.
- We unplug the charger from the outlet, arm ourselves with a sharp object and remove the insulation from the wire about five centimeters.
- Strip the wires and determine where the plus is and where the minus is.
- Determine the polarities on the battery and connect the wires to it.
- Fix the improvised terminals and supply power from the network.
Important! It is not recommended to resort to this method, since you may get hurt even while charging. Do not work with wires without insulation if you have never done this before and do not know how electric current behaves.
We use the "frog"
Another option is to purchase a universal device. In everyday life it is called “crab” or “frog”. Even a device with a completely defective power connector can be charged with a “frog”, because the current flows directly to the battery terminals.
The frog is a plastic case equipped with a plug that is inserted into an outlet. It also has a place for mounting batteries and a pair of movable “legs”. Having inserted the battery into the socket, the tabs are connected to the terminals, observing polarity. A frog plugged into an outlet effectively charges your phone.
The method has several disadvantages:
- You have to spend money on buying “crab”. At the same time, a high-quality device is expensive (more than you will have to pay for service).
- Low degree of security, especially when using inexpensive devices. Cheap crafts from unknown “craftsmen” from China will not burden your pocket, but no one can guarantee the safety of the battery.
- While charging is taking place, you will not be able to use the phone.
Do not leave the “crab” inserted into the outlet unattended. Periodically (every 20-30 minutes) check whether the battery is swollen, whether the case is overheated, and whether the charge indicators are on. These simple measures will help protect your home from fire.
A much safer charging option that bypasses the connector is to use a wireless charging station. But such technologies are supported only by the latest generation devices.
We recommend: Cleaning your laptop from dust yourself
Do-it-yourself repairs
You need to act very carefully if you decide to fix the phone charging socket with your own hands.
To disassemble the case and remove the socket we will need:
- A small set of screwdrivers.
- Technical tweezers (ordinary tweezers will do).
- A stationery knife or a regular sharp one.
- Soldering Station.
Now you need to do the following:
- Unscrew all the screws that secure the housing.
- Carefully remove the cover by prying it off with a utility knife.
- We ground the soldering iron, solder the wire to the negative (device body). The second end of this wire must be connected to the body of the soldering iron itself.
Important! These measures are necessary to ensure that the mobile phone does not suffer from the accumulation of static electricity, which can damage parts. It would also be a good idea to make an antistatic wrist strap and ground it.
- Now we unsolder all the wires from the socket. This is necessary to prevent short circuits.
- Next, you need to remove the screws from the board that hold it in place. Now we have access to the microUSB connector.
- We take out the old socket, solder a new one in its place, assemble the device in reverse order and check its functionality.
You might also find our instructions on how to clean your phone's headphone jack useful.
Today it’s hard to believe that just 15 years ago mobile devices were very primitive and were only needed to make calls to other people. Today, a stylish smartphone with a bunch of functions is quite common, and in terms of its technical characteristics, such devices are not far behind powerful computers. Many people are fascinated by the capabilities of mobile phones, so they never part with their gadgets. Such intensive use requires constant recharging, and regular use of a charging smartphone quickly leads to damage to the corresponding port. Today we will talk about how to fix the smartphone charging socket if this important part is broken.
Replacement with a hair dryer
Now let's move on to the question of how to fix the charging connector. First, let's try to make a replacement using a soldering gun. We disassemble the smartphone and inspect the components located next to it. In our example, there is a camera made of ordinary plastic located very close by. When you remove the socket with a hairdryer, it will simply melt.
If the camera is removable, then remove it by disconnecting the cable. If it is soldered or other non-removable components are located nearby, seal them with thermal tape.
We apply soldering flux to the mounting and interface contacts and heat it with a hair dryer set at 360 degrees Celsius. We will warm it up in a circular motion.
Periodically check with tweezers to see if the solder has melted. As soon as it melts, the connector can be removed from the board.
Important! If there are other elements located near the socket, we try not to overheat them so as not to desolder. If you are not sure, seal them with thermal tape.
Now, using a soldering iron, we apply a small amount of lead-tin solder to the mounting and interface pads. This will lower the melting point of the standard lead-free material, allowing you to solder the socket at a lower temperature. Otherwise it may melt.
Expert opinion
Alexey Bartosh
Specialist in repair and maintenance of electrical equipment and industrial electronics.
Ask a Question
Healthy! If you irradiate the mounting pins and interface contacts with tin-lead solder before dismantling, the temperature of the hair dryer can be reduced to 300–320 degrees. This temperature is enough to dismantle the tinned connector, but not enough to melt the factory solder with which the remaining components of the circuit are soldered.
We set the hair dryer thermostat to 300 degrees and heat the seat. As soon as the solder melts, we install the connector in place, warm it up slightly, press it with tweezers, making sure that the contacts in the socket recess coincide with the interface pads on the board.
The mounting contacts are soldered, all that remains is to solder the interface ones. To do this, apply just a little solder paste to them and heat them with a hairdryer. The temperature is the same - 360 degrees.
If we apply too much solder paste, adjacent contacts may become soldered. We immediately pass between them with tweezers, or even better, with a soldering iron with a thin tip.
Since the soldering flux is acid-free, it does not need to be washed off. We connect the device to the charger, then to the PC to determine the operation of the interface contacts. If everything is in order, then the work can be considered completed.
Healthy. Replacing a Type-C connector is no different from replacing a microUSB. We do everything exactly the same, there are just a lot more interface contacts - you have to use a good magnifying glass and tinker.
A little theory
According to science, the process of filling modern lithium-ion energy storage devices occurs in two stages:
- The power controller chip passes direct current until the terminal voltage is between 4.2 and 4.33 volts.
- When the calculated charge reaches approximately 85% of the full capacity, the current gradually decreases to 15-30 milliamps (at 97-100%), while the voltage is maintained at 4.2V.
What does the process look like in general?
The smartphone “understands” that it’s time to start charging when the output voltage reaches the critical limit of 3.5V-3.6V. This value corresponds to 0% on the indicator, in the usual “coordinates” in Android or iOS.
It must be remembered that the % in the upper right corner is a relative value calculated mathematically by the driver from the current output voltage value and the hypothetical capacity of the power supply. Over time, due to the aging of the element, the occurrence of irreversible chemical processes and, in general, degradation of the material, the thresholds shift downward, so calibration is required. Without this, the battery may begin to discharge abruptly (jerks), for example, work for a long time at 50-60%, and then instantly go to zero.
Main consumers in mobile technology
Now food for thought. A cell phone consists of many modules, but the main consumers in modern mobile phones are:
- Camera - up to 600 mA,
- Wi-Fi in network scanning mode and active data transfer - 100-300 mA,
- Processor under active load (in our example, the CPU is used to draw maps) - 100-300 milliamps,
- Display with maximum backlight level - 100-300 mAh,
- GPS chip in satellite search mode - 200-300 mA,
- Camera LED flash - 150-200 milliamps.
Taken together, this results in high energy consumption when actively using technology, for example, as a power-hungry navigator or video recorder in a car.
Total:
- if you turn on the backlit camera on your mobile phone,
- resource-intensive application with high traffic consumption,
- turn up the display brightness (especially amoled) to maximum,
Peak consumption will be 1.7 amperes per hour
If you use a 1 amp charger or a heavily damaged USB cable, the battery will be discharged rather than charged.