In everyday life, situations often arise when chair repairs are required. DIY repairs are much cheaper than calling a professional. It is necessary to find out the cause of the breakdown and select the right tool. Many people are interested in how to glue a wooden chair. It is worth taking a closer look at the materials needed to repair furniture. Wooden chairs with upholstered seats require a different approach than products made entirely of wood. Let's look at how to restore this furniture yourself.
Causes of breakdowns
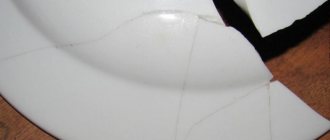
Before you look for how to glue a wooden chair together, you need to understand what caused the breakdown. This type of furniture consists of many parts that are attached with glue. Over time, the joints become unstuck. It happens that the legs move away from the harness. They are usually attached using spikes.
Some products may have manufacturing defects. A man sits on a chair with wooden legs and falls because one of the legs falls off. Don’t think that furniture is no longer usable and should be in a landfill. Breakdowns of this type can be easily repaired with your own hands without spending a lot of money on repairs.
From boring to bright
These soft-seated examples did not fit into the owners' new dining room. They were repainted in a rich color and looked great against the dark gray background of the walls. The remodel took 4 hours, not including paint drying time.
Tools and materials
To remake 2 chairs you needed:
- furniture stapler with 9.1 cm staples;
- screwdriver or screwdriver;
- shellac-based aerosol primer (1 can);
- spray paint (1 piece);
- thick fabric (3 meters);
- scissors;
- protective film, glasses, gloves.
Step-by-step instruction
Let's start the transformation:
1. Remove the seat by unscrewing the mounting bolts. You will need a screwdriver or screwdriver.
2. We take the products outside and lay them out on film. We prime them and leave them until completely dry, following the instructions.
3. Spray the paint evenly, holding the can at a distance of about 20-25 cm. The paint layer must dry completely.
4. Place the seat on the fabric and trace it, leaving an allowance of about 12 cm. This should be enough to fold the fabric at the edges and secure it with a stapler.
5. Fasten the fabric over the old seats using a furniture stapler. First we fix the front edge, then the back and only then we pull it on the sides. We bend the corners with neat tucks.
6. We screw the finished seats to the updated chairs. Work is done!
What glue should I use for repair work?
If a wooden chair is broken, then it is recommended to use the best wood glue for repair. Nowadays the greatest demand is:
- "Kleyberite."
- "Moment" carpentry.
- "Trebond."
Professional carpenters put forward the following requirements for glue:
- It must be resistant to sunlight.
- Universal to use.
- The adhesive connection must be strong.
- It is recommended to use moisture-resistant glue.
- There should be no sticky residue left on the surface.
- Should not be toxic.
If you ask a professional craftsman how to glue a wooden chair, he will probably recommend using epoxy glue. It is best suited for wood products. PVA glue can be used. Some people use a two-component composition.
From gloomy to romantic
This chair will fit perfectly into the Provence or shabby chic style, as well as into the children's room of a little princess. Decoupage furniture is one of the popular ways to transform boring objects. You can use not only napkins, but also posters, cards and images printed on a color printer.
Tools and materials
For the transformation you will need:
- white spirit or any other degreasing liquid;
- fine grain sandpaper;
- primer for wood and cardboard;
- acrylic paint;
- varnish glue for decoupage;
- napkin;
- sponge, brushes, roller;
- gilding for decoration (at your discretion).
Step-by-step instruction
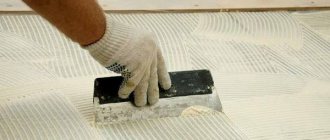
1. Thoroughly clean the stool of dirt. If necessary, we grind, making the surface rougher for better adhesion. If necessary, tighten the fastenings. Degrease the product.
2. Cover the chair with primer, and after it dries, sand it until smooth. Dust must be removed.
3. Apply acrylic paint. A brush works well for corners and seams, and a small roller works well for the back and seat.
4. Separate the top layer of the napkin, cut out the pattern, apply it to the seat and cover it with decoupage varnish.
5. After the varnish glue has dried, paint the edges with background paint to create a smooth transition.
6. If you wish, you can complement the decor with golden artistic paint.
How can a leg be repaired?
When people ask how to glue a wooden chair together, they often think about repairing the legs. This part is easy to install; it is important to choose the right tool. You should follow the step-by-step instructions:
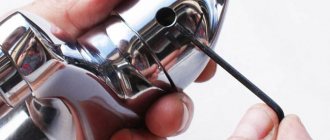
- The loose leg must be removed from the socket. You need to remove the old layer of glue from the surface. If it is firmly stuck to the leg, you can try to steam it using a boiling kettle.
- If the old glue forms a thin layer, it can be removed with sandpaper.
- It is necessary to apply a layer of fresh glue to the surface of the leg and install it in the socket. For better adhesion, you can tap with a hammer from above. It is important to use a rubber grip on the hammer.
- If the glue has leaked onto the visible part of the leg, it must be removed with a damp cloth.
- Before using the furniture, you need to make sure that the glue is completely dry. To do this, you should wait 24 hours.
Why is this necessary?
It seems that the very first question that every person who is going to restore an old chair will hear is: “Why is this necessary?” Indeed, isn’t it easier to buy new furniture and just throw the old one in the trash?
It couldn't be easier! In fact, the chairs that were made some 60-70 years ago are much stronger and more reliable than those that you now see in stores. At that time, all goods were produced conscientiously, and what was more important for the manufacturer was not crazy revenues, but the high quality and durability of the products. So it’s not surprising that Soviet chairs, even after so many years, are still found in garages and dachas, albeit a little rickety and shabby. They will outlive us all!
Modern interior with Soviet furniture
In addition, vintage is coming back into fashion, and interiors in the spirit of the USSR have become very popular. Even the “stylish, fashionable, youth” now use either a “grandmother’s” secretary or an old “grandfather’s” radio to decorate their homes. What's worse than the old Soviet chair? Trick him and everything will be as good as new.
You can also note one more reason: do you want something reliable and durable? Do it yourself! Everything is always done efficiently for yourself, isn’t it?
Well, restoring old chairs is an opportunity to create unique designer items that no one else has. Do you agree that standing out from the crowd is fashionable now?
Originally restored old chairs
So, let's see how you can restore an old chair without much effort. In fact, of course, you will have to work hard, but believe me, the result will definitely be worth all the time and effort.
Restoration of a Viennese chair
If you have such products in your dacha or apartment, do not rush to throw them away. Viennese chairs are outstanding masterpieces of industrial design. They were invented by the German furniture maker Michael Thonet, who lived in the 19th century. He made a real revolution in the furniture industry, creating laconic and elegant chairs from steam-bent wood. They could be packed in boxes and transported unassembled in 36 pieces, and assembled on site.
One of the most popular models – Model No. 14 – consists of 6 elements. Viennese chairs look natural in any space and are often used by designers in their projects. Such products are easy to find at flea markets and online services, restored and fit into a modern interior.
In our master class we will show you how to restore a Viennese chair, leaving the wood texture. After the update, this product looks truly luxurious.
Tools and materials
For restoration you will need:
- screwdriver;
- wood glue;
- 2 sheets of sandpaper (coarse and fine grain);
- wood putty;
- stain;
- varnish
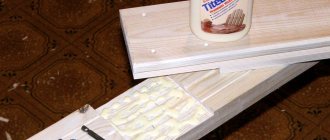
If the chairs have cracks, the parts need to be glued together using wood glue. The elements are clamped with clamps until completely dry and only then restoration begins. Cracked plywood on the seat should also be replaced, using the old part as a template.
Step-by-step instruction
1. We check the product for strength. We disassemble, drip a little wood glue onto the joints, and assemble. The chair should acquire good rigidity. We carefully sand the parts - it is more convenient to do this when the product is disassembled, but options are possible. First we use coarse-grained sandpaper, then fine-grained sandpaper.
2. Fill small chips and cracks with a special wood putty.
3. After the putty has dried, sand the product again. The cleaned chair already looks like new, but the wood needs to be protected.
4. Cover the chair with stain: it is better to take a high-quality composition so that there are no smudges.
5. After the stain has dried (refer to the instructions), the last stage begins: varnishing in 2 layers. It gives the product a noble shine and simplifies surface care.
6. The restored Viennese chair is very light, comfortable and has its own rich history.