The lacing of sneakers should not only be beautiful, but also durable. These are sports shoes designed for heavy loads, therefore they must be securely fastened on the feet. But at the same time, modern fashionistas who regularly play sports want to slightly diversify the appearance of their shoes.
It is not advisable to buy new sports shoes, but with the help of interesting lacing methods you can update even old sneakers that have become a little boring. We have collected different lacing options that anyone can easily master. They are reliable and will not come undone at the most inopportune moment of training.
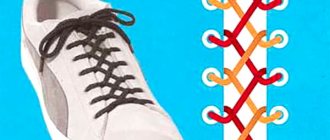
Lattice
1 / 0
2 / 0
fieggen.com
This beautiful weave of laces is quite popular. It looks best on shoes with an average number of holes: from six to eight.
- Insert the laces into the first holes from the inside.
- Cross and insert from the outside into fourths.
- Pass the first end into the second hole from the inside along the same side, and then from the outside into the fifth hole on the other edge.
- Insert the second end from the inside into the second hole on the same side, pass it under the lace of the first cross and insert from the outside into the fifth hole on the other edge.
- Pass the first end into the third hole on the same side from the inside. Pass the lace over the first cross and under the second and insert it into the sixth hole on the other side from the inside.
- Do the same with the other end.
- Tie a knot.
Basic ways to tie
Each method is distinguished by its simplicity and speed of tying. Anyone can master the skills of weaving.
Crisscross
This option for tying ribbons is considered simple and convenient. It is easy to handle not only for adults, but also for children.
Step-by-step steps to help you quickly lace your boots using the crossing method:
- Begin to pass the lace from the very bottom row. Its ends are brought out through holes (eyelets) to the outside.
- Take the left end of the ribbon and thread it through the opposite side.
- The right free end of the rope is inserted into the other opposite hole.
- As a result, the lace should cross.
Diagonal
The diagonal pattern on shoes looks beautiful and original. To tie your shoes using this method, you will need to perform a number of simple steps:
- First, pull one free end of the belt through the last hole from the outside. Then take the other half of the rope and pull it through the last hole from the bottom. As a result, one side that was drawn from the inside will be noticeable, but the other will not.
- Next, take the noticeable end of the rope and push it through the adjacent hole on the other side from the inside.
- An inconspicuous part of the lace is pulled out from below on the other side. The half of the belt that was not noticeable will be on the outside of the boot at this stage of work.
Cross above and below
This option involves alternating crossed ribbons above and below the holes. The finished pattern looks good on boots with a large number of eyelets.
The more holes, the more full-fledged drawings you will get.
This method works best for shoes with 5 eyelets:
- The braid is threaded from the inside of the eyelet, starting from the bottom.
- The free halves of the lace are crossed and pulled through the holes on opposite sides through the top.
- At the end of the work you should have two visible and two invisible crosses.
If the shoes have three holes, the operation pattern will be slightly different. The lace begins to be threaded from the inside of the eyelet. Then they cross the halves of the belt and push them through now from the outer part. The actions are repeated, creating a cross from the inside.
Straight
The straight type of lacing looks unusual on any classic shoe. The lines are parallel to each other. The number of holes does not matter. The only negative point is that the shoes will be difficult to tie.
The lacing process looks like this:
- the belts are drawn from above, so their ends will be inside;
- half of the left braid must be inserted from the wrong side through the adjacent hole on the same side;
- the right half of the ribbon is pushed through the first hole from the bottom on the same row;
- the left braid is passed from top to bottom in a parallel row;
- the right end of the ribbon is passed by analogy with the previous stage;
- lines are obtained parallel to each other;
- if there are free holes left, then repeat the steps according to the instructions.
See also
Beautiful styles and models of velvet dresses, what to wear with them
Reverse or military
This option for tying a ribbon on shoes is practical, quick and convenient. You need to tie it according to the following pattern:
- the ribbon is pulled out from above so that its ends are inside;
- they cross part of the braid and try to insert it into the adjacent empty eyelets from the inside to the top;
- the left side of the rope now needs to be squeezed through the top of the next hole in the same row;
- repeat the steps with the other half of the braid;
- The free edges of the rope are crossed and directed into the next holes on opposite sides.
Lattice
This lacing option requires more patience and labor. But it turns out an unusual pattern:
- The laces begin to be inserted from below, leading to the outer zone. Now they are crossing. After this, the halves are pulled through two empty holes and pushed through the top.
- The left side of the braid is pulled into the next hole in the same row from the bottom side. With the right half of the rope, the actions are repeated exactly the same.
- The left side of the braid is pulled into the second hole on the opposite side (it was missed in the previous steps). Repeat the steps with the other part of the lace.
- Now the left side needs to be inserted into the third pair of eyelets from the inner area. Similar steps are performed with the other end of the rope.
- The laces are pulled into the last pair of holes from the bottom to the top.
Web
1 / 0
2 / 0
fieggen.com
The web looks amazing and doesn't lose its shape. This lacing is difficult to tighten well. But if you do this, the shoe will fit snugly on your foot.
- Insert the laces from the inside into the second holes.
- From the outside, insert them into the first holes without changing sides.
- Cross and pass from the inside through the third holes. The cross should be on top of the first horizontal line of the laces.
- Slide under the first loops, cross and insert from the inside into the fourth holes. Each new cross must be above the previous one.
- Pass under the second loops and insert from the inside into the fifth holes on the other side, and then in the same way into the sixth.
Self-lacing sneakers
Self-lacing sneakers were first talked about in the movie Back to the Future. Since then, self-lacing shoes have regularly appeared on store shelves.
Self-tying laces allow you to adjust the shoe to your foot so that even non-standard feet feel comfortable. Nike released this pair. It should be noted that Nike is not the only “smart” shoe. So the modern buyer has a good choice of options.
To make the sneakers tighten themselves, a special motor is used. This design is controlled from a mobile phone and control keys located on the sole. Using the installed application, you can put on your shoes without even bending down to the floor.
The shoes themselves can change in size, although not dramatically. The maximum is half a size, but such improvement is also worth a lot, especially if your feet tend to swell in the evening.
Straight lacing with short ends
1 / 0
2 / 0
fieggen.com
Lacing with straight lines and without internal zigzag. Suitable for boots with an even number of holes, otherwise it looks messy.
Ideal for military, extreme sports and athletes. In case of injury, the straight lacing can be cut in a second and free the foot from the shoe.
- Pass the laces through the bottom holes on the outside. One end should be much longer than the other.
- Insert the first end from the inside into the sixth hole without changing sides. This completes the work with him. You should have a small ponytail left, just to tie a knot later.
- Pass the second end from the inside into the fifth hole on the same side and from the outside into the fifth hole on the other.
- In the same way - first from the inside, without changing sides, and then from the outside on the opposite side - thread the end through the second, fourth and third holes in turn.
- Pass the lace from the inside into the sixth hole without changing sides and tie a knot.
Standard lacing methods
Over the centuries of the existence of lacing, humanity has come up with various types of weaving so that the ribbons do not unravel and hold shoes in place. Many of them have become so familiar that they are regularly used in everyday life.
Classical
Not one, but two methods, which are equally popular, can be called classic.
First method:
- pass the ends of the lace through the lower holes in the shoes;
- pull the ends to the outside;
- cross and pass again through the higher holes.
According to this pattern, the lacing continues to the very top. This will allow the sides of the shoe to tighten and secure your foot.
The second method differs in that the lacing must be crossed alternately. Let's look at the method in more detail:
- the ends of the rope need to be pulled through a couple of lower holes, so that the ends are inside;
- cross them inside and pull them through the next couple of holes;
- pull the ends out, they also need to be crossed and threaded inward through the next holes;
- continue lacing until the end.
This weaving allows the laces to wear out less, which is especially important for sports shoes.
European
There is a separate way to tie sneaker laces like in Europe. The diagram looks like this:
- pass the ends of the lacing through the lower openings, bringing them out;
- lead one of the ends crosswise through the upper hole;
- send the other end through the hole that is located through one hole (also crosswise);
- Continue lacing in this way until the very end.
As a result, the look is attractive, and the process itself is simple and fast. The end result looks like a zigzag design that securely fastens the shoes.
By cutting the laces, the sweatpants will be easy to remove, which is especially important if a leg injury occurs and unnecessary manipulations only cause pain.
Without a bow
Lacing without bows will appeal to those who hate dangling lace loops. There are many ways to get rid of them. One of these methods has already been described - this is straight lacing with a hidden knot. But there are others, no less interesting. Let's look at one of the most popular:
- before you start lacing, a knot is tied at the tip of the lace, which will fix the side;
- pass the second tip through the upper opening outward;
- stretch it into the hole directly opposite, pushing the end inward;
- draw the tip diagonally out and in;
- At the end, thread the remaining lace through the lacing at the top. Next, tie a knot and trim the rest of the material.
With a bow "Butterfly"
Many people like to tie their shoelaces with a standard bow. But there are also more unusual and original options, for example “Butterfly”. This lacing method got its name due to its similarity to tying a bow tie. This lacing option looks cool and unusual, which is why it is popular among young girls.
This will work if your shoes have short laces. With their help you can achieve reliable fixation. How to do it correctly:
- the lacing is passed through the lower holes and brought inside;
- each end is pulled vertically to the next pair of holes, forming a “gap”;
- after the space, the tips are crossed and threaded into the higher pair of holes;
- the alternation continues until the end of the shoe.
The end result will be an interesting and very specific drawing that may not appeal to everyone. Also, the disadvantage of this lacing is the strong tightening, due to which the leg may feel discomfort.
Cobweb
Another way to tie laces on sneakers with a bow is the gossamer technique. It looks especially cool on sneakers with a lot of holes.
Instructions:
- the tips are passed through the holes from the bottom from the outside;
- Then two pairs of holes are passed through and the laces are threaded through the fourth pair;
- on the reverse side, the ends are threaded into the second pair (that is, it goes back);
- the ends are outside and threaded through the fifth pair;
- from the fifth, the laces return to the third pair, and after that to the sixth.
- weaving continues until the holes come to an end.
Crisscross
An interesting technology for attaching sneakers to your feet that everyone can use:
- the ends of the ribbon are threaded through the lower holes and crossed;
- crossed, threaded into the next pair of holes;
- weaving continues until the holes run out.
The technique is very simple and accessible to everyone. Its advantage is that the tension can be easily adjusted.
Double multicolor lacing
1 / 0
2 / 0
fieggen.com
You will need two pairs of laces in different colors. Choose contrasting colors and fairly short laces so that the bows are not very large.
- Insert the first laces into the bottom holes from the inside.
- Cross and pass through the third holes from the inside.
- Repeat the first steps with the second laces, only insert them into the second holes, and after crossing - into the fourth.
- Cross the first laces and thread them through the fifth holes from the inside.
- Do the same with the second ones, just insert them into the sixth holes.
- Now you have four ends, you can tie one creative knot or two regular ones.
Impact of lacing on performance
As a conclusion, we would like to draw the attention of readers to the fact that even scientists have studied the issue of lacing running shoes.
The method where you use all 7 holes on the shoe and loop the lace, as we described above, increases the efficiency of the sneaker. This conclusion was made by researchers at the University of Duisburg-Essen (Germany) after testing 20 experienced runners. Those who used the high lacing system with all seven holes found that they used the shoe's features more effectively.
Experts from Auburn University in the USA came to the same conclusion, having experimentally proven that 7-point lacing increases leg stability and improves running quality.
Wide crosses
1 / 0
2 / 0
fieggen.com
These lacings are difficult to tighten or loosen, so you shouldn't lace your shoes this way if you have to take your shoes off often. But it looks very original.
- Insert the laces into the first holes on the outside.
- Cross and thread from the inside into fourths.
- Cross again and insert into the third holes from the outside.
- Pass the ends under all the laces, cross them and thread them through the sixth holes from the inside.
- Tie a knot.
Fastening the ends
Tie ends make lacing easier and protect cuts. They are made mainly from metal and plastic, less often from rubber, leather, and thick cotton. Designer products are made from glass, semi-precious stones, brass, copper, alloys and even gold or silver.
If the tips have fallen off, you can strengthen the sections by wrapping them with tape or soaking them in glue (epoxy, wax). A more labor-intensive repair of laces is gluing a suitable metal sleeve or a piece of heat-shrink tubing (for insulating wires). The choice of method depends on the skills of the owner, the design of the shoes, the type of material, and the availability of a certain set of tools.
Sneakers are a versatile type of footwear that are predicted to have long-lasting popularity. They can be with laces or without laces - women's, children's and men's. Which option to prefer depends on individual taste.
Hexagram
1 / 0
2 / 0
fieggen.com
The lacing is quite loose: you won't be able to tighten it too much. But it looks super original - you are unlikely to see this on the street.
- Insert the laces into the first holes on the outside.
- Cross and insert into the fourth holes from the outside.
- Insert the laces into the third holes on the same side from the inside.
- Bring the first end over one edge of the first cross and then under the second and insert into the third hole on the other side from the outside.
- Pass the first end through the fourth hole from the inside, then into the opposite fourth hole from the outside, and into the third hole on the same side from the inside. Now both ends of the laces hang out of the third row of holes.
- Cross the ends. Pass the first end under the first cross and above the horizontal line and insert it into the sixth hole from the inside. Slide the second one over the first cross, under the horizontal line and over the second end, and insert it into the sixth hole on the opposite edge.
Twisted
4.1. "Reverse loops"
It forms a beautiful pattern of diamonds, but requires monitoring their size, since the laces often move out at the crossing points. Due to constant friction against each other, they wear out faster.
4.2. "Zip-zipper"
Reminds me of a large zipper. It is characterized by high tensile strength and is therefore ideal for training shoes.
4.3. "Vertical torsion"
Belongs to the category of the most creative. When using thick round white laces, it becomes even more decorative.
4.4. "Horizontal torsion"
Attracts attention with its unusual appearance. Characterized by tightening strength. It is unlikely that it will be possible to weaken it.
Lacing with pass
1 / 0
2 / 0
fieggen.com
Relieves pressure on the instep of the leg and provides mobility to the ankle joint. This lacing is suitable for people with high arches, who have pain in the upper part of their feet from wearing shoes for a long time.
- Insert the laces into the first holes from the inside.
- Cross and pass into the second holes from the inside.
- Do the same with the third holes.
- Pass the laces through the fourth holes on the same side from the outside, then cross and thread them through the fifth holes from the inside.
- Insert into the last holes the same way as at the beginning: from the inside after crossing.
To make it even freer, you can skip two holes. Then, instead of crossing at the fourth point, you pass the laces from the inside into the holes on the same side and only then cross them again.
How to tie laces on sneakers so they don't come undone
During running or intensive walking, the tape should not come undone or rub the foot, so you should use the classic and quick method for sports sneakers.
Once you have completed the cross lacing, make a loose knot near the last hole. Tie a kind of bow and hide the laces in your sneakers.
For Sport
- Start with the bottom section and thread the edges through the armholes.
- Push the left edge straight and up, and then pull it into the adjacent eyelet, entering it from below.
- Skip one hole and thread the ribbon through the top.
- Do the same with the left edge.
- Continue alternately until you reach the top loop.
The method is suitable for even pairs of holes and prevents snags while climbing mountains or through bushes.
For beauty
If ordinary knots no longer seem difficult to you, then you can go to an advanced level and master the “checkerboard” method, for which you will need 2 colors of long braid.
First make straight lacing in one color, and then wavy in another shade. Then wrap the first with the second lace and continue the vertical tie as long as the length of the product allows. True, this method of tying a braid, although beautiful, is not very practical, since it forms a weak fastener.
Hiking lace
1 / 0
2 / 0
fieggen.com
The laces even out the pressure on your foot and provide security: nothing will get caught in your laces because they are on the same side.
- Pass the laces through the bottom holes from the inside.
- Insert the first end into the second hole on the same side from the outside, then into the opposite second hole from the inside.
- Without changing sides, insert the first end into the fourth hole from the outside.
- Insert the second end into the third hole on the same side from the outside and into the opposite third hole from the inside.
- Pass the first end to the other side from the inside, insert it into the sixth hole on the same side and into the opposite sixth hole from the inside.
- Insert the second end into the fifth hole from the outside and into the opposite fifth hole from the inside.
- Now the laces are on the same side: in the fifth and sixth holes. Tie a knot.
You can tie it in two ways:
- For hiking - with a knot on the inside so that the laces do not catch on branches. The first end will be left on the left leg and right on the right.
- For cycling - with a knot on the outside so that the laces do not catch on the wheels. The first end is right on the left leg and left on the right.
Lacing by number of holes
For 4 holes
Lacing with 4 pairs of holes does not carry a large functional load and is used in summer collections. All traditional methods look good on such shoes, but you can introduce a fresh note by making the following pattern.
- The first jumper is the outer horizontal one.
- The ends cross on the inside and are brought out through the second holes.
- A vertical external jumper is made on both sides.
- The laces come inward from the third loop, cross and come outward from the last pair.
For 5 or more holes
Sneakers with 5 or more holes can be laced with different types of straight and cross lacing. But some methods look neat only with an even number of pairs . For example, the “stripe” pattern is used more often on shoes with 6 and 8 pairs of eyes.
- The first jumper is external.
- The left side of the lace is threaded vertically from the inside into the next eyelet. A horizontal jumper is made in the second row.
- The right lace is threaded through the third eyelet from the bottom and a straight jumper is made.
- Lacing in the next rows continues according to the same principle.
Elements of a straight strip can be diversified with cross diagonals on the last pair of holes. The combination according to the XIXI pattern is called Roman lacing and looks good on rulers with 5 and 7 loops.
Ladder
1 / 0
2 / 0
fieggen.com
The lacing is very tight and reliable. Great for hiking boots and skates, but can be tricky to tighten.
- Pass the laces through the bottom holes from the inside.
- Insert both ends from the outside into the second holes on the same side.
- Cross the laces from the inside, hook them under the first eyelets and insert them from the outside into the third holes.
- Cross the laces from the inside again, but this time the other end should be on top.
- Hook the laces under the second eyelets and insert them from the outside into the fourth holes.
- Continue lacing in the same manner until the end.
How to shorten long shoelaces
What to do if you need to shorten too long laces? You can use a simple method - cut with scissors. It is important to trim the ends of the laces carefully and not too short so that they can be tucked into the shoe.
There are other ways that suggest how to shorten laces without cutting them:
- Wrapping the egglets with transparent tape. This is a simple way to make the laces shorter.
- Impregnation of the tip with glue.
- Use of metal tubes. Cut off the tube, insert a cord into it, pour glue inside or press it with a nail.
Lacing with knots
1 / 0
2 / 0
fieggen.com
Thanks to the knots, the lacing is easily tightened and holds tightly.
- Insert the laces into the first holes from the inside.
- Tie a regular single knot and insert into the second holes from the inside.
- Continue lacing, tying a knot at each step.
How to tie a bow correctly
The knot to which the laces are tied also plays an important role. Tying a classic bow is very simple, but it is not very reliable, so it is better to use more sophisticated methods.
For example, the “surgeon’s” knot does not untie throughout the day.
A sliding bow is also not easy to do, but laces tied in this way never dangle.
Now you know how to beautifully tie laces on sneakers, sneakers, boots and shoes. All that remains is to pick up the shoes and start mastering the methods you like.
European direct
1 / 0
2 / 0
fieggen.com
This lacing is suitable for boots whose edges meet almost flush. If there is a large gap between the edges, not only the outer stripes will be visible, but also the inner zigzag.
Lace-up works great for Oxfords. Thanks to it, the edges of the shoes come together almost tightly, do not wrinkle or stick out.
- Pass the laces through the bottom holes on the outside.
- Insert the first end from the inside into the second hole on the other side and from the outside into the opposite second one.
- Pass the second end through the third hole using the same principle.
- Using the same pattern, pass the first end into the fourth hole, and the second end into the fifth.
- Cross the ends and pass through the sixth holes from the inside.
Lacing with just one hand
For athletes, various injuries are nothing new. But if your hand is injured, this is not a reason to give up your favorite pair of shoes. There’s just one problem: it’s difficult to tie your shoelaces with one hand.
There is a method for tying shoelaces that saves everyone in such situations:
- a knot is tied at the end of the rope;
- the free end is pulled through the lower hole from the inside out until it rests on the knot;
- the lace is passed through the opposite hole;
- it is threaded further diagonally, making zigzag movements;
- the weaving continues all the way to the top of the shoe.
This way the laced sneaker is easy to put on and take off, which is also important if your hand is injured.
Lightning
1 / 0
2 / 0
fieggen.com
One end goes to the other side through the entire lacing and resembles a zipper - it looks creative. At the same time, lacing is very fast.
- Insert the laces into the first holes from the inside.
- Pass one end from the outside into the sixth hole on the other side.
- Insert the second end from the outside into the second hole on the opposite edge, then through the third from the inside on the same side.
- Now insert the second end from the outside into the second hole on the other side, and then into the third from the inside on the same side.
- Continue lacing in this manner until the other end goes through the sixth hole.
- Tie a knot.
The correct shoe tie
For boots, traditional criss-cross lacing is suitable. Exit through the bottom holes and cross the ends, bringing them under the sides of the boots.
But for military boots, a completely different scheme is used, thanks to which they do not come untied. Tie a knot at one end and only then start tying the laces. To do this correctly, pull the product all the way and check that it is securely fastened. Bring the loose end out and then through the adjacent loop and repeat until you run out of length.
Railway
1 / 0
2 / 0
fieggen.com
Lacing is similar to the rails and sleepers of a railroad. Due to frequent crossing, it is rigid and holds the leg well.
- Insert the laces into the first holes from the inside.
- Without changing sides, pass them from the outside into the second holes.
- Cross the laces and insert them from the inside into the second holes.
- Pass the ends from the outside into the third holes on the same side.
- Cross and insert into the third holes. When crossing, each time there is a different lace in front.
- Continue lacing in this manner until you reach the end.
- Tie a knot.
Choosing the right length
The easiest way to choose the length of the ties is by measuring old ones or taking them with you to the store. You can consult with a consultant. The table will also help you navigate:
| Number of hole pairs | Length with a distance between holes up to 2.5 cm | Length with hole spacing 2.6–5 cm | Length with distance between holes 5–7.5 cm |
| 2 | 60 | 70 | 80 |
| 3 | 60 | 80 | 100 |
| 4 | 70 | 90 | 110 |
| 5 | 80 | 100 | 130 |
| 6 | 80 | 110 | 140 |
| 7 | 90 | 120 | 160 |
| 8 | 90 | 130 | 170 |
| 9 | 100 | 140 | 190 |
| 10 | 100 | 150 | 200 |
You need to consider how tight the lacing will be. When, after tying, the edges of the underblocks are joined, you can get by with shorter ties. If it turns out that the length is too long, the tape can be cut, the agglets can be reinstalled, or the sections can be glued. The ends of synthetic products should be burned.
Zipper
1 / 0
2 / 0
fieggen.com
This twisted lacing resembles a zipper. It looks fancy and holds up well, but is quite difficult to tighten.
- Insert the laces through the first holes from the inside.
- Pass the ends from the outside under the base, cross them and insert them into the second holes from the inside.
- Place the ends under the first cross, cross so that this time the other lace is on top, and insert into the third holes from the inside. Continue lacing in this manner until the end.
- Before tying the knot, pass the ends under the previous cross.
Methods for tying shoelaces
Previously, people only thought about the practicality of the knot, but for modern fashionistas reliability is not enough; they want their shoes to look stylish and attractive. So, sneakers were originally created for sports, but over time they became a part of our wardrobe and became an everyday part of a beautiful look.
Now they are worn with dresses, skirts, skinny jeans and even office suits, but to make it look harmonious, fashionistas began to think about quick ways to tie shoelaces. Australian Ian Figen played a significant role in this, he came up with most of the knots and shared them on his personal website. Here are some of them:
- hidden node;
- tangled trail;
- Sherpa knot;
- criss-cross;
- straight lacing;
- web;
- Chess board.
All methods look beautiful and unusual and attract attention to your sneakers.
Chess board
1 / 0
2 / 0
fieggen.com
This is a method for two pairs of laces, different in color. Choose flat, wide laces - with them the chessboard will look even more interesting.
- Insert the first lace into the bottom holes from the inside. One end of the lace is very short - it is only needed for the knot. We will work with the second end.
- Without changing sides, pass the other end into the second hole from the inside, then from the outside into the opposite second hole. In this way, lace the shoe to the last hole. The end will be on the same side you started on.
- Tuck the tip of the second lace under the edge of the shoe next to the tip of the first, at the bottom hole.
- Draw it under the first line of the first lace, then over the second, under the third, and so on until the very top.
- Pull the lace down, threading it over and under the first lace in turn.
- Make two more waves with the second lace: raise and lower it.
- Bring the end under the edge of the shoe next to the first hole.
If you have rather long laces and you want to ensure that they do not come undone, you can not tuck in the ends, but bring them up under the edges of the shoes and tie them with a knot.
If you can't figure out any lacing, check out the instructions on Ian's Shoelace Site. There you will find detailed step-by-step diagrams and many other interesting ways to tie your boots.
You can find out why your shoelaces are untied from this video.
Unusual and fashionable lacing methods
Sneakers have long ceased to be exclusively sports shoes. With their help, they create fashionable looks for every day and for holidays. That is why there is a need to find an idea on how to originally improve sportswear using ordinary lacing. Let's look at the most popular ways to tie sneaker laces beautifully.
Roman
The peculiarity of this weaving is the alternation of the symbols X—I—X—I, lined with laces. This is how such a name appeared. Weaving looks cool on sweatpants where there are small gaps for lacing.
The result depends on the number of holes in the shoes. To get the perfect pattern, you need an even number of perforations. Let's look at an example with six holes:
- the ends of the ribbon are passed from the left into the lower hole and raised vertically to exit through the upper hole;
- the tips cross and are threaded through a pair of holes on the right;
- the lower end rises a couple of holes higher;
- the second end is moved higher, passing one pair of holes, into the fourth pair of holes;
- the ends are crossed and directed to the left;
- At the top, the lacing is tied in a knot, forming the letter “I”.
This weaving looks very interesting, but it will be difficult to tighten the lace.
Checkered
A sneaker laced in this way resembles a chessboard. To get a better effect, you can use multi-colored flat laces.
Step-by-step instruction:
- The sneakers are laced in one color in a straight way;
- taking a different color, the ribbon from below twists in a wave-like manner to the top of the “frame”;
- Having reached the top, he turns around and goes down;
- The ends are tied and hidden inside the sneaker.
Be prepared for the fact that tightening the sneaker will be difficult and you will have to spend a little time on it.
Lightning
To wear a zipper on your sneakers you need to be a creative person. Lacing in this way is very simple:
- lacing begins from the two lower holes from the inside;
- one tip is pulled through all the holes to the last one and turned inside out;
- the second end is threaded from the outside through the second hole on the reverse edge and threaded through the third hole on the same side;
- lacing continues until the end, after which a knot is tied.
Railway
The unusual way of lacing shoes in the form of a flight may also appeal to extraordinary individuals. In addition, it is practical because it holds the foot well. To lace your shoes you need the following:
- the laces are inserted from the inside into the first holes;
- without changing sides, they are passed from the outside through two adjacent holes;
- the laces cross and are inserted into the second holes;
- the ends are pierced from the outside into third holes on the same side;
- when the ends cross, each time there will be a different lace at the top;
- This lacing ends with a secure knot.
Reverse two-color loop
Two laces of different colors are used:
- one of them is threaded from one side, and the second from the opposite;
- then they are connected on the reverse side;
- the lace is threaded through the hole on the same side, leaving a small loop free;
- the same operation is performed with a lace of a different color;
- weaving continues until the holes run out;
- A bow is tied at the end.
Lacing is convenient because the length and symmetry of the loops are adjustable.
Five pointed star
This species can rightfully be called a leader in unusualness. You can do it according to this scheme:
- the ribbon is passed through the third hole from the top and directed inward;
- the edges are passed inside the sneaker and pulled out through the bottom hole;
- the tips cross and are inserted into the third hole inward;
- the left tip is inserted into the upper left hole from the inside and outside, and then threaded through to the right;
- the right lace is passed inward, threaded through the lower hole, and brought out;
- the right end is passed through the third right hole from above and hooks onto the top of the “star”;
- the left lace is passed in the same way;
- The final touch is to thread the left lace through the top left hole so that it comes out from the inside to the outside.
Tightened loops
The weave looks very nice on white sneakers, provided the lacing is black. To get the original pattern you need:
- the ends are threaded through the second holes, the length is equalized;
- the laces are passed through the right and left holes, free loops are formed;
- two free holes are left at the bottom;
- the ends are inserted into the left stretched loops (should look outward);
- the right end is threaded from the bottom up through the left loops and inserted into the left hole on the right;
- the same scheme for the left lace, which goes into the left hole.
If these are running shoes, then it is recommended to use all the holes.
Double helix
To make a double spiral pattern and avoid mistakes, you need to know exactly how to do this type of weaving correctly:
- the laces are threaded through the lower holes so that one end is inside and the other outside;
- the outer tip moves through the opposite hole;
- the inner end is threaded in the same way as the outer one.
The result is a spiral pattern.
With hidden knot
For fashionable looks it is often necessary that the lacing knot is not visible. This adds to the attractiveness of the shoe. To get the desired effect you need to perform the following sequence:
- one end should be shorter than the other;
- the one that is longer remains unlaced;
- both laces must be inside the sneaker;
- The tension is adjusted, after which the lace is tied into a knot.
It’s already clear where to hide the laces of the knot - they just have to stay inside the sneaker.
Lace-up without tying
To prevent the lace from coming undone, you can simply leave it untied. The ends that remain loose after lacing are tightened tighter and then tucked inside the shoe.
This saves time, although the leg is not fixed so securely, so this method is not suitable for active sports.
Laced shoes - photo
Straight-laced brogues
Classic shoes laced in different ways
Classic men's shoes tied using the Criss-to-Cross method
Knitted laces using the Cross over-under method
Tips and tricks
If you follow all the recommendations indicated in the chosen lacing method, then there will be no problems and you will be able to lace your boots tightly. One big disadvantage of improper lacing is the untangling of the rope:
- It is desirable that the braid be strong and long.
- Sometimes, to make a beautiful pattern, it’s enough to experiment with knots. Just tie them tightly.
- To make the look fashionable and bright, it is recommended to replace black or plain laces with colored and bright colors.
- It is better to choose round, strong ropes.
If you choose the right type of lacing, you can transform even an inexpensive and boring pair of shoes.