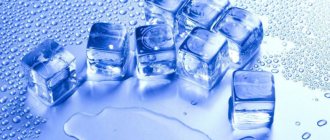
The question “How to make ice at home?” makes many people smile. After all, what could be easier than pouring water into molds and putting it in the freezer?! Just what to do if you don’t have an ice cube tray on hand or it’s cracked? And for some reason the ice in restaurants and in the photos is transparent, but at home it turns out white and cloudy. Of course, restaurants use ice makers, but at home you can do without them and make a small amount of clear ice in the freezer. We'll tell you in detail how to do this.
Why does ordinary ice have a heterogeneous structure and white crystals in the center? The answer is simple: because of the composition of the water from which we prepare it. Everyone knows that water can be hard or soft, and different substances can be dissolved in it. It is salts, gases and other impurities in the process of freezing water that form large white crystals in pieces of ice and change its color.
Only non-carbonated purified water with minimal hardness can form transparent ice when frozen. If you prepare ice correctly, it will have no taste or smell, and will melt about 40-50% slower. How to prepare it:
- Take purified water for baby food on the basis that each guest needs 500-600 grams of ready-made ice.
- Pour water into an enamel or stainless steel pan, bring to a boil, boil for 2 minutes, turn off the gas, cover with a lid and let cool.
- Repeat boiling again, cool under the lid to room temperature. This way you will get rid of gases dissolved in water.
Pour the prepared water into molds and cover them with cling film and place them in the freezer until completely frozen.
A few important details:
- The freezer compartment must be clean to prevent bacteria from getting into the ice and unpleasant odors from being absorbed. Do not store ice in fish or meat containers.
- To avoid the formation of bubbles, pour water in three stages - first to the bottom, then to the middle, and only then to the edge of the mold, allowing each layer to harden completely. You can also use the slow freezing method for this purpose (temperature -1 Celsius for 24 hours).
- You can also freeze hot water (without covering it with film), taking into account the quality of the mold material and the power of the freezer.
- Ice can be stored indefinitely.
You can use any form to make ice except glass - the glass will simply burst when freezing water expands. You can remove the finished ice from a mold of any size and material if you slightly heat the mold itself from the outside. If you don't have a special ice tray, you can use:
- plastic glasses
- plastic or metal lids
- silicone molds for miniature cupcakes or sweets
- chocolate box insert
- small plastic bags
- parts of a large Lego set and other plastic toys
All these form options need to be processed before use. New plastic bags and plastic cups do not need to be washed, but it is better to wipe children's toys with alcohol.
In Asian countries, they even prepare desserts from crushed ice, pouring it with fruit juices and syrups. Special equipment is used to crush ice. But it’s unlikely that anyone would install such a thing at home just for crushing ice. Therefore, you can use other methods to prepare small portions of crushed ice.
- Use a hand crusher . This will take a lot of time and effort, but there will be little ice.
- Use a food processor or blender : container with an S-shaped blade, pulsing mode. It will be noisy, but everything will work out provided the device has normal power and sharp knives.
- The best method is to place the ice in a thick kitchen towel, wrap it tightly, and smash it directly into the towel with an ice mallet (or a clean meat mallet). Use a flatter surface. We do not recommend using a plastic bag - the ice will simply tear it and fly apart.
About the author: porezeptu
- Related Posts
- How to get rid of garlic odor from your mouth: 8 proven methods
- How to scale fish carefully and quickly
- Proper food storage
« Previous entry
How to make crushed ice?
Place ice cubes in a food processor or blender, set it to pulsate mode and crush the ice to the desired size. Ice can also be crushed in a shaker, where it is shaken until the walls are covered with frost.
Interesting materials:
What is the Kama River famous for? What is the fall and slope of the Ob River? What is the Volga River basin? What are the sources of food for rivers? What is the mouth of the Volga River? What's biting on the river in October? What is the annual river flow? What are floodplains? What is the river regime, what does it depend on, what does it influence? What is the lowest water level in a river?
Secrets of clear ice for drinks
Those who want to learn how to make real ice for drinks with their own hands, and not just cloudy pieces of frozen water, should adopt the following approaches:
- Use of pre-treated water. Pour the liquid into an enamel or steel bowl, bring to a boil and let it simmer for a few minutes. After this, cover with a lid and leave to cool naturally. We repeat the manipulation and cool the composition again. Then we fill the ice molds and freeze the pieces. With this approach, the cocktail filler becomes transparent due to the removal of air bubbles.
- Slow freezing. You can displace bubbles that make the product cloudy if you freeze the product not quickly, but very slowly. The final version will not only be transparent, but also very smooth. True, the time for preparing ice in this case is at least a day. To carry out manipulations in the freezer, you need to set the temperature no higher and no lower than -1ºС.
- Freezing in salt water. This method also allows you to make clear and beautiful ice without cracks. Ideally, you should use sea salt, but if you don’t have it, you can make the mixture yourself. To do this, fill a deep bowl with water, add fine table salt and stir well (unfortunately, the concentration of the composition will have to be determined experimentally). We place the container in the freezer, the temperature in it should not be lower than -2ºС. As soon as the liquid has cooled down greatly, lower the filled ice trays into it and put them back in the freezer until cubes form. If the liquid in the bowl begins to freeze, this indicates an insufficient amount of salt, and the solution will have to be redone.
Advice: In general, no matter what approach to making ice is used, you need to take drinking or filtered water. Otherwise, the unpleasant smell will only go away temporarily. As soon as the product gets into the drink and begins to melt, the specific aroma returns, which noticeably spoils the taste of the cocktails.
Experienced housewives prefer to prepare ice at home according to the latest instructions. It turns out transparent, smooth, without cracks, and does not crack when adding cocktails and other drinks. The saline solution only needs to be prepared once. It can be poured into a convenient container and kept in the freezer at all times.
An effective life hack
Let's look at the easiest way to freeze. For this we need a plastic refrigerator container. We usually take this thing with us to the beach or on a picnic so that the food does not spoil under the influence of high temperatures. So, pour some water into the bottom. Important recommendation: it must be distilled. The thing is that there are many impurities in tap water. After freezing, all these particles make the ice cloudy.
Unforeseen problems: Tesla Cybertruck toy version has been delayed
Nausea, diarrhea: 9 more signs of COVID-19 to watch out for
The janitor became a star on the Internet. He simply answered the question of what he will do on February 14
Now place the refrigerator container in the freezer for exactly one day. There is no need to overexpose: twenty-four hours will be enough.
Extract the contents. Pour the unfrozen water into the sink. You will end up with a fairly large block of ice.
Don't be afraid if its surface is cloudy or coated. It's very easy to get rid of it. Boil water and dip a knife into it. By the way, it is better to take not an ordinary kitchen knife with which you cut bread, but a large knife for cutting meat.
Dip a knife into boiling water for a couple of seconds and cut off the cloudy edges from the ice block. As a result, you will see pure ice: the kind that is served in bars. True, for now we have a very large block, so we need to chop it into pieces.
Using the same hot knife, cut the block into cubes of the desired size. You can store the ice cubes in an airtight container or bag. That's the whole secret.
In the new domestic comedy, Elena Podkaminskaya will turn into the wife of an oligarch
Allergy risk: global warming increases pollen concentrations
Daniil Belykh shared his guess about what awaits the 7th season of the series “Matchmakers”
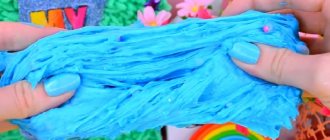
Fruit ice with soda - step-by-step recipe with photos
Cooking time: 10 minutes
Servings: up to 10 servings
Compound:
- Sprite – 1 liter
- Canned fruit mixture – 500 grams
- Chewing marmalade “Mishki” – 1 package
Sweet and original ice cream can be prepared in just 10 minutes.
- At the supermarket, buy a liter of Sprite, gummy bears and a can of canned fruit. Typically, this fruit salad includes mango, pineapple, grapes, coconut, and sometimes apricots or peaches. If the mixture is not found, then take a small jar of mango, pineapple and peach. Even if the fruit remains, it will definitely not be lost - the next portion of ice cream will not be long in coming.
- Soak gummy bears in soda for an hour. After that, mix them with fruit and place them in molds.
- Fill the contents with a sprite and set it to freeze.
- Due to the fact that the fruit is canned, it has a softer and juicier texture and when biting into ice, it is not as hard as fresh fruit. Moreover, they are already sweetened, they do not need to be kept in sugar.
Both adults and children will be happy with this fruit ice!
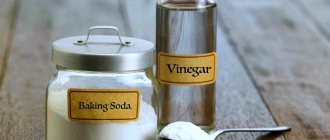
From soda and vinegar
The preparation method is similar to the previous one:
- Mix baking soda and acetic acid (1:1). There should be no reaction (foaming).
- Heat the mixture until the liquid evaporates and a thick crust begins to form on the surface.
- Cool to room temperature.
- Don't interfere. After 15-20 minutes, a monolithic lump of crystalline sodium hydrate will appear.
- The liquid remaining after “freezing” is sodium vinegar. Drain it into a separate container.
- Crystallize the crystallized substance.
- Pour into a clean bowl, cover with a napkin, and cool.
- Pour in some of the previously drained vinegar. The liquid will freeze immediately.
The solution can be reused.
Remove the substance at room temperature. Do not flush the waste down the drain, but wait until the substance evaporates naturally.
What are the calories in popsicles?
Fruit ice cream is one of the lowest calorie types of ice cream, and its benefits can hardly be overestimated. This dessert can be prepared with milk, sugar, dried fruits, or not combined with anything else.
The vitamin complex in fruit ice cream promotes the production of serotonin , a substance that improves mood and protects against stress.
If you carefully watch your figure and count calories, then it is important to know that fruit ice cream, depending on the ingredients, contains an average of per 100 g .
Fruit ice cream is a low-calorie and tasty delicacy that you need to pamper yourself with in the hot summer - it will quench your thirst in hot weather and bring a lot of useful vitamins to your body.
Basic subtleties of preparing cold dessert
- It is not recommended to store fruit ice for a long time in the freezer. If dessert sits in the refrigerator for a long time, it becomes very hard. Since liquid increases in volume when frozen, it is necessary to leave half a centimeter from the edge when pouring into molds.
- Multi-layer ice cream looks beautiful.
- To make fruit ice, you can use coffee or tea by first brewing it, cooling it and then freezing it. This way you will get coffee ice or tea ice.
- To easily remove frozen dessert from the mold, place it in warm water for two seconds. Now the question is “how to get ice out of the mold?” disappears and that's great. It is not necessary to use special molds for ice cream; disposable cups and yogurt cups are quite suitable.
- Prepare juice and puree from berries or fruits right before preparing dessert. You can add whole fruits and berries to the treat, it will be very beautiful and tasty.
Now you have learned how to make popsicles at home. Dare, fantasize and enjoy your own original tastes!
I recently came across a website with photographs of original ice molds. I really wanted to make the same ones for myself. These forms can be made independently from silicone sealant.
And so we will need: some kind of container for the mold (I took a box from Japanese food), silicone sealant, gasoline, soap and the actual models of future ice cubes.
We install the models in the container. We attach it to the bottom, lightly lubricating it with the same sealant.
Making a soap solution. You can use liquid soap diluted in water in a 1:1 ratio.
We lubricate our mold and models with soap. This is necessary so that the finished form can be easily separated. We must not forget that silicone sealant is also glue. Let the soap dry.
Next we prepare the composition for applying the first layer. To do this, dilute the sealant with gasoline to a jelly-like state. Silicone sealant smells like vinegar, and it may be tempting to dilute it with essence. Under no circumstances should this be done. By the way, sealant diluted in gasoline is a wonderful thing. You can soak the fabric with it and it will become waterproof. In our case, this first layer is needed in order to copy the smallest details. I even copied the Lego inscription on each bump. If you immediately pour sealant from a tube, bubbles and voids may form in the mold.
After the first layer has dried, fill the form with undiluted sealant. Each layer should not be thicker than 3-4 mm. Otherwise, the silicone inside will not harden.
Take it out, wash it, fill it with water and put it in the freezer.
Ready. It is better to take water not directly from the tap, but from a filter and settled. Then there will be no bubbles in the ice cubes and the ice will be transparent.
This way you can make ice molds in the shape of anything. Looking for ideas
It would seem that it could be simpler: fill the molds with tap water and put them in the freezer for a couple of hours. But the result is a milky substance that often has an unpleasant chlorine odor. To prevent this from happening, we will look at the correct technology for making ice at home in the form of transparent cubes or crushed pieces. The only equipment you need is a freezer; even molds can be replaced with improvised containers.
Theory
. Homemade ice turns cloudy due to gases (including oxygen), mineral salts and other impurities contained in the water. The gases form tiny bubbles that, when frozen, form crystals that are too large. Heavy metal salts act in a similar way. Only purified, degassed water of low hardness provides complete transparency.
Properly made ice is not only clear, colorless and tasteless, it also takes 30-50% longer to melt. As a result, the drink is less diluted with water.
Difference between conventional freezing and the proposed technology
Ingredient:
- water (purified or distilled) – 1 liter.
Depending on the number and variety of drinks, an average of 600-800 grams of ice is required per party participant.
How to freeze ice if there are no molds
The situation when you need to get cubes urgently, but there are no containers at home, happens often. Therefore, life hacks about what to use instead of plastic containers are in demand more than ever.
It turns out that you can use various improvised objects. Including disposable tableware.
Plastic cups
Small plastic containers designed for alcoholic beverages are best. They have a small volume of about 50 ml and are an ideal solution for freezing ice.
Plastic is resistant to deformation and temperature changes, easily tolerates the properties of freezing water, adapting to its shape. In addition, the volume is great for making cocktails. If necessary, frozen water can be crushed or split into several parts.
Silicone molds for candies
This option is a great opportunity to add some originality to your cocktail party. Figured ice will become the “highlight” of the drinks. For beauty, mint leaves or raspberries, cherries, and strawberries are added to it.
Frozen water cubes are easily removed from the soft silicone mold without much difficulty. There are different sizes, buy several - for a large group and enough for 1-2 people.
Chocolate box inserts
In a similar way, plastic inserts are used in which sweet treats are placed. They, like disposable cups, can easily withstand low temperatures. The ice cubes are small, often of an original shape.
In this case, it is also recommended to add berries, decorative leaves or even dyes. It all depends on your imagination and the preferences of your guests.
Plastic bags
This option is more often used for preparing desserts with crushed ice or drinks to which a large amount of finely chopped ice is added. The water is frozen volumetrically, and after reaching the desired shape, it is split or crushed with a blender.
The bags do not deform, prevent leakage and cope with temperature changes. The ice is not very elegant and neat, but it more than pays for itself in terms of volume.
Plastic toys
Resourceful citizens came up with the idea of using children's toys. For example, Legos or small containers are great for freezing ice for cocktails and spirits.
Use shaped molds. However, do not forget about hygiene. Before using the toy for cooking, rinse it thoroughly and disinfect it.
Metal lids
Deep lids from bottles and jars are used for freezing. The metal is resistant to deformation and negative temperatures, and holds water well. With enough lids you will get smooth and beautiful ice cubes for cocktails with or without alcohol.
Finding a way out of the situation when there are no molds for freezing ice in the house is simple. Show your imagination and you will have at least five options for freezing water for making desserts and drinks.
Source
Preparing water for freezing
The water must be free of impurities. The photo of ice in cubes shows how transparent it must be in order for the additives - berries, herbs or pieces of fruit in frozen water - to look beautiful.
Tap water must be filtered. But it’s better to immediately take bottled purified non-carbonated water.