How to glue plywood together
Before deciding how to glue plywood together, you need to select a high-quality glue that will cope with the task and help create a reliable plywood joint. The adhesive for gluing plywood together must have the following properties:
- Ease of use is especially important when work is done at home;
- Fast hardening;
- Do not release volatile toxic elements;
- Resistant to moisture to create protection for wood material;
- Antiseptic characteristics.
They also take into account where the wood will be used after the plywood sheets are glued. So, what to glue plywood on the street with is chosen taking into account its resistance to external factors. Interior work requires safety for human health.
It is necessary to choose a high-quality glue that will cope with the task and help create a reliable plywood joint.
Tongue and groove
This connection consists of a narrow groove and a ridge formed by a fold on the inserted part. It is excellent for corner applications as it has more bonding surfaces, greater strength and rigidity than a simple seam joint.
To make such a connection, processing of both parts is required. First select the grooves with a mortise dial or a straight or helical router. Then form a ridge on the second one that fits tightly into the groove of the first one. Make several test joints on scraps to achieve the required assembly density.
Gluing Basics
The process of how to glue plywood together with your own hands should occur in stages. They start by selecting the material and determining the option for gluing the sheets tightly together. These points are directly affected by the type of plywood material and operating conditions.
They start by selecting the material and determining the option for gluing the sheets tightly together.
Production technology
The technological process usually refers to the method of making plywood, or when the material is glued together to form a separate product. Typically, veneer is glued using a hot, dry method. Use the following options:
- The material is joined under a press using pressure; the option is suitable for working with sheets no larger than 8 mm;
- The sheets are glued one by one using pressure and heat, the method is used for plywood 10-18 mm thick;
- Multi-level gluing of plywood to each other, then the press is cooled after each stage, the method allows you to obtain thick plywood products of 20 millimeters or more.
Gluing each veneer individually provides a higher quality option by allowing temperature and pressure to be evenly distributed. It is easier to regulate the quality of the material connection.
These options are suitable for industrial production; under domestic conditions, such methods are inaccessible and complex.
Gluing each veneer individually provides a higher quality option by allowing temperature and pressure to be evenly distributed.
Adhesives used
The choice of how to glue plywood to plywood can be varied. It is necessary to pay special attention to the adhesive composition so that the result is durable and of high quality. There are most often two types of compounds on the construction market - protein and synthetic.
The main elements for most adhesive solutions are the following:
- Main adhesive mass;
- Diluent;
- Filler;
- Additives that help accelerate hardening and increase the level of adhesion;
- Plasticizing agents;
- Antiseptic elements.
It is necessary to pay special attention to the adhesive composition so that the result is durable and of high quality.
Glue requirements
Gluing technology may require high-strength properties from the adhesive composition. Only high-quality adhesives can ensure reliable bonding of the material. Therefore, you should choose solutions that have the properties described below:
- High level of adhesion of elements;
- Ease of use;
- There should be no release of toxic substances after the glue has dried;
- Water resistance;
- Resistance to biological formations;
- Do not cause deformation on the veneer, do not change its color;
- Reasonable price.
Only high-quality adhesives can ensure reliable bonding of the material.
How to drill pilot holes for screws
Learn to prevent plywood from cracking by making proper holes for fasteners. Traditional screws with a tapered shaft require drilling a mounting recess for the smooth part and a guide channel for the threaded part, plus you also need to deepen the head. Perform these operations in one go with a combination drill bit with a tapered tip and an adjustable countersink.
Diagram of drilling holes for traditional screws.
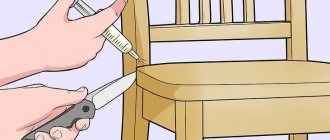
Advice.
Screw brass screws along the thread made in the guide hole with a steel screw of the same size.
Modern screws have a straight shaft and a thinner thread at the top, so they do not require a mounting recess. It is convenient to drill guide holes using the same combined equipment, but with a regular drill selected for each caliber of screws.
Diagram of drilling holes for modern screws.
Self-tapping screws with a drilling tip and countersinking ribs on the head, which make it possible to avoid preliminary drilling in soft wood, often cause splits when twisted along layers of plywood. Don’t take risks and don’t waste time replacing a cracked workpiece - even make holes for screws with a drill at least half the depth and especially near the edges and ends.
Advice. Calculate the tightening force by selecting the appropriate screwdriver mode. It is better to leave the cap sticking out a little above the surface and tighten it with a screwdriver.
It is not necessary to determine the size of the guide hole with an accuracy of fractions of a millimeter - this can be done “by eye”.
The diameter is suitable if the attached drill covers the body of the screw and not the thread.
When making recesses for the caps near the edge of the plywood sheet, apply masking tape to the drilling site so as not to destroy the top veneer.
When drilling guide holes, fix the parts, preventing movement of the workpieces and, as a result, breakage of the drill.
Any fastening of plywood parts will be neat and reliable only if the workpieces are accurately adjusted. Make strictly perpendicular cuts to the workpieces. Always start by making the groove and then fit the tongue to fit it.
It is very important that the floor in the apartment is warm and comfortable. Therefore, its installation begins with laying plywood, which will act as a base and can ensure its stability and strength.
This material, consisting of several layers of veneer made from coniferous wood, is susceptible to various types of fastening. It can be mounted using screws, nails or bolts.
Types of plywood glue
Adhesive solutions are available for sale in large quantities. You can use different options. But to make it easier to choose the most suitable glue, you should understand the available types. The following are the main types of plywood adhesives:
- Water-based or water-dispersion types, the most famous is PVA;
- Wood glues, which are made either on a casein or albumin basis;
- Using urea or phenol-formaldehyde as a base;
- Epoxy or polyurethane.
Adhesive solutions are available for sale in large quantities.
Wide groove or tongue
Strong, reliable and easy-to-manufacture connections. A wide groove (across the fibers) or a tongue (along the fibers) tightly covers the mating part and secures it, having three gluing surfaces. As a rule, the groove is made half the thickness of the plywood. Cabinet furniture made using well-fitted tongues and grooves will last for decades. You can select grooves and tongues on a saw or with a router. We prefer a saw with a mortise blade, as it makes it easier to make several identical parts, and the work itself goes faster. Once you have selected the appropriate combination of outer discs, chippers, and spacers based on the thickness of the plywood, install the mortise disc on the spindle of your saw. Make several test passes on the scraps to achieve the required joint tightness - the part should be inserted into the groove or tongue and removed with a little force, but not fall out when turning the assembly over. If necessary, add or reduce the number of spacers.
Assemble a stack of mortise discs from outer discs, chippers and spacers next to a piece of plywood. The exact thickness match can be detected with a finger.
By adjusting the thickness of the groove disk, you can cut out all the grooves and tongues for parts of the same thickness. Using a longitudinal (parallel) stop, you will be sure that all the grooves on the same type of parts will match exactly.
When selecting grooves and tongues, it is safe to use longitudinal (parallel) and transverse (angular) stops simultaneously, since in these cases the cut will not be through.
In corner joints, such a rebate becomes a rebate. Since this results in the loss of one of the bonding surfaces, it is better to reinforce the seam joints with additional means, such as screws or a solid wood façade frame covering the edges of the plywood.
Make a simple T-shaped guide from the scraps and use it for milling grooves. Align the groove in the side stop of the bar with the marks on the part to make the groove exactly in the right place.
To ensure an even ridge length, use a rebate cutter. Replacing the bearing allows you to change the width of the rebate (and the length of the ridge). The tightness of the connection is adjusted by the milling depth.
For maximum strength, place the comb on the underside of the part being inserted. This connection broke when a heavy object was placed on the shelf.
Which glue is better
To understand which glue to choose, you should understand the characteristics of the types. Due to the main constituent substance, the properties obtained after using adhesives vary. Thus, PVA stands out for its odorlessness, safety and low price. To obtain reliable adhesion, both parts are treated with glue and drying takes a week.
Carpentry types of animal origin are distinguished by the difficulty of preparing for work; to obtain high-quality adhesive characteristics, it is necessary to boil the solution.
Based on epoxy resin and polyurethane, they are produced with thinners. For this reason, they smell sharp when used and are toxic until they dry out. When working inside the building, ensure good ventilation.
Urea and phenol-formaldehyde adhesives are less toxic than the previous type and are often chosen for gluing wood.
PVA stands out for its odorlessness, safety and low price.
Primer
Wood is a natural material that expands and contracts depending on the complex effects of environmental temperature and humidity (despite the transverse layers of veneer inside the board). Cracks are observed on the inside of the face veneer, which expand and contract under the influence of changes in humidity. Due to these reasons, a preliminary primer is necessary for subsequent painting. Flexible paints are used, and the correct combination of paints is important.
Painting the paper base completely prevents the formation of cracks in the paint layer due to humidity. In conditions of high humidity and outdoor use, plywood boards must also be painted on the reverse side. In such conditions, finishing of the ends is important and must be done especially carefully and several times. Plywood intended for outdoor use must be painted with special paints.
The influence of plywood grade on the choice of adhesive composition
Choosing what to glue plywood with takes into account the specific operating conditions of the item. The level of humidity plays a significant role in this matter, and do not forget about the necessary strength of the product after its creation.
For a room where good ventilation is provided, you can choose PVA, protein or synthetic adhesives.
If the furniture will be used both indoors and outdoors, then it would be optimal to use synthetic types of adhesive solutions.
If the furniture will be used both indoors and outdoors, then it would be optimal to use synthetic types of adhesive solutions.
Tongue and groove
This connection consists of a narrow groove and a ridge formed by a fold on the inserted part. It is excellent for corner applications as it has more bonding surfaces, greater strength and rigidity than a simple seam joint.
To make such a connection, processing of both parts is required. First select the grooves with a mortise dial or a straight or helical router. Then form a ridge on the second one that fits tightly into the groove of the first one. Make several test joints on scraps to achieve the required assembly density.
Gluing technologies
It is important to choose the right connection method, for example, butt gluing. Each technique has its own operating characteristics, so popular gluing technologies will be described below.
It is important to choose the right connection method, for example, butt gluing.
Gluing sheets
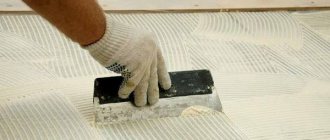
You can choose the option of gluing sheets with planes, then a ledge will form between them. The connection process will consist of the following steps:
- Each material that will be glued is sanded with sandpaper to obtain an even plane;
- The base is cleaned.
- Degreasing is carried out.
- The adhesive solution is prepared according to the manufacturer's instructions.
- Apply glue to both bases, wait some time for the glue to set (the time is indicated on the packaging), then connect the parts.
- To fix the veneer, clamps are used; you can put wooden planks on them.
- Excess parts of the solution are removed and the products are left to dry completely.
It is advisable not to subject the furniture to stress for another day after completing the drying stage.
You can choose the option of gluing sheets with planes, then a ledge will form between them.
Plywood splicing
In this method, you can resort to direct gluing of elements end-to-end or on the edge. The first option is suitable when operating conditions do not involve loads. The technology for gluing plywood together at the end includes the steps described below:
- The ends of the material are sanded.
- Degreasing is carried out.
- The adhesive is applied and the parts are pressed together.
- Glue is generously applied to the seam part and fiberglass is lowered into it; with the help of a roller, the fiberglass is pressed well to the surface.
- After the solution has dried, the seams are aligned.
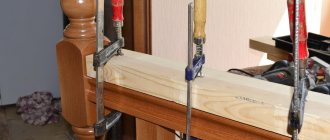
The second method of spacer parts together is different in obtaining a seamless connection. Miter work involves cutting elements at an angle:
- The plywood is placed on top of each other using a jointer; the ends are machined at an angle to obtain a mitre.
- To get the best result, two-stage processing is done. At the beginning, the jointer is taken at 1-1.5 mm, then at 0.75.
- Afterwards, the sheets are placed with the treated side facing each other, the solution is applied and the workpiece is fixed with clamps.
- The excess is removed and the product is left to dry completely.
In this method, you can resort to direct gluing of elements end-to-end or on the edge.
Wide groove or tongue
Strong, reliable and easy-to-manufacture connections. A wide groove (across the fibers) or a tongue (along the fibers) tightly covers the mating part and secures it, having three gluing surfaces. As a rule, the groove is made half the thickness of the plywood. Cabinet furniture made using well-fitted tongues and grooves will last for decades. You can select grooves and tongues on a saw or with a router. We prefer a saw with a mortise blade, as it makes it easier to make several identical parts, and the work itself goes faster. Once you have selected the appropriate combination of outer discs, chippers, and spacers based on the thickness of the plywood, install the mortise disc on the spindle of your saw. Make several test passes on the scraps to achieve the required joint tightness - the part should be inserted into the groove or tongue and removed with a little force, but not fall out when turning the assembly over. If necessary, add or reduce the number of spacers.
Assemble a stack of mortise discs from outer discs, chippers and spacers next to a piece of plywood. The exact thickness match can be detected with a finger.
By adjusting the thickness of the groove disk, you can cut out all the grooves and tongues for parts of the same thickness. Using a longitudinal (parallel) stop, you will be sure that all the grooves on the same type of parts will match exactly.
When selecting grooves and tongues, it is safe to use longitudinal (parallel) and transverse (angular) stops simultaneously, since in these cases the cut will not be through.
In corner joints, such a rebate becomes a rebate. Since this results in the loss of one of the bonding surfaces, it is better to reinforce the seam joints with additional means, such as screws or a solid wood façade frame covering the edges of the plywood.
Make a simple T-shaped guide from the scraps and use it for milling grooves. Align the groove in the side stop of the bar with the marks on the part to make the groove exactly in the right place.
To ensure an even ridge length, use a rebate cutter. Replacing the bearing allows you to change the width of the rebate (and the length of the ridge). The tightness of the connection is adjusted by the milling depth.
For maximum strength, place the comb on the underside of the part being inserted. This connection broke when a heavy object was placed on the shelf.
Methods of adhesive connection
You can create a screed or connect plywood parts for other purposes using various methods. Each one has a different degree of difficulty. Working with grooves is considered easy.
Working with grooves is considered easy.
Tongue and groove
Using a groove helps to get a good bond on the plywood. In this embodiment, the edges of the parts are cut out in the form of a ridge. The cutting thickness should be equal to half the thickness of the sheet. The ridge part should be placed from below when gluing.
Using a groove helps to get a good bond on the plywood.
Two grooves and a rack
The lath should be 30-33% thick of the plywood sheet. Grooves are created at the end of the 1st and 2nd workpieces. Afterwards, glue is applied to the grooves and the parts are connected to each other using a strip. The structure is compressed.
The lath should be 30-33% thick of the plywood sheet.
Right angles are the main rule of assembly
Homemade mounting squares will help you set right angles.
The use of mounting angles for joining plywood parts.
Make several sets of these simple devices of different sizes with your own hands from pieces of chipboard and use them when assembling large and small products.
Details of the mounting angle: 1 – corner; 2 – long bar; 3 – short bar.
Saw a square piece measuring 290x290 mm diagonally.
Manufacturing of mounting angles for joining plywood parts.
Mark the cutouts for the clamps on the corners and cut out the excess material.
Prepare the side strips and make countersunk holes in them.
Secure the corner to the workbench by placing pads of suitable thickness under it. Tighten the screws, drilling pilot holes.
Cut a right angle at the junction of the planks so that during assembly it does not interfere with the tight fit of the parts.
Ready-made mounting angle for joining plywood parts.
You can also make a mounting square with your own hands from thick plywood. Side strips are not needed here; the material is strong enough to be secured with clamps directly to the end of the device.
Drawing of a plywood mounting bracket.
Features of working with plywood glue
To independently obtain a reliable result of gluing plywood together, you must adhere to the rules described below:
- Work only with cleaned surfaces;
- When working with concrete screed, it is necessary to prime the base;
- The laminated type of material is sanded;
- The presence of toxic substances in the glue requires ventilation of the room during operation.
The presence of toxic substances in the glue requires ventilation of the room during operation.
Painting
The application of paint gives the plywood a natural textured pattern. The surface of the board can also be painted completely, without showing the wood texture. The paint is applied with a brush or spray. Colored plywood is acceptable for both interior and exterior decoration. But before final painting, the surface must be treated with a special solution to prevent the appearance of blue stains and fungi, since the biological resistance of transparent paints is limited due to the minimum content of the binding substance.
Useful tips
Advice from professionals can help you get better results. So processing can begin only on a dried surface. Study the instructions for the adhesive solution in advance; adhesives have specific preparation and use requirements.
Observe the required temperature and humidity conditions during operation. The position of the parts must be adjusted before the glue sets.
Processing can only begin on a dried surface.
Gluing plywood to plywood is not so difficult; the process can be done with your own hands. But you should carefully choose the appropriate adhesive and follow the instructions from the manufacturer so that the composition provides high-quality adhesion of the parts.
Surface finishing
The sanded, smooth surface of plywood provides an excellent basis for subsequent finishing. Plywood can be laminated, laminated, painted, impregnated with special paint or solution, etc. When choosing a paint or primer, it is important to consider the cracking tendency of veneer veneers. The surface can also be covered with laminate or veneer made from valuable wood. It is possible to use thin film. Plywood can also be covered with wallpaper. If plywood boards were stored in conditions of high humidity, then before finishing they must be dried to normal moisture content. The surface should be thoroughly cleaned of dust resulting from previous processing. This procedure must be repeated before each finishing stage. Depending on the required quality, 1-2 layers of coating are applied.
Impregnation with drying oil
A very cheap product used as an impregnation and to impart moisture resistance to wood is drying oil. Drying oil is applied to unpainted (generally not coated with any compounds) well-dried plywood.
- For greater efficiency, it is advisable to slightly warm the drying oil in a water bath .
- Using a brush or roller, apply the product to the surface. Particular attention is paid to the edges. The task is to saturate the wood with an oil composition.
- Then the product is dried - for this they use a hair dryer or leave it in a well-ventilated place.
- After the drying oil has completely dried, apply a new layer and dry well again.
- Repeat until the tree stops absorbing the composition.
After treatment with drying oil, for greater reliability, you can additionally coat it with oil varnish or oil paint. As a result, the plywood will become very resistant to moisture and delamination. The disadvantage of such additional protection is that it will take a long time to dry.
emptiness
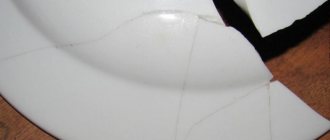
Hammers are a carpentry term that refers to voids or voids within plywood. This type of delamination occurs on plywood when heat during production causes moisture to turn into steam. This causes a pocket or depression that you cannot see until you cut the plywood. You may notice impacts when you handle the plywood or when you slide your hand across the plywood. If you hear a dull sound, it may be hitting the plywood. Discard or trim it if possible.
LiveInternetLiveInternet
- Registration
- Entrance
-Music
—Categories
- Cooking (12)
- Salads (4)
- Spices (2)
- Cakes and pastries (2)
- Main courses (2)
- baking (1)
- Snacks and sandwiches (1)
- Articles (11)
- Tips for the master (6)
- children (1)
- Photos (1)
- video (5)
- Geometric thread (2)
- demotivators (2)
- Nostalgia (2)
- Photoshop (1)
- scrap kits (1)
- humor (1)
- books (1)
- shops (1)
- do it yourself (19)
- knitting (11)
- crochet (6)
- Jigsaw templates (6)
- Sewing (1)
—Search by diary
—Subscription by e-mail
—Interests
— Regular readers
—Communities
-Statistics
mistreatment
Damage to the edge of the plywood allows moisture to penetrate the layers and can lead to delamination. Even though plywood is classified as exterior and made with a waterproof adhesive, if water gets between the layers, it will cause them to swell and warp, separating the layers. Delamination begins at the edge and over time moves into the interior of the plywood. Edge damage often occurs when forklifts attempt to pick up plywood. If you notice dents or dents in the plywood, do not use them.