How to get rid of dust from a laptop at home? Do-it-yourself methods for cleaning the cooler, cooling system, monitor and keyboard of a laptop. Features of cleaning various laptop models. Program for cleaning a laptop from Lenovo. Cleaning a laptop with a vacuum cleaner.
Cleaning a laptop is a very important and integral process that allows you to extend the life of this type of equipment. In this article we will figure out how to properly clean a laptop and how to rid all its parts of dirt.
What do you need to clean your laptop from dust, dirt and debris?
Cleaning your laptop yourself
- Before we talk about the cleaning process itself, it is necessary to clarify how often and when it should be performed.
- Ideally, you should clean your laptop every six months to a year.
- The frequency of cleaning operations on a laptop directly depends on its manufacturer - cheaper models need cleaning once a year, mid-priced laptops from reliable brands can be cleaned once every two years, but the famous Apple states that its products need cleaning no more than once every four years.
- If the time for cleaning has not yet come, but the laptop begins to act up, then perhaps it needs unscheduled cleaning.
When should you clean your laptop?
You can determine that equipment needs emergency cleaning by a number of the following signs:
- The surface of the laptop heats up very quickly - a few minutes after turning it on.
- There is noise coming from the laptop computer, like a dusty fan.
- The performance of the laptop deteriorates significantly - spontaneous shutdowns, glitches, sluggishness, blue screen.
What do you need to clean your laptop yourself?
To thoroughly clean your computer, you may need the following materials and tools:
- Phillips screwdriver
- Special cloth for screen
- Dry cloth or napkin
- Vacuum cleaner or hair dryer to blow out dust
- Machine oil or silicone grease
Types of cleaning
There are two types - superficial and deep. When deep, the device must be disassembled, thoroughly wipe all parts, completely removing dirt.
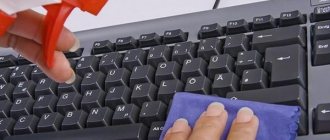
Superficial implies external care of the laptop. Keyboard on the outside, monitor, blowing dust through the fan and radiator grille. This type of cleaning is mostly preventive. The device will remain in service longer. Superficial “cleaning” is important not only for aesthetics, but for the user’s health, because a huge number of microbes accumulate on the keyboard.
If there are all signs of serious contamination on the face, complete cleaning cannot be avoided. It's easier to spend time removing dirt than to pay for repairs.
How to clean your laptop screen from dust and stains yourself at home: photos, videos
Cleaning a laptop monitor with your own hands
When cleaning a laptop screen, you need to know a few rules:
- You only need to clean the laptop screen when it is turned off and cooled down.
- A plastic bag or cling film will help get rid of dust on the screen - they will attract dust from the monitor.
- It is advisable to get a special cloth for microfiber screens.
- If you don’t have a special rag, you can use wet wipes (without alcohol), cosmetic discs, flannel cloth, or microfiber cloth.
- In cases of severe contamination, you can use a weak soap or 3-6% vinegar solution. After dipping the rag into it and carefully wrung it out, you need to carefully wipe the laptop monitor until clean.
- It is prohibited to use materials such as paper napkins, foam sponges, terry towels, toilet paper and materials with coarse lint to clean the laptop screen.
- Do not use alcohol-containing substances, washing and cleaning powders, or window cleaners to clean the monitor.
- Under no circumstances should you scrub or remove heavy dirt from the monitor with hard objects, nails, or a knife - for this it is better to use a wooden stick, a plastic spatula, or a piece of plastic cut from a plastic bottle.
Rules for wiping your laptop monitor yourself
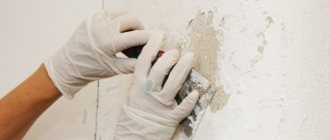
- With the dry cleaning method, you just need to carefully wipe away dust and dirt from your computer monitor or laptop. The corners of the screen can be wiped with cotton swabs - do not put strong pressure on them, so as not to damage the fragile surface.
- When wet cleaning, it is necessary to wet a rag of a suitable material in a soap or vinegar solution and wring it out thoroughly. Spraying the aid on the surface itself is not allowed - moisture can get into the laptop case, which will lead to malfunctions or permanent breakdown of the equipment. Using gentle circular or upward movements, you need to walk across the surface of the screen, and then remove any remaining moisture with a dry cloth.
Tools
What tools to choose when preparing for “spring cleaning”:
- Vacuum cleaner/hair dryer for sucking/blowing dust. If the vacuum cleaner has both functions, you can only use it.
- A can of compressed air. The aerosol performs the same function as a hair dryer.
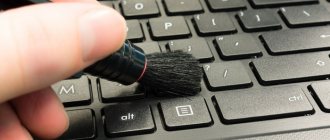
- Soft brushes, small brushes for cleaning the keyboard and other parts. For the same purpose, you can use cotton swabs or swabs.
- Microfiber cloth for wiping.
- Screwdriver Set. Screwdrivers of different diameters will be needed during disassembly.
- Machine oil for lubricating the cooler.
- Isopropyl alcohol for cleaning microcircuits.
- Pliers. Special pliers are used to remove the screen.
- Thermal paste. After cleaning the parts, you will need to replace the thermal paste to better cool the computer.
How to clean a laptop cooler from dust: photos, videos
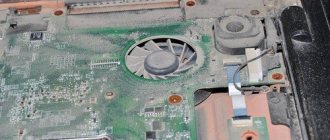
How to clean a laptop cooler from dust?
- The cooler in a laptop is an integral part of the cooling system. Visually it looks like a small fan.
- If there are no serious problems with the cooler, and it is cleaned regularly, then simply blow the laptop with a can of compressed air through its inlet.
- If the fan is quite clogged and the device makes terrible noises, then it is better to perform a general cleaning. Before starting, you must remove the battery from the device.
- To get to the cooler in the laptop, you need to unscrew the back cover of the switched off, cooled device using a Phillips screwdriver. In this process, it is very important not to touch the factory seals and unscrew all existing bolts - sometimes they are hidden under rubber bands, legs or on the side of the laptop. When all the bolts are unscrewed, you must carefully release the cover from the special latches.
- You can easily see the fan under the lid of the laptop. In most laptop models, coolers are very easily separated from their base - you just need to unscrew a couple of bolts. When unscrewing the cooler, you must act extremely carefully so as not to touch the spare parts of the device with your hands. The fact is that static electricity can still remain on them.
- When the cooler is removed, its blades and body must be carefully wiped with a paper towel or rag soaked in alcohol.
- It is also advisable to wipe the fan shaft and apply a drop of machine oil to it.
How often should full prophylaxis be carried out?
How often you need to clean your laptop from dust depends on its operating conditions . There is a myth that the interval between prophylaxis should be from one to two years. In practice this is not the case. The rate of clogging of any cooling system, from super productive HP to budget Asus, varies greatly. For example, you need to clean your laptop at such intervals if:
- the device is used in bed, placed on soft surfaces - 5-6 months maximum;
- the laptop owner is mobile and takes the car with him everywhere - from 6 to 8 months;
- have pets - 4 months, recommended once a quarter;
- the owner strictly follows the operating rules and does not use the cooling pad - 12 months.
When using a cooling pad, the intervals between maintenance must be reduced. Exactly how much depends on the amount of dust in the room, the residents in the apartment, and the daily use of the laptop. In general, it is recommended to reduce the above deadlines by a month.
Advice! It is worth installing temperature monitor software utilities into the operating system in order to see for yourself whether the chips are heating to a critical level. This will make it possible to carry out system maintenance without waiting for a future service date.
How to clean the laptop cooling system from dust yourself at home: photos and videos
Do-it-yourself laptop cooling system cleaning
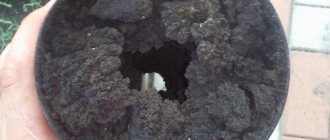
- In addition to the cooler, the laptop cooling system also includes a radiator. The radiator is located near the fan and looks like a grille of thin plates.
- The radiator can be released using a special mechanism. When removing the cooling system, you need to pay attention to the thermal paste - very often it melts and solders the radiator to the processor. In this case, it is recommended to carefully remove excess thermal paste with a napkin from both parts of the laptop and remove the radiator.
- To rid the radiator of dust, it is advisable to blow it thoroughly - with a vacuum cleaner, hair dryer or spray can.
Remove the back cover
Unscrew all the screws on the back panel using a screwdriver. Mark with colored stickers the areas with screws of different lengths.
Well, or lay out the screws on the lid and take a photo.
Check that there are no fasteners under the rubber feet. Carefully inspect the entire back surface of the laptop, the drive niche and the sides. Make sure all screws are removed.
Pry the cover with a pick or plastic card in several places around the perimeter of the case and remove it.
YouTube channel Open Me Up
How to clean your laptop from dust and change thermal paste yourself at home?
Replacing thermal paste in a laptop with your own hands
- Another step in cleaning the laptop and its cooling system is replacing the thermal paste.
- This process must be carried out after cleaning the radiator.
- You can purchase thermal paste at any specialized computer store.
- When the radiator is cleaned, you need to apply just a little thermal paste to its body so that it does not extend beyond its limits.
- A clean radiator with new thermal paste can be replaced.
Cleaning the Acer model
Before disassembling, the laptop is turned off and the battery is removed from it. The back panel is removed. After removing the hard drive and RAM, unscrew the bolts to remove the front panel. Then the computer turns over. Use a plastic spatula to carefully pry up the keyboard and lift it up. Try not to deform the cable. Next, the panel is removed by simply sliding it to the right or left. In the upper left corner you will see a cooler. To access it, carefully remove the board by unscrewing the bolts. After disconnecting the display cable, you need to disconnect the ports on the right. When removing the bolts, sort them by markings so as not to mix them up when reassembling them. The cooling system is cleaned with a vacuum cleaner and a brush, and the radiator is blown out. After the procedure is completed, the laptop is put back together.
How to blow dust off a laptop without disassembling it?
How to blow out a laptop yourself?
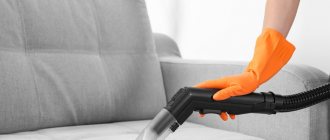
- In order to clean your laptop at home without disassembling it, you can use the procedure for blowing it out.
- To do this, you need to turn off the laptop and let it cool down.
- Then on the side (in rare cases, back) of the laptop panel you need to find a ventilation hole - it looks like a ventilation grill through which exhaust, hot air comes out.
- Pointing the nozzle of a can of compressed air or a hairdryer into the ventilation hole, you need to thoroughly blow it out. It is recommended to apply pressure on the can for no longer than one second at a time.
- It is also worth paying attention to the fact that this cleaning method is not very productive, and its effect only lasts for a couple of months.
What program is there to clean and blow dust out of a Lenovo laptop?
Lenovo Energy Management laptop cleaning program
- Lenovo has developed a special program specifically for its devices that allows you to clean the laptop from the inside.
- The program operates by accelerating the fan, which expels dust from the device.
- It’s worth noting right away that the program is not capable of dealing with large amounts of dust and dirt, however, with regular software and mechanical cleaning of the laptop, its actions will not be superfluous.
- The program is called Lenovo Energy Management.
How to start the Lenovo Energy Management program
To activate the program, you must:
- For Windows 8, go to Control Panel.
- Open System and Security.
- Find “Power Options” and “Change Circuit Settings”.
- Open the Lenovo Energy Management program.
- Select the “Dust removal” mode in the program window.
- Click the “Start” button.
- After cleaning, click the “Cancel” button.
To summarize, I would like to note that no matter how simple and effective all the home methods of cleaning a laptop may seem, professional cleaning by specialists still remains the safest and most effective.
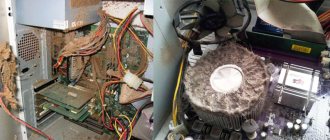
What are the dangers of heavy pollution?
If you do not clean the insides of your laptop from accumulated dust and continue to use the device when it is constantly overheating, the following problems may occur:
- The device freezes and periodically turns off at the most inopportune moment. This can, at a minimum, lead to the loss of necessary data and complicate the entire work process if the laptop is used for work.
- Failures or complete failure of the cooling system.
- Malfunctions and reduced clock speed of the video card and processor. At best, the laptop turns from a powerful “beast” into an ordinary budget computer. At worst, the main components will have to be replaced.
- Rapid wear of components and reduced service life.
- Burnout of the north bridge and microcircuits, most often the power controller.
- Laptop fire.