Dyeing eggs for Easter with onion peels is perhaps the most famous and popular of all known methods. And if previously they mostly painted only the simplest of them, using even, monochromatic coloring, now housewives have come up with many others.
Drawing is very popular: many available materials and plants are used here, from parsley with dill to a rubber band for money and masking tape. There is also a large number of marble stains, where just one onion peel is taken, as well as other food and natural dyes. For example, such as hibiscus tea, berry juice or brilliant greens.
Each time we get a new unique design, a rich ornament or simply a spectacular abstraction.
I tried many different methods, including coming up with my own. Some of them have already been described in articles on the blog. Today I decided to specifically devote time to painting onion skins. Moreover, I have accumulated a lot of ideas, options and methods, and have something to share. I will also offer you my video. I will be glad if the article turns out to be useful and you use the recipes.
Painting eggs with onion skins for Easter - even coloring
Let's start with the traditional way in which our grandmothers painted eggs. We will get an even, monochromatic brown color. To get a brighter and more saturated shade, choose husks that are also bright. If there are several red onions, then take clothes from them. In the company of brown, the two colors will give a slightly reddish glow.
There are several options for such even coloring. All of them are related to the moment the product is sent to the infusion and remains there. In this chapter I will talk about all of them. And you can now choose the one that suits your taste best.
What we need:
- any number of eggs
- 200 g onion peels
- 1 liter of water
- 1 tbsp. spoon of salt
- a little vegetable oil for greasing
How to cook:
1. It is necessary to remove the eggs from the refrigerator at least an hour in advance. They must be at room temperature. If they are colder than the water in which we will boil them, then there is a chance that they will burst.
They must be washed and degreased. This can be done with a regular alcohol wipe.
2. Prepare the husk. Rinse it in several waters to remove any possible dust and dirt. Start harvesting the husks about a month to a month and a half in advance. Try not to make it pale, so that along with light shades there are also dark brown and red ones. This will make it possible to get a richer and brighter color.
3. Place clean husks in a saucepan. And put the eggs there too. Try to place them so that they do not touch each other. There will be some unpainting at the point of contact. Fill the contents with water. We take the minimum amount of liquid and the maximum amount of husk. The color of the shade will be rich and bright.
In the next chapter, I did coloring with drawing in 100 grams of husks and 2 liters of water. You can see what color it turned out. It is more delicate and lighter. This way the drawing turns out alive and natural.
4. Add salt. It will keep the shell intact, preventing it from bursting. A tablespoon of salt is enough for a liter of water. If you pour more water, add a little more.
5. Place the pan on the fire and bring the water to a boil. Reduce it to medium and cook for 10 minutes, as usual, soft-boil the product. During this time, you can turn the eggs several times. Just be careful and preferably with a silicone spoon, so as not to scratch the color that has already been applied by that time.
Already during heating, the color of the water will begin to darken and by the time it boils, it will turn dark brown.
6. After the time is up, turn off the heat and leave the contents for additional coloring for 20 to 50 minutes. The longer they sit, the brighter the color will be.
7. Carefully remove the colored product and place it on a stand to allow the water to dry. Moisten a cloth with oil and wipe the shells while they are still warm. You can additionally polish the shell with a paper napkin or cotton rag.
Place them in a basket or on a plate lined with sisal.
This is one way. I will describe the second method in the next chapter. There is a third method, where they first boil water with the husks for 20 minutes, then put the eggs in it and cook them for 10 minutes. After which the fire is turned off and they are left to paint for another 20 minutes.
I don’t like this method because often when the eggs are lowered into boiling water, the shells can’t stand it and burst.
That's why I use the first two options.
Chef's Tips
Chef Joseph Krichevsky shared several tips that will help you decorate the Easter table in an unconventional way and surprise your guests with its colorful decorations.
- According to the chef, Easter eggs look best when placed on fresh grass, lettuce leaves or straw. As a dish, you can use a bowl that is loved by many, the presentation of which looks laconic and aesthetically pleasing.
- The process of dyeing quail eggs has the same technology as chicken eggs, however, it is worth considering several important points. Quail eggs cook faster until they are ready, so 5 minutes is enough to hard-boil them. Also, unlike chicken eggs, quail eggs will not burst if they are immediately dropped into boiling water.
How to paint eggs to create a beautiful pattern
In this section, I will share with you options on how you can get different patterns on the shell. To create it, you can use various available materials - threads, elastic bands, masking tape, stickers, ribbons, lace and even stationery bookmarks in the form of a strip, with tape on one side. You can also cut out any figures from paper.
Most importantly, I will talk about the principle of creating such drawings. Knowing them, you can come up with new options. In the next chapter I will continue this topic and tell you how patterns are created.
What we need:
- any number of eggs
- 100 g onion peels
- 1-2 tbsp. spoons of salt
- 2-2.5 liters of water
- a little oil to lubricate the shells
- means for drawing (in each method it will be written which ones)
How to do:
I want to say right away that different designs can be obtained in one coloring by preparing the eggs in advance. That is, apply one or another application to them in the form of various prepared products. Therefore, first I will describe the general mechanism, and then I will specifically dwell on each of the options in more detail.
In the first chapter, I talked about the simplest method, where both the husks and the eggs are sent to the pan at the same time and also boiled together. Here I will describe another method, where first an infusion is made, and then painting is done in it.
1. Place the washed husks in a saucepan and fill it with water. I take 100 grams, or three full handfuls if you don’t have scales. The color and intensity of the result will depend on how much onion clothing you take. I tried to collect it in different colors to get a more attractive shade.
If you use twice as much husk, the shell will turn out darker after being in the infusion.
I pour 2.5 liters of water, taking into account that some will boil away. And by the time of painting there will be less than 2 liters left.
2. Place the pan on the fire and bring the contents to a boil. Then reduce the heat and cook for 40 minutes on low heat under the lid.
3. Turn off the gas, and also leave it under the lid to infuse. In this case, the infusion can stand for as long as you like, the main thing is that it has time to cool completely by the next stage. I usually cook it in the evening and leave it to brew overnight. You can start in the morning.
4. Eggs should be removed from the refrigerator at least an hour in advance. Their temperature should be the same as that of the infusion. If you put them in it straight from the refrigerator and set it to cook, some of them may burst.
While they reach room temperature, you can start applying applications to them (I’ll tell you about them in detail below in the subheadings).
5. Transfer the prepared preparations into the infusion and cover them with husks on top. Add salt and put on fire. Cook for 8-10 minutes, as we usually do, so that the eggs are hard-boiled.
6. Turn off the heat, cover the pan and leave to cool and paint for 20 to 40 minutes. Then take them out, let them dry and while they are warm, lubricate them with oil using a cotton pad. To create a glossy effect, you can polish them with a cotton cloth or paper napkin.
Now I’ll tell you about coloring ideas.
Stripes and ribbons
A very effective and attractive option that everyone likes. To create a pattern, ribbons of different widths or strips of lace can be used. In the absence of one or the other, you can use masking tape, gluing it to a grease-free surface, creating any geometry.
I took fairly wide ribbons, which I tied crosswise. Cut the resulting strings shorter; they will also appear on one side of the shell.
To create a tighter fit of the tapes, you can additionally wrap the workpiece in strips of bandage folded crosswise. Cells from it will also appear on the surface of the shell. This minor addition will not only keep the applique from slipping off, but will also provide an attractive patterned background design.
If the surface is decorated using masking tape, then it will be necessary to wrap it in gauze, nylon or a cloth napkin.
Spectacular stripes will be obtained if there is lace. In this version there will not only be stripes, but also a beautiful patterned design will appear.
Cobweb
A similar technique can be applied to threads. You can take them of one thickness or several. Everything is very simple here.
Wrap the threads around the oval of the product in the form of a web. Or you can arrange them randomly. In this example, two threads of different thicknesses are used. Below is the knitting material, which is thicker, distributed in the form of sequential winding through a certain center. On top there is a thin sewing thread wound randomly.
In this case, additional fixation in the form of nylon or gauze is not required.
Rubber bands for money are used in a similar way. Several of them are wrapped around the egg in a loose order, as it happens. And it is better to secure them with a piece of gauze, wrapping them around the workpiece so that the elastic bands do not slip off.
Beautiful original abstraction
This idea came to me when I was looking for new interesting coloring options. And it turned out so beautiful and unusual that now, when I paint eggs with onion skins, I always use it.
The material that we will use in the applique is small bookmarks with tape stuck to one side. It is with this side that we glue identical strips randomly across the surface of the shell.
There should be neither too many nor too few of them, so that there are free spaces left in the form of white islands.
Then wrap several rows of thread around the glued workpiece so that the bookmarks do not fall apart during cooking. And that will be enough. You don’t have to cover them with additional gauze or nylon.
Abstraction with color change
It turns out quite interesting when the color tone is not uniform. Somewhere it will appear darker, somewhere, on the contrary, lighter. I first tried this technique when I dyed eggs with hibiscus tea. There they turned out “cosmic”, with a clear transition of color from light to dark.
I liked the technique, and I decided to use it in this case. I'll tell you how.
You need a piece of foil. Fold it into a triangle in the same way as folding paper to cut out a snowflake. And just as we cut out figures on it, cut them out on foil. You don’t have to make them different, you can just cut off identical circles or triangles.
Place an egg on the surface of the foil and crumple it, forming a kind of cocoon. The more irregularities that form on the surface, the better. Water will get into the holes and paint the empty spaces more effectively than those that fit tightly. And so, the workpiece is ready for painting.
Here are some ideas for getting new interesting drawings. You can make only those of them that you liked the most, or you can do it like I did, one at a time, two at a time.
Next, put them in a pan and paint them in the same way as I described above. Remove the finished pieces from the infusion and remove from them all the materials that were previously attached there. Then place them on a stand to dry the water. While still hot, grease them with oil.
And you can put it in the basket.
Dyeing Easter eggs to create patterns
The following series of ideas can be included in the same coloring - obtaining interesting patterns on the shell. Perhaps some of them are familiar to you, and some will be new.
I used the same method for obtaining the main color as in the previous story. That is, in the evening I made an infusion, and in the morning, in the cooled infusion, I boiled the eggs for 10 minutes, and then let them brew for another 30-40 minutes. And here are the patterns I came up with.
Lace patterns
We will use a piece of lace as the main material for creating a beautiful delicate pattern on the shell. Everything is done here very simply - you need to cut a piece of fabric of such a size that it is convenient to wrap the egg in it.
I specially cut out a background smooth section from a piece of tulle without any patterns, although there were flowers on it. I like how subtle and elegant the design is in this design. If you want the design to be richer, use fabric with flowers and leaves.
The only advice is to pull the tulle very tightly, otherwise the pattern will turn out blurry.
And so, a piece of tulle should be wrapped tightly around the egg and tied on top with threads or an elastic band. A lump forms at the point where the knot is pulled together, and this will be reflected on the finished product. Therefore, lift the knot up so that the sides are beautiful.
Dot pattern "Specks"
An excellent result is obtained if dyeing is done using any grain. It can be decorated using food coloring and onion peels.
Moisten the surface of the shell with water and roll it in rice or millet. Pour a little cereal onto a piece of gauze, nylon or cloth napkin. Gather the knots at the top and twist them into a knot, then tie with thread or tie with an elastic band.
Distribute the grains over the entire surface as evenly as possible. So send it later to the infusion.
There is one important point here! We will cook the product for 10 minutes, then spend another 30 minutes first in boiling water, and then in hot water. During this time, the rice will have time to completely cook.
Thus, it will increase in size by 2-3 times. If you apply the grain very tightly, it will cover all the free space on the shell and the color will be paler. Although that's not to say it's bad! Just keep this in mind. The photo shows both options. He can choose the one he likes best.
Floral fantasies
I usually always paint our Easter symbol with fresh plants and flowers. And this time I decided to experiment and took dry petals and leaves. I liked orchid petals, although you can take them from other flowers - tulips, roses..., the main thing is that the plants are not poisonous.
Moisten the shell and apply dry parts of the plant to it. Then place the workpiece in gauze or nylon and tighten the knot tightly on top using threads or an elastic band. The excess can be cut off. The preparation is ready to be sent to the infusion.
The result is a simply fantastic pattern with delicate color transitions and play of colors in a wide range of shades.
Fantastic patterns
The patterns obtained using this technique are comparable to some kind of fantastic landscape. The color transitions from light yellow to dark brown simply attract the eye with their unforgettableness. Creating such patterns is not at all difficult. And here we will need an infusion of onion peels. Or rather, even infused onion clothes.
It needs to be applied in small fragments to the egg shell and wrapped around it like a diaper. You can secure them with threads, simply wrap them around, or wrap the workpiece in gauze or a rag.
I tried doing both, but it didn’t affect the final result. The only thing is that where there were free white areas, thread marks were painted over, and it was impressive.
If you dress the workpiece in multi-colored pieces of clothing, you will get a richer pattern. Therefore, it is good to have white, brown and red husks here.
And be sure to leave some white islands, this will give additional color to the overall picture.
Video on how to paint eggs with onion skins - 11 ways (we create designs and patterns)
Sometimes it is difficult to describe in words this or that action. Especially if it concerns a master class, where there are moments when it is better to see once than to read 10 times. And so we made a video in which you can see how and what needs to be done to get this or that drawing or pattern.
The video gives 11 different ideas, from which you can take any one you choose. I painted everyone one copy at a time, so that each egg was unique.
There are a couple more methods in the picture that we have not considered. But I’ll tell you about them later; they also deserve attention.
I hope that the options that we considered are also attractive. Spreading these colors around the Easter cake will be very impressive and cool.
Easter game that requires colored eggs
Painted eggs are a key element of a fun game that is played not only in the post-Soviet space, but also, for example, in Greece. We don’t have a name for this fun, but the Greeks have it: τσούγκρισμα. It is pronounced TSOO-grees-mah (translated as “to collide”). Two players test the strength of the eggshell and practice their own special, winning strategy. The goal of the game is to break the enemy's egg shell without breaking your own.
To play, each player must hold a colored egg in their hand. The opponent hits it with his egg. When one "end" of the egg is cracked, the egg is turned over and the game continues. The one with the least broken egg wins. It is believed that the winner will have good luck during the year following Easter.
When players break eggs in Greece, one person says “Christos Anesti” (“Christ is risen!”) and another says “Alifos Anesti” (“Truly risen!”).
Easter game
We color eggs with parsley, dill and other herbs
This method is very popular among the people. Firstly, because it is very, very simple, and secondly, the coloring always turns out to be spectacular and attractive. It was as if Mother Nature herself took part in this process.
The most popular plants for application are parsley and dill. However, it should be noted that Easter always falls at a time when nature wakes up and actively gifts us with many young leaves and flowers. Therefore, leaves of any configuration and the first spring flowers can be used.
And if there is one and the other, that will also be wonderful. So, let's look at this method using classic parsley and dill.
How to do coloring:
1. To apply a clear pattern, it is best to purchase white eggs. They should be at room temperature. They should be thoroughly washed and degreased. You can take the quantity you need. Immediately prepare the sprigs of herbs.
2. We also need nylon. You can take it either from tights or from stockings. It’s better to buy new hosiery, after all, we make the product for food. You can also try dyeing using a cloth napkin. This will make it more economical.
3. Soak the shells in water and place a leaf of parsley or dill on top. Usually they are applied on two opposite sides. Or you can combine both plants on one piece, in general, as your imagination tells you.
If the leaves fall, it is also advisable to moisten them in water.
4. Wrap the egg with the applique in a piece of nylon and pull the ends tightly into a knot. In this way, form other blanks.
5. Wash the onion skins. You can take it from 100 to 200 grams per 1.5 liters of water. The more it is, the brighter and more saturated the color will be.
6. Place the blanks wrapped in nylon on the bottom of the pan and place onion peels on top. Pour water over everything so that it covers the contents, add a tablespoon of salt and put on fire. After the water boils, reduce the gas and cook for 10 minutes. Turn off the heat, cover the pan with a lid and leave for 20-40 minutes, color and cool in the resulting infusion.
7. Take out the eggs and place them on a plate. Remove the nylon clothing along with the husks and let the water dry. Then wipe the still warm shell with a cotton pad soaked in oil. And you can put our Easter symbol in a basket or on a plate.
In the same way, you can use flowers as an applique, even those that grow on our windowsill. Here is an example with violets. It turns out very tender and bright.
And in this way, appliqués are made from various available means and materials, creating simply magnificent designs.
With lace or paper stencils
Lace or stencil dyeing is an old way of decorating Easter eggs. In a similar way, it is possible to create a simple pattern or picture based on an Easter plot.
We will need:
- adhesive film;
- chicken eggs;
- onion peel.
If there is no special adhesive film, then the shell is moistened with milk and paper blanks are glued.
We just do this:
Cut out several figures from the film for covering tabletops, for example, Easter bunnies or chickens. Paste the prepared stencils onto already hard-boiled and cooled eggs.
Prepare a decoction of onion peels of different colors, cool to room temperature. Place eggs with stencils in the liquid and hold for 10 to 30 minutes, and then remove the silhouette from the side.
You can cut out any paper stencils, for example, for children you can beautifully decorate the shell with animals or favorite cartoon characters. A heart or leaf, butterfly or flower looks interesting on an Easter treat. Using scraps, it is possible to create a bouquet of flowers or a circus performance on the shell.
How to dye eggs with red onion skins and green paint
When I first saw eggs in such a magnificent design a few years ago, I was simply speechless. They seemed somehow unreal to me. I tried for a long time to understand how it was possible to make such a bizarre drawing, but, to be honest, I never figured it out.
Then I found this method on the Internet, and without even waiting for Easter, I began to try it. Imagine my joy when I succeeded the first time. Later, using the same idea, I began to do other amazing coloring, which I will share below in this article.
What to cook:
- 100 grams of onion peels
- 10 ml (1 bottle) brilliant green
- 1 tbsp. spoon of salt
- chicken eggs
- water
Preparation:
1. Rinse and dry the husks in advance. In this case, I decided to take it from red onion. Although I added a little from the usual to make the color scheme richer.
2. Cut the dried onion clothes with scissors into small fragments, no larger than 1 cm in size. Immediately prepare gauze or nylon.
If you take nylon, the coloring will be more even. If you use gauze, there may be unpainted dots on the green fragments of the picture. Although it's not too noticeable. This time I didn’t have any new tights and I used gauze.
Any material you take will need to be cut into squares.
3. Moisten a room-temperature egg shell with water and roll in the sliced husks. Try to collect more fragments on it.
4. Place some more slices on the cheesecloth and place the egg in the center. Gather the ends of the fabric up and tie them tightly into a knot, wrapping them with thread or elastic. Cut off excess ends. Wrap all the pieces in the same way.
5. Place them in a saucepan and fill with water so that they are hidden under it. Add salt. She will not allow the shell to burst. And immediately pour out a bottle of brilliant green. If there are onion slices left, you can also put them in a bowl. Place the pan with the contents on the fire.
8. It will take 7-8 minutes to cook, although 10 is possible. In this case, there will be no need to insist.
As soon as you turn off the gas, you can immediately take the pan to the sink and rinse the eggs under running water. When the water becomes lighter, cut off the ends of the fabric with scissors and remove the husks, then rinse again.
It is best to wear gloves for these manipulations, otherwise our hands will turn green.
All that remains is to dry the shell from water and wipe it with oil. Place on a plate and admire the fruits of your labor.
Required Ingredients
To prepare a classic onion broth you will need:
- 10 chicken eggs;
- 2 liters of water;
- onion peels (about 10–12 onions);
- vegetable oil;
- salt.
In addition to the list above, for Easter eggs with different patterns and interesting effects you may need:
- elastic bands or thick threads;
- rice cereal;
- gauze or nylon tights;
- needle;
- small leaves or flowers (parsley, cilantro, begonia, celery, etc.);
- wax;
- insulating tape.
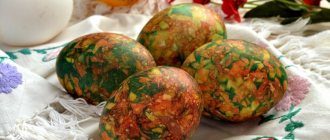
Beautifully marbled eggs using onion skins
Marble coloring can be achieved either using onion peels alone or using other dyeable products. For example, it could be berries or hibiscus tea. The main thing is that there is color contrast. In principle, the previous method, where they used brilliant green as a dye, can also be attributed to this option.
Hibiscus berries and tea will be discussed below. And now I will tell you how you can make the Easter symbol very impressive, using only onion clothing.
Required components:
- any number of eggs
- 100 +100 grams of husks of different colors
- 1.5 liters of water
- 1 tbsp. spoon of salt
- a little vegetable oil for greasing
- nylon or gauze (cloth napkins can be used)
How to do coloring:
1. Rinse the husks in advance and dry them. The more colorful it is, the richer the ornamental pattern will be. Chop half, namely 100 grams, into smaller pieces, cutting with scissors into fragments no larger than a centimeter. This is provided if you want to get a clear, small drawing, as in the photo.
There are options in which the husks are cut larger. In this case, the result is a drawing with fewer fragments, where there are stains and patterns. However, it also looks quite attractive (photo below). But I will do just small fragments. To really look like marble.
2. Rinse and degrease eggs at room temperature. To do this, you can take an alcohol wipe. Then moisten one of them with water and roll in the husk.
3. Prepare a napkin or a piece of nylon and place a little more onion slices in the center. Place or place an egg on it and lift the corners of the fabric up. Stretch the fabric and do not tie the ends with thread yet, distribute the cutting over the entire surface as evenly as possible. At the same time, white islands should remain.
Then tie the ends in a knot and cut off the excess. Prepare all the ingredients in the same way and place them in a pan.
4. Fill with the second part of the remaining husk (100 g) and fill with water. Add salt to prevent the shell from cracking during cooking. Put on fire. After boiling, cook for 10 minutes.
Then turn off the heat and leave everything in the pan as is for coloring. The path will lie in the infusion for 30-40 minutes. Then cut off the knot and remove the husk, rinsing the surface in the same infusion. We will see a very attractive marble design that attracts the eye with many colors and shades.
5. While the shell is hot, grease it with oil and polish it with a napkin. You can put it in a basket and decorate the holiday table.
Or spread it around the finished cake.
My video recipe: how to color eggs with blueberry husks and berries
This is another option for marbling, where the eggs get a fantastic coloring. In the picture they look great and look like Venetian mosaics from ancient frescoes by Michelangelo and Leonardo da Vinci. And this is just a photo. Believe me, “live” everything looks even more rich and alive.
When I decide to make eggs this way, I paint at least 3 dozen of them. Because because of their attractiveness, when everyone sits down at the table, the hand involuntarily reaches out for the next masterpiece. In addition, guests come who certainly want to take one of the copies home. Therefore, I make sure to treat everyone and give them with me so that everyone can be treated.
We ourselves also go to visit our parents and bring them the beauty that they enjoy as children. And they look at the magnificent ornament for a long time, wondering how this could happen.
I offer you my video recipe for viewing. Let me brag a little - I came up with it myself. I’ve never seen a drawing like this on the Internet.
I still wonder where such a variety of colors came from here. After all, only two components were used?!
