This article tells you how to paint eggs with green paint. It's simple, fast and interesting.
Recently, modern housewives have been trying to use natural dyes to color eggs for Easter.
- It is known that ready-made chemical dyes that are sold in stores and on the market are very harmful to health.
- Particularly dangerous are tartrazine (E102), yellow (E104) and (E122), carmoisine (E122), crimson (E124) and red (E129). Almost all of these emulsifiers are used by manufacturers to create egg dyes.
- But there is an excellent alternative - these are natural dyes that are found in every home, for example, brilliant green.
- In this article we will figure out whether it is harmful to paint eggs with brilliant green and tell you about the best ways to paint eggs with this product.
Is it possible and not harmful to paint eggs with green paint for Easter?
Eggs painted for Easter using brilliant green and onion skins.
This question can be answered unequivocally: yes, painting eggs with brilliant green is not harmful. It is even much safer than painting with dubious paints, which can lead to allergies, shortness of breath or even a feeling of suffocation. Housewives have been using natural dyes for a long time - it’s simple, convenient and safe.
Although many doctors argue that you should not paint eggs with such an antiseptic, since it can also stain the whites, and this can be harmful to health. But some are afraid and don’t do it, while others try and are convinced that there is nothing wrong with it. Therefore, if you are afraid that dyeing eggs with green paint and other similar dyes is harmful, then do not do it. You can paint an empty shell and decorate the interior of your home with it for Easter. In general, each person chooses individually, and we continue.
How to paint eggs green with brilliant green: a classic recipe
Easter eggs painted with brilliant green
First you need to prepare the eggs for coloring. Follow these rules:
- Remove the eggs from the refrigerator and leave them on the counter for half an hour.
- Boil the eggs for no more than 7-10 minutes . They should be tasty and beautiful.
- Add 2 tablespoons of salt, a little vinegar or lemon juice to the water in which the eggs will be boiled.
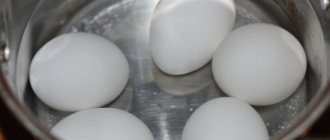
Now you can start coloring the eggs with brilliant green. Follow these steps:
Prepare greens, eggs and gloves
- Prepare the required amount of raw eggs, but not too many, otherwise they will not color evenly - no more than 5-10 eggs per 1.5 liter pan. You will also need a bottle of brilliant green and gloves.
- Now pour water into the pan. Place it on the fire and carefully lower the eggs.
- Add salt and vinegar when the water is already boiling.
- Then put on gloves, otherwise you will spend a long time washing the brilliant green from your hands. Add a few drops of greenery to the water. Pay attention to the color of the water. If you want to get a more saturated color of the shell, then add more green stuff. The water should be dark in color and the eggs should only be slightly visible through it.
- Boil the eggs in the green solution for 7 to 10 minutes.
- Then drain the water and let the eggs cool.
Easter eggs with an original and rich green color are ready!
Important: To give colored eggs a beautiful shine, grease them with vegetable oil.
With nail polish
Oddly enough, but not only with the use of natural dyes you can create a marble pattern. You can even marbleize eggs for Easter using nail polish.
Execution process:
- Boil the eggs for about 8-10 minutes. Remove from water and cool.
- Pour water into a bowl and add a few drops of different colored nail polish.
- Drops of varnish on water are slightly diluted with a wooden skewer or toothpick to create patterns and the colors are slightly mixed.
- Then carefully lower the boiled egg into a drop of varnish obtained in water, turning it over slightly so that the shell is covered with a pattern on all sides.
- Also, carefully painted egg is placed on a paper napkin and allowed to dry completely so that the varnish layer does not stick. The rest of the eggs are dyed in the same way.
Advice! To avoid getting your hands dirty with varnish, you can wear medical or rubber gloves.
Marble eggs made for Easter thus turn out to be very bright, but you should not get too carried away with painting with varnish, since this is still a substance of chemical origin.
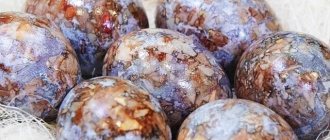
How to paint marble eggs with brilliant green with onion skins: photo, video
Marble eggs painted with brilliant green and onion skins
Prepare the following for the coloring process:
- Raw eggs
- Some onion skins (preferably the dark color of a red onion)
- A small piece of gauze or nylon stocking
- Threads (any)
- Zelenka (a few drops)
- Salt - 2 tablespoons
- Polyethylene or rubber gloves
Now start the coloring process:
Marble egg coloring process
- Crush the onion peel into small pieces with scissors. You can grind it in a blender, then the eggs will have a truly marbled surface.
- Soak the eggs in water and roll well in the crushed husks.
- Then put a piece of stocking or gauze on top of the shelled eggs and wrap them tightly with threads.
- Pour water into the pan. Place the prepared eggs in it and turn on the gas.
- Don't forget to add salt so that the egg shells remain intact during cooking and do not crack.
- After the water boils, add a few drops of brilliant green to it.
- Boil the eggs for 7-10 minutes.
- Then remove them from the water and remove the “onion” winding. Easter marble eggs are ready!
Ingredients
For coloring you will need the following products:
- fresh chicken egg - 1 dozen;
- alcohol solution of brilliant green 1% - 10 ml (1 bottle);
- onion peel - medium dry layer from 5 large heads;
- fresh water – 1.5–2 l.
The pattern appears brighter and more contrasting on white eggs. Smooth, even, uncracked specimens are selected for painting. Size doesn't matter. When purchasing, it is important to consider color and absence of defects.
The following equipment is also required:
- latex gloves;
- medical bandage (gauze) – 1 pc.;
- dense threads - 1 m;
- metal container with a wide bottom, 2 liters;
- scissors.
How to paint eggs with brilliant green and iodine?
Many housewives wonder: is it possible to make marble eggs if there are no onion peels, for example, replacing them with iodine?
- It is worth noting that without onion peels it will not be possible to make a “marble” coating.
- Using iodine, you can paint eggs an even light brown color using the method described above in the classic recipe.
- It is worth noting that if you add a little soda and salt to the water, the iodine will turn it blue. The result will be an interesting shade.
- But this does not always work out, since everything will depend on the composition of the water (whether you use purified water, from the tap, etc.), the reaction of iodine and soda.
Therefore, first try to perform the process on one egg, and then, if you don’t like something, repaint it in a different color.
Interesting: If you mix equal parts brilliant green and iodine and paint eggs in the classic way, you will get an interesting color - khaki.
What is better – brilliant green or paint?
Despite the doubts of many regarding the harmlessness of the main coloring ingredient - brilliant green - I hasten to assure: the most popular product of every home medicine cabinet is a hundred times more useful than any food coloring, which experienced and wise housewives have long abandoned. And participation in the process of coloring onions does not raise any questions at all. This is the most traditional and time-tested method of coloring Easter eggs.
How to paint eggs with brilliant green and potassium permanganate a rich brown color?
Easter eggs painted with brilliant green and potassium permanganate
Using potassium permanganate, you can paint eggs pink for Easter. To do this, do everything as described above in the classic recipe for painting with brilliant green:
- First you need to dilute the manganese crystals in a small amount of water. Take the crystals on the tip of a knife, put them in a small bottle (up to 10-20 ml) and fill them with cold boiled water. Shake the bottle so that the manganese dissolves well. Now this solution can be used.
- Prepare the required amount of raw eggs, but not too many, otherwise they will not color evenly - no more than 5-10 eggs per 1.5 liter pan. You will also need gloves.
- Now pour water into the pan. Place it on the fire and carefully lower the eggs.
- Add salt and vinegar when the water is already boiling.
- Then put on gloves, otherwise it will take you a long time to wash the manganese off your hands. Add a few drops of potassium permanganate to the water. Pay attention to the color of the water. If you want to get a more saturated color of the shell, then add more red solution. The water should be dark in color and the eggs should only be slightly visible through it.
- Boil the eggs in the solution for 7 to 10 minutes.
- Then drain the water and let the eggs cool. Ready!
Interesting: If you mix brilliant green and manganese solution in equal proportions, and then add it all to the water to color the eggs, you will get rich brown eggs. Although the same color can be obtained by painting with onion skins. But, if you don’t have it on hand, you can easily replace it with a solution of brilliant green and potassium permanganate.
With food coloring
A beautiful marble pattern for Easter can be achieved not only by using greenery and onion peels, but also by using food coloring.
The method of coloring eggs for Easter with dye to achieve a marble effect is not particularly difficult, but differs significantly from previous options.
For staining you will need:
- eggs – 8 pcs.;
- table vinegar - 2 tbsp. l.;
- paper napkins;
- gel dyes of different colors.
Unlike dyeing marble eggs for Easter, in previous versions, the main product must already be ready to use dyes. Therefore, it is necessary to hard-boil the eggs in advance and let them cool completely.
Cooled and completely dried eggs are wrapped in paper napkins. Place them separately on small saucers and pour vinegar over them so that the napkin is completely wet on all sides.
Then add 1-2 drops of dye of different colors onto the eggs wrapped in napkins (it is advisable to use contrasting colors to make the pattern brighter and clearer).
After applying the dye, you should wait a few minutes. After a couple of minutes, they should be turned over and the dye applied again to the unpainted areas. You need to leave them in this form until the napkins are completely dry (about 40-60 minutes).
Dry wipes should be carefully removed. It is advisable to wipe the shell with vegetable oil so that the colors become richer and acquire shine.
Attention! When painting for Easter in this way, it is necessary to thoroughly ventilate the room, since vinegar has a pungent odor.
“Lacy” Easter eggs using brilliant green: photo
Lacy eggs using brilliant green
If you have a piece of unnecessary lace in your house, then you can make lace Easter eggs.
Wrap the egg in lace and tie it tightly with thread
Follow these steps:
- Wrap a raw egg in lace, twist the end and tie with thread.
- Then put a pan of water on the gas, lower the eggs, and when the water boils, add a few drops of brilliant green.
- Boil the eggs for no more than 7-10 minutes.
- After this, remove the eggs and place them in cold water to cool.
- Now take them out of the water and remove the lace.
Lacy Easter eggs are ready!
Coloring methods
Each home has its own methods of painting. Some people prefer to use special paint and food coloring, while others approach this issue in a more original and unusual way, resorting to interesting methods of dyeing eggs.
Onion peel
Most believers prefer to dye eggs for Easter with natural dyes. One of these dyes is onion peel, which produces dark yellow, brown and purplish-red products:
- Water is poured into the pan and a large amount of husk is added (the initial result depends on the choice of its color and proportions).
- The water is boiled for 40 minutes and allowed to cool.
- The broth is freed from the husks, and raw, washed eggs are placed in it.
- Cooking time is 15 minutes.
- After this, the testicles need to be cooled.
Onion peels and greens
You can also paint eggs with onion skins and brilliant green, resulting in brown-brown and burgundy-green products:
- Wet raw eggs need to be rolled in fine onion peels.
- Use a nylon stocking to secure the husk.
- Dip the eggs in cold water and add brilliant green at the rate of 10 ml per 1-1.5 liters of water.
- Cook the product, cool and remove the nylon.
Painting with onion skins and brilliant green is also considered a safe method.
Beet
Egg blanks dyed with beets are also a very interesting option. These Easter eggs can be made either dark burgundy or soft pink by correctly calculating the infusion time and the concentration of the solution.
There are several options for coloring beets:
- Finely grated beets should be spread on the egg. The longer it sits in this slurry, the more intense the color will be.
- You can also simply boil the eggs along with the beets, which will then be useful for making a salad.
- Decoction with beets and 1 tsp. vinegar is also a great option for coloring. To do this, peel the root vegetable, grate it on a coarse grater, add vinegar, add water and boil for 10-15 minutes. The eggs are placed in water with beets and kept until the desired shade is obtained.
To color eggs with beets, it is best to use enamel dishes, since the beet pigment is well absorbed even into the walls of the vessels.
Food colorings
Easter eggs can also be colored with food coloring. Now on store shelves there are a lot of paints for Easter eggs of various shades, with which you can make this process as fast and efficient as possible.
Easter eggs for which food coloring is used as directed are also safe to eat. A standard sachet of dye is designed for a glass of water, so it is not recommended to reduce the amount of liquid.
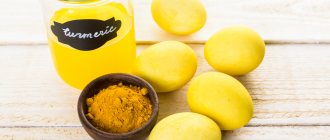
Turmeric
People began to paint products in turmeric not so long ago, but this technique allows you to paint eggs for Easter in an interesting way:
- The shells are degreased by washing in warm water and soap.
- Pour a packet of turmeric into a saucepan and pour in 500 ml of boiling water.
- The solution is filtered and cooled slightly.
- Place the eggs in the solution and let them cook for 10-15 minutes.
It is not difficult to color eggs for Easter with turmeric, but if they burst during cooking, they can acquire a specific taste.
Painting with a pattern
To dye eggs in an unusual way for Easter, you need to resort to the option of using floss threads. To do this, eggs are wrapped in thread and boiled for 15 minutes. After removing the floss, you get an original striped pattern. This way you can color eggs without dyes.
To paint Easter eggs with a pattern, you can use any cereal. To do this, the egg is moistened and rolled in buckwheat, rice, millet or a mixture of cereals, wrapped in nylon or gauze, and then lowered to boil in a coloring solution.
You can also paint eggs in an original way using tape. You just need to stick thin sticky strips on the shell and paint it in any color using the chosen dye.
Birch leaves
How to paint eggs for Easter with your own hands and make them original? Use birch leaves. If you have a dry birch broom, you can take its leaves and boil them in water for 40 minutes. After this, the solution is cooled, the eggs are placed in it and boiled until tender. Products dyed in birch decoction will acquire a delicate yellow tint.
Fabric transfers
You can also dye eggs for Easter with fabric. A scarf or tie with a bright pattern on it is suitable for this. The egg is wrapped in a piece of such fabric so that the front part faces the shell. The fabric is secured with thread or any other paper clip and sent into cold water, to which 3 tbsp is first added. l. vinegar.
Is it possible to use industrial dyes rather than food dyes that are applied to fabric? There is no definite answer, but it is best not to eat such products.
Wax crayons
It is best to paint eggs at home with children. To do this, you can adopt a method using wax crayons:
- Boil the eggs and dry.
- Place the still slightly hot eggs in special stands or cups and color them with crayons.
You can also crumble wax crayon or grate it and simply sprinkle it on the egg. After the wax melts, an interesting pattern forms on the shell.
Stencils
Coloring Easter eggs using stencils is also a very popular method. To do this, use various plants or paper cuts, which are attached to the surface of the shell using nylon. Eggs wrapped in stencils are painted in any dye. After cooling, the egg is cleared of leaves or paper, and an interesting silhouette remains on the shell.
Coffee
You can dye eggs gold using coffee. To do this, you need to take an instant drink (1 teaspoon per egg), fill it with water and cook for a couple of minutes. The finished eggs are placed in a coffee solution, kept for at least 3 hours and removed. The “tanned” dyes are dried and lubricated with vegetable oil.
You can also dye eggs golden with regular coffee. You just need to increase the time they remain in the solution.
Zelenka
Not everyone takes the risk of painting eggs with green paint. In fact, this option is much safer than using ready-made food coloring in bags:
- Pour water into a saucepan, add 2 tbsp. l. salt and put the eggs in there.
- Add brilliant green to the water depending on the desired coloring result (you can use a whole bottle).
- Cook the product until done and cool.
It is best to use gloves when working with brilliant green, as it will be extremely difficult to wash your hands later.
Hibiscus tea
Hibiscus will give the product a blue tint. Its intensity can be changed by choosing the right amount of tea. The painting process is quite simple:
- Boil 2-3 tbsp in a glass of water. l. dry tea.
- Place boiled egg mixtures in this water and leave overnight.
Here are some tips to help you dye eggs correctly for Easter:
- Eggs need to be kept at room temperature before boiling, so they will not burst during the boiling process.
- You should not overcook them, otherwise they will be tasteless.
- You must add salt to the water.
- The paint you choose for Easter eggs must be of high quality, otherwise you may get poisoned.
Can you color eggs with cake dyes? This option has the right to life, only when dyeing you need to add a few tablespoons of vinegar to the water. Cake paints are not entirely suitable for eggs, since they do not contain elements that strengthen and add shine to the shell.
One of the most important actions on the eve of Easter Sunday is painting eggs for Easter. Marble eggs are one of the most beautiful color options available. We have already written about it, and now there is a method for those who do not want to bother with this very dirty product.
The marble effect can be obtained by analogy with the previous one, only instead of brilliant green we will use food coloring.
How to paint eggs with green paint and make a white pattern?
White pattern on eggs painted with brilliant green
Easter eggs on which you want to draw a white pattern must first be painted with brilliant green so that they acquire a rich color, otherwise it will be ugly. Paint the eggs as described in the classic method. Cool the eggs and dry with a napkin or towel. Then do the following:
- You will need 1 cup of powder. You can take less, for example, 0.5 cups.
- Add a little water to a glass of powder to obtain a thick, homogeneous mixture.
- Then, put the white mixture into a pastry syringe, a bag with a thin nozzle, or a regular plastic bag with a hole in the corner.
- Now get creative and start drawing different patterns on the green eggs.
Enjoy your creativity. Such eggs will turn out to be original with unique patterns. This decoration method can be used on any color of eggs.
How to paint eggs with unusual green paint “speckled”: photo, video
Unusual speckled eggs painted with brilliant green
Rice is often used to color eggs. With its help, cold coloring is performed - it is fast, simple and interesting. But do not forget that you need to work with gloves. To color eggs this way, do the following:
- Take a small plastic bag.
- Pour 120-150 grams of rice into it.
- Now you will need 30-50 ml of water. Add a little greenery to this amount of water. The more greenery you add, the richer the color of the Easter eggs. Mix the solution well.
- Now pour half of the resulting solution into a bag of rice and mix well.
- Place a boiled egg in the green rice and stir it well in the bag with your hands.
- After 10 minutes, remove the egg. It turned out to be a beautiful green color with light splashes.
- If you want to achieve a more interesting pattern, you can first boil the eggs in onion skins and then paint them in green rice.
In this way you can paint eggs in any color and with any dyes. Watch how the woman in the video does it.
DIY marbled hibiscus tea paints
If you want to surprise your guests, use hibiscus. Depending on the color of the eggs and the time of painting, they turn out very different. You can use both chicken and quail eggs.
We will need:
- eggs;
- hibiscus tea;
- water;
- dishes;
What to do
It is better to brew hibiscus in advance so that it has time to cool. Wash the eggs thoroughly with a sponge and soda. Then boil hard in salted water. Then place in tea so that it covers the eggs completely. The minimum dyeing time is 2 hours, but to achieve a more saturated color, leave them in tea for 3-5 hours. After coloring the eggs, dry them on a napkin and brush with oil for shine.
In order for the paint to apply evenly, the shell must be degreased with vinegar.