Over time, dirty spots appear on the ceiling and walls painted with water-based paint. This is especially noticeable in the kitchen, where food is often prepared. Many housewives are interested in how to wash a ceiling painted with water-based paint in the kitchen so that this process goes quickly and efficiently.
Washing a ceiling painted with water-based paint.
Ammonia for oil and alkyd enamel
On such a surface there is a durable and dense film that is resistant not only to moisture and water, but also to mechanical stress. Therefore, such walls can be safely washed, but it is not recommended to use soap, soda or washing powders for this.
An excellent remedy for oil and alkyd enamel is an aqueous solution of ammonia, which can be prepared at the rate of 1 tablespoon per 1 liter of warm water.
The process of washing walls is simple - you need to soak a sponge in a solution of ammonia and use it to rub the stained area.
If ammonia does not help, then you can try fresh potatoes, the tuber of which needs to be grated on a fine grater, after which the gruel is applied to a sponge and rubbed over the dirty area.
The advantage of ceilings painted with water-based emulsion
Ceilings and walls treated with water-based paint have several advantages:
- This coating does not contain harmful components and even when the temperature in the living room increases, it does not emit harmful toxins.
- The water-based solution is easy to apply to the prepared surface of walls and ceilings.
- The surface painted in this way is resistant to high humidity.
- This paint will cost less than suspended ceilings, but it looks no worse.
- With minimal skills, staining can be done independently, without involving workers.
- A wide palette of water-based paint allows you to choose the color and tone to suit any interior.
- This paint can be used on ceiling tiles and is also used on multi-level surfaces.
The coating is resistant to high humidity conditions.
In other rooms, painted surfaces do not need to be washed frequently. But in the kitchen, the walls and ceiling get dirty faster and require special care. When choosing a water-based composition, preference should be given to those types to which acrylic or silicone is added.
Soda for latex paints
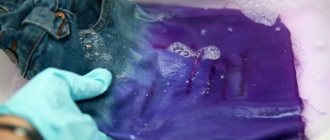
Dirt from latex, acrylic and silicone coatings can be removed with almost any non-aggressive detergents. However, the real panacea is baking soda, which in the form of a paste can cope with even severe stains.
To clean more extensive stains, you can use a solution, for the preparation of which you will need:
- 3 l. clean water at room temperature;
- 100 gr. baking soda;
- 50 ml. ammonia.
Important! To protect the skin of your hands, be sure to use rubber gloves!
How to remove stains?
To achieve the desired results, it is important to know not only how to wash painted walls, but also how to remove stains from their surface. Most often they are formed due to fat with dirt and dust stuck to it.
Here are effective ways to remove stains:
- Using starch or talc - take a slightly moistened paper napkin, apply starch or talc on it and press firmly to the problem areas, waiting for the fat to be absorbed into the powder. Next, the cleaning agent is carefully swept into a special container, and the area is wiped with a cloth soaked in soapy water.
- Dishwashing gel - pour hot water into a bowl and add detergent (2-3 tablespoons per liter of liquid) or apply the gel undiluted to a sponge, wiping the dirty area. Next, the product is left on the surface of the walls for some time (until the greasy stains soften) and wiped with clean water.
- Using ethyl alcohol , this product successfully fights not only stubborn grease, but also ink and rust. To do this, moisten a dry cloth generously with alcohol and wipe the problem area. After 10–15 minutes, rinse the surface with water and wipe dry.
- Shaving foam - a small amount of foam is applied to the greasy spot, lightly smeared and left for a couple of hours. The dried product with dissolved fat is removed with a soft, dry cloth, if necessary, lightly moistening it with water.
- Using new paint - if all of the above means are powerless in the fight against stains, the damaged area is painted over with new paint of the same or as similar shade as possible. But the previously contaminated area is cleaned to the ground, primed and fresh paint is applied.
Note! Before treating contaminants, you need to test the product for safety (on a separate fragment of the wall).
Washing painted walls is not so difficult, because there is a whole set of rules on how and what to do. The main thing is to accurately determine what coloring composition the surface is painted with, and in accordance with this, select a detergent and processing technique (with minimal friction or barely touching the wall at all).
At the same time, most paints are resistant to water, so any cleaning products will do the trick. The exception is water-based emulsion - in this case, dry cleaning is indicated. This will help keep the paint layer in its original form.
How to wash without streaks?
To prevent stains from remaining on the walls after washing, you must follow simple rules:
- If the product is new, test it on an inconspicuous area of the wall;
- First apply the products to the sponge/brush and only then to the wall;
- Prepare paper towels, napkins and toilet paper for blotting in advance;
- The process of washing walls always starts from the bottom;
- Any leaks that appear are immediately removed;
- Dirty liquid and foam are not reused.
By following the above recommendations, your walls will always be as good as new, and dirt stains will no longer cause headaches. You should also not forget about regular cleaning, because preventing a problem is easier than solving it.
Preparing to wash
Before washing, make sure that the wet coating dries quickly. This is possible if the house is warm and there is no excessive humidity. Otherwise, streaks and sometimes even mold may occur, which is very difficult to get rid of.
It is also recommended to carry out preparatory work before washing:
- Prepare the room . First of all, you need to remove photographs, paintings and posters hanging on the walls. Decorative items also need to be removed. Next, mark all the loose nails and hooks (so as not to injure your palms during the washing process). To do this, you can attach scraps of bright fabric to them (on nails). Now that all the walls are free of obstacles, you need to move the furniture to the center of the room (so that you can move freely).
- Protect the floor from moisture . To do this, you need to spread thick fabric or film along the baseboards. Furniture is also covered in the same way (but it is best to use film).
- Remove dust from the coating . Before washing, carry out dry cleaning, removing dust from the walls and ceiling skirting boards. The easiest way is to use a vacuum cleaner turned on at low power.
Important! It is recommended to carry out wet cleaning as the walls become dirty, but it is better to do this at least twice a year - in autumn and spring. In the first case, dust and dirt could enter the house through open windows; in the second, during the heating season, dust was carried with air currents throughout the house, firmly sticking to the walls.
Safety precautions
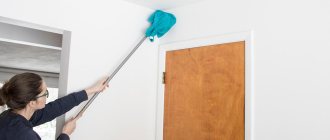
When carrying out cleaning procedures, it is recommended to place the ladder as securely as possible.
You should not install all kinds of pads under the legs if the floor is uneven. You cannot stretch while standing on a ladder in an attempt to cover the maximum area of the ceiling. In such a situation, it is recommended to get off and move the stepladder. Otherwise, there is a high risk of falling and serious injury. When wet cleaning the ceiling, water will fall onto the floor. On such a surface, the housewife may slip or the stepladder may move out of place.
The container for the soap solution must be of such size and shape that it is securely fixed on the landing of the stairs. It is recommended to wear an apron over your clothing. It should have roomy pockets. You can put a rag or sponge in them at each stage of cleansing. It often becomes necessary to wipe the ceiling with a dry cloth after cleaning with a damp sponge. In this case, the sponge can be placed in the apron pocket. Moreover, most likely, there is no place on the stairs for it. In addition, the sponge may fall, which means that you will have to go down to get it.
Stage four: start leveling
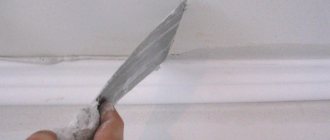
After the wall surface is prepared, putty can be applied. This process is no different from leveling other surfaces. Here are the basic principles:
The mixture is applied in several layers - this way it will lie more evenly. If the wall has many defects and significant unevenness, you first need to apply starting putty. They have a coarse-grained structure, lay flat and adhere firmly to the wall. An important point: each subsequent layer is applied only when the previous one has dried. The last layer is performed with finishing putty, which has a fine-grained structure. Before applying it, you need to treat the wall from sagging and remove marks from the spatula that could have formed after previous actions. To level the wall, you need to clean it with sandpaper or a special mesh. When the last layer of finishing putty has dried, it also needs to be sanded so that the surface is perfectly smooth.
This is important, especially if subsequent painting is planned.
The very last step remains before using the decorative finish - applying a primer to the already leveled layer of putty. We assure you that after such treatment of the walls, any coating will last a long time, and the result will be beautiful and neat.
Additional information: How to paint walls over old paint without removing the previous one
After removing the old paint, we move on to filling the various holes in the walls. Holes left by nails or bolts must be filled with a gypsum mixture prepared in a small amount of water (it should be thick enough so that it does not fall off the trowel). After drying, the rough surface must be sanded with sandpaper.
You can remove old paintwork, rust, and small irregularities using metal brushes or special scrapers. Large defects on concrete, stone, and brick walls are removed with grinding stones, such as pumice, and wooden ones - with planes and chisels. If there is mold on the wall, then such an area must be treated with a bactericidal solution against mold.
After applying such a solution, after 12 hours, fungal infections can be easily removed using a spatula or a stiff brush.
First of all, it is necessary to determine the type of old paint - for the most part, names of different classes are not compatible with each other. The best option is to re-apply paint of the same type, composition and manufacturer - in this case, full compatibility will be guaranteed.
- For other cases, there are universal primers that have equally high adhesion to different types of paints and varnishes. How to remove paint from kitchen walls quickly? Mostly they are aqueous dispersions of acrylic resins. After priming, the surface can be repainted.
What to do:
To avoid double work and unpleasant surprises, prepare the wall in advance. Take sandpaper or a special plaster sanding tool and go over the uneven areas and defects. Afterwards, brush off the dust with a brush or broom.
Stains can be removed by wiping the wall with a damp cloth and soap.
- Chemical - using special removers, after application of which the enamel dissolves and is easily removed with a spatula. The disadvantage of these compounds is toxicity: during their use and after, the room must be well ventilated.
- Mechanical - using a regular spatula, sander or iron brush. This method is the dirtiest: there will be a lot of dust, so you can’t do without a respirator.
- Thermal - using heating with a hair dryer, which softens the old paint and can be removed with a spatula.
Technology of painting the ceiling with water-based paint
The procedure for applying water-based emulsion to the ceiling surface is practically no different from working with other types of paints. However, before painting, you will need to do a preliminary test of the coverability of the material on a small piece of concrete or plywood somewhere in the utility room.
It is best to whiten the ceiling with a thread roller; there should be at least two of them in stock, one with a nozzle width of at least 20 cm, the second, 5-7 cm, is used for tinting corner areas.
How to properly apply water-based paint to whiten a ceiling
The painting procedure involves laying at least two layers of material. In this case, the direction of movement of the working tool when moving to a new layer should change to perpendicular to the previous one.
Traditionally, the first layer of water-based emulsion is laid with movements parallel to the plane of the window opening in the room. The second layer of painting is accordingly performed perpendicular to the window. In this case, the flow of light falling through the window onto the ceiling will be directed parallel to the lines of application of the water-based mixture. Even if there are risks from the roller somewhere, they will be invisible in natural light.
How to whitewash a ceiling with water-based paint without streaks
In order to obtain high quality painting of the ceiling surface without marks, marks and streaks, you must follow several basic rules:
- Before applying paint to a roller or brush, it is necessary to remove lumps of mixed dust and water-based emulsion;
- The water-based paint applied to the working surface of the tool must be rolled in a tray so that it is evenly absorbed throughout the entire nozzle;
- When painting, the roller is pressed against the ceiling surface with approximately the same force. There is no need to rush or try to squeeze the water emulsion out of the nozzle;
- Rolling out the paint and varnish material is done in strips with slight overlap at the joints. In this case, the ends of the soft roller attachment must be rounded; this is the only way to avoid the appearance of splashes and marks on the ceiling.
After painting, the layer must be thoroughly dried before repainting. Painting over a damp or insufficiently dried layer is not allowed.
Advice! Experts also recommend installing an additional light source in the room, a lantern or spotlight aimed at the ceiling. This illumination allows you to see painting defects even at the stage of applying water-based paint.
In corners and areas adjacent to walls, the water-based emulsion must be applied with a small roller, and in some cases it is necessary to use a brush to touch up or level the layer. The process of painting ceilings with water-based paint with your own hands is described in more detail in the video.
How to properly paint a ceiling with water-based paint to avoid stains
In order to avoid the appearance of stains or stains during the painting process, it is necessary to carefully prepare the ceiling surface. Even if the surface has been primed and thoroughly dried, immediately before painting the ceiling, the surface must be thoroughly wiped with a slightly damp sponge and allowed to dry for 10-15 minutes.
Use a thread version of the nozzle with bevels
The second problem is related to the incorrect use of the paint itself. Stains and stains appear on the ceiling due to uneven application of the material. After applying a fresh portion of water-based emulsion, the roller, as a rule, is pressed against the surface with great force; accordingly, at the beginning of the movement, a larger amount of paint is squeezed out. As you move away from the starting point, the amount decreases, the paint layer becomes thinner and more transparent. Therefore, it is better to roll several times with little force than to make a stain.
How to quickly whitewash a ceiling with water-based paint
There is only one way to quickly and efficiently paint a ceiling with water-based paint - using a pneumatic spray gun. It will take about an hour and a half to cover the walls and furniture in the room with plastic wrap. The same amount will be required to paint the ceiling in two layers.
The sprayer is convenient for applying water-based composition to complex surfaces.
With the traditional method using a roller or brush, the process of painting the ceiling surface takes 2-2.5 times longer.
Working with walls
If it is necessary to wash walls painted with water-based paint, use similar technology and solutions: work with soft, non-pressure movements, using a brush with natural bristles or foam sponges, using products with a neutral reaction.
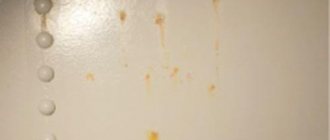
Where do spots appear most often?
Walls get dirtiest around switches and sockets. You can try to remove these grease stains with a school eraser - soft, without color or abrasive. For severe stains, use a cleaning solution with the addition of soda.
In a children's room, stains may appear near the desktop. Unfortunately, stains from markers or felt-tip pens are very difficult to remove from water-based paint.
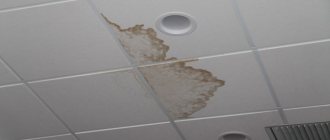
If the coating is faulty, traces of leaks are most often visible in the corners. After dry cleaning, the damaged areas are treated with a solution of copper sulfate and lime 1:30.
If you cannot remove the stain, a radical repainting of the surface is required: wash off the old paint or remove it with a spatula, and repaint it again.
The first stage of preparatory activities
Before you begin the actual repair work, you need to prepare tools and purchase materials.
To ensure high quality coating and carry out painting work as carefully as possible, you must use the following tools and devices:
- stepladder;
- cuvette bath;
- two fleecy rollers 20 - 25 cm wide;
- spatulas and brushes of different sizes;
- masking tape;
- sandpaper or sanding mesh;
- foam sponge;
- plastic film;
- protective clothing, hats and safety glasses.
In addition, you will need to buy putty, primer and the paint itself.
The consumption of the coloring composition per square meter is usually indicated on the label, and this information should be used when purchasing material.
Primer selection
The entire ceiling area must be primed before painting to increase adhesion between the paint composition and the main surface material, eliminating the consequences after special treatment of stains from fungus, leaks, soot and grease. After inspecting the ceiling and finding flaws on it, select the required type of primer:
- Soil - Hydrostop concentrate. Used for waterproofing in rooms with high humidity, eliminating fungus and mold from the surface.
- Primer GF - 012. General purpose primer. Increases adhesion between the paint composition and the base, prevents the absorption of water from water-based paint by the building material of the main structure.
- Deep penetration primer Ceresit ST 17. Strengthens the surface of the base, binds dust, increases adhesion and reduces the absorbency of the base.
Selection of materials and tools
This stage is considered the most important. The quality and service life of the future surface depend on the correct selection of tools and consumables.
It is important to make purchases in large chain hypermarkets or branded stores; there are a lot of fakes sold in the markets
Necessary tool
- The main painting tool used for working with water-based emulsion is a roller. To finish the ceiling, it is better to choose a product with a medium-wool coat - this way the paint will not splatter on the sides, but at the same time, the color of the base will overlap without spots or streaks. The height of the cylinder for faster operation should be 18–25 cm.
- Then you need to pick up one or two brushes for painting corners or hard-to-reach places, for example, behind ventilation ducts or pipes.
A brush no wider than 8 cm is best. You can also use an angled roller. You should buy a container for paint; it may be called a paint tray or tray, or a cuvette. The flat part of the bottom of the container should be corrugated so that it is convenient to squeeze out excess paint from the tool. Painting the ceiling with water-based paint does not require many tools. - In addition, you need to purchase fine-grain sandpaper, masking tape (ordinary tape will do) and plastic wrap. It is recommended to take care in advance of the availability of protective clothing, gloves, headgear and glasses. So that when painting the ceiling with water-based paint with your own hands you can control the quality of the surface, you need to prepare a powerful lamp and a pole to raise it to the ceiling.
- If you have a stepladder at hand, you can use it, but you should not purchase it specifically.
You can buy a telescopic tube for a roller or use tables, cabinets and other furniture as a stand. All small interior items should be removed from the room, and floors and bulky furniture should be covered with film. When painting the ceiling, it is more convenient to use trestles, as they are wider and more stable than a stepladder.
How to choose paint
To paint ceilings with water-based paint yourself, you can use the following types of material:
- Polyvinyl acetate compounds. The cheapest type of coatings. Surfaces coated with this paint should not be wetted with water.
- Latex. They are considered one of the highest quality. With their help you can obtain strong and durable coatings. The price of materials is also quite high.
- Acrylic. The most common type. They have a good combination of price and quality.
- Silicate. Compositions with the addition of liquid glass are most often used for painting stone or plastered surfaces. Can be used both indoors and outdoors.
- Silicone. They have good hiding power, vapor permeability and a long service life, but their high cost makes them less popular than acrylic paints.
Acrylic compositions are considered the most durable, PVA is the cheapest, for new buildings you need to take latex, universal acrylate ones are suitable everywhere, but they are expensive.
When choosing a material for painting, you need to listen to the advice of the seller, but it is also recommended to carefully read the label. The manufacturer indicates the following information on it:
- Type of work. This can be internal or external work on bases made of various materials.
- Paint consumption. Based on this indicator, you can approximately calculate the total amount of material, but it is better to add 10%.
- Covering power. The number of layers required to completely cover the old color depends on this indicator.
- Resistant to abrasion or moisture. The material may only be suitable for dry operating conditions in the absence of mechanical stress. A little more expensive are paints that can withstand mechanical stress. They are followed by materials that, after drying, do not dissolve with water, and the most expensive are dirt-repellent paints.
All water-based paints are white, color is added later, but the entire volume must be tinted, otherwise there will be stains
It is also important to consider the type of finished coating:
- Matte. They are difficult to clean, but visually increase the height of ceilings and mask minor defects.
- Glossy. More resistant to abrasion and easy to clean, but does not hide defects.
- Semi-matte. A compromise between the two above types.
We also suggest watching this video:
When emulsion and emulsion are different
For the production of water-based paints, several polymers with different properties are used. The most popular among them are:
- Silicate - forms a coating that allows the walls to “breathe”, but is not moisture-proof. Only wiping with a well-wrung out sponge or cloth is allowed.
- Latex has excellent steam permeability while retaining water. It can be washed without fear of disturbing the structure of the paint.
- Acrylic has better properties than silicate, but is in many ways inferior to latex. If exposure to moisture is short, it is quite capable of withstanding washing.
- Silicone is the best polymer today, which is not at all afraid of contact with water and is suitable for frequent washing.
Tools you can't do without
Even before you start cleaning, you need to prepare the following set:
- two buckets or basins, one of which is intended for clean water, and the second for soap solution.
- a soft and clean rag (if the walls are painted white or beige, then the fabric should have a similar color);
- several brushes with low-stiffness bristles - they will be needed to remove stains;
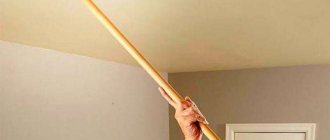
- stepladder (without it it will be difficult to wash the ceiling).
Also, do not forget about personal protective equipment. Getting detergents into your eyes is just as unpleasant as clogging your mucous membranes with dust.