The approach to interior design is the most responsible matter, because the comfort of staying in the room directly depends on it. In particular, decor such as wall molding is quite popular: with its help you can completely transform the space in the interior of an apartment, retail space or office.
- Interior decor with molding: tips
- Why are decorative plinths glued?
- Where should you not glue wall molding?
- Non-standard use of interior profiles
- Types of moldings
- Polyurethane moldings
- Plastic moldings
- Metal decorative moldings
- Wood overlays
- From foam plastic
- Wall and ceiling moldings made of gypsum
- Adhesive for moldings: which one to choose?
- How to make molding with your own hands: instructions
- Preparing tools
- Step-by-step work
- Molding on a wall with wallpaper: how to stick it?
- Caring for wall decorative plinths
These decorative elements began to be used a long time ago: even when decorating the palaces of kings or houses of the nobility in the Rococo style. And this is not surprising, because a room with moldings looks really pompous.
Today, they have begun to be used for broader purposes: they are used to decorate both wall surfaces, ceilings, and even windows. In addition, overlays also have protective functions, as they help hide surface imperfections and protect them from possible damage. The following is discussed in the article:
- advantages and disadvantages of this material, principles of its use;
- types of overlays - molding made of foam, plastic, wood, polyurethane and metal;
- some tips for choosing products;
- instructions on how to glue molding to a wall with and without wallpaper.
Types of moldings
What is molding? Molding is a three-dimensional decorative element that is a strip. Molding is a rather broad concept. This includes stucco molding, baseboards, mirror and picture frames, etc.
The modern market is represented by a rich assortment of moldings for every taste and color. Depending on what room you are going to install it in and how much money you are willing to spend on decorative molding, you need to know some of the features of these elements. So, they differ in the material from which they are made and in shape.
Molding material
Polyurethane
Plastic wall moldings are the best in terms of price and quality, which is why they are especially popular. Polyurethane products have virtually no disadvantages.
But there are plenty of advantages:
Polyurethane wall molding is perfect if you need to create zoning, hide surface imperfections and simply decorate a room.
Polystyrene (foam)
This material is not as durable as the others, but also has a number of advantages:
Foam moldings for walls are the choice of those who want to create a “royal interior”, but are not ready to spend money. Modern synthetic material will hide unaesthetic details and decorate an empty wall.
Tree
Wooden molding is in a category higher than artificial products, and therefore costs much more. The large weight requires strengthening the strip with self-tapping screws during installation.
Not suitable for rooms with high humidity. But all this is more than compensated by the attractive and aesthetic appearance of the wood. If wood moldings are treated with antiseptics and water-repellent substances, they will serve you for quite a long time.
The beautiful appearance and richness of relief forms make gypsum moldings in demand since the Renaissance. They are durable, easy to restore, do not turn yellow over time, and due to their non-flammability, are absolutely safe to use.
However, they will be correspondingly expensive. And installation will cost a lot of money. In addition, significant disadvantages include the heavy weight and hygroscopicity of stucco.
Varieties of moldings in shape Decorative strips for walls also have a huge variety of shapes. The most popular include:
What is molding?
Molding is a decorative material. It looks like a three-dimensional plank that is laid on the surface. The length of the bar is standard and does not exceed 240cm. Width, design, profile - all this can have different parameters. You can use completely flat moldings, or resort to decorating the room with volumetric strips. Models with various decorative elements and complex textures look very beautiful. But such moldings need to be correctly compared with the overall concept of interior design.
The decorative element can be made of various materials. The most popular are plastic, polyurethane, polystyrene. They also differ greatly in flexibility. They can be elastic or completely hard. The former are much more expensive, so they are used only when necessary, when it is not possible to treat a given section of the wall with a hard coating.
The most expensive are moldings made of PVC or gypsum, and the first place in this regard is occupied by marble strips. The use of such models is typical in cases where the designer’s task is to decorate a room in an aristocratic or classic style.
Types of molding
Features of installation of moldings
Since the molding is intended to decorate the room, it is important to install it carefully, without leaving marks on the surface.
What to glue
Before gluing moldings to the wall, you need to decide on the glue. It all depends on the weight of the bar and the material from which it is made.
For the installation of lightweight polyurethane and foam elements, PVA or wallpaper glue is suitable. You can also purchase special mounting adhesive for decorative polyurethane products.
More effort will have to be made when installing wooden decorations. They are fastened with self-tapping screws or nails, in addition, it will be necessary to mask the marks from the fastening.
Gypsum products are glued only with gypsum mortar or polyurethane glue, as they are heavy.
Don't rush to start working on the molding. First, let him “get used” to the room for about a day. Then it will not be deformed and will stick securely to the wall.
How to glue
Before attaching the molding to the wall, it must be carefully prepared: leveled, cleaned and dried.
Here it is necessary to take into account two nuances:
Wallpaper moldings are often chosen from polystyrene or polyurethane, since they are much lighter in weight and look better on papered walls.
You should start attaching the moldings with markings. You can use the cornice itself for this.
Then you need to cut them. Using a miter box it is easy to make oblique cuts.
The corner joints are glued first. If you decide to glue on a bare wall, do not forget to moisten it with water or primer.
Apply glue evenly to the plank and press it against the wall until it sets.
Docking of products requires special attention. It would be good to use joint glue for coating. It is applied generously so that after pressing, the excess is squeezed out.
After a day, you can start painting the molding.
Features of the use of certain types of glue and control of quantitative costs
As mentioned above, there is practically no universal type of glue for skirting boards and the use of each specific brand will depend on many factors. For example, polymer-based adhesives should be used only in well-ventilated areas, and the same “Moment”, due to its special viscosity, once it gets on the surface, is very difficult to remove. In addition, if the substance is transparent, then unauthorized contamination is unlikely to be noticed the first time. In any case, for synthetic adhesives with similar qualities it is better to use a gun.
If we touch on the topic of “liquid nails”, then among them there is a special variety - neoprene “liquid nails”. They will be an ideal solution for installing skirting boards in low temperatures or when the environment is extremely saturated with moisture. However, this type of “nails” is very toxic and it is possible to work with them only under conditions of constant ventilation of the room where the work is carried out.
But acrylic-based glue is completely safe for the human respiratory system. However, it is not able to maintain its functional fastening properties at low temperatures. From this we can conclude that it is better to use it for finishing interior living spaces, because, as a rule, low temperatures are not established in them.
Regarding consumption calculations. Based on the fact that strips, moldings and baseboards rarely exceed fairly narrow width dimensions, the approximate consumption can be determined based on the number of strips that need to be glued. Thus, half a liter of adhesive will be enough for ten square meters of area. From here we can trace the following pattern - glue for baseboards and moldings is never sold in bulk containers.
Painting
The choice of paint depends on the material of the decorative elements. It should be without acetone. Before painting over mounting adhesive on wood, foam or plastic, be sure to remove any remaining residue with a knife or sandpaper and cover it with putty.
It is better to paint the joints before gluing them to the wall.
By painting a wide molding, you can give free rein to your imagination and highlight the ornaments with different colors.
As you can see, it is not so difficult to transform the appearance of a room and give it a solemn or discreet atmosphere with the help of moldings. And it doesn’t matter what you choose: decorating the walls with moldings made of polyurethane, plastic or gypsum, the main thing is to adhere to measures in the quantity and compatibility of relief elements.
Source
Material of slats
Molding is made from different types of plastic, wood, metal or plaster.
Type 1. Wood
Wood has been used for centuries to make applied decor.
This is a traditional material for making moldings. Wooden decor must be treated with an antiseptic, and then it can be varnished or painted. Self-tapping screws or glue are used to secure the planks.
Advantages:
- Wood is easy to process.
- It is reliable and durable.
- The material is easy to paint and glue.
- The tree is durable with proper care.
- You can cut holes in the wooden molding for the wires.
Flaws:
- The tree is not moisture resistant.
- It's expensive.
- Wood planks have a large mass.
Type 2. Gypsum
Very often, rooms are decorated with plaster stucco.
This is another classic material for applied decor. To install such molding with your own hands, use gypsum or alabaster mortar.
Advantages of gypsum decor:
- A variety of shapes, colors, relief and patterns.
- Long service life.
Flaws:
- High price.
- Plaster decor is heavy.
- The material is fragile.
- Complex and expensive installation.
Type 3. Polyurethane
Polyurethane can be flexible, making it convenient to decorate curved surfaces with such decor.
Polyurethane strips are now the most popular. They can be rigid or flexible. Therefore, they can also be used to decorate curved surfaces.
Advantages of polyurethane molding:
- The material is smooth and lightweight.
- It is easy to varnish and paint.
- It’s easy to work with, stick to the base, including wallpaper.
- The service life of polyurethane planks is about 30 years.
- This molding is inexpensive.
- The material realistically imitates plaster stucco.
- It is easy to care for.
Type 4. Polystyrene
Polystyrene jewelry is very diverse.
Another plastic material for the production of molding is polystyrene.
Its advantages:
- The cuts on the planks are smooth and even, there are no defects or chips on them. This property is especially valuable when installing frames and frames that have complex shapes.
- The manufacturer's instructions indicate that polystyrene is easy to paint.
- This molding is easy to care for. It can be washed.
- Polystyrene weighs little and is inexpensive.
The disadvantage of the material is that it has a grainy surface.
Type 5. Foam plastic
Foam decor is the cheapest and of poor quality.
Polystyrene foam is the cheapest material for making moldings.
Its advantages:
- Ease.
- Easy to install.
- Flexibility.
- Low price.
Flaws:
- Fragility, unreliability and fragility.
- Fuzzy pattern and relief.
- Reacts poorly to many types of paintwork materials.
- The material is not resistant to solvents and some types of detergents.
Type 6. Metal
Metal strips separate tiles and laminate.
The most common metal decor is aluminum thresholds, corners for steps and tiles. Such planks are mounted in two ways: they are placed behind the finishing material and pressed against it or fixed with self-tapping screws.
We glue moldings to the wall correctly: tips from the experts
If you need to beautifully decorate various decorative details in the interior, there is a win-win option - molding. Under this term there is a raised bar (flat or with various profiles, relief patterns), which is used as a decorative element. You can glue moldings onto walls, suspended ceilings, arched openings, mirrors, trims, and doors. There are also furniture options.
Why glue decorative plinths?
Beautiful moldings also perform purely practical functions:
- they can be used to zone space;
- gluing moldings on top of wallpaper allows you to hide or disguise existing defects;
- strengthening and sealing joints between various materials covering the surface;
- creating frames;
- emphasis on the desired interior detail or, conversely, diverting attention from unsuccessful elements that cannot be removed.
You can also attach molding to mechanically protect the surface.
How to glue moldings to a wall or ceiling: general rules
Each specific case has its own specifics. If you need to glue moldings to a wall with wallpaper, the task will be different from gluing it to a primer.
General recommendations are as follows:
The back side of the planks is covered with glue, then pressed tightly to the desired location. You need to press along the entire length. Therefore, if the planks are long, it is better to work with an assistant.
You need to press until the glue sets. Then the element is released and the adhesive is allowed to dry completely.
The joints are treated with joint glue, which is applied generously. After pressing, excess glue comes out - they are quickly wiped off with a rag.
Complete drying is achieved in about two days. After this, the elements can be painted and gilded.
What is the best way to glue polyurethane?
The Uran adhesive composition is designed for reliable gluing of rubber, PVC, synthetic leather, and polyurethane. This is a waterproof, elastic polyurethane mounting adhesive that can be used to repair shoes, fabric products, rubber and other household items.
Interesting materials:
Whose zodiac sign is next year? How does a decorative rabbit differ from an ordinary one? What is the cheapest way to cover bathroom walls? How is a wardrobe different from a closet? What's good about a steamer? What are the benefits of genuine leather shoes? What to feed geese to lay eggs well? What to feed one-week-old turkey poults? What to feed a calf for 5 months? What to feed thuja in spring?
Step-by-step instructions
Installation of decorative strips does not cause difficulties even for people with no experience. You don’t have to look long for something to use to glue moldings to the wall either. One of the best solutions is Ultima 302 adhesive for panels and moldings 360 grams.
How to properly glue moldings to the wall
Many people doubt whether it is possible to glue moldings to wallpaper. This option for wall mounting of overhead strips is quite acceptable. True, the service life will be somewhat shorter. In addition, if you need to change the wallpaper, you will have to remove the molding along with it. But if such a situation seems acceptable, then nothing prevents the installation.
The sequence of actions on how to glue molding to wallpaper is quite simple. But you need to act very carefully. If you use too much glue, drops of it can ruin the appearance of the walls.
Before you start gluing, if possible, you should try to clear the wall of wallpaper in the place where the plank will go. This will increase the reliability of the fastening. If such preparation seems too labor-intensive or completely impossible, in this case it is better to glue the molding with mounting adhesive with maximum adhesion.
The order of stickers is standard:
If the plank is too massive, you will have to additionally secure it with self-tapping screws. After the glue has completely dried, the screws can be removed, and the places where they were can be carefully covered with putty.
To achieve a harmonious color composition, the trim strip may need to be painted. It is recommended to do this no earlier than 24 hours after all the planks have been attached.
Ceiling decoration
It is recommended to select decorative strips for ceilings depending on other materials with which the surface is finished:
Before gluing the PVC plastic ceiling molding, the surface is thoroughly cleaned. The corner elements are installed first. If the linings are very heavy, then they are additionally attached with self-tapping screws. In order to properly glue in the corners and all the elements fit together, the edges need to be trimmed with a miter box at 45°.
How to beautifully glue molding to furniture
Decorative strips can update old furniture and add a personal touch to new ones. They are attached with glue. Polyurethane is best as it leaves almost no marks.
Self-adhesive options are very convenient - they do not require additional compounds or fastening materials. To install, simply remove the protective film and firmly press the element to the surface.
If the decor is massive, it has to be further strengthened with the help of special furniture nails.
The sequence of steps when decorating old cabinet furniture with molding is as follows:
To paint the planks, alcohol-based varnishes and water-dispersed paints are used.
Application area
In modern conditions, white doors are the latest fashion. In order to mount the door leaf, platbands are often used. As a rule, they must be ordered from a special workshop. And this is a waste of time. They can be replaced with moldings. The composition will look ideal if there is also a white baseboard installed in the room.
Very often, decorating walls with moldings solves more serious problems than just decoration. For example, by installing slats around the perimeter of the window, you can visually enlarge the window opening. Of course, this will not add light, but the issue of visual expansion of the space will be resolved.
This material is often used to imitate panels. This option for wall decoration looks very nice when several types of coatings are used in the room. This is very simple to do; just cover the joints with light molding. But the result is truly amazing.
The most traditional way is to decorate walls with moldings by gluing strips over the entire surface area. To do this, use standard, rectangular planks, which are glued on. If it was not possible to match the color of the decoration itself to the tone of the wall, it can be painted.
If you like classics, curved sections will be the most optimal solution for you. With the help of such planks you can create a unique interior in the style of the 60-90s.
What to do after gluing
The pads do not require complex care. The composition is fanned from time to time with a soft feather broom and wiped with a slightly damp cloth. It is important to ensure that dust does not eat into the decorative relief elements. If you allow a large accumulation of dust, the molding may darken, and then it will have to be repainted.
Cleaning can also be done with a vacuum cleaner with a very soft brush. On difficult terrain, remove dust with a soft brush or cotton swabs.
It is better not to use cleaning agents, as they are too aggressive on painted surfaces.
The wood can be wiped with plain water, and if it is heavily soiled, washed with liquid soap.
How to wallpaper a wall with molding in the middle
Frame moldings look very noble. With this method of finishing, doubt arises: wallpaper or moldings are glued first. Experts recommend gluing the wallpaper first and placing frames on top of it.
If it is not possible to remove the moldings, then the wallpaper will have to be cut. When working with wallpaper, adjust the joints as carefully as possible. The easiest way to do this is with monochromatic options. The most labor-intensive adjustment process is when gluing photo wallpaper.
Embossed non-woven or patterned ones require more trouble. For adjustment you need to have 2-3 meters of reserve.
Wallpaper molding: how to glue it to the walls with your own hands?
The approach to interior design is the most responsible matter, because the comfort of staying in the room directly depends on it. In particular, decor such as wall molding is quite popular: with its help you can completely transform the space in the interior of an apartment, retail space or office.
These decorative elements began to be used a long time ago: even when decorating the palaces of kings or houses of the nobility in the Rococo style. And this is not surprising, because a room with moldings looks really pompous.
Today, they have begun to be used for broader purposes: they are used to decorate both wall surfaces, ceilings, and even windows. In addition, overlays also have protective functions, as they help hide surface imperfections and protect them from possible damage. The following is discussed in the article:
“Pros” and “cons” of attaching moldings/plinths to adhesive mixtures
Among the undoubted advantages of the method under consideration are the following:
- Strong adhesion to the mounting base;
- The finishing process is relatively short in time;
- A wide range of fastening mixtures on the current Russian market;
- Possibility of fixing skirting boards/moldings even on unprepared substrates;
- The ability of some types of compounds to successfully withstand temperature changes and increase/decrease in humidity (and this allows the compositions to be used in rooms where there is no thermoregulation for a certain period of time, for example, a country house in winter).
Among the shortcomings it is possible to note:
- 100% need to level the base surface to fix planks made of hard materials (wood, plaster, clay, rigid polyurethane, MDF);
- The likelihood of a long period of adhesion for some types of adhesive substances and materials - it is necessary to maintain the connection for some time through muscular efforts until hardening occurs.
Interior decor with molding: tips
First, let's figure out why a wall with moldings is so attractive. As soon as moldings find their application in the interior, the room immediately becomes much more refined.
Products can act as a separate decorative element or complement the main style. In particular, they are used as dividers for wallpaper of different colors.
When decorating surfaces, wall molding allows you to combine together seemingly incompatible decorative elements. For example, they can be used to decorate completely different types of wallpaper, wallpaper and paint, as well as other types of ceiling and wall decoration.
The overlays will look appropriate in almost any room. They are used in the bathroom, kitchen, bedrooms, etc. Also, with the help of these products, a certain area of the wallpaper is isolated, making an original frame around it. A rather original solution is the design of the window, thereby creating a stylish frame around the perimeter of the window frame.
You should choose wall molding in accordance with the overall style and size of the room. For example, for small rooms it is better to take thin planks, which will eliminate the effect of cramping the already precious square meters. If you manage to choose the right decoration, you can benefit from the area of the room, making it visually larger or, conversely, less empty.
Why are decorative plinths glued?
These products are used mainly for design reasons. However, overlays also have several other important effects.
They should also be taken into account:
As you can see, there are really many benefits from gluing decorative strips. Now let's focus on when wall moldings are not recommended.
Where should you not glue wall molding?
So, on the Internet there is often a question about whether it is possible to glue moldings on top of wallpaper. And not unreasonably, because in fact this often leads to sad consequences. Therefore, it is strongly not recommended to glue molding to wallpaper, because they will refuse to give you a guarantee that it will last for a long service life.
As you can see, wall molding should not be positioned as a universal material that can be glued to almost any surface. In addition, you need to be extremely careful with the adhesive material itself. After all, if adhesive residue gets on the wallpaper, it is difficult, and sometimes completely impossible, to remove it without leaving a trace.
In addition, there is a problem in painting the product. Most often, the overlays have to be painted to match the wallpaper, and if even a drop of paint gets on the canvas, the repair can be completely ruined.
Non-standard use of interior profiles
Interior wall molding is often used for purposes that are unusual for many. In particular, the products are used to decorate structural elements of furniture. Occasionally, decorative skirting boards can be used as decoration for various pieces of furniture.
Not so long ago, decorative overlays were used to decorate windows. Such profiles look great as window frames.
In addition, the planks are also used as frames for wall paintings. For example, if you don’t like wall paintings and prefer to paint directly on the wall. In this case, framing it with molding will be a truly unique solution, unlike classic design options.
Features of gluing some types of skirting boards
Wooden
It is preferable to apply the composition along them in a thin line along the entire back part. However, if their width is small, then the spot application method can be used. However, the edges of the strip must be properly lubricated to prevent gaps from forming at the seams. The main thing is not to fix the part right away, but to wait a few seconds and only then press the bar to the surface - this is how the adhesion will occur as efficiently as possible.
Plastic
Basically, they are used to neatly disguise wires and cables in residential premises. The adhesive substance must be applied to the stiffener and immediately pressed onto the desired surface for several minutes. It is worth remembering that the coupling process most reliably occurs with bases made of carpet, linoleum, wood and tile.
However, there are several significant points specifically for plastic strips:
- It is always worth considering the level of rigidity of the molding edge;
- Skirting boards made of foamed PVC, due to their lightness, quickly break;
- If a type of PVC is required with semi-rigid qualities, then it is mounted in the form of a long strip;
- Plastic baguettes are the most durable;
- Before gluing, these skirting boards need to be laid out around the perimeter and the joints trimmed in the right places;
- If decorative plugs are expected at corners and joints, then they are installed simultaneously with the main body of the plank;
- It is better to apply the composition in small drops within 8-10 centimeters of each other;
- On short sections, this distance can be 4 centimeters, and on complex transitions - every 2 centimeters;
- It is preferable to cover wide planks with a wavy line of adhesive mixture;
- Any plastic corners/joints are covered additionally.
Self-adhesive options
They will be an ideal solution for uneven walls and are able to create such a type of finish between the walls and the floor that the unevenness of the joints will simply be invisible. They go well with linoleum and laminate and look great in large rooms. According to their structure, self-adhesive skirting boards can be made from aluminum or polyvinyl chloride. They can also have their own coloring, for example, wood or stone. External and internal corners in such models are easily formed due to the fact that the base itself bends very easily. In some cases, masking tape will help improve the artistic appearance. The only negative is that you need to fix the self-adhesive plinth as accurately as possible, because then it will be very difficult to separate it from the wall.
Types of moldings
Manufacturers make several different types of moldings for gluing on the surface of walls and ceilings. Each of the subspecies has individual characteristics and features.
To make your choice, we suggest that you familiarize yourself with the most popular decorative elements. The categories of linings presented below are especially popular in Moscow.
Polyurethane moldings
The most common are decorative profiles made from polyurethane. This finish represents an ideal balance between price and quality of the product.
Among its advantages it is worth identifying:
This wall molding can be easily wiped with an ordinary dry cloth. It is also quite easy to glue: you need special glue for a profile made of polyurethane. Polyurethane overlays are made in different colors, so they most often do not require further painting.
Plastic moldings
Wall molding made of plastic is one of the most optimal types of linings in terms of price and quality. Main advantages:
In addition, PVC plastic linings are resistant to the negative effects of environmental factors. These products are an excellent option for those who want to quickly and inexpensively add a “zest” to their home interior.
Metal decorative moldings
Available in bronze, gold or silver styles. They are used mainly in classic interiors of apartments and hotels and allow you to create a truly chic, expensive design.
Not the most popular models due to the fact that finishing with stylized overlays imitating precious metal requires the design of a suitable interior. In other words, a room decorated with these products literally looks like a king.
Therefore, the wall covering must be appropriate - cheap wallpaper is excluded. Such products are also used to decorate mirrors and fireplaces.
Wood overlays
Wooden wall molding is considered less popular. Decorative strips for wall surfaces are sold at a relatively high cost due to the high cost of the wood base.
But the price is completely justified. After all, this material is environmentally friendly and has an expensive, attractive appearance.
The wood profiles are fastened using self-tapping screws due to the fact that the linings are quite heavy. When installing planks in rooms with high humidity levels, they must be coated with a special varnish and antiseptic for protective purposes.
From foam plastic
Foam wall molding is also a light weight plank. It costs very little and can be mounted quite quickly on the desired surface.
The advantage of polystyrene foam linings is their resistance to moisture, and therefore they are often used to decorate bathrooms. The products do an excellent job of hiding defects on wall surfaces.
Wall and ceiling moldings made of gypsum
Plaster models attract attention due to their luxurious appearance, but they also cost a lot. Installation of gypsum cornices should only be carried out by experienced specialists.
Gypsum is a renewable material. It can be restored after the product no longer looks its best. Suitable for both installation on walls and ceilings.
General gluing rules
Any plank, be it molding or baseboard, can be quickly and easily glued using the following procedure:
- The selected segment should be turned with its back, and the adhesive composition should be applied to it in small drops at a distance of 3-5 centimeters from each other (for narrow parts);
- If the width of the part exceeds 6 centimeters, it is preferable to apply the mixture on the back side in the form of a wavy line;
- The lubricated element is unfolded and attached to the desired location of the base - the ceiling, baseboard, wall and pressed tightly (should be held for 10-15 seconds on average);
- The sutures themselves should provide a tight hold within 15-20 minutes;
- It is worth remembering that fillets must be glued from the beginning of the corner;
- If the molding is glued to a stretch ceiling, then the fixation occurs exclusively on the surface of the wall, but not on the unstable surface of the stretch ceiling;
- The ends of the planks should also be coated with a thin layer, then they are attached in the desired corner, and the remaining adhesive is quickly removed with a thin spatula.
Adhesive for moldings: which one to choose?
Glue for moldings must be selected based on what material served as the basis for the manufacture of the product. So, for wood models you will need to use special adhesives designed for working with wood. Plastic variations should be glued with plastic glue, and foam plastic with any universal glue.
It is also important to focus on the weight of the material - the heavier the pad, the stronger and better quality the glue it will require. In general, some manufacturers make adhesives for different types of moldings, so it would be more advisable to use a specially designed adhesive instead of a universal compound.
Instead of an epilogue
An analysis of the market for adhesives for skirting boards has revealed that for the most part in the Russian Federation there are universal options like “liquid nails”. The remaining samples are unpopular due to their low functional properties, lack of high-quality equipment (for example, a construction spout), as well as outdated chemical composition. At the same time, it is worth noting that, as such, highly specialized compounds will soon fall into oblivion and most adhesives will simply be combined under the simple name of “installation adhesive.” The cost of such goods in Russia is very affordable, and the product range provides the maximum breadth of choice. At the same time, in this segment, up to 80% of goods are presented by foreign manufacturers.
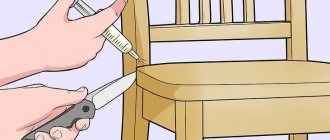
How to make molding with your own hands: instructions
Wall molding is often done independently, without the help of highly qualified craftsmen. There is nothing complicated about this: all that is required is a few tools and knowledge of a clear work algorithm.
Prepare the necessary equipment in advance so that it is at hand. Also mark the wall surface to prevent incorrect gluing: it will not be possible to remove the molding from the lined surface without leaving a trace. Therefore, make sure that everything is smooth and neat.
Preparing tools
It is simply impossible to make decorative wall molding without specially selected tools. Therefore, we will need to stock up on appropriate equipment.
Step-by-step work
First of all, you will need to measure the required length of the moldings and cut them according to the specified parameters. Using a miter box, cut the corners.
After this, we glue the corner parts in the corners and then install the even ones: follow the notes you made in advance.
If even after all the parts are glued, there are gaps, we recommend lubricating them with the same adhesive composition. It should take at least 24 hours for it to completely harden.
Molding on a wall with wallpaper: how to stick it?
Despite the warnings of experts, many still decide to decorate their premises with wall moldings on top of wallpaper. Before gluing moldings to a wall with wallpaper, try to clean the areas in the gluing areas from the coating.
If this is not possible, then glue with a particularly strong bond will come to the rescue. Buy only high-quality composition with a high degree of adhesion. The choice of glue type directly depends on the material from which the pads are made.
Having decided to decorate the pasted wallpaper sheets, you will have to make sure that the baseboards match them in design and color scheme. Glue the overlays, and if necessary, try to carefully paint the products in a harmonizing shade.
Caring for wall decorative plinths
Wall decorative skirting boards require simple maintenance. So, they will need to be wiped regularly with a soft cloth to remove accumulated dust. In this case, you cannot use aggressive chemicals, because they can damage the structure of the product.
You should also be careful with the moisture content of the rags used for wiping, since, for example, metal and wood coatings do not handle moisture well.
For those who still have questions on this topic, we recommend watching a video with a visual design of a room with wall molding:
Source
Functional and practical purpose of wall moldings
Wall molding is a decorative detail in the form of a three-dimensional strip, which is used to mask flaws, zoning a room by separating different types of finishing materials. Beautiful relief patterns on the walls create an original interior.
Moldings help to very skillfully hide defects on the walls
Moldings, due to the variety of materials used and their wide range of applications, have become especially popular recently. The main function of such details is their decorative effect. Decorating walls in this way helps create a sophisticated ambiance while highlighting the style of decoration and design elements. In addition, moldings perform a number of secondary, but no less important functions, in particular:
Conspiratorial. Decorative strips help to skillfully hide defects on the walls or disguise the boundaries of a secret door. Decorating with moldings will help distract attention from unevenness on the wall or errors in the corners.
Dividing the premises into functional zones. Decorating the wall with moldings will allow you to separate the part of the room with decorative plaster finishing from the other part, where the wall is covered with textured wallpaper.
Wall moldings are easy to care for; just wipe them with a damp cloth or sweep away the dust with a broom
Very often, designers use such decor to create original compositions where one of the walls is highlighted, or to smooth out the contrast in color transitions, as well as to disguise joints. In addition, decorative moldings are used to create panels or photo frames.
The main advantages of using moldings in the interior
As mentioned above, moldings in the interior are not only decorative, but also practical. They are light weight and easy to install. They can be used on different surfaces. Look good in various interior styles.
Helpful advice! Decorating walls with moldings to create exquisite patterns on the walls is much more affordable than traditional plaster molding, which costs several times more and requires a lot of installation time. If everything is done in accordance with the instructions, then visually these two types of decor cannot be distinguished.
Using moldings you can make frames for pictures, mirrors and arches
Based on the list of functions that these decorative items perform, we can highlight a fairly wide range of their advantages:
- Masks surface imperfections. Relief details on the wall will perfectly hide places of damage and help smooth out the transition between materials of different textures.
- Smooth transition in wall decoration with materials that are contrasting in color. This advantage of the moldings is ensured by their light coloring. They can be coated with various types of paint and any color.
- Affordable price. Modern manufacturers offer a variety of materials that have different textures and costs. The most popular are polyurethane moldings, which are characterized by their low price and excellent wear resistance.
- The simplicity of the process of finishing walls with moldings. The flat side of the back allows for reliable fastening of the product to different surfaces. To do this, you just need to apply glue and lean the molding against the wall, holding it for a few seconds.
- Easy to care for. It is enough to wipe the molding with a damp cloth or sweep away the dust with a special broom.
Moldings provide a smooth transition between different materials or contrasting areas