A modular painting is considered a modern piece of furniture, although it first saw the light of day during Ancient Greece. The main feature of such paintings is the fact that they are divided into several parts, but at the same time they are not separate images, but fragments of one composition. Such products can be purchased in regular stores and through web resources, but to create a truly original interior, it is better to make modular paintings with your own hands.
Which paintings are suitable for different rooms
The living room is considered an excellent place for experimenting and combining different light and sunny colors. If there are no specific rules regarding the combination of shades, then the size of the painting should correspond to the size of the room. Oversized modular canvases will look bulky and awkward in a small living room, and small images will simply get lost in a large room.
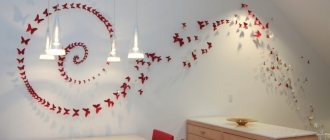
A modular painting in the living room can be the central element of the room
When making a painting for the bedroom, it is important to remember that this is a place of rest and relaxation, so the image should not have sharp and aggressive lines and colors. For this room, a calm landscape or an abstract image is best suited. It is also very important to choose the shade of the product so that it is in harmony with the decoration of the bedroom, since a sharp resonance will draw too much attention to one detail of the interior.
Paintings in the bedroom should be in calm tones that promote relaxation and rest.
Bright colors are often used to decorate children's rooms, and their number can be very large for one room. Therefore, it is better not to do a modular painting in such colors. Also, a child is unlikely to appreciate abstraction; it is better to choose images of animals, fairy tale or cartoon characters. If a teenager lives in the room, then it is better to give him the choice, and find out in advance whether he even wants to see such a decoration in his room. You can offer several photos with friends (just print them so that one fragment contains parts of two or more photos); images with your favorite actor or musician are also suitable.
A modular painting in a children's room in the style of a child's favorite cartoon will be an excellent decorative solution.
Simple pictures are best suited for the hallway interior. This is due to the fact that residents and guests rarely stay in this room for a long time, so it is not worth spending significant physical and financial resources. But at the same time, it should be remembered that the hallway is the beginning of the home, so the modular picture must correspond to the general design style of the apartment or house.
Modular painting in the hallway
Before you make a modular painting with your own hands for the kitchen, you need to think about whether there is a place for it where the piece of furniture will not get dirty. If the wall area allows for the placement of canvas, then it is better to choose still lifes, since they are best suited for the given room.
Video: DIY modular painting (master class)
Original paintings on the wall from several parts: photo ideas
Many people spend hours searching for ideas for this or that modular painting. As a non-professional designer, it becomes more difficult to determine which one will fit in one of the rooms. There are also many styles of these bright decorative elements - modern, impressionism, classic, oriental and many others. To choose the appropriate option, look at examples of composite paintings and how they can look in the interior.
Art Nouveau style
If your interior is more fashionable and modern, then you need to emphasize it correctly. Composite paintings designed in the Art Nouveau style will help with this. It does not imply the presence of a plot, but rather carries within it a certain abstraction of lines, figures, patterns and their intertwining.
For kitchen
When choosing an image for a composite picture in the kitchen, keep in mind that its shades should contribute to the digestion process and appetite. It's green and red. For the kitchen, standard options with still lifes, juicy fruits or mesmerizing landscapes are more often used.
Required materials and tools
The main part can be made from a variety of materials. These could be images on paper that were printed in fragments on a regular home printer, paper with pictures from a printing house, wallpaper with a design you liked, fabric with a print, and so on. The material from which the frame will be made depends on the selected front part. A wooden frame is ideal for fabric, photo wallpaper is best glued to foam sheets, and paper attaches well to chipboards.
So, to make from wallpaper or other material you will need the following:
- Printed images.
- Thin wooden slats, polystyrene foam, chipboard and so on.
- PVA glue.
- Tape measure or meter.
- Construction stapler.
- Pencil, marker, chalk, soap.
- Scissors.
Types of modular canvases
Depending on how many separate particles the canvas consists of, the following types are distinguished:
- diptychs are an option consisting of 2 segments that fit perfectly even into the interior of a small room;
- triptychs - contain 3 segments, which are most common among users, and from this they began to be considered classics of the genre;
- penaptychs - consisting of 4 pieces, freely located on the wall;
- polyptych - from five or more elements of a single canvas.
Remember! To decorate small rooms, you should not use compositions from many segments, so as not to overload the area.
In order to decorate a room, you don’t have to adhere to strict rules. With the capabilities of today's printing, you don't have to be a professional artist to create modular paintings at home. Isn't this a challenge for a truly creative person?
Making a modular painting from fabric
You can design and print the main part for such a product yourself, order it from a designer, or purchase a ready-made product. The first option requires talent and inspiration, the second is suitable for those who are willing to spend a significant amount to purchase exclusive material, and the third for those who just want to freshen up the interior a little.
Do-it-yourself modular fabric paintings will be a wonderful home decoration
Step-by-step manufacturing instructions:
- The first step is to make wooden slats of suitable length. To do this, mark the workpiece and cut off the excess length.
- Then you need to saw off the ends of the wooden products at an angle of 45 degrees. In this case, it is better to first fold the frame on the floor to understand which way to cut.
- After this, glue the cut fragments with glue and press them, hold them there for a few seconds and leave them alone for 1-2 hours. You can also use a construction stapler to secure wooden elements.
Making your own painting from fabric
When all the frames are ready, you can start preparing the image. To do this, mark the canvas, leaving about 2 cm on each edge to leave some material for overlap. After this, simply stretch the fabric on the prepared frame and secure it on the back side with a stapler.
Video: master class on making a modular painting on canvas
Making a modular composition with your own hands - getting started
Before starting work, you should decide for yourself the type of painting itself, its image - in this case, it is enough to take into account in which room such a painting will be hung on the wall and what the interior of the room is. When choosing an image for a painting, it is worth saying that choosing a portrait - a divided face does not look very aesthetically pleasing when divided into parts, it can, merging into one whole spot, rather create an abstraction in the style of Picasso.
The next step of your work is direct implementation - here you can use a photograph, your own drawing as a basis, and even if you don’t know how to draw, modern technologies will do everything for you. In this case, you can place an order with a master to make your own drawings for modular paintings, or choose from an existing catalog.
The design can be printed on plain or special paper or fabric, and before this step it is enough to determine the future dimensions of the modular panels. In order for the painting to fit harmoniously into your interior, choose the place where it will be located and based on this, calculate its size. If you create paintings yourself, buy a canvas in advance and create your masterpiece on it, but when the painting is printed on paper, just load the selected drawing onto the printer, first run it through a graphic editor, break it down into smaller parts and print it out and start making the decorations .
Modular paintings from photo wallpapers
- Several slabs of foam plastic should be prepared.
- Then you need to apply markings on them that correspond to the sizes of future fragments of the composition and cut the material according to it. It is best to use a special thermal cutting machine, but this tool is quite expensive, so it is not advisable to buy it to make one painting. You can take a utility knife and carefully trim the foam.
- Then you need to cut the photo wallpaper, leaving 1-2 cm for overlap.
- At the end, the wallpaper is simply glued onto the prepared base and ironed thoroughly.
You can make a beautiful modular picture from photo wallpaper very simply and without extra financial costs.
Creating your own masterpiece is quite simple. Even a novice master can cope with this task; it is only important to follow the above recommendations and act as carefully as possible.
Forming decoration
When the location of the modular picture has been chosen, we proceed to the formation of its base. For the base, various materials and decorative elements with obligatory visible volume can be used - such a base can be a wooden frame or polystyrene foam, and so on. As for the wooden base, the plates are knocked down into a frame of the required size, and if foam plastic is taken as the base, you just need to cut out the format you need to fit the size of the painting yourself.
Then we model the picture itself - we attach the canvas itself to the assembled frame with glue, and this will not be difficult to do. As a result of such work, you will receive exquisite, very original and beautiful decorations for decorating your own premises, be it an apartment, a house, a country house. When you set the goal in itself to create decor, when the painting is not assigned the role of a modular element, but rather a photo wallpaper, there is no need to create a large volume for the structures. If you search on the Internet, you can find step-by-step instructions that show that in this case all kinds of sheet materials can be used as a basis - from a processed piece of plywood, fiberboard, cardboard to old and unnecessary wallpaper, pre-glued several times.
It is worth gluing the image onto them very carefully and carefully - if it goes beyond the folded modular base, it will lead to damage to the entire canvas of the picture and you will have to start all over again. If everything was done correctly and carefully, the result will delight you with its beauty and sophistication. Arrangement of modular paintings on the wall.
As noted earlier, all the constituent elements of a modular picture can vary in size, and their separate and different placement on the wall will create one or another effect throughout the interior. Place the modular canvas on the wall, taking into account such aspects as depth and height. If you initially chose a painting canvas with depth, it can be applied to a base of different heights and thicknesses, and if the protruding segment of the image is placed correctly, the lightest point will be exactly on the thickest base and then in descending order, thereby achieving the visual effect of 3D volume .
If the elements of the modules are arranged in height, this will allow you to place the entire composition of the paintings in any geometric shape chosen at your discretion. It can be pulled up or placed in the form of an arc, placed diagonally, or laid out on the wall in the form of steps - do it as it is convenient for you and as you like.
Painting stretcher
slats with profile
A painting stretcher or canvas stretcher is a frame on which canvas or any fabric is stretched. It is made from a special profiled strip.
The main purpose of a painting stretcher is to provide tension to the canvas stretched on it, while preventing uneven tension on the fabric fibers.
For more information on how to properly stretch canvas onto a stretcher, read this article “How to stretch canvas onto a stretcher at home” (Opens in a new tab)
Its quality affects not only the preservation of the painting, but also the artist’s productivity. It is probably difficult for an artist to maintain a creative working spirit if he has to paint on a poorly stretched, sagging canvas with wrinkles and folds. And they will definitely exist if the subframe is flimsy, made of raw wood and of inappropriately sized slats.
The slats must be made of dried, jointed pine or linden wood, free from defects (wormholes, rot, knots, resin). If the slats are made of raw wood, they will definitely warp and may even change their shape and crack. The canvas on such a stretcher will sag after a while, and this will inevitably lead to deformation and shedding of the paint layer.
This artist has a properly stretched canvas on a good stretcher, which is made in compliance with all the rules.
By the way, Artist S.N. Roerich used stretchers made from solid Himalayan walnut wood in his work. Well, you understand, when there is no pine or linden, you have to make anything from anything. Where in India can you find pine?
How to stretch fabric onto a stretcher
The following materials will be required:
- subframe made of slats;
- crosses needed to eliminate distortions and deflections of the main bars, as well as increase the strength of the structure;
- set of staples for stapler.
You will also need the following tools:
- regular roulette;
- hammer (especially if you plan to use nails);
- wood stapler
- special tool for tensioning.
In general, there are two types of stretching and it depends on you which one you have to give preference to: gallery or classic. The first involves frameless design, when the canvas is stretched so that the image continues on the sides. I must say that if it is fixed on the back side of the stretcher and neatly wrapped in the corners, then everything looks great even without a frame. Therefore, today this method is considered very stylish and modern. This kind of design can be found quite often.
There is also a classic type of stretching, when the ends remain white, and the picture itself is prepared for a baguette frame. Like everything classic, this method will always be popular
In any case, it is important that the frame is made exactly to the size of the canvas, and that the timber is dry, without cracks or knots. The fibers should be directed along
Advantages and features
Today there is a wide variety of such decorative elements. They vary in shape and size. The originality of these interior items is as follows:
- giving the room a unique and complete look;
- emphasizing the taste of the home owner;
- excellent color rendition;
- creating the illusion of movement in the room;
- visual elimination of minor surface defects.
Such products can have asymmetrical, vertical or horizontal displacement. Their segments are divided into several images (diptych, triptych).
There are also modular paintings, the basis of which is glass. They are made using special paint and a printer.
We increase the stability and rigidity of the subframe structure
The necessary stability and rigidity of the stretcher for canvas from 70 cm to 100 cm is fully ensured by the crossbar, but there is an opinion that for structures measuring from 1 sq.m it is necessary to have a crossbar. And over 1.5 sq. m. a double cross is required.
Example with crossbar
Example with a cross
Sometimes for subframes, a design without a cross is preferable, but with corner spacers that provide strength, stability and rigidity to the entire structure without weighing it down. The long-term practice of using such stretchers for paintings at the Dresden Gallery serves as excellent confirmation of the advisability of their use. Based on the name of the gallery, it was called “Dresden”.
"Dresden" subframe
Fragment
What types of canvas stretchers are there?
All modern subframes are divided into two types: modular and solid. They differ in the way the sides are attached. Let's look at these two types.
Deaf
These are fixed size subframes. Its sides are attached rigidly and such fastening does not allow the sides to move relative to each other. The disadvantage of this mount is that it is impossible to change the size of this product. If over time the canvas sag on it, then the only correct way to restore the stretch is to re-upholster the canvas on the same or a new stretcher. And the advantage is that you can easily make a blind stretcher on a canvas of any size. In addition, it is easier to produce and it costs less than a modular one. Therefore, as a rule, this type is offered in framing workshops and is used in DIY production.
Modular
MODULAR STRETCHER WITH WEDGES
These stretchers better meet the requirements of preserving paintings and at the same time provide sufficient rigidity and strength of the frame. They consist of movable slats that allow you to adjust its dimensions within small limits by driving in special wedges , thereby changing the tension force of the web. Therefore, a slightly sagging canvas can be tightened by knocking out wedges.
Read more about this in the chapter “How to tighten canvas on a stretcher with wedges” (opens in a new tab)
The corners are connected by a so-called straight tenon. With this design of the corners, the end parts of the tenons do not come out through the cuts of the eyelets and do not interfere with the uniform stretching of the canvas - thus, folds of the fabric do not form in the corners.
Manufacturing recommendations
When it is not possible to print on special equipment and there are no skills to paint pictures yourself, patterned fabric can be used instead of canvas. If there is no frame, plywood of a suitable shape or chipboard is used.
You can make a modern fashion image from your own photos. This will be guaranteed to be an exclusive item.
An interesting solution would be to combine a painting with a clock. The mechanism is directly attached to one of the modules.
As an option, it is worth noting the use of glass in the creation of modular solutions. In this case, photo printing will be applied to the inside of the glass surface. There is a highlight here: a reflection effect that looks amazingly beautiful .