Often it is the little things that spoil the appearance of a room and they are the most difficult to find at the right time. Combs, rubber bands, screwdrivers, glasses, pens, the TV remote control are first lying around in disarray in some place, and after cleaning they neatly lie in an unclear place. If this happens often, an organizer with pockets will come to the rescue.
It was originally intended as a place to store shoes, but over time the convenient item has spread throughout the home.
It’s not at all difficult to make such a thing with your own hands, and it’s not difficult to choose the material. To create a beautiful storage for small items, you will need cardboard or plywood, fabric for the base and pockets, threads, needles, decorative cord and ribbon for finishing, and scissors.
Creating such a piece of furniture will be a good reason to spend time with children and teach them how to make useful things with their own hands. The process itself will not take much time, and the material can be unused jeans, shirts, T-shirts, skirts, leftover curtains or old tablecloths.
Fabric organizer options
There are different types of storage organizers. They differ in the area of their use, the form of fasteners, and for what purpose they are used.
Depending on whether the module will move in space or not, they are divided:
- Mobile boxes that are moved to different points (box for jewelry).
- Stationary options that are constantly in one place. They are fixed in a certain area (cabinet door, wall, car seat).
The following types are determined by the type of fastener:
- Floor or tabletop.
- Built into a specific location. For example, organizers located on a furniture shelf or in a desk drawer.
- Mounted options that are fixed to the surface of the selected area.
If we consider models created to contain a certain group of objects, we distinguish:
- Boxes for underwear are a fabric structure with a solid base. There may be varieties made of transparent material, plywood or cardboard. The sections are located mainly vertically, and the partitions are often made of felt and corrugated cardboard. For bras, they create practical models with compartments located along them.
- Tools are made in the form of holders (when special brackets are fixed to the wall) and a wall-mounted plywood module. Field technicians prefer to take with them stationary or removable boxes with compartments. To store a small set of tools, use a backpack in the form of a fabric organizer or duffel bag.
- Stationery is laid out in combined or simple boxes made of wood, plastic or metal.
- For shoes , a device made like a stationary furniture structure is suitable. There are horizontal and vertical variations. The first type can accommodate up to 20 pairs of shoes, and the second - about 4. The module, which provides for a vertical position, is mounted on a wall, floor, door, closet or any niche of appropriate size.
- For cosmetics, documents or small items, portable boxes are used.
List of original ideas for an organizer:
- key holder (key hanger);
- bag-mat for containing toys;
- various containers for small items;
- multi-tiered plate for cosmetics;
- pockets hanging from the wall;
- hanging toilet paper holder;
- hanger with rings for scarves and scarves;
- wall module for cups;
- a lattice in the hallway for placing keys, glasses and flower pots.
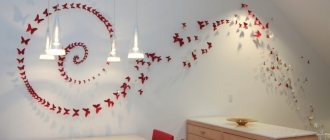
Wall pockets
Pockets on the wall are an excellent solution for organizing space in an apartment or house. Organizers of this type take up little space and can perfectly complement or complete a designer’s interior design. Products in matching or subdued tones will help emphasize the style of your home, while contrasting and bright ones will add a touch of joy.
A useful panel can not only be hung on the wall, but also mounted on the door of a room, closet or inside it. There are a huge number of options and varieties, as well as models of useful organizers. Everyone will definitely find a product to suit their taste.
This useful device was held in high esteem in Soviet times, since the furniture of that time was far from modern functionality.
In home economics magazines one could often see step-by-step instructions for making fabric stands with pockets and elastic bands for attaching small items. There you could also find a pattern and recommendations for choosing material.
This description was what today we call a step-by-step master class. Experienced housewives took the idea as a basis and created it. The girls also sewed pockets during their home economics lessons.
Today, pockets for the wall can be easily purchased in online stores, but it is more pleasant to make them yourself.
Types of pockets on the wall
Wall pockets can be divided into several categories:
- According to the intended purpose: for the kitchen, bathroom, children's room, garage, for example.
- Frame and frameless. The product can be soft or have a rigid base made of cardboard or plywood.
- By functionality, for example, universal or special, such as holders for newspapers, documents, slippers, combs, telephone or TV remote control.
- In appearance: single or in the form of a stand.
- According to the method of fastening: on loops, a rod, Velcro, or simply screwed tightly to the wall with self-tapping screws.
Also, wall pockets can serve a decorative function or, as they said in an old cartoon from the Soviet era, cover a hole in the wall. Young mothers store small things in pockets on the wall, and their grown daughters happily hide their “treasures” and dolls.
A variety of materials are suitable for making useful things. Organizers for small items can be not only rag, but also made from:
- oilcloths;
- silicone;
- felt;
- plastic;
- newspaper tubes.
To make a useful device, scrap materials can be used, such as scraps of boards, plastic flasks or bottles. In garages and utility rooms, craftsmen even use cans to make improvised “pockets”! Knitters can crochet or knit pockets, and seamstresses can easily turn even old jeans into pockets!
A little patience and imagination - and a homemade organizer will decorate the hallway or help tidy up the pantry. This convenient invention will also be useful for schoolchildren. Lately, people are increasingly asking to bring wall pockets to kindergartens. There they are placed in lockers and a change of underwear, shoes and the child’s personal belongings are stored there.
Textile organizers with pockets
Organizers for storing things with pockets are not difficult to make. To make the basic version you will need simple materials.
This:
- a large piece of fabric for a 2-sided base of the craft;
- smaller fabric for pockets;
- durable thin plastic for fastening parts (replaced with dublerin, which is glued with an iron);
- bias tape or tape for processing the product;
- eyelets.
Execution order:
- Sewing is done by hand or on a sewing machine.
- First, it is recommended to decide on the size of the fabric model and the size of the pockets. Sheet A4 is used as a standard template.
- Cut out rectangular shapes of the appropriate scale from plastic material, and from fabric - blanks 2 times larger. You should leave 2-3 cm for the volume of the parts and take into account seam allowances.
- Fold each pocket segment in half with the right side out, place a piece of plastic inside and stitch along the top.
- Iron the material on the sides outward in the form of an “accordion” so that there are allowances on the side.
- Next you need to stitch the edge folds of the pocket. Treat each pocket in the same way.
- To make the base of the organizer, you need to place a plastic piece between the layers of a double fabric blank.
- Place small parts on the created base and secure them with pins.
- Sew the pockets to the main module.
- Then take a round object and use it as a template to round the corners of the base.
- Treat the craft with tape or ribbon in a circle.
- Mark the installation location for the eyelets and attach them.
Option for making an organizer for the hallway:
- The first stage involves cutting out 2 rectangles from dense material, measuring 80x40 cm (any size can be chosen as desired).
- Sew the created segments first with the wrong side up, then turn them right side out and stitch along the edges.
- Cut 4 strips from this or another suitable fabric.
- From the stripes, make 4 pocket lines, each with 2 pockets.
- Next, fold the upper edges of the fabric runner and trim it with colorful braid or decorate it with applique.
- Each pocket should be given depth using 2 folds that are not secured at the top.
- Sew the strip with creases on 3 sides and between the pockets.
- Seal the bottom edge of the sewn bags with finishing material or braid. It will cover the edge and secure the folds.
Ribbon Keeper
Any needlewoman accumulates a large number of small things, including meters of bias tape, braid and a wad of all kinds of ribbons. In order to ensure that all these items can always be quickly found, it makes sense to build an organizer for handicrafts with your own hands. How to store ribbons separately from needles, buttons, pins and other small items, we will consider in this part of the article.
To create a box for ribbons, you need a small box, fabric or self-adhesive paper, glue, eyelets, tools for installing them, whatman paper, colored cardboard. A suitable box with a non-removable lid can be purchased at the post office. You need to cut off the excess cardboard from the lid, leaving only the top. If the box is dark, it should be covered with either adhesive paper or white Whatman paper, and a cloth on top. The inside of the organizer is also covered with pieces of fabric. All allowances located on the inside of the lid and box are decorated with colored cardboard. Next, you need to install the eyelets on the lid and sides of the drawer using special tools. Now you can put the spools of tape in the box, and bring the ends out through the holes.
Hanging organizer
Method for making an organizer for needlewomen:
- Steam the fabric piece with an iron and cut out 2 rectangular shapes from it, the width of which is 5 cm + (2 cm for allowances) larger than the hanger, and the length can be adjusted as desired.
- Apply hangers to the upper central zone and trace them along the contour (as an option, attach half of the object, then bend the material in half lengthwise). Step back 2 cm and cut out the part.
- Place the cut segment on the 2nd piece of material and cut it to the silhouette.
- Next, round the lower corners (you can use a plate to create a smooth rounding).
- The next step involves calculating the location of the pockets and their number. Draw lines on the fabric with chalk.
- Then you need to calculate the width of the strips of thick transparent film.
- To form the volume of the pockets, folds must be made. They are laid on both sides of the part, about 2 cm of polyethylene length is laid on each crease.
- If there are 4 pockets in a tier, then the length of the polyethylene strip will be calculated as follows: the width of the fabric blank + 8 folds of 2 cm each. Total 16 cm. If desired, adjust the depth up or down.
- Next, cut out the required number of rectangles from the film, their height is determined by the size of the pockets (markings on the fabric + seam allowances).
- Treat the upper part of the film with finished bias tape.
- Finally, hang the organizer on hangers.
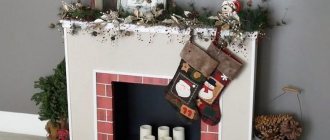
DIY storage organizers for the bathroom
Necessary components for making a hanging fixture for the bathroom:
- oilcloth;
- pencil;
- ruler;
- scissors;
- dense material;
- fixation rod;
- sewing machine;
- hooks
Design method:
- Take a piece of fabric, the scale of which depends on the object where the organizer will be placed.
- Using a pencil and ruler, divide the fabric into a number of segments equal to the number of pockets. As an example, you can take 9 bags.
- Next, take measurements on the oilcloth. It is also worth considering that the pockets should be 2 rubles. wider than the marked rectangles.
- After this, cut off a piece of oilcloth of the required size and divide it into 3 strips, which in turn are divided into 3 more parts.
- Using pins, attach the oilcloth strips to the fabric, leaving 3 pockets on top.
- Cover the rod with material and sew on a side.
- Attach the hooks to the door and hang the craft on them.
Do-it-yourself organizer for small items. How to sew pockets for small items with your own hands: master class
In every apartment, many small items accumulate, which often get lost and do not have a permanent place. This situation occurs in a woman’s purse, in a needlewoman’s corner, in the hallway and in other rooms. To eliminate clutter, it's smart to make your own small items organizer. With its help you will quickly find what you are looking for. Thanks to the available compartments, you will always find keys, cosmetics, umbrellas, combs, gloves, toys and many other small things on time.
From cardboard
Storage organizers help you organize your space.
To make a simple craft in which elements of underwear are folded, you will need the following materials:
- knife or scissors;
- pencil;
- drawer from the closet;
- ruler;
- cardboard along the width of the secretary.
Do-it-yourself storage organizers made of cardboard (1 option)
Organizers for storing things with your own hands made of cardboard (2nd option)
Procedure:
- Measure the parameters of the finished box, then calculate how many cardboard strips should be inserted into it. This factor is determined by the desired cell size.
- All strips must have the same width, which corresponds to the height of the drawer.
- Mark long pieces on cardboard, then cut them along the marked lines. You will get 2 long and 3 short tracks.
- Next, you need to mark the cut lines according to the diagram below:
| Band size | Number of cuts | Length | Section width |
| Extended | 3 | ½ partition height | Equal to wall thickness |
| Shortened | 2 |
- It is recommended to cut the workpiece carefully; it is better to first make a small cut, and in the process bring it to the desired size.
- To strengthen the partitions and prevent creases, it is advisable to varnish the paths or wrap them with tape. If desired, the parts are covered with colored paper.
- Install membranes in a furniture box - install short strips on top of long pieces.
DIY wall organizer: how to make it and how to decorate it
Today, when there are quite a lot of small items in family life, organizing home space is quite difficult. This problem can be solved if you make a wall organizer - of course, you can buy it, but a truly beautiful and unique accessory is obtained only when you put your own imagination and creative passion into it. By the way, such a thing can also be an excellent holiday gift for loved ones.
From boxes
To design a practical device for storing socks and underwear, you will need the following tools:
- shoe box;
- pen;
- ruler;
- glue;
- decorative paper;
- glue.
Step-by-step creation of crafts:
- First, you should decide on the size of the linen drawer, decide how many things will be placed in it. This determines what size box to choose and how many sections to divide it into.
- You need to put the lid of the package aside; you will need it later.
- On the side walls, mark the height of the future product. It is recommended to take into account the size of the closet in which the underwear will be stored.
- Next, mark the cut lines, then cut off the excess.
- Use the lid and remaining fragments of the box to form internal partitions. To do this, you need to calculate how many parts need to be made. Based on the calculation of the optimal section space, this will be 7-8 cm2.
- The height of the walls is made equal to the level of the box or slightly lower, and the length will be 2-3 mm less than the box itself. In this case, folded items will easily fit into the sections.
- Now it is advisable to decorate the blanks on all sides with wrapping paper or simple white sheets.
- Send them under a press for 2-3 hours to dry.
- Next, decorate the sides with fabric, thick multi-colored packaging or paper material for scrapbooking. For long-term operation, raw materials must be durable.
- For decoration, an allowance of 3-4 cm is made on both sides. It is better to glue the sheets after “trying on” to avoid unevenness and creases. First, for convenience, the sides are folded, then sections are made on the fold lines at the corners of the box so that the material lies evenly. Finally, the decor is glued on.
- Decorate the bottom in the same way.
- On the press-dried planks, mark the locations of future cells.
- On long strips, make a mark from the side of the glued edge, and on short parts, from the opposite edge. Then the assembled grille will take on a neat appearance.
- Make cuts along the outlined contours to the middle of the cardboard. The width of the section corresponds to the thickness of the strip.
- Finally, assemble the lattice and insert it into the box.
From plywood
Organizers for storing things are made of plywood.
To create a useful craft for the bathroom and fold towels in it, you will need the following tools:
- self-tapping screws (screws);
- plywood sheet;
- metal cans of pickled pineapples;
- brushes;
- glue gun and PVA glue;
- acrylic paint;
- colored wallpaper or decorative napkins.
Step-by-step method of formation:
- Wash the jars thoroughly, then mix the paint with PVA and paint them. It is recommended to use a light color scheme or tones that go well with the tiles in the bathroom.
- Dry the tin container and decorate it in the “decoupage” style; apply any image. It is allowed to complete the illustration using paint of a different shade.
- Using a glue gun, apply glue to the edges of the iron container and stick a satin ribbon of a suitable color there.
- Give the tins time to dry.
- Paint the plywood in a suitable tone and cover the entire length of the perimeter with the same edging.
- Place the cans parallel to one another on a plywood sheet and secure them to the base with short screws.
- Make a hanging mechanism on the back surface, and insert special hooks into the bathroom wall.
Do-it-yourself storage organizers made from plywood
Variants of plywood organizers:
- A holder for magazines and letters is made of 10-15 sheets, fastened at the bottom with pencils and screws inserted into drilled holes.
- For a mirror with shelves, you will need a large rectangular veneer plate, on which a long dressing table is attached to one side, and several small wooden shelves are nailed to the other edge.
- Drill many round holes on a large sheet of plywood and insert suitable sized wood dowels into all or some of them. Various kitchen utensils are hung on the inserted bushings.
- Make stable triangular stands from plywood, hang chains, necklaces or beads on top of them.
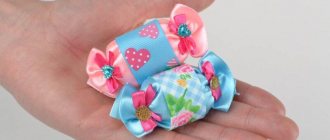
Convenient jewelry storage
Designers offer a glamorous solution for organizing space for decorations. Most often this is a panel placed on the wall near the dressing table. When making a jewelry organizer with your own hands, you should take into account the interior of the room and the design of the dressing table. The panel must be correctly combined with the surrounding environment. Most often, to create an organizer, a baguette is used, on which, instead of a picture, burlap or canvas for embroidery is placed. Sometimes the fabric is replaced with wire, fishing line or colored ribbons, on which earrings and hairpins are placed. To hang beads, you can screw screws decorated with buttons or small decorations into the frame.
From jeans
Organizers are made from durable denim to store things.
Necessary materials for forming a stand for stationery:
- cardboard tubes and cans of various diameters and shapes;
- denim pieces;
- lace;
- cardboard;
- braid;
- glue gun;
DIY storage organizers made from old jeans
Manufacturing method:
- Cut a strip of jeans to fit each tin or tube. Leave an allowance of 3-4 cm for the hem and side seams.
- Make vertical cuts in the bending area and glue them to the bottom of the can with a glue gun.
- Then process the top of the thick mold.
- In a similar way, cover all the jars.
- As a decoration, decorate each denim piece with ribbon and lace as desired.
- Glue the decorated blanks together.
- Place the resulting structure on thick cardboard and trace along the outline with a pencil. Cut out the drawn template.
- Place the cardboard base on the denim and glue it. Make cuts on the fabric edges, fold them inside out and glue them.
- Attach the base with the reverse surface to the jars using glue, and decorate the joint areas with twine.
- If desired, the craft is decorated with flowers made from denim.
Step-by-step method for making a practical organizer:
- Cut old jeans, then rip one galosh lengthwise and secure its edge to the back surface of the board.
- Repeat similar steps with the 2nd leg. As a result, the entire front surface of the board will be covered.
- Rip out the denim pockets and attach them to a piece of wood. You can cut out denim squares along with the pockets, which will give you more storage space.
- It is advisable to sew the entire front fabric until it is attached to the board. This means that you need to sew on the pockets, and then fix the whole piece from the inside out with a furniture stapler.
- A rope is attached to the sides of the finished product, then the organizer is hung on a nail driven into the wall.