Required tools and materials
To make a beautiful wooden tabletop and legs, you will need the following building materials:
- sandpaper;
- antiseptic;
- white primer;
- waterproof varnish or paint;
- masking tape.
You need to make sure you have the tools in advance:
- brushes and rollers;
- paint tray;
- grinding tool.
To paint your table while protecting your hands from harmful chemicals, make sure you have rubber gloves.
Which paint to choose?
The following types of paints are sold in stores:
- water-dispersed;
- oil;
- acrylic;
- alkyd;
- enamels for wooden surfaces.
You can paint wooden furniture using any of them. However, before purchasing, be sure to check the type of wood of the table so that the type of paint is chosen correctly. Then you will be able to do the job efficiently.
Water-dispersed
This type of paint is designed for furniture used in heated rooms. It contains no dangerous harmful substances. It is evenly distributed over the entire surface and dries quickly, so even an inexperienced painter can paint a wooden table. The paint creates a durable coating that is resistant to moisture. But it does not withstand mechanical stress when cleaning with abrasive particles. To avoid rapid wear and tear, it is better to wash such a table using a soft sponge.
Oily
The basis of oil paint is drying oil - a greasy agent, due to which the painted surface takes a long time to dry. Used for interior and exterior finishing of any wooden products. After application, a thin oily film remains, but after a short period of time it dries out and peels off.
This outdated type of painting work is used less and less, since modern enamels are more economical and wear-resistant.
Acrylic
After treatment with acrylic enamel, a beautiful glossy coating is formed on the surface, resistant to fading from the sun. The drying process does not require much time - a durable film appears within 15-60 minutes, depending on the conditions where the painting work is carried out. It is not harmed by mechanical impact, therefore, due to wear resistance, enamel outperforms other analogues.
Alkyd
If the table will be used outdoors, then it is better to opt for alkyd enamel. It has proven itself best when carrying out external work on finishing wooden surfaces. A rich color palette, glossy sheen and matte finish will allow you to get any desired result.
The paint withstands exposure to aggressive detergents, frost and direct sunlight. Available in the form of aerosol bottles and liquid. It should be taken into account that its strong smell can take a long time to disappear from the room.
Enamels for wooden surfaces
Using wood enamels allows you to repaint furniture to suit any color and taste. They allow you to protect surfaces from thermal and mechanical damage, which is especially important for countertops. Negative weather events do not harm them.
The main requirement when choosing enamel is that it matches the type of wood from which the table is made.
To increase the wear resistance of a table treated with enamel, after it has dried, the surface must be coated with waterproof varnish in at least 2 layers. This will give greater strength and extend the time until the next restoration.
Good paint is the key
Let's remember that properly preparing the surface for painting is only half the battle. A lot depends on the paint. Your requirements will be satisfied, first of all, by enamel, which creates durable coatings with high mechanical resistance. It is easy to get scratches and damage when using the table. For example, Dulux Rapidry . This is a universal, quick-drying acrylic enamel with a mild odor. A table painted with it will also be resistant to high temperatures and will not turn yellow or fade.
Black, green or red? Don't throw away your old wooden table - just paint it, preferably an attractive, surprising color.
Surface preparation and painting
It is better to disassemble the table if you plan to paint all its parts. If only the countertop requires updating, then you don’t have to do this. You only need to cover with masking tape those areas that will remain untreated.
Preparing the surface for painting includes the following steps:
- Cover the floor with oilcloth or newspapers if you will be working indoors.
- Using a sander or sandpaper, carefully sand the desired area of wooden furniture. Remove any dust remaining after cleaning the table parts.
- Defective areas are leveled with putty or primer of the same color as the paint. Let the treated surface dry.
- Pour the paint into the tray and use a brush or roller to apply it to the parts, evenly distributing layer by layer until you achieve the desired effect.
- When using an aerosol, shake the bottle first. Apply paint from a distance of 30-50 centimeters from the tabletop and legs.
- Allow the previous coat to dry before applying a new coat.
To increase the wear resistance of the paint, you can apply an additional layer of acrylic varnish on top of it after drying. 10 hours after treatment, you can remove the masking tape.
Paint and stencils
Using paints, you can completely restore an old table, including the legs, which often have scuffs. If you are good with a brush, the work will be simplified - it will not be difficult for you to depict the desired design or pattern. If you have problems with drawing, use stencils that are easy to buy in craft stores.
First, you need to thoroughly clean the table, paint it with background paint and wait until it dries completely. Now you need to mark where the patterns will be located, you can also draw a light sketch with a pencil. Next, take stencils and apply images to your taste. When the decorated table is dry, cover it with a protective layer of varnish.
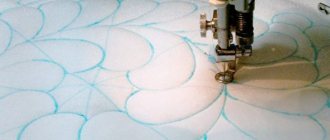
Another original solution for DIY decor is to use regular patterned tulle instead of a stencil: cover the tabletop with it, apply paint and then carefully remove it. You will get an original openwork table!
Photo: inrosstroy.ru
Photo: verstakdoma.ru
Decorating the table surface
The painting of the table will be decorated in an original way if you use the decorative technique of decoupage. It is important to decide on the color and pattern, which should be in harmony with the overall interior of the room. For example, an image of a geographical map will go well with the interior of an office if it is placed on the surface of a desk.
Specialized stores for decoupage sell napkins with various designs, so choosing a suitable design will not be difficult. Or you can go the other way and make the table lace using tulle. Here you need to rely on your imagination, and your table will become a piece of art.
Decoupage technique in vintage style
To paint a countertop in vintage style, you will need the following materials and tools:
- sanding machine or sandpaper;
- glue (use PVA or special decoupage glue);
- aqualak;
- primer;
- varnish for a wooden table;
- decoupage cards or drawings, photographs from magazines;
- a jar of white acrylic paint or other light colors;
- fan brush or roller.
Choosing a color scheme for an old table
The choice of color depends entirely on the owner of the table and his preferences. This could be bright, rich shades, creating the illusion of a wooden texture, painting the countertop white or metallic, etc.
- Juicy tones: light green, yellow, scarlet, blue
Such color solutions will “fit” well into a modern style, where such furniture will become a bright detail of the interior of the room.
- White or black color
This is the best option for those owners who are pretty tired of the “native” color of the table or countertop and decided to make it more “neutral”.
This solution will suit any interior and will become its laconic highlight. When painting a table correctly, its wood texture will be hidden under a uniform layer of paint.
- Metallic
Painting all furniture or its parts in metallic colors is a successful solution for design in a classic or high-tech style.
Varnishing a wooden table: recommendations from experts
The choice of furniture in modern furniture stores is quite wide, as is the material from which it is made. But products made from natural wood have not lost their attractiveness. For example, a kitchen set made of solid wood. Such a product will be 2-3 times cheaper if you order it from a craftsman. You can try to assemble it yourself, even better. That parts for such furniture are also widely available in stores. But, we will talk about what kind of varnish to cover a wooden table so that the furniture is protected from all kinds of damage and is pleasing to the eye.
Benefits of painting furniture yourself
What are the benefits of painting yourself?
- Confidence in the quality of work performed.
- Possibility to choose the desired color and dyeing method.
- Such furniture is easier to “fit” into the interior.
- It's easy to bring new ideas to life or simply restore individual pieces of furniture.
Painting is one of the fastest and most effective techniques in furniture decor.
Varnish selection
Preferences in choosing a paint material depend only on consumers. Our task is to familiarize them with the properties of each type. Varnishes for table coverings are:
- Water-based are the most environmentally friendly. The substance is almost odorless and does not pose a health hazard to the consumer. Water-based varnishes are most often used for children's furniture. But professional craftsmen rarely use them, since after drying the treated surface becomes matte.
- Acrylic-based materials are affordable and quite easy to process. It is best for beginning craftsmen to start with these varnishes. If mistakes are made during the work process, they can be easily corrected. To do this, use white spirit or grind the surface.
- Polyurethane based and recommended for professional craftsmen. It is better to apply this substance by spray. In this case, the surface will look quite stylish. It is better to purchase such material in branded stores.
- For very expensive wood, specialized furniture oils are used. This composition is quite expensive, so it is rarely used. Apply only by hand using a swab.
We select a primer for a specific job
We paint wooden products ourselves
If you are painting wooden walls or other elements, then the choice of primer is also important. Therefore, I decided to compile a table of the characteristics of the soils used:
| View | Recommended use | Notes | Drying time |
| Acrylic water based | It is fashionable to use for any type of wood with the exception of pine and resinous ones. Works well paired with acrylic paints with the same base | It has almost no odor and dries very quickly. It is enough to simply treat the surface after priming. Able to adhere to previously painted areas | Dries on average in 1 hour, and coloring compounds can be applied after 3-4 hours |
| Alkyd on oil | Used on fresh wood, penetrates deeply and isolates resinous knots | Suitable as a base for oil paints. | Dries in 45 minutes, painting is possible after 7-8 hours |
| Shellac with pigment | It blocks substances penetrating through previous types of soil. If the table is being restored, it helps the new paint to adhere well to the product. | Dries quickly and has almost no unpleasant odor. It is possible to use the material for wooden elements that are planned to be painted with oil and water mixtures | Drying occurs within 15 minutes, the next layer must be applied after 45 minutes |
We paint wooden products with our own hands
If you need to paint wooden walls, you need to choose the right material.
And here it is worth paying attention to the following factors:
- For what purposes are coloring compositions needed? For external work, you can use oil paint; it will perfectly protect the walls from harmful influences. Acrylic-based mixtures also help protect well, but their price is much higher than their predecessor
- Inside the house, it is better to use water-dispersion mixtures for wooden walls. Their advantage is quick drying and odorless
- To preserve the naturalness of wooden coverings, stain and varnish are used
- The amount of material required depends on how the paint spreads. Most often, manufacturers indicate everything on the packaging, and the application technology is spelled out there. But it is often better to consult a professional
- Painting materials are manufactured for different weather conditions, and each has its own temperature threshold required for application or high-quality service. Look at the markings that are on the packages and ask sellers in hardware stores for their explanation.
The technology for painting wooden materials is no different from other areas to be painted. For this process you can use the following tools:
- Brush – a narrow and wide brush will help both paint large areas and reach hard-to-reach places
- Roller – you will still need to purchase a brush for this. It is this that will help paint those places where the roller will be helpless. By the way, it still requires a certain skill
- Sponge – suitable for craftsmen and professionals. If painting wooden elements is done by a beginner, then it is better for him to use other tools
- Sprayer - it will be very easy and simple to carry out all the processes. If you have such a tool, all work will go quickly and smoothly. The gun does not leave streaks and does not fly in different directions like with brushes. This not only allows you to stay clean, but also saves on material.
As auxiliary tools for painting, you need to purchase paint trays, gloves and a protective face mask. Be sure to cover all furniture that may come into contact with paint. Do-it-yourself painting will not pose any problems if you are serious about the preparatory process.
Tips for choosing varnish color
For beginning craftsmen, a very important question is what shade to choose varnish for a wooden table. The customer must also put an end to this issue. You can not disturb the natural texture of the wood or cover it in the color of cherry or walnut. But you don’t always get the result you expect. To prevent this, you should familiarize yourself with some features:
- Colorless varnish will not always preserve the original appearance of wood. Most often it gives the wooden surface a yellowish appearance. Therefore, if it is necessary to maintain the original shade, it is better to use polyurethane materials. They eliminate the appearance of yellowness.
- When visiting branded stores, sellers will provide a large assortment of colors to choose from. To get the color that you prefer, it is better to take a color that is 2-3 tones lighter. After all, the desired gloss on a wooden surface is formed only after applying 5 or 6 layers. With each subsequent layer, the shade will become darker.
- In the case when 2-3 layers are applied and the result is the desired surface color, but the required gloss is achieved, then this problem can be solved with the help of colorless varnish.
- Varnishing should begin only after high-quality sanding has been completed.
How to coat wooden surfaces for their decoration and protection
All wooden structures used in the construction of buildings must be subjected to coating treatment. This will not only increase their wear resistance, but also significantly improve their appearance. The paints and varnishes used for this serve as reliable protection against moisture and ultraviolet radiation, which have a detrimental effect on wood. However, they must be used at the earliest stage of construction.
Wooden surfaces experience constant loads, the degree of which depends both on the location of the building and cardinal directions, and on many other factors. The material wears out especially strongly in the coastal zone and in open spaces. At the same time, the wall of the building located in the north wears out much less than on the southern and western sides.
How and with what to coat a wooden fence for durability
Ceramic tile
At the end of the renovation, there are often excess tiles left in the kitchen or bathroom, which can be safely used to decorate the table. In this way you can beautifully decorate an old dining table in the kitchen or on the open terrace.
Patchwork tiles in the patchwork style look great, as well as decorative tile panels and borders with patterns. No less impressive will be a tabletop made of tiles that imitate stone or expensive wood.
Photo: mebel-mart32.ru
Photo: maiolichevietresi.com
Painting wooden surfaces - a whim or a necessity
Since wood is a natural material, it can be destroyed under the influence of certain factors. Among which:
| Ultraviolet | Its impact has a detrimental effect on wooden surfaces, destroying and modifying them. The material turns gray, and its fibers begin to stick out in different directions. Such surfaces quickly become dirty. |
| Moisture | Promotes swelling of wood. When it dries, its volume decreases, and since these factors cause a state of tension, over time it completely cracks. |
| Moisture-saturated air | It is a catalyst for the formation of fungi, blue stains and mold affecting wood. The former tend to penetrate into the structure of the material, coloring it gray-blue, while the latter form on the surface, covering the wood with dark spots. Unlike these two, rot fungi contribute to the destruction of wood, making its further use impossible. |
How to cover a wooden table outdoors yourself
What needs attention
The wear resistance of painted wood depends not only on its quality.
This factor is also directly influenced by the correct layout of building structures, which needs to be taken care of in advance:
- make wider overhangs;
- increase the height of the plinth;
- paint the joints of the seams and parts of the boards located below with your own hands;
- make the shape of the roof of a wooden house correct and provide it with a drainage system;
- leave an opening under the outer skin for ventilation.
Tip: Lumber is constantly exposed to the environment, so it should be kept covered on the construction site, allowing access to air.
How to cover a wooden door outside in a private house
Three-layer painting system
In order for the wood to last as long as possible, a three-layer painting system should be used.
- Apply the first layer of antiseptic primer, which protects the wood from moisture and fungal formation.
- Next, use a primer paint that allows the finishing coat to be absorbed evenly. In this case, both topcoat paint and a special primer can be used.
- A topcoat paint, oil or acrylate, is used as the finishing layer. It is used to give a wooden structure the required color and shine, and serves as additional protection by creating a paint film on the surface.
Mosaic
Decorating an old table with mosaics is not only a great way to make a tabletop incredibly beautiful and original with your own hands, but also a rather exciting process in which you can involve a child.
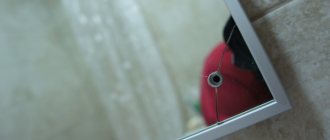
Mosaic elements can be bought in a store or made from scrap materials, for example, broken mirrors or tiles. Draw a sketch of the design on the tabletop, pick up some glue and start creating your masterpiece!
Photo: proffstroygroup.ru
Photo: nashenasledie.livejournal.com
DIY decorative pillows (95 photos)
Finishing materials
Coating with special oils and wax for wood will help protect the wood from many negative factors. However, stain, whose price is lower, is also suitable for these purposes. Although the waxing process is quite complicated, it can be done at home.
How to use stain
Protective compounds and stain are applied to the already prepared wood in the same way as paint. A uniformly colored surface can be achieved if these materials are applied quickly and continuously so that the entire surface dries evenly. If any area dries faster, the border will remain noticeable.
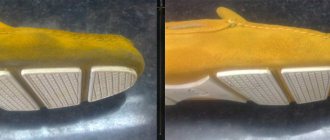
In the photo - wood stain for decorative work
Each of the wooden sections is painted with stain in stages by applying in the direction of the grain. Do not wet the brush too much, otherwise drops will form on the surface. If this cannot be avoided, the drops should be thoroughly smeared, not allowing them to dry out.
You also need to ensure that at the junction of sections of the structure, the layers do not overlap each other. Considering the technological complexity of this process, you should first practice.
Waxing
The most convenient material for applying wax is a piece of cloth, but some compounds can also be applied with a brush. To create deeper color and shine, the material must be applied in two layers.
Applying wax or coating on wooden furniture for durability
Tip: It is more effective to apply wax in the direction of the grain, but this is not a necessary condition.
To treat the surface you need:
- Use a piece of soft cloth to collect wax from the container;
- start rubbing;
- when particles of coating begin to remain on the surface, the rubbing process can be considered complete;
- then the wax should dry, but not harden;
- after which polishing is carried out to ensure smoothness using a clean rag.
After a certain service life of the wooden structure, waxing can be repeated.
Protecting wood with oil
The oil serves as additional protection against adverse factors affecting the wooden surface. Whatever the oil used for processing, they are all applied in the same way.
Depending on the purpose of the surface being treated, the following oils are used:
- tung is non-toxic, so its use is ideal for treating countertops and other surfaces used for food preparation;
- Danish and teak are used for processing hardwood and outdoor furniture, giving them a special gloss;
- linseed oil is suitable for treating any surface, but requires preliminary boiling (preferably double boiling), which allows it to dry faster and eliminates stickiness.
Any of the oils is applied with a soft brush, generously moistened with the composition, in the direction of the fibers with rubbing movements, which allows you to cover large areas and penetrate deeper into the structure of the wood. After absorption, excess oil is removed with a piece of cloth. If there are no other instructions in the instructions for the composition, the wood should be left for half an hour, and then polished with a dry rag.
What is the best way to cover a wooden table in the kitchen?
How to work with varnish
Despite the fact that varnishing does not require special care, this material must be applied along the grain and in good lighting, as it is often colorless, which is why some areas may remain untreated. You should also regularly check treated areas for gaps.
Coating wooden walls inside with acrylic varnish
Tip: each section should be processed in stages, while even application of varnish is possible with smooth brush work.
Before applying the next layer, you need to take a damp cloth and wipe off the first one. This action is explained by the fact that the varnish tends to spread along the fibers of the wooden surface.
Wood paint requires protection
To obtain the required shade, paints are often mixed with each other. But before moving on to this process, you need to make sure that they have the same base, which can be either water or oil.
The paint is applied along the fibers, without overlapping the already dry and wet areas with each other. Please note that coloring alone is not enough.
The material also often requires a protective layer - wax or varnish. But before you start applying it, you need to make sure that the finishing materials used are compatible with each other.
How to paint a table white?
Despite the light shade, painting white increases the service life of products made from pine or birch, oak or beech.
- We clean the objects from dust and remove the old coating.
- To highlight edges, slats or carved decorations, paint them dark.
- To create a natural appearance, rub the painted areas with wax.
- Repaint with white paint in several layers. After each coating, you must wait until it dries completely.
- The waxed areas must then be rubbed with a knife.
- We sand all areas with fine sandpaper.
For whitening, a special composition is used, which includes wax and pigment. During processing, lines are formed that give the product an antique appearance. The work is carried out in the following sequence:
- Dust is wiped off the furniture.
- Previous layers are removed.
- Colorful material is applied.
- Using a metal wood brush, small indentations are created in the direction of the grain.
- The cavities are filled with whitening paste.
- After drying, wipe the surface with a dry cloth.
- Everything is covered with varnish.