Hair ties: choice
Scrunchies are most often used by those with long or medium length hair. It is very easy to collect strands of hair in a bun using an elastic band, because constantly walking around with your hair down is not always comfortable.
With the help of elastic bands you can create a lot of different hairstyles, as it holds the strands firmly. This is why many hairdressers often use elastic bands in their work, using them to create interesting hairstyles.
Making rubber bands with your own hands is quite easy if you decide on the model in advance and choose a certain option. Rubber bands come in the following types:
- Silicone
- Foamiran
- Satin
- From different types of fabric
Tools
Working on decorative rubber bands to secure your hairstyle does not require the purchase of special tools.
You will need:
- regular ruler;
- sewing needle;
- small scissors with sharp tips;
- a burning device or a simple lighter;
- glue gun
When creating bows, it is convenient to use stationery clips to fix the workpiece on a piece of cardboard.
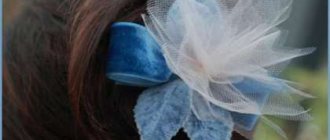
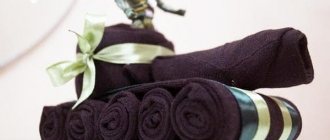
Satin ribbons
You can make very beautiful and stylish elastic bands from satin ribbons that can definitely decorate your hair and give you a good mood. Elegant rubber bands made from satin ribbons with your own hands do not injure the strands and glide over them. They can be decorated with any decor - beads, rhinestones or various decorations.
If you want to make an elastic band to your liking, then be sure to use these instructions. The decoration will turn out to be very original and unique, and as you know, hand-made items are incredibly valued in our time.
Casual option
To fix your hairstyle at home, it’s easy to decorate a boring elastic band with tape.
- To do this, just wrap the elastic band with a ribbon, securing it with hand stitches.
- It is easy to sew a sausage from a wide ribbon, then passing a regular linen elastic band through it. Fasten the elastic band and stitch the edges of the sausage manually.
Manufacturing process
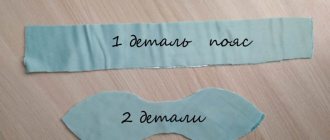
To make elastic bands from ribbons with your own hands, you need to take the following materials:
- — Elastic band for sewing;
- - Satin ribbon;
- - Scissors and needle.
You need to wrap the ribbon around the elastic and sew the edges, not forgetting to make a little drapery, so the elastic will look more elegant. The edges of the ribbon and elastic are sewn together at the very end, the finished product can be trimmed with beads and seed beads, and any other decorative elements can be sewn on top.
Basic techniques for creating petals and leaves
An ordinary sharp kanzashi flower petal is made from a square piece of ribbon. It is folded in half diagonally. Repeat the procedure again with the resulting triangle. The tail and base are cut off, the edges are singed.
Rubber bands using the kanzashi technique are made from different petals. For lush flowers, volumetric elements are appropriate. Take a square piece of tape and fold it in half horizontally. Each side is folded in half twice more. The edge is cut at an angle of 45° and treated with flame. Make two folds on the opposite side, hold with tweezers, and run the fire along the edge.
To create a flat petal you will also need a square of tape. It is folded in half diagonally, then again. Holding it with tweezers, the sharp lower edge is pulled to the base. The tip is cut off and soldered.
Kanzashi rose pins are made from other petals. You will need a piece of tape 2.5 x 6 cm. Two adjacent corners are bent down, aligned with the edge, and sealed. Additionally, the edges are folded and scorched with fire. For a small rose you will need 12 petals.
Leaves will help diversify the composition. A piece of green ribbon is turned wrong side out. The left side is bent 90° and the right edge is placed on top. They cut it off, form two folds at the base, fix it, and scorch it with fire. The size of the leaf depends on the length of the ribbon.
Hair ties can be made from bows. You will need a candle, ribbons, cardboard, glue, scissors and decor for the central part. The following are the instructions:
- A U-shaped template is made from cardboard (it is needed for the convenience of forming a bow). Insert the tape and wrap it three times, securing it with a paper clip.
- Sew the future bow in the middle and carefully pull it off.
- Two bows made of red ribbons are fastened crosswise in the center and secured with a beautiful bead.
The template can be used to create a brooch, hairpin, headband, or hair tie. Kanzashi bows and flowers can be either a central element or part of the overall composition. Two identical bows with elastic bands look good.
Rose petal
Ribbon petal 1.2 cm
Leaf A soft petal can be made by carefully melting the ribbon over a fire
Pointed petal with curved end Simple round petal Simple sharp petal
What is an elastic band made of?
At home, there are often leftovers of various unnecessary materials that are usually thrown away. These can be scraps of fabric, lace, ribbons, sequins, shreds and much more. All these materials can be used to make rubber bands with your own hands.
Don’t forget to use your imagination and creative thinking, then you can create unique jewelry that will delight others. You can create brightly colored scrunchies that are perfect for summer, or you can create more calm and neutral decorations that are suitable for fall and winter.
Do not overdo it with decoration and decor, otherwise the elastic band will look ridiculous and inappropriate. It is worth wearing different elastic bands, using elegant accessories for holidays, and neutral ones for everyday wear.
Ways to play with the toy you received
Handgam is an amazing polymer. If you squeeze it quickly, it will begin to become hard and can be separated into several parts. If you squeeze it slowly, it will become soft and begin to spread on the surface.
What to do with the toy:
- Stretch. The toy is flexible and can be pulled without breaking.
- Use as a jumper. You can form a ball from the handgam and throw it onto the surface. He will jump.
- Give the gum different shapes. Use molds. This game will be interesting for young children.
- Break up. Hardened chewing gum can be broken into several pieces with a hammer.
- Tear. With a sharp movement of the hands, the chewing gum is separated. Reconnecting the toy is not difficult.
All these games are aimed at developing motor skills and improving hand function. Exercises and games can also be used by those who want to restore the use of their hands after injuries.
Fabric elastic
Making the most ordinary elastic band from fabric is incredibly easy. You need to prepare a piece of fabric, you can use chiffon, satin, silk, velvet and so on. The larger the flap, the more voluminous the accessory will be.
The most common elastic band for sewing is used as a base, which is covered with fabric. You can sew a fabric cover in advance, thread a sewing elastic band into it and sew the ends together. The finished product is decorated to your taste; you can use false flowers, sequins and much more.
Any DIY hair tie is an original hand-made item that is worth your time. You can create elastic bands in different styles and colors, choosing them to your liking.
Twister hairpin
About ten years ago, an unusual hairpin – a twister – came into fashion. It is a flat stick 2 cm wide with rounded ends and a hole in the middle. The hole is about 10 cm long, and the entire hairpin is 15-20 cm.
A bunch of hair is inserted into the hole, then the ends of the hairpin are twisted towards the middle, or bent in another way. The flexibility of the hairpin is given by a wire frame, which is wrapped in beautiful fabric or leather.
We offer instructions on how to properly make a twister hairpin. To work, you will need a piece of insulated copper wire or regular wire, but then you will need tape for winding. You need to close the ends of the wire and secure them to make a circle with a diameter of 20-25 cm.
For a twister hairpin, you need to sew a cover in the shape of a very elongated oval. Fabrics such as velvet, brocade, organza or any other that looks beautiful are suitable. You can sew fringe into the ends of the cover. There should be a hole in the middle of the cover.
After sewing the parts of the cover together, you need to turn it right side out. Insert a wire frame through the unsewn end, after folding the circle into 2 sticks. All that remains is to sew up the edges of the hole in the middle with a neat seam and the edge through which the wire was threaded. The hairpin is ready.
Unusual rubber bands
In addition to the usual fabrics, elastic can even be made from felt, corduroy or denim. In addition to fabric accessories, you can make it from wooden beads, knit an elastic band from yarn, and also make it from multi-colored stones in the form of beads; such elastic bands are perfect for a holiday or any celebration.
It is best to store elastic bands in a separate bag or case so that they do not get lost and are always at hand.
Children's elastic bands
When making children's rubber bands, you can show your imagination; the brightest elements and multi-colored scraps are used here.
You can make a simple elastic band covered with fabric, or decorate it with your own made bows, artificial flowers and lace. Girls love everything shiny and bright, so rhinestones, sequins and beads are perfect for children's elastic bands.
DIY elastic bands made from satin ribbons are also perfect for girls; they look discreet, but at the same time elegant. You can experiment with fabric using suede, velvet, lace and other unusual fabrics.
Useful tips for beginners
Real kanzashi jewelry in Japan is made from natural silk. Budget options are quite suitable for beginning needlewomen: satin and grosgrain ribbons, lace, braid, brocade. These materials produce even squares, which is mandatory when creating perfect petals.
To prevent the material from crumbling, the edges are scorched with a flame. A candle or lighter will do. You can use a soldering iron with a thin tip. Before melting the edge, the tip is cut off. Then the flame solders the material and prevents the petal from falling apart.
Inexperienced craftswomen are recommended to start mastering kanzashi with simple flowers with sharp petals. Bows can consist of the same elements. With practice, the needlewoman will be able to create leaves, roses, lilies with curls inside, and combine several translucent ribbons to obtain interesting shades. The size of the element should be such as to cover the base of the hairpin, elastic band, or hairpin.
A step-by-step master class will allow every craftswoman to try herself in the art of kanzashi. The materials are readily available and can be purchased at any craft store. Just a little practice and you can start implementing complex shapes. An unusual hair clip made using the kanzashi technique will be an excellent gift for a girl of any age.
Elastic bands in the shape of a rose
Elastic bands in the shape of roses turn out beautiful and elegant. Roses are made from pieces of satin ribbon, the width of which is 15 mm and 5 mm. You can take ribbons of any color; black and pink go well together.
Making a rose from a ribbon is very simple, you need to fold it into seven parts and stitch it with a needle, this way it will come together and you will get a flower. A small rose made from a 5 mm wide ribbon is sewn inside the large rose. The finished flower is sewn onto an elastic band, which can be anything.
How to attach jewelry to a base
Ready-made bows and kanzashi flowers from ribbons can become part of an elastic band or hairpin. Attaching the workpiece with glue is impractical and unsightly. Fastening with tape looks much neater, for this:
- Cut a circle out of felt and make two small cuts in the center.
- Glue an elastic band between the resulting holes.
- Insert the ribbon, bend it around the elastic, and bring it out into the second hole.
- Glue the ends from the inside out.
You don’t have to make cuts on the felt circle, but secure the elastic with a strip on top. A flower or bow is attached to the resulting blank. You can create a universal mount. You will need two pieces of elastic and a felt base. The last element can be round or rectangular. Four cuts are made on it. Rubber bands are inserted into the resulting holes, and the ends are glued from the inside out. This blank is suitable for attaching to a headband or hairpin.
Leather elastic
The leather elastic band looks incredibly impressive and original. It is not suitable for children, but will perfectly decorate an adult representative of the fair sex.
If you are wondering how to make a hair tie with your own hands, then use one of the suggested tips and make a unique accessory for yourself or your loved ones.
Leather elastic bands look in a minimalist style; the color of the skin is best matched to the hair color, then the elastic band will look harmonious and emphasize the individuality of its owner. In addition, leather elastic bands are perfect for men who wear long hair and like to tie it in a ponytail.
No chemicals
It is better for young children to trust making toys using quick but safe recipes. Therefore, let’s look at how to make gum for your hands at home without borax. Take starch, any dye and glue.
Combine liquid starch and glue in a 1:3 ratio, add a pinch of food-grade, and therefore harmless, dye or 1 teaspoon of acrylic paint. Stir the mixture until completely homogeneous. Place the mixture in the refrigerator for 5 hours, then you can start playing.
An excellent thickener is soda. This is an affordable ingredient that can be found in almost every household. Let's look at what you can do with this ingredient. Take: soda, thick shower gel and any hand cream.
Place 2 tablespoons of gel and 4 soda into a convenient sized container and mix with a spoon to combine the components. If the mixture is too thick, add a little water. Then squeeze out a strip of about 20 cm from the tube of cream and add dye if desired. Knead everything on a board like dough. To achieve greater plasticity, leave the mass in the refrigerator (not the freezer) for several hours, and then stretch it thoroughly with your hands.