Failures and breakdowns often occur in the operation of washing machines, but many problems can be dealt with on your own, without turning to a specialist for help. Thus, each user can remove the rubber band from the drum of the washing machine, clean it or replace it with a new one.
Purpose of the rubber seal
In any model of washing machine, the rubber seal performs the same function - it serves as a sealant.
It reliably isolates the space between the body and the tank. If the integrity of this part is compromised, then water can leak onto the electrics - the control board. The second rubber band - the one you see every day - is located on the door. It prevents water from overflowing from the drum and prevents short circuits.
Reasons for gum wear
The elastic often comes into contact with detergents, moisture, and experiences pressure from metal parts and bulky clothing. If you use cheap powder or detergent for a long time, you can destroy the silicone. It becomes more brittle and thinner.
Temperature changes also have a detrimental effect on the cuff. The rubber band comes into contact first with hot water, then with cold. Such jumps destroy the structure of the material over time.
Natural wear and tear is the most common cause. Replacing the rubber band in this case is a mandatory process in the operating history of the machine.
The elastic band sags in the middle. This should be changed without hesitation.
Let's find out the reasons for the breakdown
To fix the problem yourself, it is first recommended to figure out what the cause of the breakdown is. Most often, the malfunction is associated with wear of the part or mechanical damage.
- As a result of long service life, the rubber of the cuff has worn out.
- When washing, caustic, corrosive chemicals were used, which could also damage the cuff.
- Entry of foreign solid or sharp objects into the hatch (all kinds of metal products, plastic, badges, keys, etc.).
- Frequently machine wash unsuitable items (e.g. hard-soled shoes, heavy outerwear, thick hats).
- Using low-quality washing powder or exceeding its permissible volume. Powder of inadequate quality can often cause destruction of the rubber element.
Main features and recommendations
Cuffs exist in washing machines for a reason; the part is responsible for some important functions. Among them:
- Protection against liquid leakage during washing.
- Creating obstacles to the penetration of liquids and detergents into other mechanisms.
Wear or failure leads to the need to replace the part. The most common cause is damage due to sharp objects. Because of this, smudges appear at the device itself. Anyone can change an elastic band, but this job is of average difficulty.
When to remove the seal
Typically, removing the old cuff and installing a new cuff is necessary in the following situations:
- The rubber has served its service life.
- The cuff received mechanical damage.
The rubber seal breaks, as a rule, in the following cases:
- Low quality washing powders were selected.
- There are often hard and heavy items in the drum, such as shoes or jackets.
- Inaccurate loading of things.
- The washing temperature is too high.
- Keys, coins and other objects that could damage the elastic have fallen into the drum.
To understand that the seal is no longer suitable for use, take a closer look at your equipment. There are a lot of “symptoms” that indicate a violation of the integrity of the rubber cuff:
- You find water under or near the machine.
- When washing, you may hear sounds uncharacteristic of SMA.
If you hear a crash, it is very dangerous! Turn off the machine, drain the water, and replace the rubber band to avoid shorting.
- Closing the hatch is more difficult than usual.
Further repairs involve removing the rubber band. Next, we will tell you how to remove the cuff and not mix anything up.
Remove the cuff
Many SMA models are designed in such a way that you do not need to disassemble the case to replace the rubber seal. In some cases it is impossible to do without disassembling the front part. But don’t worry – you don’t need to be an expert; even a beginner can do the job.
The main thing is to be careful, follow safety rules and, if you need to replace the rubber cuff, buy a strictly identical part.
Before you replace the hatch cuff yourself, assemble a small case with tools. You will need:
- Phillips screwdriver or electric screwdriver;
- 2 slotted (minus) screwdrivers;
- needle nose pliers and socket wrench (optional);
- dishwashing detergent or gel soap.
Whatever your washing machine, you need to act almost the same:
- Inspect the machine and move it away from the wall.
- Disconnect from communications: electricity and water supply.
- Unload clothes from the drum.
- Open the hatch.
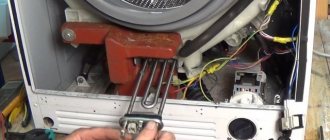
The seal is secured using two clamps. Remove the first one, which is usually located on the outside of the elastic:
- Gently bend the elastic band, pulling it towards you.
- You will see a part that looks like a metal wire (but the clamp may also be plastic).
- Pry up the clamp with the first thin screwdriver, and use the second to pull the part towards you.
- If you have needle-nose pliers, you can remove them with them. The clamp is tightened with a special spring: if it is stretched, it will easily come off. To stretch the spring, you need to insert a tool into its mounts and spread the handles. The spring will stretch, the clamp can be easily removed.
To remove the second (inner) clamp, remove the front panel of the machine. It's easy to do:
- Remove the pair of bolts from the back of the washer that hold the top cover in place.
- Pull the cover towards you, remove it and set it aside.
- Remove the detergent drawer. Pull out the receiver almost completely and press the latch that you will see in the center. This is usually a small plastic strip that covers the rinse aid container.
- Unscrew all the fasteners that you see behind the detergent receiver.
- Above the display panel, unscrew 2 more bolts, then carefully move the panel upward so as not to break the wiring.
- There are still fasteners under the panel - get rid of them too.
- The washing machine should rest against the wall: tilt it slightly back to make it easier to remove the fastenings from below.
- Open the service hatch at the bottom of the machine (front).
- Straighten the emergency drain hose and unscrew all the fasteners you find.
- Push the rubber band into the drum as far as possible.
- You can remove the front cover. To make it give in easily, pull it up.
There are only a few steps left:
- Find the clamp that holds the seal to the tank.
- To loosen it, you need to unscrew the bolt. If it becomes inconvenient, hold the nut with a spanner.
- If in your SM model the filler pipes are attached to the cuff, remove them from there by loosening the clamps and removing the lock.
- Now you have completely freed the part, you can remove it.
Attention! Since you have done such painstaking work, take advantage of this opportunity and clean the front of the drum from accumulated dirt and scale. Be careful: when removing the top cover, wear gloves, as the bottom ends are sharp.
And if the front panel is heavy, call someone for help so you don't drop it on yourself
Be careful: when removing the top cover, wear gloves, as the bottom ends are sharp. And if the front panel is heavy, call someone for help so you don't drop it on yourself.
Now, if you need to replace the cuff in the washing machine, then you need to take a new part and assemble the machine.
Preparation for repair
In order to change the hatch cuff on an LG front-loading washing machine without much difficulty, you need to prepare. First, of course, we will study the instructions on the procedure for carrying out work and the safety instructions for repairing electrical appliances.
- We need to turn off the machine and drag it to where it will be convenient to work with it.
- We also need to purchase a new hatch seal that is guaranteed to fit your LG washing machine.
- After this, we need to collect simple tools, prepare mentally and begin work.
So, turn off the machine using the on/off button. We completely de-energize it by removing the power plug from the outlet. Next, turn off the water supply to the machine and remove the hoses: drain and fill. We twist the power cord and hoses, and then drag the machine to the place where the repair will be carried out.
Open the door of the washing machine. There is a silver plate right above the hatch that shows the full model name of your LG washing machine, for example LG F1056MD. We rewrite the name and go to the washing machine spare parts store. Knowing the name of your machine model, the seller will give you the cuff you need.
Now a few words about tools. You don’t need anything serious for the job, just a Phillips and flathead screwdriver and a flashlight. If you are too lazy to turn the screws, you can use a screwdriver. That's all, let's start the repair.
Instructions for removing the first clamp
Removing the clamp is a mandatory step to gain access to the seal itself.
- Determine the position of the plastic-metal holder. It is located on the side of the cuff.
- To dismantle it, you will need to unscrew the screw that facilitates retention, and then pull the spring part towards you. First pry it off using a flat screwdriver.
- All that remains is to pull out the plastic part where the locks are located.
After this, the edge of the cuff can be easily removed from the front panel.
Disassembling the machine
The cuff is difficult to replace without disassembling the washing machine, so we’ll start with disassembly. We go around the back of the machine and unscrew the screws that hold the top cover. Pull the lid towards you and lift it up.
Now we go around the front of the car. We need to get the powder tray out so that it doesn't interfere with our removal of the control panel and front wall. Pull the powder tray out towards you until it stops, press the plastic tab in the center and remove the powder receptacle completely.
Having pulled out the powder receptacle, you will see that there are two screws to the right and left of its niche. We unscrew these screws as carefully as possible using a Phillips screwdriver.
Now we need to remove the control panel of the LG washing machine. There are special latches on the back of the control panel behind the end of the housing. You can press them out using the same Phillips screwdriver. We press the latches one by one and carefully pull off the control panel.
Proceed with caution; there will be a large bundle of wires trailing behind the control panel. There is no need to disconnect them, just place the removed panel along with the wires on top of the corner of the machine body.
We take a flat screwdriver in our hands and squat down. We hook on the manhole cover that covers the garbage filter. This cover is located at the bottom on a narrow decorative panel.
Having opened the lid, we move aside the emergency drain hose, which may interfere with access to the fastening element. Using a Phillips screwdriver, unscrew the screw that holds the decorative panel. The screw is located to the right or left of the filter, depending on the LG CM model. Carefully grasp the decorative panel and pull it off the latches, first on the right side, then on the left.
We open the hatch door wide, take a flat-head screwdriver and try to remove the front clamp of the hatch cuff. This needs to be done precisely at this stage, since this clamp will interfere with removing the front wall of the SM housing. We find the spring on the clamp. The spring can be located both above and below. We pry up the spring with a flat screwdriver and, moving it towards ourselves, carefully pull off the clamp.
Instead of a flat-head screwdriver, you can take a dull table knife; it will be even better for this operation.
At this stage of disassembly, we cannot yet remove the door sealing rubber. But we can tuck it inside the drum so that its edges do not catch the front wall of the case during further disassembly. Thread the cuff into the drum. Next, unscrew the two screws that hold the UBL of the LG washing machine. There are screws to the right of the hatch and you will need a Phillips screwdriver to remove them.
To release the front wall of the LG washing machine, you need to unscrew five more screws. First unscrew the two screws on top, and then the two screws on the bottom.
Using a screwdriver, carefully press the UBL out of the front wall so that it falls inside. Now you can remove the front wall and put it aside. There is no need to specially remove the hatch cover; let it remain assembled with the front wall of the machine body. Next we need to remove the hose attached to the cuff fitting.
How to remove?
Prepare a flat-head screwdriver for the job, and if your machine is old, then pliers.
In addition, do not forget to turn off the power to the machine and disconnect it from the water supply. First, remove the door from the car, as well as the hatch lock. Your main steps to detach the cuff will be to remove the clamps used to secure the elastic to the front wall of the device and to the tank body. Carefully unscrew the leading edge of the cuff, then loosen and remove the first clamp. If this part is plastic, then it is fastened with latches, and the metal clamp is fixed with a screw or spring, which must be removed using a screwdriver. The screw should be unscrewed, and the spring should be slightly pulled back and loosened. By prying up the clamp with a screwdriver, you can remove it. If the machine is an old model, the design of the clamps does not have adjusting bolts or latches, and to remove such clamps, you will have to work with pliers. Your next step is to carefully remove the front part of the rubber seal. It is held in the machine due to its shape and its own tension. After this you need to start disconnecting the second clamp
Sometimes this task requires removing the cover of the machine body. Using a screwdriver, unscrew the clamp bolt or simply move it. After this, the cuff can be removed from the device.
Replacing the hatch cuff of a washing machine: step-by-step instructions
The seal is attached to the tank and to the front wall of the machine with two clamps. The replacement process involves removing the clamps from the damaged cuff and putting them on a new one, placed in a shrinkable place.
Step 1: Preparing for removal
- Unplug the machine and turn off the water supply.
- Open the hatch door of the washing machine.
Step 2. Remove the outer clamp
If the clamp is plastic, you need to pull the elastic band at the junction of the latches towards you. The clamp can be attached to the body with a screw. Loosen it with a screwdriver and pull it towards you. If there is no screw, pry up the spring with a screwdriver and pull it out towards you.
There is a mark on the top of the cuff that should be opposite the mark on the tank. If there is no mark on the tank, draw it with a marker so that later you can correctly install the new seal.
Step 3. Pull out the inner clamp
To get to the second one, remove the top cover of the machine. To do this, you need to unscrew the bolts holding it.
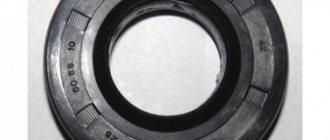
What is a sealing cuff and its purpose
This part of the washing machine ensures reliable sealing of the unit between the tank and the body, as well as for tightly closing the hatch door.
The loading hatch cuff is an element made of heat-resistant silicone rubber, which is highly resistant to water.
Dismantling the clamp
Before removing the elastic band from the washing machine, buy a new original cuff that matches the model of your SMA in advance.
Important! You can buy a cuff at a service center, in a specialized store, or even on the Internet. The main thing is that the part is original and fits your SM model. The new rubber band should feel soft to the touch. Also, a high-quality new elastic band bends well.
Prepare for repair:
- Unplug the machine.
- Arm yourself with two screwdrivers: “plus” and “minus”.
At the first stage of dismantling the rubber seal, you will have to remove the clamp holding it in place. It can be made of either metal (in the form of a thin wire) or plastic. The clamp is removed, regardless of the model of the machine, always the same way:
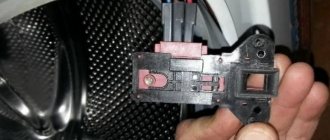
- Locate the clamp latch or spring. It can be located at the bottom of the hatch or on the side - where the blocker is located.
- Take a minus screwdriver and pull back the spring, loosening it.
- If there is a screw there, take a second screwdriver and unscrew it.
- The plastic clamp is held in place by latches - they will open easily when you pull it towards you.
- Use a thin screwdriver to pry up the ring and remove it.
- Now you can remove the cuff by tucking it towards the drum - this way you will remove it without damaging it.
If you removed the cuff to get to other parts of the case, and are going to put it back in place, pay attention to one important nuance. There are small triangular marks on the elastic band and drum. They must necessarily match.
If one mark is missing, draw it yourself - this way you will assemble the structure correctly.
A little theory
The cuff is a rubber gasket that is installed on the body of the “washing machine” and seals the hatch, preventing liquid from flowing out during washing.
At first, the parts were made of dense and flexible rubber. Now the rubber has been replaced with its closest “relative” - silicone. This has its advantages: silicone is more resistant to high temperatures and does not tan, turning into “wood” after many years of use. And it is easier to withstand severe deformation during repairs and dismantling.
The shape of the waterproof gasket may change depending on the functions of the washing machine: for example, if the machine has drying and aquaspray programs, the “elastic” becomes perforated. It is impossible to talk about all the features of the part within the framework of this article.
This is an article from a series about repairing washing machines. Review of the main machine breakdowns and solutions:
We fix 15 main problems with washing machines with our own hands
Removing the front panel
In order to completely remove the rubber band from the drum of the washing machine, you also need to disassemble the facade. It's not difficult if you follow our recommendations:
- After unscrewing the fasteners on the back of the machine, remove the top cover.
- Remove the detergent dispenser - underneath you will find other bolts that hold the front panel in place.
- Using a thin screwdriver, bend the latches of the control unit, remove it and place it on top of the case.
- Also remove the bottom panel (where the drain filter is).
- Walk around the perimeter of the front panel to unscrew the fasteners holding it in place.
- Now you can pull the wall towards you, thereby providing access to the inside of the seal.
Attention! In brands such as AEG, Samsung or Indesit, you don’t have to remove the front part of the machine. It is enough that you simply unscrew and remove the top cover.
How to put a new rubber band on a drum
After cleaning the old cuff or preparing a new one, you can begin assembling the machine. It is important to follow the step-by-step guide and not deviate from the sequence of actions:
- First of all, we check which side the rubber product should be placed on. There is a convex mark on top of the rubber band, and drain holes on the bottom.
- If the cuff comes with a drain hose and adapter, you will need to first connect them and secure them to the inside of the sleeve.
- If there are no plastic components, we remove the old elements and prepare a place for a new part.
- At the next stage, we put on the elastic band. This procedure is considered the most labor-intensive, since it depends on the design of the washing machine.
- If it is not possible to remove the front panel of the device, unscrew the top screw of the lock and secure the spring with a screwdriver. It is important to ensure that the sleeve is tucked inside the device. We fix the rim on the side opposite to the lock and install it in a special groove. After this, you can secure the hatch lock.
- If the panel is removable, installation of the rim will be faster and easier. We put it on the bottom of the gutter and tighten it with a screwdriver.
After securing the inner rim, you will need to assemble the front panel. The elements are installed in this order:
- Counterweight (if you had to remove it).
- The main part of the panel.
- Hatch lock.
- Instrumentation part.
- Detergent compartment.
- Top cover.
At the last stage, turn the cuff outward and place it in the right place.
If you removed the sunroof, you need to install it back.
Replacing the hatch rubber
Now it's time to remove the rubber seal from the tank of the machine. It’s true that the internal clamp is preventing us, but removing it is a matter of technique. As in the case of the external clamp, we find the spring, hook it with a screwdriver and pull off the clamp.
We firmly grasp the cuff and try to pull it off the grooves. You'll have to put in some effort. Don't be afraid to damage the old cuff when removing it, as it will be thrown away anyway. Once you manage to remove the old cuff, move it to the side so it is out of the way.
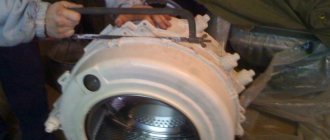
After removing the old LG washing machine cuff, you may notice a huge amount of dirt that has accumulated in its seat. Take a rag and thoroughly wipe off all the dirt. We remove the bushing from the old cuff and place it on the new cuff.
DIY repair
Some people do not want to seek professional help and try to repair the damaged part themselves.
What you will need
First you need to prepare all the tools and materials that will be useful when performing the work.
A piece of thin rubber
People who plan to repair an old elastic should select a new patch to attach to the cuff. When choosing a material, the size of the damage on the surface is taken into account. It is necessary to select a piece of rubberized material so that it completely covers the damaged area.
Solvent
After using clothes washing devices for a long time, traces of mold may appear inside the drum. Getting rid of moldy plaque is difficult. To quickly remove dirt accumulated under the old cuff, use a solvent. This liquid instantly corrodes even very old stains.
Use the solvent carefully so as not to damage the washer.
Super glue
Superglue is considered an indispensable tool when working with rubber products. This adhesive composition will help not only seal the cuff, but also secure it to other surfaces. When replacing the rubber band, use superglue to attach it to the body of the washing machine.
Soft cloth or cotton wool
Fleece or regular cloth will be needed to pre-treat the surface to which the new patch will be attached. It is necessary to treat the area under the rubber with special disinfection liquids. This is done so that the rubberized material attaches more securely and does not come off for a long time.
Remaking an old fur coat into a stylish one with your own hands, interesting ideas and instructions
Sequencing
To properly attach a patch to a damaged cuff, you need to familiarize yourself with the sequence of actions.
We remove the clamps that secure
First, a person needs to get rid of the fasteners holding the cuff. To do this, he will have to independently unscrew two small clamps located on the front wall and near the drum. The fasteners located on the wall are unscrewed first.
After this, you can unscrew the second clamp and carefully remove the damaged part.
Finding the problem area
Having taken out the rubberized gasket, they inspect it in detail and look for the damaged area.
To quickly find the problem area, carefully straighten all the folds of the cuff. Sometimes it is not easy to find a gap visually and you have to look for it by touch
To do this, run your hand over the surface of the rubber to find irregularities that may cause damage.
Thorough degreasing of the area and patch
The damaged seal must be degreased so that the patch can better adhere to it. The degreasing liquid is applied so that the treated area extends two centimeters beyond the gap. Until the solvent has completely dried, the sealant is held flat.
How to glue a patch
To attach the patch to the cuff, apply a thin layer of superglue to the damaged area. After this, a straightened rubber patch is applied to the treated surface. It is pressed against the surface for 5-10 minutes until it sets with superglue.
What other problems may occur?
After replacing the cuff, it is best to check its functionality by running the washing machine “idle” (for example, on a short program, without loading laundry). This way you will understand whether the new part is installed tightly and whether repeated removal is required.
A common problem is a broken machine handle, especially the plastic part. Replacing the door handle of a washing machine is a very simple process, for which you probably only need one screwdriver. You can purchase a new part in a specialized store, indicating the make and model of your car. Qualified specialists will select a new part and offer their assistance in installing it.
It is worth noting that the hatch cuff requires regular maintenance. It must be cleaned, otherwise the dirt accumulated on it will become a source of not only an unpleasant odor, but also bacteria that corrode the material.
Required Tools
Replacing the cuff of a washing machine hatch with your own hands is possible; no special skills are required.
Therefore, you can avoid calling repairmen and save money. The main thing is to approach this process confidently and carefully.
Before replacing, prepare a new seal, a screwdriver, detergent (soap) and a marker.
Advice: in order not to make a mistake when buying a new cuff, take your old one with you and select the same model specifically for your machine.
Prevention measures
In order to encounter cuff malfunctions as little as possible, it is necessary to follow simple preventive measures.
- After each wash, wipe the cuff with a dry cloth to remove any remaining water. Otherwise, pathogenic microflora will actively multiply, and with constant contact with water, rubber will lose its performance characteristics.
- Powder residues gradually collect in the grooves of the seal and turn into a thick coating. It must be removed periodically, since washing agents have a detrimental effect on the characteristics of rubber.
- When loading things, you should carefully check the contents of your pockets. Foreign objects in the drum during washing can damage the cuff and render it unusable.
- The manufacturer's recommendations regarding the weight of the laundry to be loaded must be strictly followed. Not only the maximum, but also the minimum weight is important.
- Clothes with iron elements and large decor should be washed in special bags, which are also necessarily used for shoes.
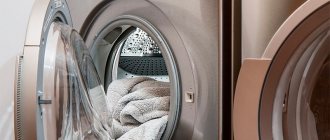
- Cleaning the washing machine using special products should be carried out regularly - at least 2 times a year. It is advisable to carry out complete mechanical cleaning every two years.
- The hatch should be slightly open if the machine is not in use, which will provide ventilation.
Watch a video about replacing the cuff below.
Why do you need to clean?
The rubber seal has a complex design with bends and folds. Dirt, hair, lint and debris accumulate in large quantities in the folds of the cuff - everything that was not removed through the filter and drain hose.
Due to the configuration, the rubber constantly maintains high humidity, which serves as an excellent environment for mold.
The musty smell not only creates an unfavorable atmosphere in the room, but also permeates washed clothes. Therefore, a responsible housewife should not have any questions about why the rubber band needs to be cleaned.