Let's look at replacing a bearing in a Zanussi Aquacycle 1000 washing machine, manufactured in 2002. All work was carried out at home, with our own hands. Since the repair was carried out in 2022, the age of the washing machine was approximately 15 years. Which, in principle, is not bad compared to machines that were manufactured at a later date. With proper operation, the service life of bearings is 15-20 years. Structurally, the Electrolux and Zanussi SMAs are similar, so this approach can be applied to both brands.
Do you wash your shoes in the machine?
Oh yes! No
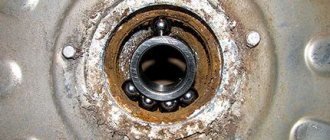
These machines use a powerful SKF double bearing model BA2D.
Characteristics:
- d=30;
- D=60;
- B=37.
Product code from spare parts suppliers: 026298, 12404633657, 255119, 633657, 663667.
For this tank, a special oil seal of the following dimensions is used: 40-60/10. Correspondence table for spare parts of popular models.
- Preparation
- Disassembling the Zanussi washing machine (“Zanussi”)
- Changing the bearing
- Assembling the washing machine
- Catalog SMA "Zanussi"
Disassembling the dishwasher
All dishwashers are designed quite simply.
In addition to the washing chamber, there are several control elements. They are located below. To access, you need to remove the side panels. And also the top cover. Unscrew the screws on the back of the PMM.
Backside
Remove the cover.
Front view
We take out the decorative plastic panel under the door. It is installed with latches.
Removing the bottom panel
Bottom panel and open door
Unscrew the screws hidden by the panel. They secure the side walls.
Front mounting screws
Remove the side panels.
Dishwasher without side panels
In principle, you can look at the side below and perform some actions. But it will be more convenient to remove the plastic bottom. Unscrew the screws and pull out the panel.
Bottom side view
This Zanussi PMM model has a flow-through heater installed, and it is combined with a recirculation pump. In the photo below, the heating element is highlighted.
Heating element with recirculation pump assembly
Pump assembly and contacts of instantaneous water heater.
Heater contacts
Nicknamed a multimeter. The normal value is 30-50 Ohms. If there is no resistance, then the heater has burned out. It is not supplied separately from the pump. Therefore, either purchase the complete unit - as of 2017, this is 11,200 rubles, or repair.
To purchase, you need the product number of the dishwasher. It's on the door.
Product number on the door
Call a specialist
We will call you back within 15 minutes to arrange a convenient time for your visit.
Districts
- Altufyevo
- Babushkinskaya
- Baumanskaya
- Bibirevo
- Biryulyovo East
- Brateevo
- Bratislavskaya
- Rokossovsky Boulevard
- Central Administrative District
- Chertanovo
- Golyanovo
- Gorbushka
- Kolomenskaya
- Kozhukhovo
- Krasnopresnenskaya
- Kuntsevo
- Kuzminki
- Lyublino
- Medvedkovo
- Mitino
- Novogireevo
- Novokosino
- Novo-Peredelkino
- Otradnoe
- Pavshinskaya floodplain
- Printers
- Perovo
- Polezhaevskaya
- Preobrazhenskaya Square
- Peace Avenue
- River Station
- Ryazan Avenue
- SAO
- Northern Butovo
- Lilac Boulevard
- Sokolniki
- NEAD
- SZAO
- Teply Stan
- Tushino
- Southern Administrative District
- st. Academician Yangel
- st. Seleznevskaya
- SEAD
- South-Western Administrative District
- Varshavka
- Veshnyaki
- Voikovskaya
- Vykhino
- Company
- Zhulebino
Analysis of the Zanussi front washing machine
Typically, the body of washing machines consists of a top cover, a front, a back and two side panels. Sometimes there is a bottom pan. Zanussi's technique is slightly different - instead of four panels, the body is divided into two halves, connecting at the sides of the washing machine.
To disassemble the equipment, you need to perform the following steps:
Unscrew the screws, move it back a little and lift the top cover. Under the cover in the middle there is a metal plate, along its edges there is a fastener that holds the front and back panels. You need to unscrew it. There are plastic plugs on the sides of the machine at the panel joints. They need to be pryed and pulled out. There are screws underneath that will need to be removed. On some models, two more screws are located on the bottom of the back of the washing machine. They also need to be removed. Now both halves are fixed only with a plastic holder
To remove it, you need to carefully press the latches. Sometimes it may consist of two halves connected by a screw
Unscrew the fasteners, press the latches, after which the holder rises up and moves to the side. Now you can move and remove the back half of the case.
Partial disassembly of the washing machine has been completed. Now the owner of the device has access to the motor, pump, heating element, belt and many other components for repair or replacement.
In some cases, for example, to replace a bearing, it is necessary to completely disassemble the Zanussi washing machine.
- First you need to disconnect the wiring from the heating element and motor, pressure switches and pump, and water inlet valve. It is recommended that the wires be marked or photographed before disconnecting. If errors in its connection are made during assembly, this can lead to serious consequences.
- Remove and pull out the temperature sensor.
- Unscrew the upper counterweight.
- Rotate the pulley and remove the drive belt.
- Unclench the clamps and disconnect the pipes.
- Unscrew the fasteners holding the motor.
- Lightly tap the pulley to move and remove the engine.
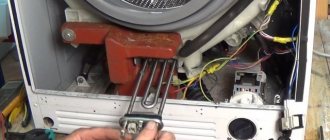
- Unscrew the nut between the contacts of the heating element, carefully so as not to break the contacts, and pull out the heating element.
- Unscrew the tank struts.
- Disconnect and remove the pressure switch, loosen the clamps, release the fill pipes and pull them out along with the water fill valve.
- Unscrew the drain pump, disconnect the hose from it and move it aside.
- Disconnect the pipe at the top of the tank.
- Open the hatch, pull the cuff back and pull it towards you. Use a screwdriver to pry up the clamp, find and release the latch, and remove the clamp.
- Pull the upper part of the cuff, find the watering pipe, loosen the clamps, then disconnect the part.
- Unscrew the interference filter.
- Unscrew the two screws, stick your hand inside the tank and pull out the hatch locking device.
- Close the hatch, unscrew the fasteners, remove the hatch.
- Pull out the detergent cuvette, unscrew the fasteners under it and on top that hold the control panel. Release the latches, disconnect the wires, remove and put it away.
- Remove the tank from the springs and pull it out of the housing.
- Disconnect the counterweight.
- Place the water tank with the hatch down, block the pulley, and unscrew the bolt. If it does not budge, lubricate it with WD-40, wait a while, and then try again.
- Grasp the pulley with both hands and, swinging it to the sides, separate it.
- If the tank is collapsible, unscrew all the screws and remove the top part.
- If it is non-separable, select the screws with which it will be connected during assembly and drill holes for them along the seam of the tank. Next, saw the tank along the seam.
- In place of the screw that held the pulley, screw in a similar old screw and knock out the shaft with hammer blows at a right angle.
- You can then remove the drum from the bottom of the tank.
Now you can disassemble the drum, replace the bearings, inspect and clean the shaft and cross, and perform other work. Complete disassembly of the washing machine has been completed.
Puddle formation
If water is detected under the washing machine, the following components should be checked:
- Gasket at the connection point of the filling hose. If excessive wear occurs, it must be replaced.
- Hatch seal. Over time, this element may become deformed or crack. To dismantle a worn cuff, it is necessary to remove the clamp holding it. It fits quite tightly, but if you pry it with a screwdriver, it comes off quite easily.
- The drain pipe or the location where the drain hose is attached to the pump. If there is damage in this area, water will begin to seep in as the machine fills. A damaged part - a hose, pipe or pump - must be replaced.
- Car tank. Leaks may be due to its depressurization.
In the latter case, specialized equipment will be needed for repairs, so you will have to contact a service center.
Control board
The user sets the desired washing parameters by pressing keys on the control panel. You can select the desired mode by rotating the selector knob, activate additional functions, adjust the temperature and the number of revolutions. The “tidy” is connected to the main electronic module.
Zanussi's main control board consists of semiconductor elements: microcontroller, triacs, capacitors, triggers, thyristors, resistors. Communication with the main parts and components of the machine is carried out via electrically conductive paths.
It is the control board that ensures the sequential execution of cleaning programs. All available washing algorithms and parameters are pre-recorded in the electronic module circuit. This gives the user the opportunity to launch the required mode without errors using the dashboard.
Some washing programs are carried out strictly according to the algorithm recorded in the “intelligence”. Individual modes can be adjusted - changing the water heating temperature and spin speed.
Increased speed
The first step in such a situation is to check the serviceability of the engine and the integrity of the power circuit.
Without sufficient experience it will be difficult to do this, so it is better to contact a service center.
Here, if necessary, they will check the correct operation of the control module circuit - perhaps it is sending incorrect commands to the device.
Rumble during spin cycle
Loud noise when the drum rotates at high speeds may be due to the following reasons:
- The position of the machine is not strictly horizontal.
- The drum is underloaded, as a result of which the center of gravity of the laundry has deviated from the center of rotation (strong vibrations will occur at high speeds).
- One of the bearings is broken.
Bearings in Zanussi cars can be replaced independently. This is done like this:
- Having completely disassembled the machine, you need to remove the tank with the drum.
- After removing the drum pulley and unscrewing several bolts around the perimeter of the tank, the latter needs to be disassembled into two parts.
- Using careful blows of a hammer through a wooden lining, you need to knock out the drum axle shaft from the bearing assembly in the rear half of the tank.
- Next, using a puller, remove the bearing itself along with the seal.
- The drum axle shaft and bearing seat must be thoroughly cleaned.
- A new one is installed in place of the old bearing, and its seal is filled with special lubricant.
Having lubricated the axle shaft and the inner ring of the bearing, the drum and the rear part of the tank are again assembled into a single unit, after which both halves of the tank are fastened together, coating the joint with sealant.
Changing the bearing
To change the bearings, you need to disassemble the tank. To make working with it easier, it is better to remove the counterweights. We unscrew the through fasteners and remove the front one located around the cuff.
Counterweight Mounts
We pull off the rubber. It is pressed against the body with a round clamp, in the form of a spring.
Tank without counterweight and cuff. A spring is visible on the floor.
Remove the pulley using a 17 mm socket.
You will need to use a lot of force! Let's use leverage!
I use a metal tube for this to create the necessary pressure. The fact is that a special lock is applied to the thread to prevent unwinding during rotation. And tension must be applied in order to move the bolt from the retainer. After this it will unscrew easily.
Pulley removal lever
Remove the small counterweight under the pulley.
We unscrew the bolts in a circle that hold the two halves of the tank together. You will need an extension for the socket wrench.
Unscrewing the fastening bolts.
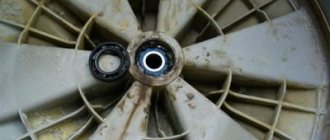
We separate the two halves of the tank and take out the drum. Sometimes it doesn't come out easily. Then you need to hit the shaft with a hammer - as many times as necessary.
Important! Do not hit the shaft directly. There is a possibility of damage. Let's tighten the fastening bolt and hit it through the board!
Bushing for bearings and oil seal.
We clean the landing site from the inside of the tank and remove the oil seal. To do this, use a strong screwdriver or chisel. Often you have to use a hammer.
Old oil seal, cleaned of dirt.
Then we pull out the metal retaining ring. It is located under the oil seal, in a special groove and fixes the position of the bearing. It is better to use round nose pliers with narrow tips and a slotted screwdriver for this. Requires some skill when removing.
Retaining ring.
We knock out the bearing. I use a chisel for this. Very comfortably. There is a wide platform on one side and a narrow one on the other. Let's dismantle the outer one first. We use a medium hammer.
Expert opinion
I work in the household appliance repair industry. Extensive experience in restoring washing machines and dishwashers.
Ask a Question
Note! It is more competent to use special pullers for removing and installing bearings. This is a professional tool. Costs - from 5000 rubles.
Since the bearing is double, this may take time, approximately 15-20 minutes. The chisel must be moved either in a circle or crosswise. This is necessary so that the bearing does not warp in the sleeve and it comes out evenly.
When knocking out, we strike any part of the bearing.
This is a rather noisy procedure, so it can be moved outside. I usually use counterweights as backing since I always have them on hand.
Repair kit.
Let's start the installation. The new bearing has a plastic sleeve inside. Do not remove until the product is seated. It will come out easily on its own after you put the drum in place.
Plastic bushing in the bearing.
Expert opinion
When landing, strike only on the outer diameter of the bearing!
First we use the wide part of the chisel. When the body settles, it will be narrow. Be sure to strike on different sides. It is better to use the criss-cross technique, gradually moving in a circle.
You can hammer the bearing in other ways. Some people use an old bearing for this. Another option is a fairly large bolt and a small hammer. The fourth method, which is also the most professional, is a special installation tool.
Planting with a chisel.
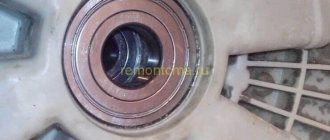
After the bearing is in place, be sure to put back the metal clamp. It should be located in the recess.
Mounted bearing with retaining ring
Then we install the oil seal. As a rule, it has to be driven in with a hammer through a plank. And also, you can use the old one for this. For reliability, it is recommended to use instant glue to connect to the body. This is especially important if the oil seal fits into place very loosely. For example, you placed it with your hands, pressing lightly.
We apply special lubricant to washing machine bearings. We place it on the inner skirt of the oil seal, completely filling the space.
It is highly advisable to apply lubricant to the part of the shaft that is in contact with the oil seal. Only here!
If you cannot find the right product, then you can use Ciatim 221. Some masters use Litol 24.
In principle, the product must satisfy the following requirements:
- Operating temperature not lower than 150°.
- Water resistance.
- Good ductility.
But it is still best to use special materials for washing machine seals.
Installation, connection and operation of the Zanussi washing machine
How to connect a Zanussi washing machine to an outlet
The main requirement of the manufacturer is a stable voltage in the electrical network of your household. In principle, there is nothing difficult in connecting the washing machine to an electric current, but it is advisable to fulfill some conditions. What needs to be done for this, read below
- Separate wiring → Let's compare a washing machine with a boiler, oddly enough, in almost any house or apartment there is a separate wiring to the boiler from the meter, and for the washing machine there is a carrying case in which an adapter is plugged in (from a Euro to a Soviet socket) and into this adapter The plug from the SM is turned on, guys, under no circumstances should you do this. Now let's see how much the boiler consumes - up to a maximum of 2 kW, and the washing machine consumes up to 3 kW. Now ask yourself if you need separate wiring for your washing machine.
- Separate outlet → If you have done separate wiring and installed a separate outlet, this does not mean that this outlet can be used by other household appliances or anything else. Understand that if you constantly pull the plug out of the socket and then insert it back in, the insides of the socket become loose, rendering it unusable. After several hundred such operations, you will not even see that the socket is broken, that is, when you connect the washing machine, the contacts spark or heat up. In general, the washing machine must have its own wiring
- Install machines → In the paragraph above, I said that every time you pull the plug out of the socket you render it unusable, to avoid this, it is advisable to install machines with a capacity of at least 16 amperes. Thanks to this, you can disconnect the washing machine from the network without removing the plug from the socket. The fact is that when you turn off the washing machine with the button, you do not turn it off completely, it will simply be in standby mode, and if your power supply goes to 380, and this very often happens in the vast post-Soviet space, then the control module may simply burn out. In short, it is advisable to do everything to protect your equipment from electrical surges
- Grounding → If you live in a private house, then grounding will practically not cause problems; as for an apartment, then everything is more difficult. Grounding is necessary so that your machine does not receive an electric shock; in addition, thanks to grounding, you can avoid such crap as electrolysis in the washing machine tank. Probably everyone has noticed that their washing machine shocks, at least a little, so it is advisable to carry out this step
In principle, these are all the requirements that the manufacturer makes. If the grounding point can be omitted and in some cases it is simply not feasible, then all other points are mandatory, and how long your washing machine will work will depend on this. Now I want you to read one example from life, or rather a question that is often heard on my channel
In order to avoid voltage surges and ensure that your equipment operates in normal mode, you need to install a current stabilizer with a power of at least 3.5 kilowatts. Understand that a washing machine consumes about 2.7 kW. You ask where this figure comes from, I will answer this way
- Heating element → that is, heating element, consumes from 2 to 2.5 kW, depending on the model of the washing machine
- Motor → that is, the engine consumes from 100 Watt to 500 Watt, and when starting to move, the consumption is even greater
- The rest of the periphery → this includes the brains of the washing machine, valves, drain pump (usually 40W) and other bells and whistles
Preparation
When the bearing fails, noise occurs when the laundry is spun. And with every wash the noise gets louder. Therefore, it is better not to delay the replacement. Operating the machine with a half-broken bearing will lead to damage to the shaft or its seat. Also, if the oil seal is worn out, grease gets inside the tank and the laundry becomes dirty.
If the shaft is abraded, it will need to be processed using special equipment, and if restoration is impossible, then buy a cross. Even in Moscow it is quite difficult to buy it for a washing machine of a certain brand. They are usually delivered to order with a waiting period of 2 weeks to 2 months.
Set of pliers.
To perform a complex of works you need a set of tools:
- slotted screwdriver;
- Phillips screwdriver;
- set of socket heads (8, 10, 13, 17);
- ratchet, two extensions and cardan;
- pliers, round nose pliers, wire cutters, clamp pullers;
- hammer, chisel or drift, knife;
- plumbing silicone and a gun.
Knife, ratchet and adapters
More necessary tools.
This is the minimum kit with which you can change the drum bearings of a Zanussi washing machine. In case of complications, you will need a grinder.
In addition, you need a special lubricant for the MMA oil seals and a thread locker (must be blue). A flashlight will be very useful in your work.
This model has undergone repairs.
Zanussi washing machine does not heat water or washes with cold water
To understand whether the machine is heating water, you just need to place your palm on the glass on the washing machine door. If, after conducting this kind of test, you find that the water in the drum is cold, you should think about why this happened.
When you notice that your Zanussi washing machine is not heating the water
, do not be sure that the electric heater has burned out. Of course, there are exceptions, but when the heating element is in excellent condition and the water is cold, then the problem lies in the temperature sensor and the electronic control module. In any case, you cannot cope with this breakdown yourself; you must call a specialist. Using special equipment, he will quickly conduct a complete diagnosis of the washing machine and determine what the reason is. To correct such breakdowns, as a rule, transportation to a workshop is not required.
You can also check whether the equipment is connected correctly, because it often happens that, having decided to save on the quality of the connection, water randomly flows into the sewer and does not have time to heat up in the tank.
How to disassemble the Malyutka machine
Disassembling the Malyutka washing machine is much easier than other models. The only problem will be the lack of a special key for removing the activator, which is not difficult to make yourself. The following disassembly steps are simple:
- remove the plug from the engine casing;
- stop the engine rotor;
- unscrew the activator housing;
- disconnect the tank and electric motor.
After performing these operations, the Malyutka can be considered disassembled. The help of professionals is not needed here. The structure of the machine is clearly visible in the diagram.
Thus, in the event of a breakdown, after watching the thematic video and instructions, we can safely disassemble any washing machine. A little plumbing experience and minimal knowledge of electrical engineering will contribute to success.
What to do if the dishwasher is still under warranty
For at least the first year after purchase, do not repair it yourself - by doing so, you will deprive yourself of warranty benefits. The warranty period and conditions must be clarified when purchasing household appliances.
During this period, you can work to remove blockages in the dishwasher filters. In addition, it is allowed to clean the holes in the sprinkler rocker arms from dirt and food debris if the PMM begins to wash dishes poorly.
Do not forget that many defects in work occur due to non-compliance with operating rules. The machine may not work only because there is no water in the water supply or someone has closed the inlet ball valve.
Therefore, you need to periodically check: the presence of electricity in the sockets, the water pressure in the water supply and the absence of blockages in the sewer. If you connect the dishwasher to the communications yourself, make sure you did everything correctly. An error may result in the PMM refusing to wash dishes.
Remember: you do not need to take the PMM yourself for repairs to a service center under warranty. This must be done by the store that sold you this equipment, because it weighs more than 5 kg. It is quite possible that technicians will volunteer to repair the device at home.
Innovative solutions
Manufacturers do not stop there and constantly introduce technical innovations. Many new models are equipped with an improved inverter motor, which reduces noise characteristics and reduces vibration during operation of the unit, thereby extending the life of the machine.
Another innovation is Airflow technology, which allows you not to worry about the formation of unpleasant odors. To keep the inside of your car clean and fresh, don't leave the door ajar. Thanks to the unique ventilation system, the drum self-cleanses every time after the end of the wash cycle, which also reduces the intensity of plaque formation.
Water does not fill
We are looking for the cause of the malfunction:
- First you need to make sure that the water has not been turned off.
- Next, you need to check the capacity of the filling hose by disconnecting it from the machine and turning on the water supply.
- If water flows through the hose properly, install it in place and check the condition of the filter. Together with the filling valve, it is located in the place where the hose enters the unit body. After removing the top cover, the assembly (valve + filter) must be unscrewed, after which the filter can be disassembled and cleaned.
Cleaning filters, both inlet and outlet, must be done regularly, without waiting for problems to arise.
If the water supply has not resumed, you need to check the functionality of the filling valve. The resistance of its winding should be 3.75 kOhm, and when the voltage indicated on the case is applied to the contacts, the device should open. A malfunctioning valve must be replaced.
This problem may also indicate that the level sensor is broken or its tube is clogged.
In many cases, the owner of the washing machine can repair it himself. Repairing a Bosch washing machine yourself - an overview of the main types of breakdowns and methods for eliminating them.
What criteria should be taken into account when choosing a shower cabin, read in this topic.
Failure of the heating element, wear of the bearing, failure of the control unit - these types of faults in washing machines are the most common. Here https://aquacomm.ru/cancliz/mnogokvartirnyie-doma/santehnika/stiralnaya-mashina-indezit-neispravnosti-remont-svoimi-rukami.html you will learn how to fix Indesit machine breakdowns yourself.
Hatch lock
[sticky-ad id=13532]
Let's consider two situations:
The washing is completed, but the hatch still cannot be opened
If the lock is jammed, the hatch can be opened using the emergency cable by pulling it towards you. You can find it behind the bottom panel (you need to unscrew it), on the right, near the filter. The cause of the malfunction lies in the electronics, so you will have to contact a workshop.
The hatch won't close
The latches that hold the hatch in the closed position are made of fragile plastic, so they often break.
To make sure that this is the case, you need to disassemble the lock:
- Having opened the hatch, unscrew the two screws that secure the lock to the body;
- remove the hatch seal (cuff), having first removed the clamp holding it (you need to pry it off with a screwdriver);
- After removing the cuff, the lock can be pulled out.
If the plastic parts of the mechanism are really broken, you need to purchase a new lock and install it in place.
To make the lock last longer, close the hatch as gently as possible.
Bosch washing machine care
To ensure a long service life of a Bosch washing machine, you need to use it correctly and not forget about maintenance. After each wash, the hatch and powder receptacle must be wiped with a dry cloth and left slightly open - this will protect the equipment from the appearance of mold and unpleasant odors. There is no need to use aggressive detergents to care for the drum - this will shorten the life of the washing machine.
We suggest you familiarize yourself with the smell in the shower from the drain, what to do
When putting things into the washing machine, you need to make sure that there are no small objects in the pockets that could get into the drum. To wash some items (bras, clothes with metal fittings), it is recommended to use special covers or bags to avoid breakage. You cannot put laundry in the machine that exceeds the permissible weight limit; this leads to overload and premature wear of the drum compartment and engine.
It is necessary to periodically clean the garbage filter and hoses, otherwise they become clogged and debris remains inside the machine, causing the laundry to have an unpleasant odor after washing.
Before carrying out any maintenance procedures, make sure that the machine is disconnected from the power supply.
Causes of breakdowns
As practice shows, most of the breakdowns of Zanussi washing machines are most often associated with their improper operation. This could be due to incorrect installation of the unit or simply ignored the instructions for use. In addition, some housewives sometimes underload or overload the drum with the weight of laundry, thereby creating its imbalance.
Some problems are directly related to small objects getting into the working paths of the equipment. It is the blockage that is considered the most common cause of machine breakdowns (laces, coins and buttons can get into the machine during washing).
Such objects can not only clog the pump, pierce the drain hoses, tank, unscrew the heating element, but also tear off the pump impeller.
In addition, a frequent breakdown is the removal of the hatch handle. Breakdown usually occurs when equipment users do not have the patience to wait a few minutes before unlocking the hatch after washing, and they make efforts. The use of large amounts of soap (when washing children's clothes) or washing powder also causes problems. As a result, the heating element becomes enveloped in detergents, overheats and burns out.
The quality of the water used for washing also plays a huge role. If it contains a lot of salts, then at high temperatures they begin to intensively deposit on the heating element in the form of scale. The same applies to rust, which clogs filters and prevents water from entering the tank and waste water being removed. The drive belt is also an unreliable element in Zanussi washing machines it must be regularly tightened or replaced with a new one every 4 years.
What types of malfunctions are there?
There are many possible problems that can affect the performance of your washing machine. Let's look at popular problems with the Zanussi washing machine and how to fix them.
Drum doesn't move
The drum may jam during operation, which will naturally lead to disruption of the functionality of the equipment. The reason may be various mechanical inclusions that get inside with loaded items.
The hatch is blocked
Locking the hatch will not allow you to open the machine chamber and load clothes into it. In this case, the problem most often lies in the jamming of the lock, which will have to be removed manually.
Self drain is broken
Lack of water drainage may be due to clogged filters or drain system. Cleaning all key elements solves the problem.
Water does not fill
If water does not fill into the tank during operation, the problem may be low pressure, a faulty valve, or a broken control unit. The last option is quite rare in practice and can be solved by replacing the module.
Increased speed
Rapid operation of the motor indicates a malfunction of the tachometer, a malfunction of the control module, or poor tension of the drive belt. In this case, the drum begins to move too quickly, which threatens the reliability of the entire system.
No water heating
The heating element is responsible for heating the water in the washing machine. Its malfunction will naturally prevent the device from using heat during operation. Also, sometimes the water level sensor may not allow you to enable the option. You can solve such problems yourself by replacing components. If this does not help, it is better to contact a specialist.
Puddle formation
Puddles under the machine form when the pipe leaks, the cuff is damaged, or simply wear out the gaskets on the key components of the machine. This is one of the simplest problems that can be solved without major investments.
Rumble during spin cycle
Loose drum mounts, broken counterweight, or other similar factors may cause the unit to not operate smoothly. The result is constant shaking and rumble during washing, which is especially audible during the spin cycle.
First of all, in this case, it is important to check all bolts and fastenings for their tightness.
Bottom line
To replace or repair a particular part in a Zanussi washing machine, the equipment will need to be partially or completely disassembled. You can do this yourself if you have the necessary tools. During the process, it is recommended to take photographs of each step in order to correctly assemble the washing machine, especially when connecting the wiring. Observing this rule and following the instructions, many will be able to disassemble the equipment and replace the necessary part. However, if you are not sure of a positive result, you should call professionals and trust them to disassemble and repair the washing machine.
Diagnostic modes for washing machines with different control panels
The Zanussi washing machine is considered a reliable unit, but, like any equipment, it needs preventive maintenance and proper care. If you neglect these procedures, you may encounter the device giving an error and refusing to work. You can check the functionality of the elements yourself using the instructions below. Options may vary depending on your device model. A horizontal machine or a top-loading machine may vary in scenario.
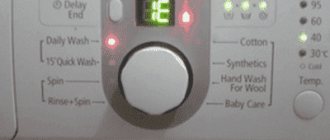
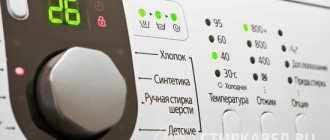
All manipulations are carried out in test mode. Entering the diagnostic mode is done by setting the selector to the “off” mode. and then pressing the “start” button and the buttons indicated in the figure.
EWM 1000
This line includes 7 methods for checking faults. You will need to wait a five-minute pause between switches for the diagnosis to be successful. Before proceeding, you should remove all clothing from the tank. Diagnostics of EWM 1000 is carried out as follows.
- The program selection selector is located in the first position. Here you can check the functionality of the buttons. When pressed, they should light up or produce a sound alert.
- When you turn the selector to the second position, you can check the water inlet valve into the wash dispenser. At this stage, the hatch will lock. The pressure switch controls the fluid level.
- The third mode controls the liquid fill valve during prewash. When you select it, the door lock will also work; the dial sensor is responsible for the water level.
- The fourth position will turn on two valves.
- The fifth mode is not used for this type of machine.
- The sixth position is to check the heating element along with the temperature sensor. If the liquid level does not reach the required level, the SM will add the required amount additionally.
- The seventh mode tests the operation of the motor. In this mode, the engine is cranked in both directions with further acceleration to 250 rpm.
- The eighth position is the control of the water pump and spin. At this stage, maximum engine speed is observed.
To exit test mode, you will need to turn the device on and off twice.
EWM 2000
Diagnostics of this line of washing machines is carried out as follows.
- The first position is diagnostics of water supply for the main wash.
- The second position is responsible for supplying water to the pre-wash compartment.
- The third position controls the water supply to the air conditioning compartment.
- The fourth mode is responsible for supplying liquid to the bleach compartment. Not every device has this feature.
- The fifth position is the diagnosis of heating with circulation. Also not present in every model.
- The sixth mode is needed to test the tightness. During this, water is poured into the drum, and the motor rotates at high speeds.
- The seventh position checks the drain, spin, and level sensors.
- The eighth mode is needed for models with a drying mode.
Each step tests the door lock and fluid level, along with the functionality of the pressure switch.
Preparation for repair
To successfully dismantle and then install a bearing, you need:
- Screwdrivers: slotted, Phillips, hex.
- Torx keys.
- Pliers.
- Set of wrenches.
- Hammer and bolt (15-20 cm).
- Glue or sealant.
- WD-40 for stuck parts.
Time to prepare the washing machine. Disconnect it from the network, turn off the water supply. Disconnect the intake hose and drain the water from it. Also drain any remaining water from the drain filter, which is located at the bottom of the front panel, behind the hatch.