Let's consider replacing the bearing on the LG washing machine with your own hands at home. LG brand SMAs have proven themselves to be reliable and unpretentious, while having a stylish design that many consumers like. But even such washing machines are prone to breakdowns. One of them is wear on the drum bearings. And as a result - increased noise during spinning, sometimes becoming so loud that further operation becomes unbearable. In this case, replacement is necessary.
Expert opinion
I work in the household appliance repair industry. Extensive experience in restoring washing machines and dishwashers.
Ask a Question
Wear can be determined by significant play of the drum in different directions. Quite often in this case the belt begins to fly off if the machine is not equipped with a direct drive motor. If you wish and have the necessary tools, you can actually carry out such repairs yourself at home. To do this you need to remove the bearing.
- Preparation for repair
- Disassembling the LG washing machine
- Replacing bearings
- Assembling an LG washing machine
- Video
- Catalog of LG washing machines
Preparation for repair
Please note that sufficient space is required to complete the work. You will have to completely disassemble the car, removing additional equipment. Then you will need to take out the tank, divide it and pull out the drum. Please consider these points before starting repairs.
Repaired washing machine
Important! First of all, we disconnect the machine from electricity and sewerage. We also disconnect the inlet hose, having first shut off the water supply through it to avoid flooding.
The work will be carried out on an Ldzhi washing machine with a Direct Drive system with a 7 kg load of laundry. This model has a steam cycle, but this does not affect anything. You just have to dismantle the additional element. The device of other models is the same.
We prepare the tools:
- Slotted, Phillips, and Torx screwdrivers.
- Pliers.
- Wire cutters.
- Hammer.
- Punch.
- Ratchet socket wrenches.
- Penetrating lubricant like WD-40.
Solving common problems
For device repair to be successful, it is necessary to correctly identify the causes of the breakdown. To do this, it is worth analyzing the signs of malfunctions:
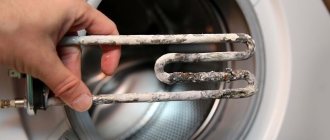
- If the heating element breaks down, an error code appears on the monitor. If there is no such signal, the operation of the heating element can be assessed by other criteria - the quality of the wash, the dissolution of the washing powder. To accurately determine the operation of the element, it is worth measuring the voltage. This is done on contacts.
- When the pressure switch breaks down, the water often drains itself. She is recruited and immediately released. The indicator does not indicate that the tank is full. Therefore, water is continuously poured in and drained from the device. Dealing with a violation is not difficult. To do this, replace the pressure switch.
- If the bearings fail, unusual noises appear during operation of the device. Sometimes the unit rumbles so loudly that the sounds of breakdown can be heard even in neighboring apartments. To identify a violation, you should rotate the drum in different directions. If squeaking and knocking noises occur, bearing failure may be suspected.
- An abrupt shutdown of the device indicates that the fault is localized in the terminals. It may also indicate damage to the wires. The control module itself breaks down quite rarely. Much more often, the wires directed to the sensors burn out and short out.
- The drain pumps of this manufacturer's equipment often break down. This is due to a not very successful design. The drain often gets clogged. As a result, the blockage prevents the water from draining completely. In this situation, the “OE” code appears on the monitor.
- Sometimes the filler valve cuff breaks. If it is broken, water enters the tank even when the unit is turned off. If water gurgles after turning off the device, you may suspect a breakdown of the fill valve.
In LG equipment, bearings break quite often. To cope with such a defect, it is necessary to properly disassemble the device. This must be done carefully, strictly following the instructions. It is advisable to take photographs of this process. Thanks to this, it will be possible to assemble the unit correctly.
Share link:
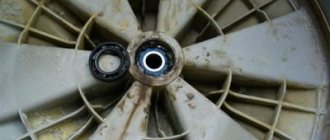
Replacing bearings
Note that there are specialized bearing pullers. But the cost of such a mechanism is: 4-5 thousand rubles. There is no practical sense in purchasing them for one-time repairs. Therefore, we use a hammer and a metal drift, which can be a chisel. This is the best option.
Let's start with the oil seal. We pry it off with a strong screwdriver and pull it off. If it doesn’t work right away, then soak it in a penetrating lubricant.
Then we knock out the outer bearing. Place the tank on a stand and strike with a hammer, moving the drift in a circle. As a rule, this is the easiest dismantling.
Then remove the inner one in the same way. If difficulties arise, use VD-40. This procedure is quite loud, so it can be moved outside so as not to irritate the neighbors.
Important! When dismantling, it is allowed to hit the inner rim of the bearing. During installation - absolutely not!
Installed new bearing
We clean and dry the seat and begin installing the new repair kit. We carry out the work in reverse order. We install the oil seal last. Before installing it, apply lubricant to the skirt, as well as the internal spring. For convenience, we use old bearings, cleaned of oil and dirt. That is, we hit them. This will avoid distortion during installation.
It is recommended to fix the oil seal using glue or self-tapping screws.
After cleaning the tank, carefully inspect the shaft, especially the oil seal seat. LG is the only company that has this part made of stainless steel. If repairs are carried out a long time after the bearings begin to fail, this area may be damaged by rust. For small flaws, the situation can be corrected using fine sandpaper. If there is significant damage, then boring or seating of an additional ring is necessary. In this case, an oil seal with a different standard size is selected.
Possible difficulties
Difficulties that may arise when replacing bearings in an LG washing machine:
- If there is a feeling that when knocking out the bearing it does not come out or moves out unevenly, the cover must be turned over and the actions on the reverse side must be corrected.
- If the bearing wear is significant, this can lead to wear on the cover. In this case, it will have to be replaced.
- To avoid damaging its integrity during the process of removing the cuff, the clamp must be removed carefully.
- Sometimes some water remains in the hoses and tubes. You need to be careful not to get it on the electronics.
Assembling an LG washing machine
Front Panel Installation
When connecting a tank, it is recommended to apply high-temperature plumbing silicone to the joint to eliminate possible leaks due to deformation of the rubber gasket.
All steps for assembling the washing machine are performed in reverse order and do not cause any difficulties.
Adviсe:
- When disassembling, you can photograph the stages sequentially.
- All screws and self-tapping screws are screwed back in. This will avoid confusion.
Common mistakes
Many home craftsmen know how to change a bearing, and even undertake to repair direct-drive machines. But everyone makes mistakes, the most common of them are:
- Broken UBL wires.
- Damage to the sealing collar (when the rubber band is removed without removing the clamp).
- Damage to the pulley (during unsuccessful attempts to remove it from the drum axis).
- Breakage of bolt threads (if removed without heat, lubrication, or sudden movements).
- Broken wires of the temperature sensor or heating element.
- Broken water inlet pipe (if you forget to loosen the clamps).
- Damage to the drum due to improper removal of the bearings.
Remember: every mistake complicates the repair, and an attempt to save money may result in the purchase of a new washing machine. Be careful, follow the instructions and rules, and everything will work out. If you are still not confident in your abilities, contact a trusted professional - he will do the job quickly and efficiently.
For those who dare to do their own repairs, we have prepared a useful video with step-by-step guidance:
This video shows how to change bearings in a direct drive machine:
When does it need to be changed?
The following signs will indicate that it is time to replace the bearing in your washing machine:
- Extraneous noise that occurs during washing or while rinsing clothes. This may include metallic clanging, knocking and grinding sounds.
- Poor quality spinning. Due to the destruction of the bearings, the drum does not pick up speed, so the laundry remains wet.
- Washing machine imbalance. When the drum rotates, it will sway violently from side to side.
- Damage to the edges of the cuff. This may serve as an indirect sign of bearing wear.
You can determine that it’s time to change a part even without disassembling the washing machine. To do this, just unplug it, place your hand on the top of the drum and swing it. It should move with the tank on the springs, but there should be no play between them. If there is free play, it means the bearing has begun to deteriorate.
Methods for determining failure
First of all, you need to determine what kind of breakdown occurred. An initial diagnosis will help you decide whether it is possible to fix the problem yourself or whether you will still have to spend money on professional repairs.
The right step would be to first familiarize yourself with the circuit diagram of the washing machine in order to have an idea of where everything is located.
In many cases, a breakdown in the Indesit washing machine can be repaired with your own hands. But to do this, you at least need to familiarize yourself with the design of the machine.
Sometimes, to determine the cause of the failure of household appliances, it is enough to read the instructions for use, which, among other things, contain recommendations for eliminating breakdowns.
The first thing you need to do is look at the display. If it is impossible to complete the specified process, the washing machine displays special codes on the display.
Models of Indesit washing machines produced in recent years are equipped with displays, the signals of which will be the first to report the occurrence of a malfunction
Error codes in the operation of the washing machine are given in the instructions that the manufacturer necessarily attaches to its product:
- F01 – in the control of the drive motor the triac semiconductor device is closed;
- F02 - due to an open circuit or short circuit, the tachogenerator has lost the ability to signal the rotation of the drive motor, another reason for such an error is the motor is blocked;
- F03 – the temperature sensor circuit has been short-circuited or broken;
- F04 – failure of the water level sensor;
- F05 – due to an interruption in the operation of the drain pump, a clogged drain tract, or a malfunction of the water sensor, the “empty tank” signal is not given;
- F06 – due to errors in the front panel buttons, the program code is not defined;
- F07 – the heating element does not heat up;
- F08 – faulty wiring, relay or tubular electric heater itself;
- F09 – EEPROM memory has failed;
- F10 – the water level sensor suddenly lost signals of both a full and an empty tank;
- F11 – the supply voltage has disappeared in the drain pump;
- F12 – communication between the controller and the display module is broken;
- F13 – open or short circuit in the sensor circuit responsible for the drying temperature;
- F14 – malfunction in the drying heating element;
- F15 – damage to the heating element relay responsible for drying;
- F16 – drum blocking;
- F17 – power is not supplied to the hatch door lock or they forgot to close it;
- F18 – on the main electronic module there was a communication error between the controller chips and the processor that controls the asynchronous drive motor.
A complete explanation of error codes in the operation of Indesit washing machines and ways to eliminate violations will be provided in an article entirely devoted to these important issues.
It is possible to check various contacts, wiring, sensors using a very useful device - a multimeter. The device will show whether there is power everywhere.
If you have dealt with electrical repairs before and know how to use a multimeter, it will help clarify the situation and point out some errors
Sometimes it is enough to listen to the sound made by the unit. When the washing machine begins to creak, make excessive noise, and sometimes even rumble, then, most likely, problems have arisen in the bearings or drum, the oil seal is damaged, the counterweight fasteners are loose, and the shock absorbers are in poor condition.
Parsing the machine
To disassemble the device, you must first disconnect it from the power source and turn off the hoses. It is recommended to place the unit in such a way that you can access each of its parts. All car disassembly procedures should be photographed. This will help you reassemble the device correctly after the repair is completed.
Removing the top cover
First you need to unscrew the lower fixing screws that are located on the back wall. They should be moved slightly back - 3-4 centimeters. Then remove it from the stops, fold it back and set the lid aside.
Detergent tray
To remove this part of the device, you need to press it with your finger onto the latch located in the center. After which the tray can be pulled out. After this you can see the side bolts. They should be unscrewed with a Phillips screwdriver.
Disconnecting wires
To disconnect the wires, you need to unscrew the plastic holders. Then you can pull out and disconnect the wires. To do this, you need to find and squeeze the latches. Then unplug the connectors one by one.
How to remove the clamp
The next step is to open the door. The clamp spring should be pryed off. This is done with a screwdriver. It is located under the drum rubber. You should take out the clamp and insert the cuff under the drum.
Service panel cover
To remove the service panel, press out the latches that go on top. Then lift and slightly tilt the panel towards you. It is recommended to unfasten the wiring and pull it out through a special hole. Then remove the control panel from the device.
Cuff
The hoses connected to the cuff can be disconnected using a flat-head screwdriver. The cuff is fixed on the tank with the same clamp as on the hatch. Therefore, the spring should be pryed. This is done with a flat screwdriver. As a result, you will be able to get the fixing clamp. The cuff can then be removed from the drum and set aside.
Disconnecting tank hoses
To make the tank lighter, it is worth disconnecting the heavy counterweights. Then you need to unscrew the screw fastenings of the counterweight located on top and remove it. Similar steps can be performed for the lower counterweight.
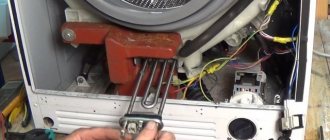
heating element
To remove the heating element, it is recommended to unfasten the batteries and cut the tie with wire cutters. Then you can unscrew the grounding contacts.
Disconnecting all elements connected to the tank
Be sure to remove all parts attached to the tank. The clamps of the pipes can be loosened using a Phillips screwdriver. You should also remove the screws securing the pressure take-off chamber.
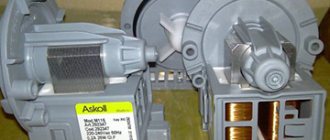
Stator
This part should also be removed after unscrewing the screws. It is recommended to tilt the element down. This will help remove the wires from it.
Shock absorbers
These fragments are fixed on pins. To pull them out, you need to put on the key and squeeze the locking tabs. Then pull the part towards you with pliers. It is recommended to disconnect it and lower it down. Then remove the front shock absorber. This is done using a spanner wrench. Using pliers you can remove the pin.
Tank
To remove the tank, it is recommended to remove the side springs that secure this structural element. Use a flat-head screwdriver to unscrew the plug, lift and pull out the spring from the hole located on the frame. Carefully lower the drum down and remove the spring. Do similar steps on the second side.
How do you understand that you need to change the washing element?
A signal that the washing machine requires repair can be knocking, rustling and other extraneous sounds that appear during the washing process. Most often, they indicate that the bearing assembly, one of the main elements of the cross, has failed.
An unpleasant creaking and grinding sound that accompanies the entire washing process is a signal for immediate repair of household appliances. Such sounds most likely indicate deformation and destruction of the crosspiece.
Ignoring the problem can lead to even more serious damage and even complete failure of the washing machine.
A decision to repair or replace the crosspiece can only be made after a visual inspection of the part. If the cause of the knocking noise is wear of the bearing assembly, a partial repair can be carried out (replace the bearings and oil seal). The wear of the shaft and threads, mechanical damage (cracks, dents) require a complete replacement of the cross.
What and where to lubricate
Not many people know that bearings require maintenance, but oil seals are also required to be lubricated. Usually the bearings already have grease in them.
If this part is original, made at the manufacturer and bought in a specialized store, then you can put it in the car without additional processing.
Otherwise, questionable quality necessarily requires preliminary care, because cheap materials and lubricants are usually used, among other things. It's better to update it yourself.
Disassembling the washing machine
Lubricating the bearing of a washing machine without disassembling is not possible, so the process of lubricating the internal parts is labor-intensive.
This is necessary in order to get the tank with the drum in which the part we need is located. Before work, the equipment is de-energized and disconnected from the water supply. The machine is placed in a place with free access to it. You will need pliers and screwdrivers.
- The top cover of the machine, which is held on by two bolts at the back, is removed.
- The compartment for detergents is pulled out.
- The wires from the board are disconnected and the control panel is disconnected.
- Using a slotted screwdriver, the clamp is removed, which is removed by pressing the spring. Then the edges of the elastic are tucked into the drum and the cuff is removed.
- The bottom panel must be removed. It is secured with latches.
- Next, the front panel is removed. To do this, the bolts are unscrewed behind the powder receiver.
- All wires and pipes that go to the tank must be unhooked.
- The pressure switch with wires is removed and the front panel is pulled out.
- Both counterweights are removed to make the tank lighter.
- The tank is removed from the springs, having first unscrewed the shock absorbers. The tank is placed on the floor with the pulley facing up.
- The belt is removed from the engine, and then the engine itself.
If something cannot be disconnected or removed during operation, do not use force. You can fill soured screws with WD-40 and drill out broken ones.
You need to pay attention to the tank. There are two types: collapsible and solid. If you have a Hotpoint-Ariston washing machine, for example, then most likely the tank is non-separable. In this case, it will have to be cut to get to the bearings. It is sawed with a hacksaw along the joint seam. The halves are connected back together using bolts and sealant.
If the tank is collapsible, then it needs to be opened by unscrewing the bolts.
How to change brushes?
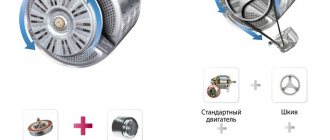
With a probability of 80%, it can be said that the breakdown of the commutator motor is associated with its brushes. The service life of brushes is about 3–5 years. If the washing machine is used intensively, replacement may be required even earlier - after two years. That is why the famous Korean company switched to inverter motors. This makes SMA more expensive, but also many times more reliable.
Any home craftsman can change the brushes. Taking into account the time required to dismantle the engine, the entire repair process will take at most half an hour. You can invite a specialist, but the service will cost you about 2,500 rubles. Yes, you will have to pay 500 rubles for the brushes. The asking price is 3000 rubles. But you can save money by replacing worn-out parts yourself:
- Having disconnected the wiring from the terminal, press the contact to pull out the brush.
- Assess the degree of wear of the element. Need to change? Then take a new spare part and put it in place. Lower the contact and connect the terminal.
For some time, the ED operates a little noisily while the new brushes are being ground in.