There is now a washing machine not only in every city apartment, but also in rural houses. Units from well-known foreign brands have been operating for decades and are distinguished by excellent quality indicators. This cannot be said about the products of some domestic companies and products from China. There is no need to list the reasons for marriage; they are standard and, unfortunately, have not changed for years.
If a city resident’s washing machine stops working, there is no problem; at any moment he will call a technician and he will quickly fix all the problems. In the most difficult cases, he will take the machine to a specialized workshop and, after a few days, deliver it back already repaired.
But what to do in a distant village where there is no such opportunity? There is only one way out - try to fix the problem yourself. Moreover, replacing the heating element is the simplest type of repair work.
Replacing heating element in a washing machine
Causes of heating element failure
Not a single manufacturer of washing machines produces all the components themselves; a significant part of them is made at related enterprises to order. As a result, the risks of supplying low-quality goods increase. Responsible manufacturers send their representatives to suppliers to monitor the entire process and check products on site, and hacks buy what is cheaper. As a result, the heating elements fail. This is the main cause of breakdowns. But there are also objective factors related to operating conditions.
- The heating element coil or control sensor has burned out. In villages, the voltage in the network often jumps; due to strong winds, wires on overhead power lines may overlap. The result is that the voltage instead of 220 V is 380 V. Either the heating element, or the automation, or all together burns out.
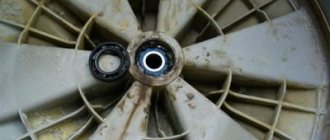
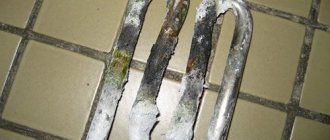
One of the causes of failure may be a burnt-out spiral - Poor water quality. Very often, water has a high concentration of calcium; at high temperatures it hardens and settles on the surface of the heating element. Calcium greatly impairs heat transfer, which significantly reduces heating efficiency. But these are not all the problems created by calcium solids. They provoke a significant increase in the heating temperature of the nichrome spiral; it is not designed for such modes and quickly burns out. The high temperature of the heating coil causes the metal casing to overheat - it also burns out.
Calcium deposits are most often the cause of heating element failure
Separate the hatch cuff
To do this, open the door of the washing machine. Take a screwdriver and carefully pry up the spring clamp that secures the rubber cuff. Remove the clamp by pulling it in a circle. Now we remove the rubber from the body of the front wall of the washing machine with our hands. The hatch lock can be secured with screws or latches. Unscrew or remove the clamps and push the lock inside.
How to tell if the heating element is not working
Due to the fact that it is impossible to open the tank during washing, you should find out about a breakdown of the heating element by indirect signs.
You can roughly calculate the time for draining dirty water into the sewer before rinsing and at this moment touch the surface of the hose. If it is warm, everything is normal, if it is cold, then the heater needs to be changed. But not everyone has the opportunity to do this. By what other signs can you notice a breakdown of the heating element?
- The quality of washing has deteriorated sharply. Moreover, it does not increase when replacing the washing powder used and increasing the heating temperature on the control panel.
- Electrical energy consumption during washing has been significantly reduced. We must remember that the machine uses at least 80% of all energy to heat water.
- The washing machine turns off on its own or the circuit breakers of the protective electrical fittings are triggered. Such situations are observed when filling the machine with water. If this happens to you, immediately disconnect the device from the power supply and do not use it until repaired.
If the quality of the wash has sharply deteriorated, you need to check whether the heating element is working
Important. Unfortunately, most domestic houses and apartments of old projects do not have grounding, which significantly increases the risk of injury. At the first sign of problems with short circuits, you should turn off the electrical equipment as quickly as possible and call a professional electrician, or fix the problem yourself. But for this you need to have special tools and devices, and know the requirements of the PUE.
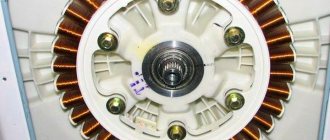
Washing machine heating element device
What tools may be needed
- Screwdrivers of various configurations or a screwdriver with a set of bits (hexagons or asterisks may be useful). Different configurations, because some manufacturers use “tricky” screws that cannot be unscrewed with a regular screwdriver. This is how manufacturers try to tie any type of repair to their service center. Naive.
- Pliers or a ten-socket wrench. We will unscrew the heater mount.
- If you want to verify the final loss of the heating element, you can prepare a tester.
Algorithm of actions
We will give detailed instructions for checking and replacing the heating element a little lower, but now we suggest you familiarize yourself with the universal algorithm of actions, regardless of the specific brand of washing machine.
Table. Procedure for replacing the heating element.
| Repair stage | Brief description of actions |
| Manufacturers install heating elements in various places. Getting to some is not difficult, but in other cases you have to disassemble almost half of the unit to do this. This is done deliberately; using this method, manufacturers force consumers to repair machines only in specialized workshops. How to find out where the heating element is located? Move the machine aside and inspect the back wall of the case. If there is a large metal plug on it, then it is easy to remove the heater - remove the cover and gain access to the fixing screws. If the case is solid, you will have to remove the entire front panel. It will take much more time to dismantle the elements than it takes to replace the heating element. |
| Before starting work, be sure to unplug the washing machine from the socket. Unscrew all elements of the washing machine body that prevent access to the heater. Inspect the device carefully. If you don't trust your memory, it is recommended to take a photo of it. Some types of heating elements may contain temperature sensors; this complicates the replacement algorithm and increases the cost of repairs. |
| Additional performance check and installation of the heater | The heating element can fail for several reasons; you must make sure that it is faulty. We will explain how this is done a little further in this article. Installation of elements is carried out in reverse order. Pay attention to the condition of the rubber gasket; it may be damaged when removed. If you have such a situation, then you need to change it too. It’s better to do this right away than to discover leaks under the washing machine during operation. They can provoke very unpleasant consequences. |
Before starting work, it is recommended to familiarize yourself with the technology for checking the serviceability of the heating device.
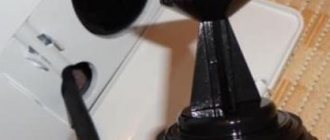
Removing the control panel of the washing machine
First, we take out the cuvette for the powder - pull it out, press the button inside and finally pull it out. For models that do not have a locking key in the cuvette, pull it all the way, slightly up and out of the grooves.
Two or three screws become visible. We delete them. Now you need to unscrew the remaining screws that hold the control panel in place. They can be on top or on the sides. After unscrewing these screws, carefully remove the panel. We leave it hanging on the wires. For convenience, let's put the panel up.
Rules for checking heating element
You can check the heating element without removing it from the tank, which greatly simplifies and speeds up repair work. If it turns out that it is completely serviceable, then the problem is with the control electronics, and its repair requires special technical education. Without such knowledge, it is better not to touch the control system. The test is done with a tester or other electrical device that allows you to measure resistance and current.
The serviceability of the heating element is controlled by three parameters.
- To break a nichrome spiral. This is the most common reason for heating element failure: for some reason the coil burns out and no current passes through it. This malfunction is checked by testing the element; for this, the tester leads are connected to two terminals of the spiral. The measurement switch is set to the “Resistance” position. If the arrow of the device sharply deviates towards o, then the spiral has burned out. Before dialing, check the functionality of the device - close the two outputs, the resistance arrow should suddenly move to zero.
Using a multimeter you can determine the break in the spiral - For breakdown of the hull. This is a very dangerous malfunction, especially for those users of washing machines whose electrical wiring in their house or apartment is not grounded. The current enters the unit body, causing serious damage. By the way, many have already encountered small breakdowns in the body. If you easily run the back of your hand over the metal parts of such devices, you will feel a tingling sensation. It indicates that the entire unit is under voltage, although it is still low and does not cause harm to the body. How to check for a breakdown on the housing? Connect one output of the device to the heater terminal, and the second to the metal part of the housing. If the arrow is at zero, everything is fine; if it deviates, then the element must be changed. During testing, set the device switch to 200 MΩ. It is very important to repeat the test on a heated heating element. Connect power to it for a few seconds, disconnect and repeat the test. Very often, a breakdown is detected in a heated state. This is due to the expansion of the internal fillers of the heating element; such a heater must be changed.
This is how hull breakdown is determined - Power check. It is not considered mandatory, but you can do it for a full guarantee. Find out how much current should flow through the spiral. To do this, its power must be divided by voltage. For example, for a 1900 W heating element, the current is 1900:220 = 8A. Switch the tester to AC ammeter mode and connect all elements in series to the power source. If the arrow points to 8 A, then everything is normal. If the current strength has decreased, then the heater is critically worn. It still works, but we need to prepare for a replacement. In order not to disassemble the machine again in a few months, it is better to immediately install a new one.
Checking the power of the heating element
Device Models
LG
In machines from this manufacturer, the heater is often located at the back. The contacts come out, but most of the spiral is hidden inside the housing. It’s difficult to get confused - the device of this brand has a direct-drive motor, which is attached to the tank, and the heating element is under the tank. The case does not require extensive disassembly.
Advice
The power of the new heater must correspond to the previous one. LG brand machines have power ranging from 1900 to 2000 W.
Indesit
Here the heater will be located at the back. Close the inlet valve before work, disconnect communications. The rear wall of the Indesit machines has a small hatch. Prepare a shaped screwdriver or an asterisk. The heating element is secured inside with a special bracket: make sure that the part fits directly into the bracket.
Samsung
The heating element is located on the flange (together with the fuse). While the heaters of other machines can be repaired, this is not possible in Samsung machines - you will need to buy a new one. Price - in the range of 700–1500 rubles.
Step-by-step instructions for replacing the heating element
We will consider a simple option - the heating element is located behind the drum.
Step 1 . Drain any remaining water from the drum. To do this, open the bottom cover on the front panel of the case and remove the plug. Place a low container to collect water, otherwise it will spill on the floor. To drain completely, it is recommended to tilt the washing machine slightly and hold it in this position for several seconds until the liquid drains.
There should be no water left in the machine
Important. Do not allow sudden movements of the washing machine; it has heavy balancers that can damage the body. Weights dampen vibrations during spinning of laundry.
Step 2 . Place the machine in a free space and provide access to the rear. Unscrew the shield; it is secured with four screws. Remove the part and place it near the wall. Do not throw anything under your feet; all elements of the washing machine, electrical appliances and tools must be in order and in their places.
Remove the back cover to get to the heating element
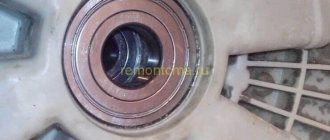
Step 3 . Find the heating element, it is screwed to the bottom of the drum. It has three terminals: phase, neutral and ground. Some models have temperature sensors on the body of the heating element; handle them very carefully, they do not respond well to impact forces.
The heating element is usually located below the drum
Step 4 . Remove the phase and neutral terminals, unscrew the grounding fixing nut, and remove the contacts connected to it from the screw.
Carefully remove the contacts and unscrew the nut
Practical advice. Before further dismantling, we recommend checking the functionality of the heater. We described above how this is done.
If the heating element is working properly, then there is no point in disassembling anything further; the cause of the breakdown is different. If you have enough technical knowledge, then you need to look for it in the control and automation system. If you have no experience, call a specialist. To make it easier to make the right decision, let us inform you that the cost of the control unit can be up to 50% of the price of the washing machine. And unqualified intervention in its work in most cases causes complete failure with the impossibility of further recovery. If the heating element is confirmed to be faulty, continue disassembling the machine.
You can check the serviceability of the heating element without removing it from the machine body
Step 5 . Unscrew the locknut of the grounding screw, but not all the way, but to the length of the thread. This is done so that when tapping on the nut the thread does not jam. You need to knock until it sinks a little, thus weakening the expansion of the rubber gasket. The fact is that to seal the heating element, an internal plate is used, which, when the nut is tightened, is pressed against the rubber gasket and expands it.
With light blows of a screwdriver, loosen the fixation of the heating element.
Step 6 . Using a screwdriver, carefully pry the heater body around the perimeter and slowly tear it off. The rubber has stuck a little, don’t rush, don’t deform the seats.
To pull out the heating element, you need to pry it slightly with a screwdriver
Step 7 . Buy a new part from the store. Professionals strongly recommend taking an old heating element with you, this is the only way to guarantee that you won’t make a mistake with your choice. The fact is that manufacturers produce a new heater for each model; it may differ by only a few millimeters in length or width. This gives the right to assign a new series to the washing machine and, accordingly, sell it at a new price. And heating elements are no longer interchangeable.
The new heating element must have identical dimensions
Step 8 . Clean the place where the heater is installed from calcium, there will be a lot of it there. Use any available items, check the quality with a flashlight.
The heating element installation site must be thoroughly cleaned
Step 9 . Inspect the condition of the sealing rubber seat and, if necessary, remove carbon deposits from the surfaces.
The seal seat must also be clean.
Step 10 . Loosen the grounding nut and insert the heating element into place. Make sure it occupies a special niche.
Insert a new heating element into the housing
Step 11 . Tighten the nut and connect all wires.
Connect everything in reverse order
Pour some water into the drum and turn on the heat for a few seconds, then turn off the machine. If the heating element is warm and there are no drips, great, screw on the remaining parts and place the unit at the place of use.
Replacing heating element in front position
Video - Replacing heating element in a washing machine
The process of replacing heating elements in different washing machines has significant differences. Now you understand what to do in each specific case, follow the instructions and carry out work only taking into account the requirements of the PUE. If you have time left, you can help your wife clean the oven; this also requires special skills. To make your work easier, we recommend reading an article about this on our website. It will give you the opportunity to avoid making annoying mistakes and save a lot of time.
Expert advice
- If you don’t want to get tangled up in bolts, nuts, and parts, don’t throw anything at your feet. Place the ingredients carefully. You can take photos with your phone before each stage, and at the end, while assembling, check the photo. This will help you do everything right.
- Some heating elements have temperature sensors. They react poorly to impacts, even weak ones, so handle the parts with extreme care.
- Do not use sharp objects when cleaning the internal parts, but it is useful to soak the heating element itself in a solution of citric acid.
There is already a washing machine in almost every apartment or house. If previously such equipment was a sign of wealth, now its absence causes bewilderment: how can a housewife do without such a necessary thing?
As a rule, a washing machine breakdown happens at the wrong time. Read our articles on how to identify faults and repair the pump, drum, pump, drain and pressure switch yourself, as well as replace bearings.
In order for the machine to last as long as possible, it is worth studying the basic rules of care and repair. After all, it is not always possible to find a specialized workshop nearby with a good, conscientious craftsman. Replacing a heating element is one of the simplest repairs: you can handle everything yourself.
Indesit
In order to remove the heating element from an Indesit brand automatic washing device, you must perform the following steps:
- Remove the back cover.
- Disconnect the wires.
- Using a socket wrench, unscrew the nut located in the middle of the base.
- Gently hit the bolt with any hard object so that this part is pushed inside the tank.
- Use a thin screwdriver to pry up the base of the heater, pull it towards you and remove it from the washing machine tank.
At this point, the operation to remove the heating element can be considered complete.
We install a new one
The new heating element for the washing machine must comply with the technical characteristics of the old one and this must be checked before installation. Insert the new tubular electric heater into its seat slowly to avoid any kind of distortion. After inserting the heater, secure it by screwing the nut onto the stud - be careful not to overtighten it. If you tighten the nut too much, you can squeeze the heating element inward, but this should not be allowed. When the electric heater is installed and secured, you need to connect the wires to it using terminals, and then reassemble the washing machine in the reverse order.
Sometimes, craftsmen who professionally repair washing machines “place” the heating element on the sealant. They do this to ensure there is no leakage of water. But it is worth noting that if the new heating element was installed correctly without various displacements and distortions, then there will be no leakage even without sealant. It makes sense to use sealant in cases where the old heating element was put back.
When the machine is assembled, you need to check its functionality. To do this, set a washing program that heats the water to at least 50°C. After waiting 15-20 minutes after the program starts, touch the glass of the hatch door. If it is warm, then the repair was completed successfully.
Here is a fairly simple process for replacing the heating element on a washing machine. By spending a little time on it, you can restore the machine’s functionality and save on the services of third-party repairmen.
Ariston
remove the heating element in an Ariston brand car with minimal disassembly of the household appliance. To remove this product you must:
- Unscrew the fastening screws of the small plug located at the bottom of the back cover of the device.
- By removing the plug cover, access to the heating element will open, from which all electrical wires should be disconnected.
- Remove the nut located in the central part of the product.
- Carefully push the bolt inside the tank.
- Use a slotted screwdriver to pry off the gasket and remove the part from the device.
The procedure for removing the heating element is completed.
Signs of a tena malfunction
Sometimes heating elements fail due to manufacturing defects, but most often the cause is hard water used in washing. Scale accumulates on the surface of the heater, which prevents the water from heating. The heating element begins to overheat and as a result burns out.
Corrosion develops on the heater and destroys its surface. This results in a short circuit. Heating elements often break due to improper operation of Zanussi washing machines. For example, when washing things that are too dirty or worn out. The same thing happens when you wash things in the machine that are not meant to be washed in the machine.
Removing the front panel of the washing machine
It is held in place by the same screws. First, unscrew the lower ones. For different car models, they can be located - at the very bottom of the case, under the decorative panel, near the drain filter, or at the bottom on the sides.
Let's go upstairs. And we also remove all the screws that may hold the wall. Let's check - have you unscrewed everything? Then we grab the front wall with our hands, remove it and set it aside. Before us is the entire internal contents of an automatic washing machine.
Symptoms of a problem
A number of characteristic signs may indicate that the heating device has become unusable. The first and most obvious is the lack of heating of water. To verify this, just place your palm on the hatch half an hour after the start of washing. If the glass is warm, then the device heats the water, and if it is cold, then the heating element is faulty.
The second evidence of a breakdown can be poorly washed laundry with a musty smell. This washing result is obtained only if the items were washed in cold water.
Many machines are equipped with a breakdown detection system. When error code F19 appears on the display, this indicates a breakdown of the tubular electric heater. So the owner of the machine knows exactly what is causing the machine to malfunction.