The appearance of a squeaking floor covering can bring pleasure to few people. If you do nothing, the squeaking may become stronger. Various floor coverings can creak, including laminate. This material is classified as a high-strength, wear-resistant coating, but it wears out over time. When walking on laminate flooring, unpleasant sounds may be observed, which may become more distinct and louder. Noise can not only get on your nerves, but also be the first signal that your flooring needs to be repaired. So why does laminate flooring squeak, what should you do indiscriminately to quickly eliminate such a nuisance?
Why does laminate flooring squeak?
If the laminate crunches and creaks, look for the reason in one or several factors at once:
- an initially low-quality laminate with unusable locks and crooked geometry was purchased;
- climatic conditions of use are violated;
- installation technology is not followed;
- the floor has not been leveled;
- no technical gaps are left;
- the substrate is too thick;
- dust and debris were removed incorrectly during installation;
- changes in temperature and humidity occur.
Tension at panel joints
The slats are connected to each other by means of protrusions and recesses made on their adjacent sides according to the lock and key principle. The panel must be inserted with its protrusion into the recess of the other part until a characteristic click is heard, indicating the correct connection. Usually the slats are tapped against each other with a hammer through some piece of wood to ensure that the key is completely inserted into the lock.
After the start of operation, the coating itself will adjust the density of the connection, but for the first time - from a week to a month - adaptation to the microclimate and loads is usually accompanied by squeaking. Moreover, the laminate lock creaks for three reasons:
- Adaptation. This is the main reason, which with good materials goes away on its own over time and does not require additional action. All you need is a gap between the outer slats and the walls (see the corresponding section of the article).
- Loose joint. If the panels are not fully connected, crunching is inevitable. All that remains is to disassemble the defective area and re-arrange the slats. If the gap is small, perhaps injecting a sealing compound there will help.
- Dust and sand. Contamination of the lock joint with small debris requires either thorough cleaning with a vacuum cleaner or re-laying of the coating. This problem is discussed in more detail in the corresponding section of this article.
In general, tension in the locking joints is one of the main reasons for the crunching and squeaking of laminate flooring. It all depends on the quality of the material - if it is good, everything will go away unnoticed within a few weeks after the start of use. Hence the next and final problem and cause of squeaking is the quality of the laminate.
How to remove a squeak without analysis?
Why does laminate flooring squeak, how can I fix this problem without dismantling it? If the reason does not lie in serious violations of the installation technology, perhaps simpler, quicker methods will help you.
- Paraffin candle. Melt it, pour wax in those places where the sound is heard. If gaps have formed between the seams, the candle can act as a sealant. Treatment with a soft spatula will close them and protect them from water and debris.
- Polyurethane foam. Helps with sagging floorboards. Put on the nozzle, shake the can, pour foam under the boards in the place where it creaks. Wait for it to dry completely, remove any residue from the surface with a special solution. This method is quite simple, but not very effective - everything will be fine until the foam subsides. And this will happen very quickly.
- PVA glue. Used as a foam substitute. Drill a 0.5 mm hole (one or more) in the place of the unpleasant sound, remove any debris, and use a syringe to pour glue into the hole. Do not step on this place until it dries completely; it should stop creaking.
- Oil. The life hack is exactly the same as with PVA glue - drill the floor, fill it with a syringe. Lubricating boards works great on thresholds and other places with constant load.
The photo shows colored wax that can be used to seal drilled holes.
We fix the problem with little effort
Depending on the reasons, squeaking can be eliminated by completely or partially removing the laminate and working on the errors. But some defects can be corrected without such radical measures.
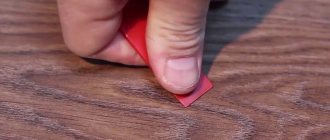
Creaking in locks can be eliminated by filling the joints with melted paraffin. Melt the candle in a water bath and fill the joints between the boards. Rub it into the cracks using a plastic putty knife or scrap plastic card. Paraffin will serve as a lubricant and the floor will stop squeaking. The same effect can be achieved by pouring oil into the joints or adding talc.
You can rub paraffin or pour oil into the joints
At the threshold, the floor may creak if the ends of the boards “walk.” Secure them to the base with silicone glue.
If the same thing happens along the walls, remove the baseboards and fill the gaps with PVA glue. Some recommend doing this with polyurethane foam; be careful, as the foam expands it can squeeze out the laminate boards.
Remove the baseboard
The reason for the creaking along the walls is that there is no gap and when the lamellas expand, they rest against their surface. In this case, you need to establish the optimal gap by filing the laminate. If you don’t want to remove it, you can carefully do it with a grinder. Or use a hammer drill to make a recess in the wall where the board fits.
How to cut laminate flooring with a regular jigsaw - video
We eliminate the creaking in the center of the room due to a hole in the base by drilling the board and using a syringe into the hole, filling the voids with PVA glue. Let the glue dry without loading; you cannot walk on the repaired area for about a day.
Video: what to do to stop the floor from creaking
In some cases, such measures are ineffective. Then the floor will have to be dismantled.
The best ways to eliminate squeaking
If the root of the evil lies in poor quality materials or poor installation technology, most likely the floor will have to be dismantled and reinstalled. But don't rush into this decision!
Dismantling is not the only way to eliminate creaking laminate flooring. Understanding the cause of unpleasant sounds will further help determine the simplest, inexpensive option for getting rid of it.
Getting rid of squeaks due to uneven floors
Poor preparation of the base will lead to one result: the laminate creaks. Any pits or bulges appear when walking and spoil the geometry of the laminate floor.
Unfortunately, to correct an uneven base, you will have to disassemble the floor. How much depends on the scale of the problem.
If the laminate creaks in one place, take it apart, cement the depression or grind off the bump, let it dry, and put the boards in place.
If the sound is throughout the entire floor, it is necessary to dismantle the floor covering, level it - it is best to use the self-leveling method, lay the underlay, and lay the planks again.
Important: Crooked lamellas cannot be returned to their place; they require replacement with new ones.
Watch the video to find out why you can’t lay laminate flooring on an uneven base.
What to do if the laminate creaks due to a temperature gap?
When the laminate creaks not constantly, but with changes in the temperature or humidity of the room, remove the baseboards and check the condition of the technical gaps.
Laminate boards tend to expand/contract with climate fluctuations. If, when laying the laminate, you do not leave enough space between the covering and the wall, or leave it insufficient, the planks will quickly hit the wall when they expand. The surface begins to creak and bulge in some places.
The photo shows one of the ways to leave gaps when laying laminate boards
When wondering why laminate flooring creaks, first of all check the climatic gap near the walls and pipes for compliance with the standards:
- the correct gap for most rooms is 1 cm;
- distance from the board to the pipe - 1.5 cm;
- the gap between the floor and walls in damp and large rooms is 1.5 cm.
If this is the cause of the laminate squeaking, the solution will not require dismantling. Craftsmen advise eliminating this problem by cutting the boards to the required width around the perimeter of the room. At long distances, a grinder or jigsaw will help - cut off carefully so as not to damage the wall and floor. And around the pipes, cut off the laminate with a sharp knife.
Removing the creaking of laminate locks
Tension in the locks is another cause of squeaking. If this is the problem, then an unpleasant sound will appear almost immediately after installation. This is due to the fact that the floor covering adapts to the surface of the base, traffic, and room climate.
The photo shows an example of a laminate floor. After installation, 2-3 months must pass for the slats to take their final shape and stop creaking.
When the floor settles down and takes its final shape, the creaking will stop on its own. As a rule, this takes up to 3 months. If this does not happen, first of all check the presence and size of climatic gaps, following the instructions from the previous paragraph.
How to remove laminate flooring from squeaking due to remaining debris?
If laminate flooring squeaks when you walk, sand and other small debris may be the cause. Dust does not arise on its own, but remains after hasty installation - without thorough cleaning before, during, or after installation.
A loud crunch will indicate that sand has gotten into the locks of the laminate floor. Do not delay repairing the coating: small debris can lead not only to extraneous sounds, but also to damage to the locking connections.
As a rule, it is not possible to remove the squeaking of laminate flooring without disassembling it - you will have to remove the lamellas, remove the backing, clean the base of debris, and put on new lamellas. To avoid confusion when reinstalling, number each part before disassembling.
The photo shows a construction vacuum cleaner that will make it easier to clean the screed from debris and dust
A crumbling screed can also lead to dirt accumulation and squeaking in the laminate flooring. To correct the mistake, the coating is dismantled to the place where it creaks, filled with cement, leveled, dried well, and primed. If you are not sure that you can handle it, call a specialist for a beacon screed.
Proceed with installation after complete drying. Thoroughly clean the base before you begin, and go over each strip with a vacuum cleaner during the process.
How to fix squeaky laminate if the backing is too soft?
The underlay is the most important layer of the finished floor. It smooths out small unevenness, protects the laminate floor from water and moisture, dampens noise, and insulates sound and heat. But bigger doesn't mean better. You should not try to solve the shortcomings of the screed by making a flat floor with a thicker gasket. A substrate that is too thick will settle, the laminate on it will begin to sag, its locks will fail, and it will certainly begin to creak.
The photo shows a thin cork backing for laminated panels
The optimal thickness depends on many factors. Including the type of laminate, operating conditions and substrate material. Most often, the manufacturer indicates the most suitable option on the packaging with panels.
Dependence of thickness on material:
- cork - 2-4 mm;
- coniferous - 4 mm;
- foamed - 2-3 mm.
Dependence of thickness on laminate:
- standard 8 mm panels - 2-3 mm;
- thin 6-7 mm - 2 mm;
- thick 9-11 mm - 3-5 mm.
How to eliminate laminate flooring squeaking due to the underlay? Change! It will be necessary to completely dismantle the covering, replace the old gasket with a new one and re-install the lamellas.
Thick backing
Sometimes sheets of polymer backing are additionally laid on the leveled floor surface before laying the coating. It is expected that it will smooth out minor irregularities, ensure a tighter fit of the lamellas, and contribute to heat and sound insulation. Such effects do occur - but only with a substrate thickness of no more than 2-3 mm. If you lay thicker polymer sheets, they will begin to spring, causing the slats to sag, deform and creak.
This is a very common problem, especially if the flooring was laid by a novice craftsman or even by the homeowner himself, who is not familiar with the nuances of the relevant technologies and materials. There is a completely understandable temptation to lay out the thickest possible substrate - it seems that the thicker it is, the more pronounced all its beneficial effects will be. Sometimes even thin sheets are laid in two or three layers. The effects are likely to manifest themselves, only as a result of the laminate creaking.
Unfortunately, such an oversight cannot be corrected without analysis. An attempt to fill in household products with the properties of a sealant, if it gives any effect, is only temporary, and after a few weeks or months the problem will return. Sooner or later, you will have to remove the laid coating and re-lay the substrate, this time choosing no thicker than 3 mm. An additional risk for this reason is that the panels may become deformed and will have to be replaced, that is, buy a new batch of laminate.
How to avoid squeaking?
The surest option on how to remove laminate floor squeaking is to initially do everything to avoid it. To do this, you need to know the intricacies of laying this coating and follow the rules.
- Do not use laminate immediately after purchase. Like linoleum, it needs to rest in the room where it will be laid. Simply leave the boards horizontal for 24 hours in summer and 48 hours in winter at room temperature. When they take their final shape, they are ready for installation.
- Buy high quality laminated parquet. Saving on materials can result in many problems: from creaking and crunching to deformation and swelling. More expensive laminate will last much longer without complaints.
- Prepare the base thoroughly. The self-leveling floor or cement screed must be perfectly leveled, smooth, and durable. If the surface crumbles, you will definitely hear a crunch under your feet. And unevenness and defects will manifest themselves as sagging and swelling of the boards.
The photo shows an example of high-quality installation: a perfectly smooth and clean concrete floor, the correct thin backing
- Choose the right substrate. The most wear-resistant option is cork. It will not bend under the pressure of furniture even after several years, but is not suitable for use in damp rooms. The most profitable one is foam, but it can become deformed and become thinner. Eco-friendly pine bark is often too thick, so it is only suitable for compacted laminate. The optimal thickness of the substrate for use in an apartment is 3 mm.
- Keep it clean. Clean the area before laying the underlayment and before installing the panels. During installation, keep a vacuum cleaner handy and remove dust as often as possible. If possible, cut in a separate room.
- Leave temperature gaps. We have already mentioned the ideal distance between the wall and the boards - 1 cm. At high levels of humidity and temperature, increase it by 50 mm. In large rooms, they also leave gaps between the boards themselves, covering them with decorative strips.
Before you start working, study not only the rules, but also take into account the mistakes of others:
Preventing a problem from occurring is much easier than getting rid of squeaks after installation. But if you are faced with the problem of extraneous sounds, do not delay the solution. Time can only worsen the situation and increase the cost of correcting errors.
Preventative work
One of the least pleasant defects is the creaking of the floor or its individual sections. Subsequently, this can cause a lot of difficulties, including accelerated wear of the coating.
When a defect is first discovered, it is better to fix it as soon as possible. Otherwise, you will have to replace the entire coating. To see what happens when laying laminate flooring without gaps near the walls, watch this video:
It is also worth considering a number of these recommendations:
It is worth paying attention to the possible installation of climate control equipment, which will allow you to maintain the optimal temperature in the room. It is not only possible, but also necessary to save, but not on building materials. The product does not have to be expensive, but it simply must have good thickness.
Lay the covering only on a leveled base
The shelf must have a fairly dense structure and a thickness of at least 0.3 cm
Thick substrates are often the main cause of squeaking. Careful preparatory work should be carried out before laying the material. It is necessary to thoroughly level the surface being used and clear it of construction debris. Before installation, the material is stored indoors for several days. All locking connections must be carefully selected and fit together well. A small space is left around the perimeter of the room.
