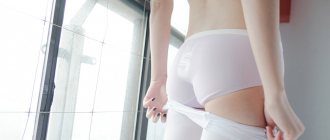
A bone that comes out of a bra not only spoils the appearance of the product, but also causes discomfort and pain when worn.
Not a single bra is immune from this, and it doesn’t matter whether it’s expensive or cheap, whether your breasts are voluminous or small, etc. It would seem that there is no way to cope with this problem, because as soon as you put it in place, in a few minutes it will starts to shoot again. What to do, it seems the only way to solve this problem is to throw away the bra.
But don't rush to part with your bra. It is very easy to give it its original look.
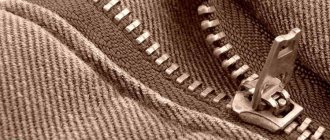
A wire has come out of your bra, how to fix it
A bone that comes out of a bra not only spoils the appearance of the product, but also causes discomfort and pain when worn.
Not a single bra is immune from this, and it doesn’t matter whether it’s expensive or cheap, whether your breasts are voluminous or small, etc. It would seem that there is no way to cope with this problem, because as soon as you put it in place, in a few minutes it will starts to shoot again. What to do, it seems the only way to solve this problem is to throw away the bra. But don't rush to part with your bra. It is very easy to give it its original look.
Bold tips for eliminating bra problems
Bra manufacturers are unlikely to encourage the following methods for eliminating bra problems. But since the time when underwear is sewn not according to personal standards, but according to average standards, ladies have to either invent tricks and life hacks, or give up bras, at least in some versions.
The advice from the creators of the 5-Minute Crafts channel often involves a fierce appeal with bras, but what can you do if you can’t remove it for another matter? If you don’t feel sorry for hopelessly ruining your bra for the sake of the only successful solution, watch and remember!
Saving your favorite bra
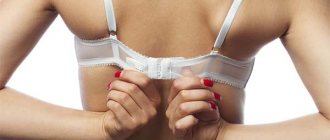
The most obvious way to fix a bra is to put the needle back in and stitch the hole tightly.
But it's not that simple. This method does not guarantee that the situation will not happen again. Therefore, if the underwires come out again even from a previously mended bra, it is worth wrapping the sharp edges of the knitting needle with several layers of electrical tape or plaster, wrapping it in fabric or wrapping it with thread. This will help avoid tearing the fabric again.
There are times when repairing a bra with a missing wire is quite problematic, since there is not enough fabric to sew up the tear. Then the knitting needle is cut so that the edges of the hole meet and can be mended. Don't worry, shortening the wire will not affect the shape of the bra or the comfort of wearing it.
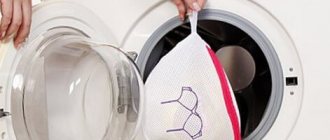
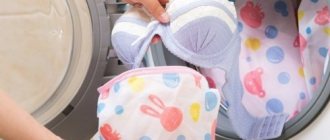
Important! To avoid damage, it is recommended to wash your underwire bra by hand or in a special bag or plastic container at low speed. After all, it is during washing that the bone most often damages the fabric, which sooner or later will lead to rupture of the fabric and the release of the sharp edge of the metal bone.
If the dress cannot be worn either with or without a bra...
There are dresses made of narrow fabric (The structure of tissues of living organisms is studied by the science of histology)
or with patterned inserts, which are very difficult to match with inconspicuous underwear. What to do when even a seamless bra creates folds on the body, but without it the breasts look sad?
The most suitable underwear is always flesh-colored, therefore, under clothes of any unusual color it is not necessary to choose a tone-on-tone bra; It’s easier and better to wear a nude one. You should do the same in the case of transparent or translucent clothing.
To prevent the straps and belt of the bra from creating additional rolls and folds, they must simply be cut off savagely. How will the bra hold up then? The cups must be glued to the dress from the inside! The main thing in this process is not to confuse the sides: the front part of the bra must be connected to the wrong side of the dress.
Step by step how to fix a bra if an underwire has come out
There are times when a knitting needle comes out at the most inopportune moment, and there is no needle and thread at hand to sew it up. In such cases, it is worth using other quick repair methods.
Using a callus patch
If a knitting needle came out in a public place, or there is no time to fix it, you should resort to this method.
Step 1: Place the bone in place.
Step 2. Cut a small piece of the patch.
Step 3. Use it to seal the hole where the knitting needle came out.
For emergency repairs
, any plaster will do, however, preference should be given to a fabric plaster. It's more durable.
Attention! This method is temporary and does not guarantee that the bone will not come out again. Therefore, it is important not to put off repairing your bra, but to have it sewn up as soon as possible.
Scotch tape
Another emergency repair method. Suitable for those who do not have a plaster on hand, but it is still not possible to mend a bra.
All you need for this is a small piece of tape, which we will use to seal the hole from the bone that was previously inserted into place.
Container for washing a bra in a washing machine
For greater fixation of the bone, you should glue the tape in several layers. However, you should avoid creasing the tape, which can scratch and injure the delicate skin of the breast.
Glue
What else can you do? Using a glue gun, fill the hole with glue and while it is hot, press the fabric against the knitting needle so that the glue holds them together. This method is very effective, and after it there is no need to mend the bone. But when it hardens, the glue becomes hard and can cause discomfort.
Hand wash bras and line dry
If the bones come out...
The iron bones of bras sooner or later break through the tissue (medical system of cells and intercellular substance, united by a common origin, structure and functions)
and crawl out, digging painfully into the skin. The gap space can be sewn up, but this will have to be done again and again, since the sconce bones can be stubborn in their desire to literally break through.
It is even more effective to seal the weak space with silicone glue and rigid tape, leaving no chance for the bone to make a new breakthrough.
Replacing iron bones with plastic ones
If this is not the first time a knitting needle has come out, you should think about replacing it with less traumatic fabric or plastic ones. These can be purchased online or at some fabric stores.
However, it is worth remembering that
plastic underwires do not support the breasts as much as metal underwires , so this option is not suitable for those with large breasts.
The right bra
To avoid problems with bra underwire, you should buy only high-quality lingerie that is the right size and shape for you.
Peculiarities
The universal bra has the following interesting features:
- It perfectly supports the breasts and gives them an ideal shape;
- Suitable for ladies with any bust size;
- The size of the underwire model should ideally fit the female breast;
- Characterized by a chic variety of styles and models.
How to repair a bra if an underwire has come out
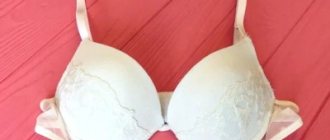
Comfortable and beautiful underwear is the key to health and good mood. Today, branded products are not cheap, and it’s especially disappointing when, a week after purchase, you notice that a wire has come out of your bra. It would seem that it is almost impossible to cope with the problem - no matter how much you refill the sharp part, it will continue to pop out and prick. Don't despair and give up your favorite clothes. There are several techniques that allow you to repair a product and at the same time not spoil its original appearance.
Positive characteristics
Sexy and comfortable lingerie has the following positive characteristics:
- Perfectly fixes large breasts;
- This property will definitely please busty ladies, since in such underwear their movements will not be constrained or restricted;
- Corrects the shape of small breasts;
- Women's bras with underwire lift a small bust and create remarkable volume;
- Ladies note feelings of comfort and self-confidence when wearing this accessory;
- Reliable fixation of any bust will allow a fashionista to choose almost any open or tight-fitting outfit.
How to “tame” an unruly bone forever
For the uninitiated, it should be explained that an underwire is a metal arc inserted into the bra cup and allows the product to maintain its shape. The sharp ends of the arc are blunted by drops of dried paint. As a result of prolonged use, machine washing, incorrectly selected size and a number of other reasons, the bones at the most inopportune moment can break through the thin fabric and break out.
The first thing that comes to mind is to tuck the piece into place, take a needle and mend the hole that has formed in the fabric. This fix will help, but not for long. After a day, and sometimes even a few minutes, the tip of the arc will again rest against the body, bringing pain and inconvenience, so the problem must be approached thoroughly.
To work you will need the following tools:
- needle;
- threads of a suitable color;
- scissors;
- ripper;
- wire cutters;
- empty ink refill.
To repair the product, you must proceed as follows:
- Using a seam ripper, slightly widen the hole and pull out the metal arc by 3–4 cm.
- Cut off the tip of the empty ink refill and place it on the tip of the bone. This work will be much easier to do if the plastic is slightly warmed up by holding a candle or lighter over the flame.
- Gently knead the melted plastic and let it cool. The result is a protective cap that will protect the fabric from tearing.
- Return the bone to its original place.
- Carefully mend the hole and hide the end of the thread between the layers of material.
- If there are any doubts about the strength of the darned material, you can apply a patch from a dense fabric of a matching color to the problem area.
Sometimes the bone sticks out so much that it is impossible to stretch the material and connect the edges of the hole. In this case, in order to repair the product, at the beginning of work, the arc is cut with pliers by 0.5–1 cm. Shortening this part will not affect the shape of the product at all, and repairing the bra will take place without unnecessary difficulties.
The harm and benefits of seeds
First, perhaps, let's look at what the positive and negative aspects of wearing a bra with underwire are based on.
It turns out that the bra frame can cause a number of troubles.
- The bones can put pressure on the ribs.
- Often the bones rub the skin.
- Wire frames sometimes pierce the fabric, causing discomfort and even wounding the skin.
What are the benefits of the underwire model:
- The frame is an excellent support for large breasts.
- This bra can create a nice contour for any bust size.
- This is an opportunity for a woman to change her figure, make it more attractive and slender.
All the points described above indicate that the harm lies not so much in the frame itself, but in the incorrectly chosen bra. It is important that it is not tight and does not squeeze the chest and ribs. Otherwise, the normal circulation of lymph and blood can be disrupted.
In addition, if the bust is uncomfortable or simply small, then the result may be pain in the chest, back, and also in the lower back. All this causes great discomfort throughout the body.
It is not true that bunions can cause breast cancer. On the contrary, a correctly selected bra model will protect a woman from stretch marks and all kinds of microtraumas to the breast.
Emergency Bra Rescue Measures
Often, problems with your bra arise at the most inopportune moment - at work, during a party or on the road. The bone rests against the chest, irritates the skin, and there is neither a needle nor thread at hand to sew up the hole and somehow alleviate the situation.
- Of course, you can simply place a cotton pad under your bra. The end of the arc will rest against the lining, which will slightly reduce discomfort and pain. But such protection is good for a very short time, since when you move your hands, the structure will certainly shift somewhere.
- In such cases, you can use a band-aid or tape. The use of improvised means will allow you to eliminate the problem on the spot and postpone repairing the laundry for several days. This type of emergency repair is very easy to carry out. You need to set the bone in place, cut off a piece of fabric plaster or tape, depending on what is at hand, and seal the hole on the inside of the cup.
It is easier to prevent any “accident” than to eliminate its consequences. To avoid damage to your underwear, bras should be washed by hand, or at least use bags designed for machine wash. A delicate product requires manual cleaning, especially if the model is decorated with beads or lace. Machine washing at high speeds causes the fabric to quickly become thinner, after which it ruptures and the bone falls out.
The harm and benefits of frame bras
An underwire bust reliably supports large breasts and forms beautiful contours for a bust of more modest sizes. Sometimes a woman’s figure changes beyond recognition, becoming slimmer, fitter, more attractive.
Recently, more and more negative reviews have been heard about bodices with underwires. They say that they are harmful to health, and it is better to completely abandon them in favor of frameless models. But, as it turned out, most often health problems can arise not from the bra itself, but from the wrong choice. If it is tight and puts pressure on the chest and ribs, it can disrupt the normal circulation of blood and lymph. A bra that is too small or uncomfortable causes pain in the chest, back, shoulders and brings incredible discomfort to the entire body.
There is a myth that frame bras can cause cancer. This erroneous opinion was dispelled by domestic scientists from the Blokhin Institute of Oncology. Mammologists say that if you choose the right bra, it will never cause breast cancer. On the contrary, the bodice will protect the delicate skin of the breast from microtraumas and stretch marks.
But there are several cases when wearing an underwire bra is not recommended:
- For pregnant women, it is better to choose a more comfortable model that does not restrict movement.
- Breastfeeding mothers should not wear an underwire bra in the first months after giving birth.
- During the postoperative period, it is not advisable to wear a bra with underwires.
- For young girls who are just starting to wear a bra, it is better to abandon frame options in favor of softer models. Their body is still growing and developing, and hard bones can lead to pain and even injury. At a young age, it is better to choose a bralette without wires, with a minimum number of seams and without thick lace.
Important: It is not advisable to wear an underwire bra all day. Especially if it is complemented with foam cups. In the evening, it is better to change it to a supportive T-shirt, a sports bra or a regular bra without wires and molded cups.
What to do if a wire comes out of your bra?
Today we will have a purely female conversation, so for now men can mind their own business. Sooner or later, no matter how high-quality and expensive underwear we buy, almost all bras have a problem with underwires that break through the fabric and can put pressure on the ribs, chest or armpit.
Before we move on to finding ways to solve this problem, let's discuss the reasons why the pit usually pops out. Of course, we all know that underwire underwear is designed to maintain the shape of the breasts without any physical discomfort.
One day, out of curiosity, I attended a master class on making underwear. When I saw the braid where the bone is inserted, as well as the strength of all the fastenings with which the braid is processed, I realized that pulling the bone out is not so easy. Therefore, if this happens, then something is definitely wrong.
If the stain doesn't come off...
If a stain has appeared on your bra from nowhere, which does not want to be washed off and does not lend itself to any methods of elimination, then the only thing left to do is either throw the item away, or savagely cut off the damaged part, and try to put the rest to good use.
If the cups of the sconce look decent and, for example, only the belt is damaged, then cut it off and use the rest to make a reticule or a comfortable cosmetic bag. Don't forget to use belt clasps - they can also serve as clasps for your newest cosmetic bag! Just cut them off and sew or glue them to the sconce cups!
How to deal with a popped bone
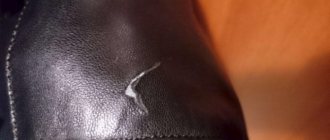
If you discover that the tip of the insert has broken through the fabric, you need to take immediate action. The larger the hole, the more difficult it is to sew it up. If trouble happens outside the home, you can put the bone back in place by covering the damaged area with a band-aid. This is a temporary measure, but it will allow you to survive for several hours without experiencing pain from injections of sharp metal or plastic.
At home, you need to examine the fallen bone. If the tip is too long and sharp, it is useless to sew up the hole; after a while the fabric will tear in another place. It is better to cut off the tip with pliers and then put a protective cap on it. A piece of bicycle nipple or any soft rubber will do. An ingenious solution is to isolate the sharp tip with a tip removed from a cotton swab. The homemade tip is secured with quick-drying glue or jewelry epoxy (available at craft stores).
If the tip of the bone is not sharp, but excessively flat, it is better to wrap it with a thin strip of tape or cover it with several layers of light nail polish. Tuck the insulated part under the fabric and sew up the hole with strong synthetic threads. Apply the stitches as tightly as possible, the seam should resemble darning.
Having tucked in and fixed the fallen bone, it is worth examining the second cup of the bra - it is possible that it also requires repair.
Why is a bra wire dangerous for a machine?
The frame part of women's underwear is small in size, but this will not prevent it from causing considerable harm. If you don’t get it in time, you may face the following consequences:
- the bone made of metal begins to rust, which is why the laundry is washed in dirty water and gets dirty;
- the sharp part of the bone sticking out of the drum when it rotates can tear the laundry inside;
- may damage drum perforation;
- a sharp bone can pierce a tank;
- lead to damage to the coating of the heating element, due to which it will not be able to fully operate, or break it into pieces;
- tear the drain collar, which leads to leakage;
- pierce the pipe, which cannot be repaired;
- get stuck in the pump blades, which can cause it to burn out or fail.
Important:
You need to remove the bone as early as possible so that it does not harm the machine. It is better not to wash with stuck fittings so that it does not pass further and damage the working parts.
Prevention of the problem
To prevent underwires from spoiling delicate underwear, you need to wash your bras by hand or use a special device for the machine. It is not recommended to rub the product vigorously and squeeze it at high speeds.
The better the quality of the bra, the less risk that the underwire will break through the fabric. You shouldn’t skimp on linen; when purchasing, you can ask what sealing elements were used in a particular model. The best option is flexible and fairly thick plastic inserts with wide, rounded edges. On the inside of the bra, you can sew sealing strips made of dense, but not rigid fabric.
Broken bra underwires are a common problem. A timely darning can solve it, but it is possible that after a while the sharp edge of the insert will fall out again. If this happens, you should remove both wires and wear a bra without corrective parts; many models will only benefit from this.
Interesting models
Professional designers and stylists never cease to delight fashionistas with stunning and feminine lingerie models. A lady of any age and with any taste preferences can choose the ideal product. What interesting bra models are currently on the market? Let's figure it out together.
Classic
A timeless classic that will never go out of style. Models in this vein are characterized by a smooth surface and the absence of additional decorative details. The design of this lingerie is always strict and laconic. As a rule, every lady has such underwear in her arsenal.
It is perfect for everyday wear.
Model "Gabriel"
A soft product called "Gabriel" fits perfectly on a woman's figure. These bras are easy to wash. The linen does not lose its shape for a long time and retains its attractive appearance. "Gabriel" with underwires can combine various materials: lace fabric, delicate silk or cotton. These bras are equipped with strong and reliable underwires.
"Angelica"
Ladies simply adore the beautiful Angelica models. These balconette bras slightly expose the upper chest. In such lingerie, a lady will definitely be desirable to her chosen one.
Backless bra
7. If you wear backless dresses, you can alter your bra so that it is hidden.
· Clasp from an old bra
Cut the clasps off the old bra, leaving enough room to sew on the elastic band.
Sew one clasp to one end of the elastic band, fasten it to one end of your bra and wrap it around your waist to measure the length you need.
Cut the elastic band or elastic band to the desired length and sew another fastener to the end. Fasten it to the other end of the bra.
8. Here's another way to remodel your bra.
so that it is not visible when wearing a dress or other clothing with an open back.
In what cases is it better not to wear underwires?
One way or another, but indeed, there are cases when a model with underwires is not recommended for wearing.
To choose a simple and most comfortable bust model that will not hinder your movements, you should:
- pregnant women;
- mothers who breastfeed their babies, especially in the first months after the birth of the baby;
- women after operations, especially if they were performed in the chest area;
- very young girls who are just starting to wear bras. The fact is that a young body is in the process of formation, and a rigid frame can cause pain and lead to certain injuries.
Another important point that every woman needs to know is that a bra with underwires should not be worn all day, especially if it is accompanied by foam cups. It should be periodically replaced with a special supportive T-shirt, a simple bra or a sports bra.
What to do if a wire comes out of your bra
9. Panty liners can be a temporary solution for popping bunions.
from a bra. A patch is also suitable for this purpose.
10.
If the bone has come out, try to solve this problem with
textile glue and thread and a needle.
· Thread the bone back through the hole.
· Seal the hole with fabric glue and leave to dry for a few minutes.
· Then close the area where the hole has formed using stitches (about 10 for a small hole and twice as many for a large one).
What do you need to sew underwear?
To create linen you need:
- Textile;
- Scissors;
- Centimeter;
- Threads and needles;
- Sewing machine and overlocker;
- Accessories for linen
Interesting materials:
How to connect IPTV via T2? How to connect IPTV to Samsung Smart TV? How to connect irobot to wifi? How to connect an ISO image? How to connect iTunes if iPhone is disabled? How to connect a USB camera to Android? How to connect YouTube to a computer? How to connect YouTube to TV via Wi-Fi? How to connect YouTube premium Vodafone? How to connect Ivy to smart TV?
DIY bra
How difficult it can sometimes be to choose something for yourself! And especially underwear. Not everyone has standard figures, but the factory doesn’t always take this into account. There are, of course, ateliers, there are online stores where underwear sets are sewn according to your parameters. But even here, not everything goes smoothly.
Not everyone is comfortable coming to the studio for such an intimate matter, and ordering by mail is also no guarantee that the item will fit without trying it on. There is only one thing left to do - sew the bra yourself. To do this, it is enough to know the basics - different types of seams, several terms, and be able to take measurements and create patterns.
Girls are taught all this in technology lessons at school.
Types of bras
First, decide on the model:
After all, a bra can also be used as a swimsuit top or a sports top. Flesh-colored underwear is the most popular - it goes with any clothes. Therefore, first of all, it is better to sew it. When you learn well and it turns out flawlessly, you can sew white and black bras, and then all the other colors you need.
Before you start cutting, be sure to watch the video, here is a detailed master class so you don’t miss anything:
It is also useful to know how to sew bodices for homemade transparent blouses and dresses - then they should be sewn into the product itself. By the way, the same applies to knitted patterns, so if you know how to knit and often knit clothes for yourself, this article will teach you how to knit a bra.
DIY bra: pattern
Study the pattern carefully - as you can see, there will be a lot of darts:
Pattern with explanation:
Fabric selection
You also need to choose the fabric in advance. Elastic, of course, is more comfortable, but it is also more difficult to sew from it; on the other hand, denser fabric holds its shape much better.
If you want it to be thicker and more beautiful, you can make 2 layers: towards the body with cotton, outwards with lace stretch fabric. A fabric with a small elastane content, where the main percentage is cotton, would also be perfect.
Keep in mind that the lace fabric is most likely pure synthetic with elastane.
Be sure to test the fabric for stretchability lengthwise and crosswise. Otherwise, if the fabric stretches too much, and you don’t take this into account, the cups won’t hold their shape when you put them on. Don’t forget to decate the fabric before cutting, that is, wash it in warm water and then iron it so that it shrinks immediately. If you can’t wash it, at least iron it with steam and lay it on the table until it cools.
How to take measurements
A little about taking measurements for creating patterns: chest level (we measure under the chest), HR - from the nipple to the place under the chest, BR - from the nipple to the place at the top of the chest where the bra will end - you choose this point yourself, BR - from the nipple to the beginning of the armpit level, CG - from nipple to nipple, CR - CG divided by 2. If you have non-adjustable straps, then their length also needs to be measured.
It is important to know which model is right for you. There are those that are suitable for a full bust or, conversely, for small breasts. For the second case, a model with a wide belt or a sports bra is suitable.
DIY crochet bra
If you want to make a swimsuit, you can knit it. True, the lining should still be made of fabric - cotton or linen. The knitting should be tight, so we use double crochet or single crochet stitch. There is a crochet option.
The fabric, knitted in a rectangle, must be draped and tied with a cord so that it fits well on all the bulges. The connected triangle must be tied with ST BN and lightly pulled together.
For a small bust, it is better to make an option without a cup.
Or even a sports bra without fastenings. For larger breast sizes, you can sew a bra with wide sides. They will better support the bust so as not to put more strain on the back.
Look at photos of different models:
note
Bra with underwire. Suitable for almost everyone, good support, thanks to them you can make push-up cups.
Seedless. Best for imperfect or sagging breasts.
With straps “under a T-shirt”. For dresses with bare shoulders or for a sore back, this will put less strain on the spine.
“Push-up” - to lift the breasts (sagging, for example), so that they look more seductive in the neckline.
With a fastener not at the back, but at the front.
Whatever bodice you choose, it should fit perfectly on your figure - not pinch the skin and not sag.
Video on the topic of the article
Source: https://webdiana.ru/dom-i-semya/rukodelie/11009-byustgalter-svoimi-rukami.html
MK on sewing a real adult bra for a teenage girl
Hello, dear visitors of my blog! Today I decided to post a master class on sewing a bust for a teenage girl at home. I made and posted this MK on Osinka a year ago, but now I decided to keep it as a separate post. I don’t know the prices for accessories from a year ago, how much this or that need costs now.
So let's begin! I’m faced with a problem - my daughter is 11 years old, she doesn’t have breasts as such yet, but she’s already embarrassed to wear tight blouses, and she doesn’t accept T-shirts and tops at all. It was decided to buy the smallest bras, but... The breasts are small, and the girl is plump, then 4 of our purchased bras with the smallest cups simply squeezed her like a caterpillar under the breasts.
We ripped open one copy and decided to sew it ourselves according to the girths we needed. I cut only one cup - it turned out to be extremely useful - I looked at the processing sequence and at the same time wrote down on paper what I needed to buy and in what quantity to make one copy. I don’t pretend to be the truth in the first instance, so I write further without the correct terminology - as best I can.
So, we will need:
1. Lace - I have it stretch, I bought it in our local store for 50 rubles/m. It has scallops along two edges. 2. The corset cups are the smallest - I’ll show you a photo next, there is a pack and the name of the company. It should be noted that the most expensive fittings were the cups - 194 rubles! 3. Elastic tape for straps. Our stores are not very rich in such a specific product (not every day people sew busts), but I was lucky and managed to buy an elastic band for straps with a jacquard pattern on it - it looks beautiful. This elastic band costs 12 rubles/m, I bought it with a width of 1 cm. I only used it on straps. 4. Elastic tape for straps without a pattern, but with scallops along the edge. This elastic is sewn all over the bra, it is slightly wider than 1cm, 14 rubles/m. 5. Fastener for busts. I bought a double hook 3 rows/2 loops. Price-9 rubles/pcs. Unfortunately, for now we only have basic colors on sale - white, black and beige. 6. Hooks for straps. I bought not very aesthetic ones, but the white, transparent ones look even worse - they look very flimsy. We will need 4 hooks for 1 rub/piece 7. Ribbon regulator. This is just a flattened piece of plastic, similar to a figure eight, it regulates the length of our flyers. We need 2 pcs at 1 rub/pc. 8. Bones. There are no small ones on sale at all. I bought 2 pairs, more or less matching the oval, but large; my husband wanted to sharpen them and fit them to our sample. After consulting with sewing colleagues, we came to the conclusion that a growing child’s body does not need bones at all; in fact, there is nothing to keep there, but these bones can be crushed or come out. I bought a pair for 10 rubles, but did not use them. 9. An incomprehensible plastic stick. I whipped her out of her bra around the armpit area. I went to the store with it, but they didn’t offer me exactly the same one. But there were some plastic sticks that matched the width of my stick and were easily cut with scissors. I bought 3 pieces for 2.20 each. 10. Tunnel tape. This is the same velvet thing with bones sewn into it. I didn't find it on sale. I wanted to replace it with a velvet ribbon, but I only had burgundy and it was kind of stiff... I didn’t buy it, and later I did without it, because... I didn't insert any bones.
11. Glue. In one store I bought a meter of white knitted glue for 35 rubles/m, in another I found a simply stunning amount of similar glue in different colors, but for 150 rubles/m (the width is different and the manufacturer is Italy)
That's it, let's start cutting and sewing!
In the photo you can see that I simply circled the parts of the bra and marked the top and bottom, where with an allowance, where without, the number of parts... I traced the contours, slightly stretching the fabric (because someone wanted to sew so much that they didn’t even think of unstitching everything to end).
Advice
This bra is new, the parts are not stretched, so the pattern turned out more or less similar. In the original, the bust is made of fabric, where you can see the lobe from the drawing, we also transfer it to the pattern.
Please note that I cut from lace without touching the scallops about 1 cm from the edge - we will need them later for decoration, we try not to cut them, but leave them in a long strip. Duplicate the adhesive middle part No. 1 and two side parts No. 2.
Pay attention to the stretchability of the adhesive; it did not stretch on one side for me - it is necessary that parts 1 and 2 do not stretch at all. On the left is the red glue for the second bust. We sew together parts No. 1 and No. 2 using a fine stitch, cutting off the seam allowances close to the stitching. Something is already emerging!
We sew on the back part of the bust, the same one that I enlarged by eye by a few centimeters. You can always cut off the excess where the fastener will be. I pressed the joint seam towards the back of bust #3, and this is where the tunnel tape is sewn.
But I didn’t have one, I just drew the width of my plastic stick and stitched it. It turned out to be a pocket. The seam was cut close to the line. In the photo, on the red glue stick is the same original blue bust stick. I cut the same length from my copy and rounded it with scissors.
As long as we don’t leave these sticks in our pockets, they will interfere with our processing.
Now the cups.
Above in the photo are the ones I bought, you can see that they are push-up. Below - whipped from a blue bust, I went shopping with her. For new cups we cut off one “ear”, like our blue cup. Upon closer inspection, you can see that the cups have a right and a left (look at the push-up).
The cups are already white, but our lace turned out to be just boiling white, and the cups underneath were a little yellowish, so we decided to trim the outside of the cups with white supplex. Supplex is a good fabric, we pin the cup along the contours and tighten it where necessary so that wrinkles do not form, we don’t need them. Here, too, I don’t know if the share is important - I pinned and pulled as my heart told me.
We sew the cups along the contour from the inside out - it’s easier to do it there; we cut off the excess fabric close to the contours of the cup.
note
Next is the inside of the cup. Above in the photo is our cup made from a blue bust, you can see that an ordinary cooler with lycra was used. We push the cooler into the center of the cup, pin it, and then without any tension we pin the cooler along the top of the cup, gradually pushing all the excess down. As a result, a fold is formed.
My daughter didn’t have it stitched, but on my purchased busts it was stitched like a dart and cut close to the stitching. Leave a fold. Again we sew along the contour and cut along the borders of the cup. This is what our cup blanks look like from the outside and inside.
(I came to the conclusion that you can also buy beige cups in the absence of white ones on sale - you can always cover them with any fabric in the color of the lace). We run all this under overlock. Our cup blanks are ready for lace!
We begin to decorate our cups - we cover them with lace. We place one edge with scallops on the top of the cup, chop it off, my scallops slightly protrude beyond the border of the cup. Approximately in the center of the cup at the bottom, we pin the folds, tighten the lace, if necessary, so that it fits beautifully.
Believe me - it's easy with elastic lace! We draw along the contour. Do not cut off allowances of approximately 1cm yet. We stick the cups into our main part. What to pay attention to here: the “ears” that we cut off from the finished cups! They should not be sewn in!!! I turned the place where I marked it in red twice and sewed the cups in.
On the wrong side, our cups point towards the bra belt. Here the tunnel tape for the bone is sewn in in a good way, but because... We decided not to use it, so we simply sew the cup from the face with two parallel seams - from the face “like adults”, and from the inside we simply fix the cups so that they do not protrude.
It should be noted that there is already stiffness where the bones should have been, this is enough for girls!
In the first photo below there are future straps, at the bottom there is an elastic band with teeth (the wider one), we sew it to the bottom of the bust.
Between the main part and the elastic we put our scallops 1 cm wide - this sandwich looks like this: we put the face of the scallops on the face of the bra so that the teeth look AT the product, with the elastic on top.
Important
We sew it on with a zig-zag, I don’t remember the numbers now, but I simply selected it according to the size that the blue bust was sewn in. We sew the elastic along the edge that is not at the edge of the product.
I sewed by slightly stretching both the fabric and the elastic; our central part of the bust is glued with glue, so nothing stretches there. And we are not delaying! Just a little bit of gum. We turn the elastic inside out - the teeth immediately look down - already beautiful, and we sew the elastic with a zig-zag on the face of the product along the second edge. Thus, on our product, only one line goes across the face.
We insert our plastic “sticks” into the pockets all the way down (the top has not yet been processed). Using an elastic band with teeth, we process the upper sections of the bra. The sandwich is still the same - the face of the product + the face of scallops + elastic band.
We leave a little elastic on top - later there will be a loop for the hook of the strap. We make a loop for the hook, sew here with a small zig-zag, cut off the extra tails close to the line.
The hook loops on the back are simply elastic folded in half and sewn on with a fine zig zag stitch. I also didn’t take a photo of how I sewed the clasp—if you pick it up, you’ll understand everything right away, but you can also look at the finished busts, there’s nothing complicated there.
We put the elastic band for the straps into the adjusters and put on the hooks, fasten it - this is also difficult to explain with your fingers, look at the finished strap and repeat.
This is what our bust looks like from the inside and from the face. Now I see that the lace on the cups is not symmetrical - we will take this into account for the future.
What I learned for myself: the child will grow, but the breast size will remain in this cup. I will enlarge details 2 and 3. If the chest is wide, then it will be possible to make the blue jumper wider.
That's all!
Advice
The devil is not as terrible as he is painted and it is not the Gods who burn the pots. The main thing is to start and not be afraid, because to be afraid is to do nothing.
Here is our second bust, sewn using the same technology.
Thanks for stopping by and happy sewing!
Source: https://lina-irina.blogspot.com/2015/04/blog-post_10.html
LiveInternetLiveInternet
—Categories
- what does the red thread on the wrist mean (10)
- red thread from Jerusalem buy (10)
- where to buy a red thread amulet (8)
- how to make red thread (8)
- buy red thread (7)
- how to tie a red thread (7)
- tie amulets threads (7)
- how to tie a red thread correctly (7)
- threads of amulets on the wrist (6)
- you need to tie a red thread on your wrist (6)
- what is the red thread on the wrist for (6)
- how to tie a red thread amulet (6)
- weave a thread charm (6)
- red thread against the evil eye (6)
- red thread on which hand (6)
- red threads on the wrist mean (5)
- how to tie a red thread (5)
- red thread from Israel (5)
- amulet thread buy (5)
- where to buy red thread (4)
- red thread on hand (4)
- correct prayer on the red thread (4)
- prayer to tie a red thread (4)
- can I use red thread (4)
- red thread on the wrist prayer (4)
- prayer amulet from the evil eye red thread (4)
- amulet thread bracelet (4)
- red thread on the wrist buy (4)
- how to tie a red thread on your wrist prayer (4)
- red thread amulet buy (3)
- bracelet red thread (3)
- where to buy red thread on the wrist (3)
- what does red thread on the wrist mean (3)
- red thread on the wrist how to do it correctly (3)
- red thread on the wrist (3)
- how to tie a red thread on your wrist (2)
- red thread from Jerusalem (2)
- prayer on a red thread (2)
- red thread on the wrist from Israel (2)
- red thread (2)
- red thread on the right wrist (2)
- red thread on the wrist (2)
- red thread amulet (1)