The deliciously crispy, golden crust of the meat and the dizzying aroma of vegetables baked in the oven will leave few people indifferent. It is rare that cooking in the oven is complete without oil splashing and soot settling on the inner walls of the kitchen appliances.
Washing a device is a tedious procedure, however, thanks to the use of some available tools, it is quite possible to turn cleaning into a process that requires minimal effort and time.
Security measures
Many chemical detergents contain aggressive substances that, when they evaporate or get on the skin of the hands, can cause an allergic reaction and burns.
Even harmless, at first glance, home remedies - citric acid, soda - also negatively affect the skin and mucous membranes upon direct contact with them, causing various irritations and peeling.
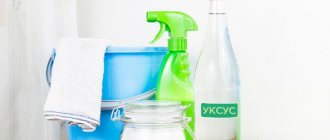
Vinegar is a wonderful cleaning product , however, if you decide to use this product to wash surfaces, also be careful - the acid it contains can cause skin burns.
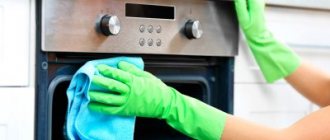
Therefore, when starting to clean the oven, be sure to wear rubber gloves (remove all jewelry first) and while working, make sure that the product you use does not get into your eyes.
IMPORTANT! If the detergent comes into contact with the skin or mucous membranes of the organs of vision, immediately rinse your hands or eyes with plenty of clean water.
To ensure that during operation you have free access to all internal surfaces of the device, before carrying out the procedure, remove all racks from the oven, remove dishes and baking sheets.
Find out how to clean a gas oven - 13 recipes for use at home.
New cure for cancer
Scientists around the world are looking for a cure for this insidious and terrible disease. In recent years, they have turned their attention to the effect of lemon and soda on malignant cells. As a result of the observations, it turned out that the substances found in these products negatively affect more than 12 types of different cancer tumors. Under their influence, the growth and development of pathogenic cells is disrupted. In some cases, this combination turned out to be very effective, as a result only pathogenic cells die, while healthy ones remain unharmed.
Although positive results have been achieved, it is still too early to say that a cure for cancer has been found. After all, each organism is individual and what helped one may not help another patient. But scientists are working on this, conducting research to improve this technique. Doctors also recommend periodically taking an aqueous solution of soda and lemon for the overall health of the body.
Soda, vinegar, salt
The simultaneous exposure of three foods can quickly remove old grease deposits from the walls of the baking cabinet.
To enhance the cleaning effect, use vinegar essence (70-80% concentrated acid solution) instead of table vinegar:
- moisten the walls of the oven, soak a sponge in water, put soda on it and apply the powder to the internal surfaces of the device;
- pour 500 ml of water (room temperature) into a heat-resistant container, add 350 g of table salt and add a tablespoon of vinegar essence, stir all components of the solution thoroughly until they are completely dissolved;
- turn on the oven, set the heating temperature to 180-200 ⁰C;
- place the dishes with the prepared product on the bottom or lower tier of a heated kitchen appliance for half an hour;
- turn off the baking cabinet, let it cool for 20-30 minutes;
- open the device door, remove the container with the solution;
- Using a soft sponge, thoroughly wipe all the walls of the cabinet, starting from the top, then wash the sides and bottom;
- Rinse the internal parts of the device with clean water and leave the oven door open for a while to allow the stove to dry.
REFERENCE! If the stove is only slightly dirty, you can use a simpler cleaning option: sprinkle coarse table salt in an even layer on the bottom of the cabinet, turn on the oven (up to 100 ⁰C).
After 30-40 minutes, the salt will acquire a light brown tint - turn off the gas (power supply), let the chamber cool and remove greasy deposits from the walls with warm soapy water.
Will you use the suggested recipes?
Not really
Soda, vinegar and citric acid
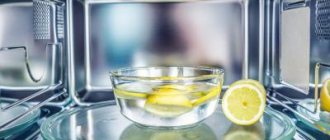
An unpleasant odor often “settles” in a dirty oven , which is felt every time the oven door is opened.
To clean kitchen appliances and, at the same time, easily get rid of the second problem - the “aroma” of ingrained fat and soot - you will need soda, apple cider vinegar and citric acid.
Sequence of the procedure:
- turn on the oven (set the heating temperature to 100 ⁰C);
- While the device is warming up, pour half a glass (100 ml) of apple cider vinegar into a small bowl, add 40-50 g of citric acid and 1 tablespoon of soda powder, mix everything;
- turn off the device, treat the hot inner walls of the chamber with the prepared preparation;
- close the door of the device, leaving the product to act on the surface for 20 minutes;
- after the time has passed, soak the sponge in water and wipe the treated oven walls, then rinse them with clean water;
- After cleaning, leave the cabinet to dry with the door open for half an hour.
IMPORTANT! If apple cider vinegar is unavailable, you can replace this ingredient with regular table vinegar. Similarly, fresh juice of 1 lemon is suitable as an equivalent replacement for citric acid.
Citric acid does an excellent job of cleaning the iron inside and out; read more about this here.
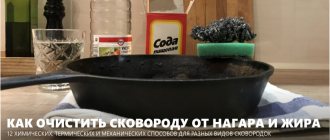
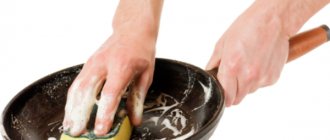
Old grease from cast iron pans - how to deal with it
Modern housewives are in a hurry to throw away grandmother’s frying pans, as they are commonly called, and cast iron pots, since the appearance of the utensils does not inspire optimism. Indeed, a very old layer of soot and fatty deposits seems impossible to clean.
But there is a way, and for this you will need:
- a jar of PVA glue,
- 1 laundry soap,
- a basin in which the frying pan will fit.
The greater the layer of fat and soot on the frying pan, the longer it needs to be boiled
It is better to grate laundry soap: this will make it more convenient to use its properties. Pour water into a basin and bring it to a boil; when the water boils, glue and soap shavings are poured into it. In this case, the fire must be reduced. All this needs to be mixed, because the soap must dissolve. And the frying pan is lowered into this solution. You need to cook it for two hours, no less, adding water from time to time.
The bottom line is that the solution makes fatty deposits very soft and amenable to cleaning. They may begin to crumble already during the cooking process, but you can finally clean the dishes with a metal sponge. The pan will sparkle, and the old fat layer will simply have no chance.
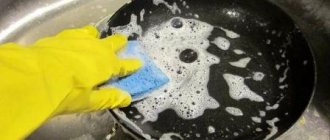
Cleaning with vinegar, baking soda and soap
A paste made from soda and dishwashing detergent perfectly removes grease and fumes from the walls of the chamber. To make such a product, mix soda powder and a chemical in equal proportions, apply it with a sponge to the walls and, after 20-30 minutes, wipe off the dirt.
When removing plaque, act extremely carefully, without applying too much force. Otherwise, the walls of the device may be scratched.
There is also a second, simpler option for the cleaning procedure, which involves the use of these products:
- moisten the walls of the chamber (wet them with a sponge or spray water from a spray bottle);
- dip a rag in water, wring it out lightly, sprinkle soda on it;
- Apply the powder to damp surfaces and leave the device like this for an hour;
- Apply liquid detergent to a sponge and wash the oven, then wipe clean surfaces several times with water and dry with paper towels.
ATTENTION! If the cabinet walls are very dirty, “help” the soda to dissolve the grease deposits using table vinegar: pour the vinegar into a container with a spray bottle and, after treating the surfaces with soda, spray an acidic product on them.
Rules for cleaning the toilet
Since gentle cleaning methods do not involve the use of aggressive chemical solutions, there is no need to use a complex protection system. To work you will need:
- brush;
- latex gloves;
- dry rags.
To remove the maximum number of germs, it is important to follow simple rules when cleaning the toilet.
It is necessary to wash the entire plumbing fixtures. You can’t limit yourself to just cleaning the bowl. Bacteria remain on other surfaces. Therefore, at the initial stage, using a damp cloth and the selected product, it is necessary to wipe the tank, seat, base of the bowl, then the lid and outer surfaces.
It is important to apply the cleaning agent from top to bottom. It is correct to first wash the very top parts of the toilet (tank and lid), only then go down to the rim, then into the bowl itself. With this sequence, it is possible to remove most of the pathogens.
Each wash should end with draining the water. During cleaning, it is necessary to make several descents, and at the final stage, experts recommend wiping all surfaces dry.
The water drain button must be washed at the very last moment. This is the main place where bacteria accumulate. When cleaning the toilet you have to touch it several times, so after washing it is useful to disinfect it and wipe it dry with a paper napkin.
The area around the plumbing should also be clean. You need to thoroughly wash the floors and walls, clean the seams between the tiles, wipe and disinfect the corners.
Steam cleaning method
Steam helps soften plaque, making it much easier and faster to remove dirt. The steam generator allows you to easily remove grease and fumes.
But, if you don’t have such a device, you can arrange a steam “bath” for the stove in other ways:
- pour a liter of water into a fireproof container;
- add any cleaning agent that you use to wash dishes to the liquid;
- place the solution in the cabinet chamber, turn it on to warm up to 140 ⁰C;
- After 45 minutes, turn off the oven and wash off soft stains with a sponge and detergent (you can use laundry soap).
In addition to detergent, vinegar essence can be an ingredient for a steam bath:
- preheat the oven to 200 ⁰C;
- pour a liter of water into a baking tray or other container, add 2 teaspoons of essence to it;
- put the dishes in the oven;
- after the liquid boils, note the time: after 15-20 minutes, when the device door begins to fog up, turn off the device;
- After half an hour, when the stove has cooled down, open its door, wipe all internal surfaces with a damp cloth, then with a dry towel.
What they advise on the forums
Let's look at the reviews of those who cleaned the seams on their own.
If you don't mind chemicals, use this option. And the recommendation for processing fresh seams will reduce their contamination.
BiArt:
Don't rush to pick out the grout. MELLERUD special cleaning agent for tile joints, according to the instructions, dilute 1:3, but if the joints are very dirty, then you don’t have to dilute it at all. Spray the seams with a spray bottle, or pour this product over them, and after a few minutes, clean them with a brush. Very effective (without exaggeration!!!), the smell is not unpleasant, it is better, of course, to work with gloves. And for future repairs, an additive for grouting from the company LUGATO, I don’t remember exactly what it’s called, tilers call it “mayonnaise” for its similar appearance. The additive imparts plasticity to the grout, reduces pores, it has water-repellent properties, and the tile seams are correspondingly less dirty.
Source www.bmwclub.ru
An unusual example of using tooth powder.
Antonov:
And I remembered again. I once cleaned those seams with great success using tooth powder. I bought it at the pharmacy. A colleague recommended it to me. I used a hard toothbrush as a cleaning brush.
Source hodremonta.ru
Whiteness perfectly cleans seams and fights fungus.
Foma37:
I also came across this and was surprised how cheaply and cheerfully you can bleach everything. Fortunately, there were advisers)) “Whiteness” (in my opinion, a bubble costs 38 rubles) is a terrible infection, but you just fill the seams on the floor and after a day they are white as if they had just been rubbed (you can repeat until the desired result). It stinks of bleach but the result I was surprised when the sealant along the edge of the bathtub began to eat up the fungus; usually the sealant is cut out and re-installed. And then you take a cotton pad, soak it in white and leave it overnight... after three nights there is not a trace of the fungus left, it looks like the sealant has just been applied.
Source www.bmwclub.ru
Sometimes an accidental oversight turns into a simple solution to cleaning white grout between tiles.
Elena:
We accidentally spilled toilet comets. After about 5 minutes they wiped it off, and the seams were white. so different
Source www.baby.ru
An option to combat mold without using chlorine-containing products.
oddi:
Among the folk methods that will help clean the seams from mold are regular, slightly diluted vinegar, as well as hydrogen peroxide. Whiteness is not the best option.
Source hodremonta.ru
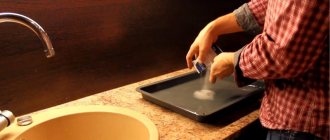
How to clean a baking tray
The container for baking food gets dirty much faster and more heavily than the walls of the oven itself, so when regularly paying attention to cleaning the oven, do not forget to clean this accessory.
One of the fastest and most effective cleaning methods is to use baking soda, hydrogen peroxide and liquid dish detergent:
- mix 100 g of soda, 1 teaspoon of detergent, 2 tablespoons of peroxide in one container to obtain a homogeneous white mass;
- apply the composition to all surfaces of the baking sheet;
- After 15 minutes, use a hard sponge to clean the deposits from the baking container.
Stubborn carbon deposits can be removed in the following way:
- fill the baking tray with hot water with 2 tablespoons of soda dissolved in it;
- After 3 hours, use a hard sponge to wipe off the plaque from the surfaces.
ATTENTION! To prevent the baking tray from having to be washed frequently, before placing food in it, place parchment paper on its bottom (including the sides).
Special attention is required when washing baking trays made of ceramics, Teflon, enamel and other “delicate” materials, for cleaning which it is unacceptable to use abrasive agents.
Preparations and methods for removing contaminants from the surfaces of such kitchen utensils are presented in the table:
| Means | Mode of application |
| Dishwashing gel |
|
| Mustard powder |
|
| Baking powder for the dough |
|
| Soda and salt |
|
Using a Steam Cleaner
You can clean the most difficult stains in tile joints with a steam cleaner. This device helps remove any dirt and disinfect. Prolonged exposure to hot steam helps remove deeply ingrained fungus. The steam generator will require a special nozzle with a thin spout. The number of treatments depends on the degree of contamination of the seam. Experts recommend carrying out at least 5 such cleanings. This will help completely remove putrefactive fungus even from the deepest layers of grout.
Useful tips
- daily wiping the inner walls of the baking cabinet with detergent will save you from the need for frequent “general” washing procedures;
- To easily and quickly remove fresh streaks of fat in the chamber, before wiping the surfaces of the device, slightly warm up the kitchen appliances (to a temperature of 40-50 ⁰C) for 20 minutes;
- Before starting work on cleaning the oven, remove (if the design features of the device allow) the door from the oven: this will make cleaning the equipment easier;
- during the cleaning process, avoid contact of any detergents with the heating elements of the device or the fan;
- if, despite the ideal cleanliness of the internal surfaces, there is an unpleasant odor in the oven, crush 15 tablets of activated carbon, mix the powder with a glass of water and place the liquid in the oven overnight, closing the door. Thanks to the absorbent properties of coal, excess “aromas” will disappear.
IMPORTANT! To clean the oven, it is unacceptable to use steel wool, hard sponges, brushes and abrasive detergents - by removing plaque, you can damage the surfaces of the cabinet.
When cleaning the oven, strictly adhere to a certain algorithm of action and observe the proportions of the products required to prepare the cleaning solution.
The number of procedures for removing contaminants can be significantly reduced by using special lids during the baking process that prevent drops of fat from getting on the walls of the chamber.
You will find 12 recipes on how to clean the inside of the oven in this article.
Did you find this post helpful?
Not really
Preventive measures
To ensure that dirt accumulates in the tile joints as little as possible, follow these recommendations:
- The grout is applied according to the instructions. Pay special attention to preparation: degreasing and priming.
- It is better to give preference to grout with an epoxy base. It prevents the formation of mold and repels dirt.
- After cleaning, it is recommended to apply impregnation to the tiles and seams, which closes the micropores. This will prevent further penetration of the fungus deep into the grout.
- The seams should be cleaned regularly - at least 2 times a month.
- Remove moisture from all surfaces by wiping with a dry towel.
- Constantly ventilate the room.
- Carry out wet cleaning and cleaning with vinegar and ammonia.
- Do not use granular cleaners or abrasive brushes, as they will make the surface of the seams rough and dirt will collect faster.