Coolers or water dispensers are becoming more and more popular every year, and such devices can be used both in office premises and in the apartment. The need for clean water will never decrease. Any equipment can become faulty from time to time, regardless of quality and manufacturer. If the breakdown and malfunction are minor, then you can do the repairs yourself without contacting service centers.
High-quality repairs can only be made if the cause is identified. Before disassembling the water purification device, carefully read the instructions for the cooler, which indicate possible malfunctions and how to solve them.
Correct cooler cleaning sequence
It is more advisable to clean the water cooler when the water in the bottle is almost or completely empty, this will make the process easier and faster.
Important!
First of all, be sure to unplug your device!
Next, we adhere to the following procedure.
We wipe the body of the device with a damp cloth, either antibacterial or soaked in a special solution. Drain the remaining water from the container and remove it from the device. To rinse the device, sequentially drain the water first from the hot water faucet, and then from the cold water faucet.
Be careful not to get scalded by the hot water. We pour out the remaining water by unscrewing the plug from the hole intended for draining, which is located on the bottom of the device. On some models it is located on the back wall
Then screw the plug back. We unscrew the bottle receiver by turning it counterclockwise. Pour a solution of citric acid into the open hole, which is prepared at the rate of 100 g per 5 liters of water. Both tanks should be filled to the top. To make sure of this, open the taps - water should flow out of them in a continuous stream. Plug the device into the outlet and press the switch. As soon as the water heats up, unplug the device.
Then you need to wait 5-6 hours for the device to be disinfected inside. At this time, you can clean other parts of the device. Remove all disassembled parts from it: the drip tray and the grille. Then wash them together with the bottle receptacle with dishwashing detergent.
After the specified period, drain the water from the device, as before, first from the taps, and then through the drain hole. Here you need to unscrew the taps and clean them with a brush using Anti-Clean spray. If you don't have it, dish soap will do at home. Then rinse the taps thoroughly and screw them back on. Then fill the entire system with clean water and drain it according to the already familiar pattern. The procedure can be repeated 2-3 times to completely rinse off the cleaning solution and loose scale. Then you assemble the entire device, install a new bottle and enjoy clean and fresh water with a sense of accomplishment.
Instructions
When the preparatory stage is completed, they proceed directly to cleaning. It includes several steps that must be performed in strict order:
- The cooler must be de-energized.
- Remove the bottle.
- When the water in the device cools down, it must be drained. Taps are used for the bulk of water. Then open the valve and drain the remaining water. The valve is usually located on the side or bottom of the appliance. It is better to find its location in advance. It is recommended to rock the cooler from side to side to remove all the liquid to the last drop.
- Remove all elements. The first step is to disconnect the drip tray. Next are the taps.
- After this, you need to examine the structure, since a screwdriver may be needed to dismantle some elements.
When the cooler is disassembled, its parts are cleaned. It includes 3 types of work:
- sanitation;
- descaling;
- rinsing.
Sanitation
It is also called disinfection. Its purpose is to remove bacterial plaque from the walls of the elements and disinfect them.
It is convenient to place the elements of the device on a liquid-repellent mat. Begin work by cleaning the external surfaces. To do this, you will need a soft foam sponge and dishwashing detergent. Next, using a citric acid solution, wash all internal parts and removable parts. To clean hard-to-reach places, use a brush.
The disinfection solution must be poured into the water tank. To carry out this manipulation, you will have to remove the bottle receiver by turning it counterclockwise. The tank should be full. Check the filling by opening the taps. If everything is done correctly, the water will flow in a continuous stream. In this position, the tank is plugged in for 10 minutes. The heated liquid will remove remaining impurities invisible to the eye. After the time has elapsed, the device is turned off. Drain the solution. And repeat the procedure a couple more times.
If it is not possible to use the electrical network, the solution can be left in the tank for up to 6 hours and then drained.
Descaling
If the scale is insignificant, then it can be dealt with already at the first stage by using a solution of citric acid.
A more aggressive method is to use vinegar diluted with water. It is also poured into the tank and left there for 15 minutes. Next, plug the device into the network, wait for the water to boil, and turn it off. After these manipulations, the solution must be left in the tank for 5 hours.
In the most advanced cases, chemical agents will come to the rescue. Any product for descaling teapots will do. The powder must be dissolved in the required amount of water (indicated on the instructions). Fill the tank with the solution and connect the cooler to the network. After boiling, wait 20 minutes and drain the solution.
Cases of contamination can be so advanced that even the fan in the device is damaged by scale. Only replacing parts will help here.
Rinsing
The final stage. It is necessary to clean the cooler of any remaining solutions that were used for cleaning. This step should not be neglected, since not removed drops of the cleaning solution can subsequently penetrate into the water, and with it into the human body. For rinsing, use ordinary water. It must be poured into the tank. Connect the device to the network and boil the water. The water must remain in the tank for some time. It is best to leave it for several hours, such as overnight. Then the water must be drained through the taps. This procedure can be repeated 3-4 more times. When boiling again, the water can be drained after a quarter of an hour.
When rinsing, it is important not to forget about the removable elements. They are also immersed in clean water and washed
Tips for cleaning your home cooler
The following tips will help simplify the process of cleaning the device and protect you from many unwanted mistakes:
- It is not recommended to use abrasive products for cleaning. These include kerosene, acetone and gasoline. They are unsuitable and not intended for such work.
- Do not pour cold water into heated tanks. You should wait until they cool down.
- When changing bottles, do not forget to disinfect the area in contact between the bottle and the bottle receptacle. This is done using antibacterial agents.
- It is advisable to keep the cooler in the shade. Exposure to sunlight deteriorates the quality of water (it can ferment). The walls of the cooler are also damaged. Covered with a green film.
- It is better to clean with detergents away from children and wearing rubber gloves. And your hands will be safe, and you will protect the cooler from getting new germs.
- The bottle receptacle is washed frequently. At least 2 times a week.
Cleaning the cooler is an important and necessary step towards improving the quality of the device. By regularly disinfecting your device, you extend its life and allow you to drink clean water, which has a beneficial effect on your health.
Products on promotions
Special price
valid when ordering on the website until 01/13/2020
Left to finish:
Drinking water in Rostov-on-Don
Still haven't decided where to order water delivery?
We always have a large assortment of drinking water 19 liters for every taste:
- from an artesian well in the Rostov region: Lux and Source.
- for children, adjusted for mineral and salt composition: Solnyshko and Children's Source.
- melted and mineral, bottled in the foothills of the Greater Caucasus Range: Mountain Spring, Sofia Glacier, Mountain Peak, Pilgrim and Arkhyz.
We are opening new stores selling water, coolers and pumps in various areas of the city.
We are easy to find in the Center and Aleksandrovka, on the Western and Northern residential areas, on Madoyan, Vavilov, Chkalovsky, Dnepropetrovsk, in Nakhichevan and Temernik, on Leventsovka and in the Suvorovsky district.
Causes of water pollution
The first source of pollution may be the water itself. In fact, this is why it is recommended to buy it only from trusted suppliers. The second most common cause is dirt and bacteria on the hands. If the neck of the bottle can still be protected with a protective film, then the entry of microorganisms inside during its installation is inevitable. All this leads to their intensive reproduction, up to the appearance of colonies already inside the device - a characteristic coating is formed on the surface and, as a result, the cooler needs to be cleaned.
Any cooler requires timely care, washing and cleaning.
In addition, deterioration in water quality can be caused by the following factors:
- Lack of personal hygiene. No one can guarantee that all household members or office employees scrupulously adhere to basic sanitary rules!
- Unfavorable external environment. Dust in the room, lint from floor coverings, small particles contained on outerwear - all this sooner or later ends up inside the dispenser.
- Small insects and rodents. It sounds shocking, but it is a fact. Many public institutions where such devices are installed are at risk of spreading infections precisely due to the local “fauna”.
- Scale formation. This may indirectly cause the cooling fan to break down.
Mineral salts present in water contribute to the formation of plaque and scale.
Preparing the device for first use
Connect it to the electrical network. To avoid shorting the electrical wiring, do not modify the plug or extend the power cord yourself. Never place heavy objects on an electrical cord.
Press the hardware start buttons located on the back of the cooler unit. When properly connected, the red and green lights on the front should light up to enable heating and cooling. Wait about half an hour. The device will warm up/cool down to the appropriate temperatures.
Why is cleaning necessary?
Failure to timely clean the cooler can not only lead to damage to the device itself, but also harm human health. Over time, a biofilm inevitably appears on the inner surface of any container, which contaminates the water with dangerous microorganisms, which causes an unpleasant odor and taste. Also, scale forms in the heating container, leading to the appearance of a yellowish sediment.
If the device is not cleaned in a timely manner, its performance will decrease:
- water from the tap flows worse or stops flowing altogether;
- the cooler “boils” without ceasing;
- The device may completely fail.
If the owner notices at least one of the signs listed above, it is recommended to immediately clean the cooler.
Weak water pressure from the tap indicates that the device needs cleaning
Recommendations for cleaning and main contraindications
According to the instructions, the cooler is cleaned every six months. But experts recommend reducing this interval to one month. This will give you a guarantee that accumulated contaminants will not enter your body.
Timely cleaning will help the equipment work easier and, accordingly, longer. In addition, you will prevent bacteria from entering the water. Don't look at the crystal clarity; at first glance it also appears clean in the tap. Bacteria are invisible to the naked eye and at the same time can penetrate everywhere.
But to do everything yourself, you need to be familiar with the intricacies of cleaning coolers
It is important to understand that you can only use products that will not create a problem if they get into drinking water. That is, gasoline, kerosene, chlorine, powders and even tap water should not be used
Instructions for cleaning the water cooler yourself:
The ideal time to clean your cooler is to replace the empty bottle with a new one.
Wash your hands with soap. Disconnect the cooler from the power supply. Remove and thoroughly rinse the drip tray under running water using a small amount of dishwashing detergent. Wipe the cooler body with a damp soft cloth. Remove the empty bottle from the drip tip. Drain the cold and hot water from the tap into a pre-prepared container. Be careful to make sure the hot water has cooled down first. Open the water drain valve, which is located on the bottom or rear panel depending on the model of your device, remove any remaining water from the system and close it again. Unscrew and wash the faucets with a brush and dishwashing detergent. Rinse them thoroughly in running water. Put the taps in place: on the right - cold blue, on the left - hot red.
Prepare a solution for cleaning the cooler: dissolve 100 grams of citric acid in 5 liters of water. Use only clean containers to prepare the solution and stir the citric acid powder well. Turn the bottle receiver counterclockwise and remove it from the machine. Slowly pour the prepared citric acid solution into the cooler through the hole where the bottle receiver was located. Check that the tanks are full by placing a container and pressing the hot and cold water tap. A continuous stream indicates fullness. Add solution if necessary. The volume of tanks differs for different cooler models, so you may still have some solution left over. Connect the cooler to the power supply and set the hot water switch to the ON position. Wait until the water in the system heats up, the heating indicator should turn off and disconnect the device from the power supply. Leave for 5-6 hours to disinfect. Drain the solution from the system through the cold and hot water taps, and the remainder through the valve. Rinse the cooler with clean water; it is better to use bottled water rather than tap water. To do this, pour approximately 4 liters of water into the system and drain it as described above. It is better to repeat rinsing with clean water
Attention! Do not use the water that was used to flush the system. It may contain traces of disinfectant. Screw the bottle receiver into place and do not forget to close the valve to drain the water. Place the full bottle on the cooler. Connect to the mains. Wait for the water to heat up and cool down
The cooler is ready for use.
Cleaning the body
The external panels of the cooler are processed in the following sequence:
First wipe the body with a damp cloth or soft cloth
Detergent can be added for disinfection purposes. Wash the back wall, paying special attention to cleaning the grille. Remove cobwebs and dust. Wipe the body with a dry cloth. Install a new bottle on the cooler
Connect the dispenser to the power supply. Check heating and cooling of water.
If the device has not been cleaned for a long time, then you can use radical methods. To do this, manufacturers have released a number of special cleaning products that can be purchased at household chemical stores. You must study the instructions and act strictly according to them. Professional products can also be purchased for internal cleaning. It is prohibited to use gasoline, acetone, kerosene, or any powdered abrasives for cleaning work. Using them, you can easily damage the enamel on the surface of the dispenser. Do not heat the device before cleaning. Damage to the heating element and tank will occur.
How to descale a cooler
Sanitary treatment of coolers from scale is necessary for the following reasons:
- drinks develop a foreign, unpleasant odor and taste;
- the water begins to boil much more slowly than before;
- the energy consumption for operating the device increases;
- scale promotes the formation of corrosion;
- the dispenser may break down prematurely;
When using any detergents, pay attention to the instructions supplied with the device. Not every model can be treated with universal tools
However, descaling has steps common to all models. The step-by-step process looks like this:
- Disconnect the device from the network.
- Drain all liquid through the tap.
- Mix water with citric acid or vinegar.
- Pour the prepared solution into a container.
- Leave for 15 minutes.
- Start the process of heating the water and boil the liquid for 20 minutes.
- Leave the solution in the container for 5 hours.
- Drain the solution and pour clean water into the cooler for rinsing.
- After 15 minutes, repeat the rinsing procedure.
- Wipe the device elements.
- Plug in the cooler.
An important point: it is not always possible to clean the appliance from scale, especially when it has reached the fan. In order not to disrupt the operation of the device, sometimes it is better to seek help from professionals.
https://youtube.com/watch?v=XFd7_YsLXcs
Follow the rules:
If you wash the device regularly, severe contamination will be avoided; when it is not possible to clean the cooler with soapy water, you should purchase special household chemicals in stores (work only with gloves); important requirement: disassemble the device only if you are confident that you can assemble it; At home, it is better to wash the device using vinegar and lemon (you can find other tips on YouTube, but not all of them are safe for the device); Do not treat parts with acid to avoid damaging them; do not start cleaning a heated cooler, this can lead to damage to a number of parts; Before each bottle replacement, wipe the neck of the bottle receiver with alcohol-based wet wipes, and also clean the needle of the device element; Upon completion of washing the equipment, drain a certain amount of water to clear the paths of any detergent particles accidentally retained in them.
Proper and timely cleaning of the cooler helps to extend its service life and allows you to be confident in the purity of the water you use.
How to perform a hygiene procedure inside
Before washing the cooler, you will need to first prepare a cleaning device for this. To do this you need:
- De-energize the purification system.
- Remove the cooler bottle.
- Completely remove the liquid, this must be done as carefully as possible so that not a single drop remains.
- Disassemble the purification system into separate parts. Their composition and quantity may vary depending on the model of household appliance.
- If you have fasteners, you will need to arm yourself with a screwdriver.
Cleaning and disinfection from the inside
The first step in cleaning a household appliance at home is to carefully treat its external elements. First, you will need to place the cooler on a pre-prepared mat, then successively walk over the contaminated surface with a soft sponge with dishwashing gel. After external cleaning, you can begin washing the internal elements. To do this you will need to do the following:
- Wear protective rubber gloves.
- Dissolve fifteen grams of citric acid in a glass of clean warm water.
- Using the resulting active liquid, carefully walk through the internal elements with a stiff brush, trying to clean all the hidden corners. If this is difficult to do, you can use a regular toothbrush. For hygienic reasons, it must be new.
- Next, you will need to prepare a similar solution with citric acid, only in larger quantities to completely fill the water tank. After filling the container, you will need to connect the cooler to the power supply and wait ten to fifteen minutes. When the device heats up, stubborn contaminants will dissolve.
- If necessary, you can clean the interior surfaces several times.
It should be noted that instead of cleaning the cooler at home, you can clean it using specialized household chemicals, for example, CoolerClean or BIOR-1.
Descaling
If using the previous method did not help descale your household appliance, you will need to prepare a stronger cleaning agent. To do this, you will need to mix water with nine percent table vinegar in a ratio of five to one. To put the internal elements of the cooler in order, you need to do the following:
- Fill the tank with the resulting solution.
- Wait fifteen to twenty minutes for a more intense effect.
- Connect the device to the power supply and boil water.
- After a few hours, remove the liquid using both hot and cold water taps equally.
It is worth considering that if scale has spread to the fan, it will not be possible to clean the device at home.
Cleaning removable parts
All detachable elements of the cooler must also be thoroughly cleaned. This is quite easy to do. You just need to apply a little dishwashing gel, for example, Sorti or Fairy, onto a soft sponge, and carefully process all removable elements. Then rinse with clean water and wipe dry with a kitchen paper towel.
Rinsing
When the cooler has undergone the necessary treatment and is completely cleaned, you will need to get rid of the remnants of active cleaning agents. To do this you need to do the following:
- Fill the tank with clean water, not from the tap.
- Boil the poured liquid.
- Wait twenty to thirty minutes.
- Remove water using taps.
It is advisable to carry out a similar procedure three to four times to completely clean the cooler of any remaining chemical compounds. Otherwise, users of the purification system may experience serious health problems.
External cleaning
After the water has been completely drained from the device, you can begin the cleaning procedure. It is recommended to start by removing contaminants located on the outer surface.
To treat parts, you can use dishwashing detergents, soap and other solutions (for example, with the addition of iodine or ammonia), as well as special substances for cleaning the cooler.
It is recommended to use the following tools and additional equipment:
- waterproof mat;
- container for collecting water;
- soft brush or sponge for washing;
- a small brush for cleaning taps and pipes (can be replaced with a wire with cotton wool);
- dry lint-free cloth;
- latex gloves.
First of all, start cleaning the taps. They are dismantled and thoroughly washed outside and inside using special brushes.
Dismantling and cleaning the taps is one of the main stages of comprehensive device cleaning
The next step is to clean the receiver to collect residual liquid (drip tray). This is where a large number of microbes accumulate. Afterwards, the body is washed and the area where the bottle is attached is sanitized.
After the bottle receiver is removed, access to the tank will open, at the bottom of which there is a divider. It also needs to be dismantled and washed well, first with a soapy solution, then with clean water.
When all components are cleaned, the previously dismantled parts must be reassembled in reverse order. Then wipe the body again with a damp cloth, and so that there are no streaks left, wipe it with a dry one.
The video also demonstrates how to disassemble the device and sanitize it at home:
Technical characteristics of coolers
The leading characteristics by which dispensers are selected are as follows:
- Power spent on cooling and heating water;
- Heat treatment speed;
- Technology used in cooling;
- Maximum heating and cooling temperature (optimum: +40C for cold water and +980C for hot water);
- Availability of temperature controller;
- Method of installing a water tank;
- Device size;
- Filtration method (preferably multi-stage purification);
- Availability of a disinfecting ultraviolet lamp (important for children's institutions);
- Additional functions: automatic on/off timer, dosing, child lock.
How to clean the cooler in a computer. Step-by-step instruction
Disassembling the system unit
So let's get down to business.
- First, we need to disassemble the system unit; more precisely, we need to remove its side cover.
- To do this, turn the block towards you with its back side and use a “+” screwdriver to unscrew the 2 screws. Then press the lid and slide it forward.
- Next, we need to find out which of the coolers makes the biggest hum (noise), the one that is noisy and will be the most clogged. In order to find out which of them makes the most noise, turn on the computer and with the system unit lid open, listen to the hum of all the fans.
- After identifying the faulty cooler, so to speak, turn off the computer and disconnect the power cord from it.
As practice has proven, fan blades are most often susceptible to rapid clogging:
- video cards;
- power supply;
- processor.
Since we are not looking for easy ways, I will describe to you how to clean the power supply from dust and dirt.
Cleaning the power supply cooler
To do this we need to remove the power supply from the processor.
In order to put everything back together correctly, I recommend taking a few photos before removing the power supply and using them as a guide during assembly.
- We disconnect all the power supply wires from the motherboard, from the hard drives (hard drive), CD/DWD drives.
- Using a “+” screwdriver, unscrew the 4 screws on the back of the system unit, then carefully remove the power supply.
- Let's disassemble the power supply itself. Unscrew 4 screws.
- In the middle we see the cooler that we will clean.
- Unscrew the 4 screws that secure the cooler to the power supply case.
- Once unscrewed, use a vacuum cleaner to remove coarse dust from the blades and power supply board.
- Next, use a cotton swab to clean the fan blades. Also wipe with this swab or small brush all the elements of the power supply that you can reach. Such a brush can be made from any thin tube, for example, from a ballpoint pen, or from a lollipop and a thin fishing line that you can find.
And finally, lubricate the motor. On the cooler in the middle we see a round sticker; under it there is a fan axis and a bearing or bushing. In some coolers, after you remove the sticker, there is a round plug in the middle; you need to carefully remove it with a needle.
And only then will you see that very axis. Drop a drop of machine oil on this axis, then glue the sticker back on.
That's all. We cleaned the cooler without any difficulties.
We reassemble everything that has been disassembled in reverse order.
Be sure to read:
How to find out the wear level of a laptop or netbook battery?
How to run an ATX power supply without a computer?
What is the operating temperature of the processor?
How to properly assemble a computer from components yourself
What bearings are used on power supply fans?
Fans use different types of bearings with different mechanical life and noise levels. The characteristics of rotating units are tabulated in order of increasing cost (starting with the cheapest).
| Bearing design | Noise level | Resource, hours |
| Sliding (plastic bushing with anti-friction coating) | In good condition low, with wear it increases noticeably | Claimed to be up to 35,000, actually 10-15 thousand hours |
| Slides (with grooves on the bushing and axle through which lubricant circulates) | Short | Up to 30,000 hours |
| Self-lubricating slide (LDP) – sealed with recovery oil slot | In good condition - low | Declared – up to 160,000 |
| Sliding with polyoxymethylene (POM) - the shaft is coated with a special compound that reduces friction. | In good condition - low | Declared – up to 160,000 |
| Hydrodynamic (FDB) - a design of a sliding bearing in which the shaft rotates in a layer of lubricant. | Short | Stated - 80,000 hours, actually about 40,000 hours |
| Ball bearings - only radial design units are used in coolers | Relatively high, but due to the increased service life, partial wear occurs later, so the average noise level over the period of operation is not higher than that of plain bearings | Declared - up to 90,000 hours, actual - more than that of plain bearings. |
| Oil pressure control (SSO) – upgraded FDB with increased lubrication layer and magnetic alignment | Lowest | Claimed - up to 160,000 hours in fairly harsh conditions |
| Ceramic rolling bearing | Short | Up to 160,000 hours in harsh environments |
Ceramic ball-bearing.
Obviously, neither the resource nor the noise directly depends on the cost of the node. You can choose a cooler of a suitable price for specific purposes with the required characteristics.
Why do you need to clean?
Before you start cleaning, you need to understand the reasons for cleaning coolers.
Raid
The main reason for cleaning the tank is to prevent the formation of plaque, which negatively affects the quality of the water. It appears if you do not rinse or wash the water cooler for a long time. To avoid deposits, you need to rinse the device once a week.
Scale
Many models of water coolers are equipped with a heating element, which is responsible for heating the liquid. Over time, scale appears in it, which is formed due to exposure to hot temperatures. Due to scale, the taste of water deteriorates.
Bacteria outside
If you do not wash the cooler for a long time, a bacterial biofilm will appear on its contact surfaces and inside. It is very dangerous because it changes the composition of water and worsens its taste. Regular cleaning will help prevent bacteria from forming.
Algae spores in water
Sometimes a faint greenish coating may appear on the walls of the containers. It indicates the formation of algal spores in the water. This is a seasonal phenomenon, and therefore most often they appear from the beginning of May to the end of September, when solar activity increases.
About coolers and what happens in them
Many people have seen enough TV programs about coolers and what happens in them! So this is all due to our laziness and lack of self-respect, and the cooler is not so bad - five years ago they just cleaned it, and there were already bacteria in it. That's it! Because of this attitude, coolers begin to be cleaned when they no longer work, or work poorly, or the faucet is leaking, etc. In such cases, only professional chemistry will help, and sometimes complete disassembly of the cooler for washing in parts. Ozonation and cleaning with a citric acid solution is used only for regular cleaning of a cooler or a new device. Stale “grandfather” coolers from the “I don’t remember when I bought them” category do not lend themselves to such a childish decision.
How to clean a water cooler yourself with citric acid: instructions
By following all cleaning steps, you can wash the device efficiently and effectively. Today you can find a large number of tips on how to clean a water cooler yourself. All work consists of the following stages:
- Sanitary treatment of the body.
- Washing small parts.
- Carrying out disinfection of internal surfaces.
Before carrying out this procedure, you should thoroughly wash your hands with soap and treat them with an antiseptic solution. You can use medical gloves for cleaning.
When processing small parts, it is better to use two containers of water. You can put a soap solution in one basin, and boiled water in the other. All parts are washed according to the following scheme:
- The taps are carefully removed from the device. You should remember their location or make appropriate notes on the device. The removed parts are washed in a soapy solution or left in a container with a soapy solution for several hours. After this, you can clean all the grooves with a small brush. Clean taps are washed with running water, rinsed in a container with boiled water and dried.
- Start cleaning the drip tray. It looks like a tank with a grate and is located under the taps. It should be disassembled by separating the grille from the tray. They wash it in the same way as the taps and install it in place after drying.
- The bottle receptacle is pulled out by turning it counterclockwise. Clean it in the same way. Next they move on to the divider. It is a plastic circle with two holes, located at the bottom of the water tank.
The taps should be screwed back into place before washing the receiving tank. It is necessary to fill in special cleaning and disinfection products, for example, “BIOR1”. It can be purchased at any specialty store. For 125 g of substance, pour 5 liters of liquid. After dissolving the substance, the liquid is poured into the tank through the bottle hole and drained through taps and an additional valve.
The device must be turned on in heating mode and the solution must be heated, and then the device must be turned off. Leave the device with the solution in this state to complete disinfection.
After this time, it is necessary to drain the liquid from the tank, taps and valve. If the liquid is dark in color, the procedure should be repeated until a clear liquid is obtained when drained. Then the tank is filled with clean liquid and drained several times.
The device is dried and assembled. Place a new bottle of water in it and connect the device to the power supply. It is not recommended to drink the first two glasses of water from hot and cold taps. They need to be poured out and then take a new glass and taste the water. If there is a sour taste, rinse the device again.
What are the features of self-repair of a cooler?
There can be many reasons for the malfunction. There are often problems that can be eliminated quite quickly. Let's look into them.
The device is dirty
If dirt has accumulated in the cooler, it will stop working and will need to be cleaned .
- First, the device is disconnected from the power supply and the water bottle is removed.
- The surface of the cooler must be thoroughly rinsed using the usual detergents used to wash dishes. The work must be done carefully, especially in the place where the needle is located, onto which the liquid container is placed.
- Then they take the pallet. It is thoroughly washed and rinsed.
- All parts of the dispenser are wiped dry with a soft cloth.
Then all elements of the device are returned to their places. Fill the bottle with water and drain a little through the tap. This is necessary to flush the tap as there may be some detergent left in it.
The device does not heat water
Most often the cause of the malfunction is the following:
- The device is not connected to the electrical network.
- You didn’t click on the “turn on” button, which is located on the panel.
After performing the necessary operations, the indicator still does not light, check the outlet itself. This is easy to do: take any electrical appliance and connect it. If it does not start working, the reason is that the outlet itself is faulty: either replace it or plug the cooler into another outlet.
If the cooler does not start working in it, you will have to disassemble the equipment:
- We remove the panel located on the rear panel and check the functionality of the fuse. If necessary, insert a new element.
- Again nothing happened, which means the reason is the heating element. In this case, the malfunction can only be repaired at a service center.
There is no water in the cooler taps
There are only two reasons for this malfunction:
- When installing the bottle, they forgot to remove the label.
- During operation, a plug of air appears in the container, preventing the cooler from working efficiently. Eliminating the inoperative state of the installation is simple: pump the dispenser until air bubbles appear in the water container itself.
If owners operate the cooler correctly and follow the instructions, then, as a rule, such misunderstandings do not arise. In addition, you need to check the operation of the taps every time the water in the bottle is changed.
Water flows out on its own or the faucet is leaking
If you notice that water flows out of the dispenser spontaneously , check the safety of the container. Perhaps microcracks have appeared on it. You can eliminate this error yourself. To do this, remove the damaged bottle and replace it with a new plastic container.
If liquid is constantly leaking, dripping from the faucet, then you cannot solve the problem yourself: only specialists from the service center can remove this malfunction.
Why clean a household appliance and how often should it be done?
Manufacturers of water purification systems claim that during operation there is no need to frequently clean them at home. However, in reality everything turns out to be much more complicated. There are a number of factors that quite often lead to the need to clean the cooler:
- Penetration of pathogenic microorganisms into the system, which, at best, can cause an intestinal infection. Despite the apparent tightness of the filter, the simplest forms of life can easily get there.
- Due to the fact that modern devices provide the ability to heat water, it is not surprising that from time to time there is a need to descale the cooler.
- Since during operation people do not always touch the external elements of the cleaning system with clean hands, dirt can accidentally get into the purified liquid.
- Poor quality water sometimes contains protozoan algae cells that take root inside the apparatus and begin to actively multiply, covering its internal surfaces with a green coating.
Many users of household appliances are interested in how often the cooler should be cleaned. When using the device on an ongoing basis, you need to perform a hygiene procedure at least twice a year. However, to avoid problems in future use, experts recommend doing this twice as often. Additionally, there is a need to clean the cooler in the following situations:
- when switching to another brand of water;
- when pressure deteriorates;
- after a significant break in work;
- with even a barely noticeable deterioration in the taste of water from both cold and hot taps;
- when a yellowish sediment appears at the bottom of a mug of tea or coffee;
- upon completion of the repair.
Isn't it better to turn to specialists?
Cleaning a cooler yourself without special skills can be difficult and not always effective. Firstly, you may not clean the connecting pipes and internal tanks properly
Secondly, carelessness can damage the internal parts of the device. As a result, the cooler will leak or cool the liquid poorly.
Thirdly, some cooler models are assembled in such a way that it is impossible to open them at home without damaging the structural parts.
Therefore, it is better to realistically assess your strengths and decide whether you can do the cleaning yourself. The best option is to call service specialists.
Cleaning a water cooler: subtleties and nuances
Before you begin processing yourself, you must take into account that this procedure requires the allocation of free space and takes quite a lot of time. Therefore, it is necessary to prepare in advance a clean bowl for rinsing “trifles”, a soft lint-free cloth, a brush (or a clean toothbrush), and detergent (Mr. Muscle will do for a start). It is advisable to carry out this procedure in the intervals between replacing the container - this will reduce the likelihood of bacteria getting inside again.
The presence of foreign substances on structural elements leads to their coarsening and shortening their service life.
External sanitization
First of all, you need to disconnect the dispenser from the electrical network, then remove the bottle and drain the water. Since disassembling a water cooler with your own hands does not involve any particular difficulties, all external elements must be dismantled: the drip tray, decorative panels (if any), as well as the neck opening with a needle for water supply.
Bacteria, getting inside the bottle and settling on the walls of tubes and other elements, can cause serious harm to human health.
All external surfaces should be thoroughly wiped with a soap solution, to which you can add a little iodine or ammonia
In the latter case, it is advisable not to forget about precautions. It's not just the front that needs a thorough cleaning - the back and even the power cord also need a good cleaning.
Sanitizing any cooler is a mandatory event that must be carried out periodically with your own hands or with the involvement of professionals.
Cleaning the cooler: washing removable parts
All removed parts can be washed in a bowl of cleaning solution (or dishwashing detergent). In this case, before rinsing, it is necessary to thoroughly clean the resulting deposits and accumulated dirt. For hard-to-reach places, it is better to use a special brush or toothbrush.
Please remember that plastic parts must not be rubbed with scrapers or a metal sponge!
As an additional measure, you can spray the removed parts with a disinfectant solution and leave them there for 10-15 minutes. This procedure should be performed after primary processing. In most cases, washing a water cooler at home requires following a simple rule - it is better to put the cleaned parts separately.
After washing, they should be handled with rubber or disposable gloves.
Processing of internal parts
Deep cleaning of the dispenser is carried out using a previously prepared solution. For this purpose, both special products produced by industry and the usual ones can be used: vinegar or citric acid. Typically, cleaning a cooler is carried out in two stages:
- Disinfection and descaling. The prepared solution is poured into storage containers until they are completely filled. In this case, both taps are left open to remove air pockets and allow the cleaning liquid to fill all water supply channels and pipelines.
After this, you need to turn on the dispenser and wait until the heating indicator goes out. Then, at intervals of 10 minutes, you need to drain a glass of water, alternately from each tap. The drained water returns back to the cooler. The recommended duration of the entire procedure is about half an hour.
Washing. At this stage, you should thoroughly rinse all internal parts that came into contact with the solution. To do this, you need to carry out a final spill with four times the volume of a standard 19-liter bottle. Despite the fact that flushing a water cooler at home requires significant excess water consumption, it is prohibited to use city water supply as a source!
Basic preparatory work
This equipment should be cleaned at the same time that you change the water bottle. This is the simplest and fastest option. Before you start cleaning, you will need to unplug the cooler and wait until the water in the bottle cools down.
Next, you should drain the remaining water, and also prepare all the products that will be needed for high-quality cleaning:
- dishwashing detergent;
- ruff;
- a basin of water;
- gloves;
- napkins or paper towels.
To wash equipment at home, you will need to prepare a special solution consisting of 5 liters of water and 100 g of citric acid. What's next?
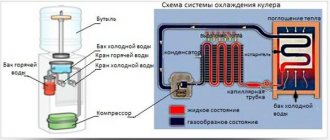
Diagram describing the operation of a flow cooler
In flow-through devices, water is taken not from bottles, but from a water supply. In this regard, such devices are equipped with a water filtration and purification system. It works in the same way as home filters installed under sinks in kitchens. If children drink water from flow coolers, then ultraviolet lamps are installed to treat it antiseptically. UV irradiation kills all microorganisms, incl. viruses.
Next, the internal structure of a tankless cooler is a water distribution system, which *consists* of a common *water tank*, followed by separate tanks for chilled and hot water.
The “cold” tank is located above the “hot” one, and between them there is a check valve that prevents the mixing of chilled and hot water. Both tanks are wrapped in thermal casings. Thanks to them, the temperature is maintained so effectively that without disassembling the water, the heater or cooler is turned on for a few seconds every half hour.
Flow coolers require disconnection from the electrical network if they are left unused for a long time.