The main task of the pump is to pump clean water into the tank before the washing process, and then pump dirty water back after washing.
Time will pass, for some it will take much longer, for others less, and the time will come to change the pump, because this element wears out, as it carries a large load.
In our article we will tell you and explain how to properly check the pump, how to get to it and, most importantly, how to carry out repair work yourself.
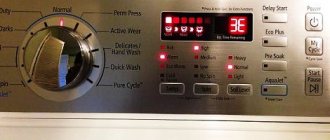
Signs of a broken washing machine pump
If problems arise with the pump, the machine may :
- do not respond to the installed program;
- make humming sounds when filling or draining water;
- pour water into the drum in less than the required quantity;
- During the process of collecting water, a complete shutdown of the equipment is possible.
To diagnose and, if necessary, repair or replace the machine pump, you need to:
- listen to how the machine works in order to identify extraneous sounds. If the machine makes a lot of noise when draining, it means there is water in the pump or some of its parts are deformed;
- open the socket to remove the blockage in the drain filter . All small and foreign objects are located here - hair, threads, buttons, seeds, etc.;
- clean the drain hose . Even if it doesn’t look damaged, you still need to remove it and wash it under hot water;
- check the operation of the impeller , it may be jammed. It is located behind the drain filter, which needs to be unscrewed and pulled out. The impeller blades will be visible and need to be rotated. The rotation should not be too easy. If there is any debris - bra knuckles, coins, threads and hair, it must be removed;
- check the integrity of the contacts and the functionality of the sensors going to the pump.
If during the diagnostic process the pump is identified as the cause of the problems in the washing machine, then you will have to inspect it. To get to it you will need standard tools.
Required Tools
Repairing the pump is simple, as it does not require many tools or special devices. Most often, three things are enough for dismantling and repair:
- Phillips screwdriver;
- sharp knife or chisel;
- electric voltmeter.
Pliers or pliers are useful as auxiliary tools to remove the clamps from the hoses.
Prepare a dry rag and bucket in advance . There will likely be a small amount of water in the pump that will spill onto the floor.
Causes of pump failure
- The pump broke down due to a malfunction of the engine, as a result of which there is no voltage to the pump.
- The seal (rubber or plastic) is damaged by scale and dirt that settles on the impeller.
- Incorrect connection of the pump or failure of the water level sensor causes the pump to constantly operate.
- The pump will not be able to drain water due to a clogged filter.
- Small foreign objects destroy the impeller. It's easy to diagnose. When the pump starts, the machine makes a hooting sound.
A little theory
A washing machine drain pump or pump is a mechanism that pumps water and detergent out of the tank. A special electric motor starts the pump. It can have a power from 30 to 120 W and a frequency of up to 3000 rpm. The pump takes part in almost all washing modes - this ensures water circulation in the machine and better removal of dirt from things.
Principle of operation. Draining dirty water occurs like this: water enters through a rubber pipe, which is connected to the tank and volute using special clamps. The liquid enters the pump through a special filter located in the volute - it protects the pump impeller from foreign objects. The water then comes out through a drain hose connected to the volute.
Where is the pump located
Models of washing machines Candy, LG, Whirpool, Ariston, Beko, Samsung are equipped with a pump located at the bottom. To get to it, the washing machine is laid on its side and the bottom panel is removed. The snail with the filter is attached with screws that can be unscrewed and the required part is in your hands.
If we talk about Zanussi and Electrolux models, their pump is located behind the back cover, which will need to be removed.
The most difficult models to disassemble are Bosch, AEG, Siemens. They will have to dismantle the entire front panel.
Replacing a faulty part
Remove the pump in the step-by-step sequence described above. Examine the pump in detail and determine whether a complete replacement of the washing machine pump is required or whether the snail can be left.
Before installing the pump, it is necessary to clean the volute and the pump mounting area from dirt. Then the pump is screwed on and the pipes are connected.
A new pump is selected based on the following indicators:
- Mounting method: bolts or snaps.
- The location of the contacts is front or rear.
- Connection to the network - with terminals or chips.
- Power – from 19 to 20 W.
DIY washing machine pump repair
Under heavy loads, the pump is protected by fuses that are located on the winding of the part and are switched off. When the temperature normalizes, the contacts are restored.
First you need to disconnect the pump from the cochlea . In general, there are two types of fastening: simply with screws and without screws (you only need to turn the pump counterclockwise). At this stage, you can find out whether the impeller rotates on the shaft. Normally, it should spin with small delays, so-called jumps. This is due to the action of a magnet rotating in a coil. If it is difficult to turn and there is no debris, then you will have to completely disassemble the part and see if it is possible to repair the washing machine pump impeller.
The motor housing has a latch on both sides that needs to be unhooked with a screwdriver. This is if your car has a collapsible motor, but there are non-separable types. At first glance it is impossible to make out, but if you know some of the nuances, you can.
Don't forget to take care of your machine
Cleaning the pump can be avoided if you properly care for the equipment. The bulk of the garbage ends up in the washing machine due to the fault of the “owner”, so it is better to reconsider your attitude towards washing. So, the following recommendations will help avoid blockages:
- use detergents marked “for vending machines”;
- remove strong stains on hands;
- wash clothes with decor in special bags;
- organize an incoming filtration system;
- Clean the dust filter regularly.
If you have dogs and cats at home, it is recommended to clean your washing machine every month. In other cases, cleaning once every six months is sufficient.
How to prevent pump failure
If you follow these recommendations, you can significantly extend the life of the drain pump.
- Always remove foreign objects from pockets before washing.
- Use bags for washing clothes.
- In case of strong, coarse dirt, clean things, and also remove animal hair by hand before entering the machine.
- Install filters at the inlet of the filler pipe.
- Carry out scale prevention.
- When washing items with buckles or rivets, turn the items inside out.
The washing machine collects and drains water thanks to the most important element - the pump. With prolonged use, it can fail (physical wear), which is quite common, which is why the pump is considered the weak point of modern washing machines.
Operating rules
In order to operate the washing machine for as long as possible without repairing (replacing) the drain pump, you must follow certain rules:
- When connecting yourself, carefully ensure that the end of the drain hose is located at least 50 cm from the floor.
- Heavily soiled clothes (especially those with traces of soil) are soaked for some time in a warm soapy solution before loading into the drum.
- Before each wash, carefully inspect and clean the pockets of small debris and small objects.
- To prevent scale build-up on the inner walls of the drain pipes, add a special agent that softens hard tap water along with the washing powder.
Compliance with basic operating rules guarantees up to ten years of uninterrupted operation of the drain pump.
Signs of a broken washing machine pump
If problems arise with the pump, the machine may :
- do not respond to the installed program;
- make humming sounds when filling or draining water;
- pour water into the drum in less than the required quantity;
- During the process of collecting water, a complete shutdown of the equipment is possible.
To diagnose and, if necessary, repair or replace the machine pump, you need to:
- listen to how the machine works in order to identify extraneous sounds. If the machine makes a lot of noise when draining, it means there is water in the pump or some of its parts are deformed;
- open the socket to remove the blockage in the drain filter . All small and foreign objects are located here - hair, threads, buttons, seeds, etc.;
- clean the drain hose . Even if it doesn’t look damaged, you still need to remove it and wash it under hot water;
- check the operation of the impeller , it may be jammed. It is located behind the drain filter, which needs to be unscrewed and pulled out. The impeller blades will be visible and need to be rotated. The rotation should not be too easy. If there is any debris - bra knuckles, coins, threads and hair, it must be removed;
- check the integrity of the contacts and the functionality of the sensors going to the pump.
If during the diagnostic process the pump is identified as the cause of the problems in the washing machine, then you will have to inspect it. To get to it you will need standard tools.
Preparing for work
You need to prepare to disassemble the Bosch washing machine. This is done so that in the process of performing basic work, you do not have to be distracted by searching for tools and other little things.
Actions that are performed at the preparatory stage:
- Clear the area where the equipment will be dismantled. It is inconvenient to do this in the bathroom. It is better to take the machine out into an open space with good lighting.
- Cover the floor with cardboard or thick film. This will protect the coating from debris and scratches.
- Prepare boxes for bolts. It is better to label each of them so as not to mix up the screws.
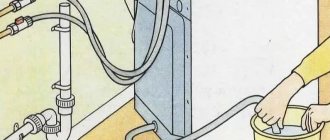
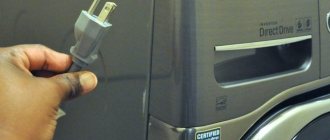
- Disconnect the device from all communications, remove the drain hose from the drain, and turn off the power to the device.
- Prepare a phone that is convenient for filming the disassembly process. Subsequently, the photographs taken will allow you to quickly and accurately assemble the washing machine.
- Prepare a container to drain any remaining water from the emergency hose. Rags to collect liquid will not be superfluous.
Minimum set of tools:
- a set of screwdrivers or a screwdriver with different attachments;
- hammer;
- pliers;
- socket and open-end wrenches;
- lubricant, for example, VD-40 - it will be needed if parts or bolts are rusty.
When all the tools are prepared, you can proceed to the main stage.
Causes of pump failure
- The pump broke down due to a malfunction of the engine, as a result of which there is no voltage to the pump.
- The seal (rubber or plastic) is damaged by scale and dirt that settles on the impeller.
- Incorrect connection of the pump or failure of the water level sensor causes the pump to constantly operate.
- The pump will not be able to drain water due to a clogged filter.
- Small foreign objects destroy the impeller. It's easy to diagnose. When the pump starts, the machine makes a hooting sound.
Diagnostics
Most modern models of Bosch washing machines, for example the Maxx 5-6-7 series, are equipped with a self-diagnosis system, which greatly simplifies the identification of faults. In order to establish the nature of the breakdown, it is not necessary to contact the service center; it is enough to perform a few manipulations, and your machine itself will “tell” what the problem is. So, let's start performing the service test:
- Close the sunroof, move the program selector to the “Off” position.
- Pause for 2-3 seconds, move the switch to “Spin” (clockwise).
- When the Start LED flashes, press and hold the Mode Speed button. Watch "Start" - it should start flashing again.
- Turn the switch to "Drain" (clockwise).
- Release “Revolution Mode” (you didn’t forget to hold this position, did you?).
- Next, put the switch in the position corresponding to testing any component of the washing machine (3 – motor, 4 – drain pump, 5 – tubular electric heater (TEH), 8 – main wash water inlet valve, 14, 15 – quick automatic test). Below is a diagram of the switch and the location of the numbers that correspond to the position of its handle.
Here is a schematic image of the switch and an explanation of the positions of its handle.
Some models differ in the numbering of commands: for example, in the Bosch Logixx 8 washing machine, the motor is checked in the 4th position (by the way, in this washing machine you can carry out quick diagnostics by setting the switch to number 3). When the test is completed, an error code will appear on the display, which the instructions will help you decipher. In older models without a display, the error can be recognized by the glow of the LEDs, after which you can begin to repair the Bosch washing machine.
The photo shows the control panel of the Bosch Logixx 8 washing machine; Diagnostics of breakdowns in it is carried out according to the Bosch Maxx principle, only the numbering of commands is slightly different
It is somewhat more difficult for owners of older generation models - they will have to determine the breakdown based on its symptoms.
Signs of malfunctions and their causes
Devices from earlier years, for example Bosch WFT 2830 or Bosch WFF 1201, cannot independently diagnose problems, so the user will have to do this based on their characteristic symptoms:
- Water is collected slowly or not at all. This occurs due to the accumulation of debris in the inlet filter or a malfunction of the fill valve. The culprit of the breakdown may also be the water level sensor - pressure switch;
- water does not drain well. The problem most often lies in a clogged drain filter, failure of the drain pump or pressure switch;
- the water does not heat up. The heating element is almost always to blame for this. The heating element burns out for two reasons - natural wear or scale formation. Sometimes there is no heating due to problems with the control board or a malfunction of the temperature sensor;
- The drum does not spin. A belt drive transmits torque from the engine to the drum. If the belt falls off or breaks, the drum will not move. A more serious option is engine failure;
- loud noise during spin cycle. The reason usually lies in the destruction of the bearings.
In the photo Bosch Maxx 4 WFC 2060 is a model equipped with a self-diagnosis function
Any of the listed problems can be caused by a failure of the control module (electronic controller). Unfortunately, it is very difficult to repair this unit yourself; it is better not to try. Contact a service that provides repair services for Bosch washing machines at home. Specialists will resolder the board or replace it with a new one.
DIY washing machine pump repair
Under heavy loads, the pump is protected by fuses that are located on the winding of the part and are switched off. When the temperature normalizes, the contacts are restored.
First you need to disconnect the pump from the cochlea . In general, there are two types of fastening: simply with screws and without screws (you only need to turn the pump counterclockwise). At this stage, you can find out whether the impeller rotates on the shaft. Normally, it should spin with small delays, so-called jumps. This is due to the action of a magnet rotating in a coil. If it is difficult to turn and there is no debris, then you will have to completely disassemble the part and see if it is possible to repair the washing machine pump impeller.
The motor housing has a latch on both sides that needs to be unhooked with a screwdriver. This is if your car has a collapsible motor, but there are non-separable types. At first glance it is impossible to make out, but if you know some of the nuances, you can.
A construction hairdryer will help, with which you need to warm up the long part of the part, the so-called shank low temperature. After heating the shank, the crosspiece with the magnet is removed from the housing. Usually dirt accumulates on the magnet and in the place where it was pulled out. After cleaning, the magnet itself is removed. Next you will see the bearing, which is also cleaned and lubricated. After these procedures, the part is reassembled. There is a ring under the blades that should fit tightly into place. The seal may need to be replaced.
Bearing wear
Because of this, friction appears between the volute and the impeller, which causes problems and repairs of washing equipment pumps. The problem can be solved by replacing the bearings. In an emergency, when it is not possible to buy a new part, and washing cannot wait, only shortening the blade by no more than 2 mm will save you. This is done with a sharp knife.
After repair, the housing is installed in the coil and fixed. This concludes troubleshooting the pump on your own.
What kind of lubricant
First of all, you need to decide on the material. Experts recommend not combining different types, but using one lubricant for all parts. Don't rush into the store - read the specifications carefully.
Properties of lubricant for washing machines:
- moisture resistance,
- high viscosity,
- heat resistance (some machines have a boiling mode, which means the lubricant should keep 90-100 degrees Celsius),
- neutrality.
The last factor is of great importance, especially when it comes to bearings. It is closed by a rubber gasket - an oil seal. Aggressive lubricant will turn it into an inelastic disc or into a loose substance. Such a seal will not protect the bearing, water will get inside, oxidation will begin, and, most likely, the part will break and will have to be replaced with a new one.
WD-40 is usually used to remove rust, salt deposits (lime) and dirt. This is the most popular household product today, and it does its job quite well. An additional plus is the thin proboscis on the sprayer, which delivers the cleaner more accurately.
TOP 5 lubricants for washing machines:
- Amplifon.
- Anderol.
- Staburags NBU 12.
- Liqui Moly "Silicon-Fett".
- Huskey Lube-O-Seal PTFE Grease.
These brands are used in workshops and service centers and are convenient for use independently. Liqui is the most expensive, which pays off with high quality and ideal compatibility with all types of oil seals. Anderol is directly indicated in the instructions for Indesit machines as recommended.
How to prevent pump failure
If you follow these recommendations, you can significantly extend the life of the drain pump.
- Always remove foreign objects from pockets before washing.
- Use bags for washing clothes.
- In case of strong, coarse dirt, clean things, and also remove animal hair by hand before entering the machine.
- Install filters at the inlet of the filler pipe.
- Carry out scale prevention.
- When washing items with buckles or rivets, turn the items inside out.
It is quite possible to repair the drain pump of your washing machine yourself without calling a technician. But first you will need to carry out simple diagnostics of the device.
Why is there no water draining?
Draining contaminated water after the main stage of washing or rinsing proceeds in this way: water from the drum through the outlet pipe under the action of the exhaust pump impeller enters the outlet filter (the part is needed to prevent large fragments that appeared during the washing process from entering the hose - torn buttons, coins from pockets). After passing through the filter, the water flows through the drain hose into the sewer. The drain pump is controlled by an electronic board.
Thus, water may not drain due to malfunction of various elements:
- drain hose;
- exhaust filter:
- pump impellers;
- pump motor;
- exhaust pipe.
- electronic board.
The causes of failure can manifest themselves in different ways, for example:
- the draining stage is slower than usual, and washing programs may fail;
- the program stops execution at the moment of draining;
- the malfunction occurs periodically - with some washes it ends successfully;
- When the pump is running, the water does not drain.
Signs of a broken washing machine pump
If the machine is not operating correctly, before disassembling the drain system, you need to make sure that the fault is located in this exact location. It can be determined by several characteristics:
- The water drainage program has turned on, but the pumping system does not work;
- during draining, strong noises and buzzing are heard;
- water is pumped out, but flows out very slowly;
- during system operation, the machine may turn off;
- The pump motor hums, but no water comes out.
If one of these breakdowns is detected, we can say with a high degree of probability that the washing machine pump will have to be repaired.
We remove what we usually use to manage
Now things are back to normal again. At the third stage, we dismantle the control panel - the part where all the buttons, indicators and display are located
It is important to be careful not to yank the control panel too much from side to side: we don’t want to just disassemble the washing machine and forget about it
Our goal is to return the assistant of German origin to her ability to work. But before removing the control panel, you need to remove the detergent tray - in Bosch washing machines, the screw holding the panel is hidden behind it. Only after all the screws have been removed can you try to lift the control panel with a slight movement.
Again, everything must be done carefully so as not to damage the wires and contacts. If the panel gives way, then it is enough to hang it on a special hook built into the side of the washing machine for such cases and forget about it until assembly
In general, you can also disconnect the control panel from all communications, but this is usually only required if the fault affects the control panel itself. There are plenty of detailed instructions on how to disable the control panel on the Internet.
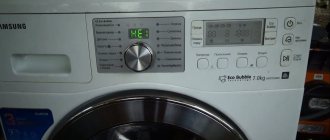
Where is the pump located
To remove the pumping system from the body of an automatic washing machine (WMA), there are different methods, depending on the model of the unit. Models from Whirpool, Samsung, Ariston, Beko, LG, and others do not have a bottom. Accordingly, you can remove the pump by tilting or laying the device on its side and disconnecting the bottom panel (open the door or hatch). After which you will see the screws that secure the volute with filter to the front plate.
Everything is very simple in SMA Electrolux and Zanussi. Just open the back cover of the machine and you will see the required unit that needs to be disassembled. The most difficult access to the required part is in SMA AEG, Bosch and Siemens. You can get to the pump only by removing the front wall of the washing machine.
Algorithm
Modern washing machines are disassembled according to one principle. The main difference is in the design of the tank. For example, LG has a collapsible one. Similar ones are installed in Electrolux, AEG, Samsung. To remove the drum, you need to release the mounting screws.
Cars like "Ariston" or "Indesit" have a solid tank. Replacing the entire structure is quite expensive, so experienced craftsmen use several tricks that allow them to replace or lubricate bearings and other parts without updating the entire tank.
- First of all, you need to open the door slightly and unplug the machine.
- The easiest way to replace pumps in modern devices. They are located at the bottom of the machine and are accessible through the bottom. Therefore, the first thing to do is to put the car on its side or tilt it back and rest it against the wall.
- Remove the front lower panel.
- In many models, shock absorbers and other elements are attached to the bottom. If inspection and repair of defenders is not necessary, it is better not to touch such a bottom, but to remove the face shield. To do this, remove the powder tray (it is secured with self-tapping screws and the water supply valve).
- Remove the control panel.
- Unscrew the screws of the front shield.
- Using a screwdriver, carefully pry off the clamp that holds the cuff, so as not to damage the rubber, and remove it.
- Press the cuff inside the drum and remove the panel.
- Disconnect the wires and set the shield aside.
- Now you can easily disconnect the pump. The most common breakdown in this unit is a blockage or a hole in the pipe (which causes water to leak under the machine) and wear of the armature/motor (which causes vibration when spinning and draining water).
- Clean the pipe and filter from accumulated debris.
- If there is a gap or defect in the motor, replace the pump parts.
After the first stage, access to the shock absorbers/defenders opens. The simplest case is grease abrasion. To restore it, you need to unscrew the parts, extend the rod as much as possible, apply a thick, high-temperature, wear-resistant lubricant to its base and fold and unfold the mechanism several times.
After 10 years of operation, most often the depreciation fails completely. The drum begins to “beat” and make noise during the spin cycle, the machine begins to vibrate and “jump,” and leaks are possible. In such cases, experts recommend replacing the shock absorbers.
Life hack Home craftsmen have found a way to restore defenders and shock absorbers. To do this, you need to remove the rod, as well as the sealing ring-locker. Pour out the “dust” of the gasket and replace it with a piece of leather belt, 2-3 mm thick and approximately 21 mm wide. The section is inserted into the defender body as a ring, with the smooth side facing the body. Next, the gasket together with the rod is treated with a wear-resistant and necessarily viscous lubricant. Machine oil will quickly drain and wear out; such repairs will only last for a couple of months.
Second phase:
- Remove the back panel.
- Remove the weight - the layer that lies on top of the tank.
- Next, remove the clamp that transmits rotation to the tank.
- Using a small screwdriver, press the tabs on the plugs to disconnect the wires from the heating element, tank and motor.
- Unscrew and set aside the motor.
- Disconnect the heating element and water sensors.
- Loosen the fasteners of the tank itself and carefully remove it.
- Remove remaining weight.
Disassembling the washing machine pump
To disassemble the pump for troubleshooting, first disconnect it from the volute. To do this you will need to unscrew the screws.
Some pump models have a different attachment to the volute. Just turn it counterclockwise and it will come off.
The next troubleshooting step is to check the impeller. Although you can see it without disassembling the entire structure: just pull out the drain filter. It is possible to visually determine whether it is broken or not. But you won’t be able to find out whether it rotates on the shaft or is fixed without complete disassembly.
The picture below shows a broken impeller due to an ordinary coin getting into the system.
The impeller should not rotate easily. Normally, it rotates with some delays (jumps) due to the magnet rotating in the coil.
If rotation is difficult, and there is no visible interference in the form of various debris, then you will have to completely disassemble the pump.
Pulling off the broken impeller
The second step is to remove the plastic impeller. In order to install a new one instead of a broken plastic one, you must act strictly according to the instructions. The algorithm is like this:
- cut off part of the plastic from the tip of the impeller (use a hacksaw);
- pull out the base along with the blades from the pump;
- fix the dismantled base in a vice;
- take two slotted screwdrivers;
- Place the screwdrivers on the bottom of the screw and press the impeller several times, moving from bottom to top.
You cannot put excessive pressure on the plastic - you need to gradually move the impeller up. As a result, its base will “fly off” from the fasteners and expose the shaft, which spins the entire system. The main thing is not to overdo it, otherwise you can break the threads on the axle and make further repairs useless.
Use WD-40 cleaner to remove stuck and rusted parts.
The next step is to remove the rod shaft from the pump. The vice is unscrewed from the tabletop, turned over and installed with the clamps down. The pump is fixed in them, or rather, its dismantled axis. Further instructions look like this:
- take a screwdriver commensurate with the diameter of the shaft seat;
- insert a screwdriver into the hole mentioned;
- tap the rod with a hammer (with light but increasing blows).
After tapping, the shaft will remain clamped in a vice, and the rest of the structure can be taken apart without difficulty. But there is no need to rush to replace the impeller and reassemble it. First, it is recommended to carefully inspect the pump, clean it of debris and scale. Let's immediately pay attention to the axial rubber. As a rule, due to the rotation of the blades, it is greatly abraded. If the damage to the cuff is severe, it should be replaced.
Cleaning internal contaminants
To do this, use a screwdriver to pry the latch on the motor body on both sides and remove it from the reel.
There are also so-called “non-separable” motors, but they can also be “treated”.
After disconnecting the body with the blades from the coil, we will see a monolithic part. The crosspiece seems impossible to remove. But there is a little trick.
- Take a regular hair dryer, set it to the lowest temperature, put on gloves, and start heating the shank of the part (its long part). Do this with care.
- After a while, when the shank has warmed up well, pry up the crosspiece with a screwdriver and carefully remove it (along with the magnet) from the body.
There may be a lot of dirt on the magnet and in the area from which it was removed. Everything needs to be thoroughly cleaned, after which you can remove the magnet itself from the shaft. You will see a bearing that requires cleaning and lubrication, respectively. Also lubricate the bearing on the bottom of the housing.
Then insert everything into place, with slight pressure until it clicks. The O-ring located under the blades should fit tightly into place.
The figure below shows a dirty motor from an Indesit brand machine.
In motors of this type, in addition to the above procedures, it may be necessary to replace the seals.
What are the requirements?
Sunflower or other household oil is not suitable here. The substance used to lubricate the sealing ring has special requirements.
- High moisture resistance. Otherwise it will quickly wash out.
- No aggression towards rubber - it should not corrode or soften. By choosing the wrong substance, you will shorten the life of the seal.
- Heat resistance. Due to the friction of the shaft and the operation of the bearing unit, the rubber heats up. Hot water should also not affect the properties of the sealing element.
- Sufficient thickness. Liquid consistency is not suitable - it will leak out after some time.
Source of the article: https://skolkogramm.ru/info/chem-smazat-pompu-stiralnoj-mashiny
The reason is the bearings
Contamination is not the only reason for device malfunction. When the bearings fail, runout occurs during shaft rotation. Due to the beating, the impeller begins to rub against the volute casing. This causes noise and unproductive operation of the pump, up to a complete stop.
This problem can be solved by replacing ball bearings, which can be purchased at specialized retail outlets or at a household appliance service center.
If at the moment it is not possible to buy a new part, and washing cannot wait, then you can temporarily extend the life of the pump by shortening the blades by 2 millimeters with a sharp knife. But don't overdo it: if you cut more, the system's performance will drop.
After cleaning, replacing bearings or seals, the motor repair can be considered complete. Install the body with the blades into the reel and secure with latches. Subject to safety rules, connect 220 V voltage to two contacts and check the operation of the device. After making sure that the device is operating normally, you can connect the cochlea and return the entire structure to the SMA body.
As you can see, repairing a washing machine pump with your own hands is not such an impossible task and can be done by anyone who carefully reads these recommendations.
Is the impeller really damaged?
If there are problems with drainage, it is irrational to immediately begin dismantling the impeller. Damage to the propeller is a rare breakdown; more often the blades are blocked by debris, or the entire drainage unit fails. It is better not to rush into repairs, but first diagnose the drain system. Then it will become clear where the failure occurred and whether the pump requires inspection.
If the LG washing machine does not pump out water, then you need to pay attention to the following points:
- listen to how the drain works (whether it makes an intermittent noise or hums evenly);
- check the garbage filter for blockages (perhaps it is clogged and does not allow water to flow into the sewer);
- feel the drain hose (if it is squashed or clogged, it will require cleaning);
- turn the impeller by hand (it is important to make sure that it is not slowed down by hair or debris);
- assess the condition of the sensors and wires connected to the pump (are there any burnt out or loose contacts).
A broken impeller is not a reason to replace the entire pump. If desired, you can replace the plastic separately. The main thing is to make sure that the part is broken and follow safety precautions.