Any modern washing machine has a pull-out compartment for powder and auxiliary liquid products (rinse aid, fragrances). Their inner walls and moving parts are reliably sealed before washing, but sometimes leaks still occur. Why is this happening? What should I do if the powder compartment is constantly leaking?
If you notice that the powder tray of your washing machine is leaking, then it’s time to contact a service center that repairs washing machines of any complexity in Moscow at the client’s home. Guarantee for all types of repair services for any models: Samsung, LG, Candy, Zanussi, Ardo, Indesit, Ariston, Whirlpool, Bosch and many others. We work daily from 7:00 to 23:00, without weekends and holidays. You can submit a repair request by phone or online.
Do-it-yourself repairs or call a professional?
The simplest inspection of the powder receiver tray can be carried out independently, without calling a specialist.
But if you need to disassemble the washing machine, but there is no time or opportunity to carry out repairs, you can turn to a specialist for help. You can find a specialist in companies that repair washing household appliances. Such companies are widely represented on the Internet. Contacting a company that has been providing repair services for years allows you to receive quality service.
The cost of work depends on the complexity. If repairs are also required to adjacent units, the service fee will be higher.
The average prices in the capital are as follows:
- replacement of the inlet hose – from 1,200 rubles;
- pipe replacement/repair – from 2,000 rubles;
- replacement of detergent dispenser – from 1,200 rubles, etc.
The final cost is determined after diagnosis. The cost of parts that require replacement will be additionally paid. After the repair, the technician issues a warranty and tests the operation of the washing machine.
Original equipment in the Electrolux branded online store
You are in the Electrolux branded household appliances store. All offers in our catalog are 100% original and have certificates of conformity. Washing machines are covered by a 12-month manufacturer's warranty. You can order a smart washing machine with home delivery to any region of Russia, and also use our showrooms in Moscow and St. Petersburg. In the catalog of our store you will find a large number of different filters that will allow you to choose the most suitable solution. Both front-facing and vertical machines are available, devices with different drum volumes, as well as special models for small areas. If necessary, our specialists will provide you with free consultation on any issue via telephone conversation or online chat.
What to do if a leak is detected?
If you find a puddle under the washing machine, you should act quickly - without waiting for the end of the washing process. The algorithm of actions includes the following main stages:
- You need to turn off the power to the device as quickly as possible. To do this, remove the plug from the socket. This must be done without stepping into a puddle of water. If you can’t reach the plug, you will have to turn off the power to the entire apartment.
- After the washing machine is de-energized and the plug is removed from the socket, it is necessary to turn off the water supply tap to the appliance. If you cannot use it, you need to turn off the tap at the cold water inlet to the apartment.
- Place rags on the floor around the machine and try to collect all the water.
- If there is still water in the washing machine, you should use the emergency drain. Access to it is from the front side.
If possible, you should determine at what point in the wash program the water began to flow out. This information can help you find the source of the problem.
Initial actions
If you notice problems with the flow of water into the tank, you need to act. If the car was purchased less than a year ago and it is still under warranty, then there is only one answer to the question “what to do” - contact the service center with a receipt and a warranty card. You should not open the case yourself and try to fix the problem.
Older machine owners will have to go a different route and pay for repairs out of their own pockets. Doing it yourself will be cheaper, but will require more time and effort. First, you need to establish the “sore spot” of the washing machine, so we sequentially check the above-mentioned parts of the system, moving from simple to complex.
At the start, if you notice a missing set and a barely audible buzzing sound, you should do the following:
- check if the water supply tap is closed;
- the open tap must be turned off;
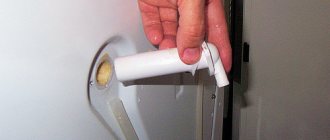
- disconnect the inlet hose from the washing machine by lowering the end into a specially prepared container;
- test the inlet hose, eliminating possible kinks and blockages.
If after successfully carried out “first aid” there is no result, pay attention to the filler hose filter. More precisely, on the filter installed in it - a fine metal mesh. It often gets clogged with scale and small debris.
It often becomes clogged with scale and small debris.
- Disconnect the hose from the body.
- Inspect the internal mechanism of the valve and find the mesh.
- Take the pliers and grab the special protrusion on the filter with them.
- Pull out the mesh (without twisting).
- Clean the filter with a needle or strong water pressure.
- Return the part to its place.
Next comes the coarse filter. As a rule, this mesh is placed after the tap and also suffers greatly from scale. But here the cleaning scheme is different: we take two wrenches and, holding the joint with one, unscrew the bolt with the second. First you need to place a container under the pipe and release water with strong pressure. The flow will clean out the dirt, and all that remains is to return the nut to its place.
Prevention measures
To avoid the problem of leakage from the powder tray, it is advisable to remember the following preventive measures:
- The washing machine must be installed according to the rules, using a building level tool.
- The powder tray must be washed periodically to avoid clogging.
- The powder receptacle should be protected from children's pranks.
- For washing, only special products intended for automatic washing machines should be used. You cannot pour, for example, soap shavings into the cuvette. This can not only lead to clogging and leakage of water from the tray, but will also lead to other, more serious damage.
Common causes of Samsung washing machines leaking
As for another South Korean company, in this case there are slightly more reasons for leaks on the floor. Firstly, on several forums, owners of equipment from this manufacturer complain about the insufficient quality of the inlet hose, in particular, the fastening element that directly connects the hose and the device itself.
Secondly, for some reason, in Samsung washing machines, the device that controls the level of liquid poured into the dispenser - pressotate - often fails. Being one of the main indicators of the processes occurring in the machine, the pressotate, if it breaks, can cause a huge number of troubles:
- The system collects an excess amount of water, as a result of which it can spill out through the hopper and dispenser;
- Incorrect determination of the amount of water in the working space may result in its not being removed, and a new fill with the machine loaded to the top can squeeze out the “extra” water through the sealing collar.
Finally, a leak may simply be caused by poor assembly. As practice shows, the quality of execution of the same model very much depends on a specific plant: for example, a plant in China supplies the market with devices that are better assembled than the plant in Kaluga, from which goods began to be supplied to Europe only in 2016.
Why did the leak occur?
After turning off communications and draining the water from the LG machine, you can proceed to diagnostics. A puddle on the floor does not always indicate serious problems, and in some situations it is not even related to the device itself.
It is recommended to inspect all water supply communications in the premises and the sewage system. Water on the floor may be due to leaks that are not related to the washing machine. If the source of leakage is determined visually, solving the problem is easier than when water simply appears under the washer.
The following events can lead to a puddle of leakage from below:
- clogged or unusable filter;
- pump breakdown;
- tank damage;
- wear or poor fastening of the pipes inside the machine;
- damage to the rubber of the hatch;
- Leaking hoses at the entrance to the washing machine.
After carrying out urgent measures, you should inspect the communications, and only after that proceed to diagnosing the washing machine.
Violation of the integrity of one of the hoses
During operation, this part often loses its quality, and over time, leaks may form in it. For diagnosis, you can use a simple method: wrap the hose with toilet paper. If it becomes wet in a certain place, then we can safely conclude that there is a leak there. If depressurization is detected at the junction of the hose and the housing, then first of all it is necessary to replace the gasket.
The device has two hoses: inlet and drain. If water appears on the floor when filling the tank, the first option is damaged; if the washing machine leaks from below during the spin cycle, the second option is damaged.
If the diagnostic result is a violation of the integrity of one of the hoses, then it is easy to solve the problem at home, without calling a technician.
If a small hole is found on the hose, it can be patched with high-quality rubber material using glue that can withstand moisture. For the first time, you can safely use ordinary wide electrical tape. However, this is an exclusively forced temporary measure. Most experts argue that the optimal solution to the problem is to replace the hose with a high-quality analogue, rather than repair it. In addition, the cost of such an element is inexpensive, and the new hose will ensure uninterrupted operation of the technical device.
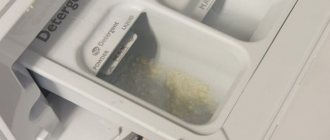
We look at the powder receptacle
If after the next wash you find that there is water below, and on the left side of the machine body, inspect the detergent dispenser. Checking the cuvette is very simple - it is easy to remove from the body, the procedure does not take much time. The powder receptacle often leaks due to defects made by the manufacturer, as well as due to mechanical damage that occurs during cleaning of the tray, from falls or impacts. Things to remember:
- have you recently dropped the powder container, for example, when cleaning it after another wash;
- whether the cuvette was soaked in aggressive household chemicals;
- did you rub the surface of the tray with a hard brush or try to scrape off the plaque with a sharp object?
If the answer to at least one question is “yes,” then remove the powder receptacle and carefully inspect it for cracks. Fill the tray sections with water and see if it flows out the bottom. If the powder compartment leaks, then there is nothing left to do but purchase and install a new dispenser.
Problems with the door lock or hinges
In rare cases, water runs out of the washing machine door due to a manufacturing defect or careless use of the unit. The root cause of a hatch leak may be a deformed machine hinge. That is, the hinge mount was slightly bent, and it was this malfunction that caused the door to not close tightly. And a leaky connection between the hatch and the body, as we already understood, will inevitably lead to leakage.
When this is the case, fixing the situation is not difficult. The solution is to replace the loop with a new one. Especially savvy owners can try to determine where the deformation occurred and try to straighten the surface without resorting to replacing the part. To change the fastening you need to prepare two screwdrivers (Phillips and slotted) and an open-end wrench.
Also, the SMA can leak due to a malfunction of the lock blocking the door. The reason for the failure of the lock fastening will be purely individual, it all depends on the brand and model of your washing machine. In some cases, this is caused by a burst spring, in others by a torn gasket, causing an increase in play. It is better to entrust the search and elimination of the cause of the malfunction to a professional, so as not to waste a lot of personal time “digging” inside the machine. However, if you still want to fix the problem yourself, do the following:
- using a Phillips screwdriver, remove the plastic panel located on the inside around the glass of the hatch door;
- loosen the door and disconnect it from the body;
- examine the lock, check the movement of the movable tongue;
- If you find wear on the elements or other damage, repair them.
If you notice that water is leaking from under the hatch of your automatic car, immediately take action. You can figure out the cause of the leak yourself or invite a technician who specializes in repairing washing machines.
It is important to fix the problem immediately after detection, this will avoid more serious leaks and minimize the risk of electric shock.
Share your opinion - leave a comment
Repair methods
Repair methods depend on the model of the washing machine, design features and the identified cause of the malfunction. In most situations, repairing individual components is sufficient to restore functionality.
Replacing the water supply hose
If a leak is observed at the junction with the tee in the water supply system or at the connection to the housing, it is enough to install a new gasket to fix the problem. If you find a leak on the hose itself, you will need to replace it. To do this, you need to select a hose of a similar size.
If the problem is in the filter
When the filter is malfunctioning and allows water to leak due to loose fittings, you can easily fix the problem yourself. You just need to tighten the fasteners using pliers.
Cleaning the dispenser from deposits
You can clean the detergent dispenser grid from plaque and accumulated dirt with a strong stream of water. To do this, the compartment is removed from the housing and thoroughly washed. If there is heavy dirt, you should use a cleaning agent.
Replacing the intake valve pipe
If there is a leak in the pipe that is responsible for letting water into the tank, you can do without replacing the part. When the damage is at the connection point of the pipe, you need to coat it from the inside with rubber glue and press the part tightly. It takes about 15-20 minutes for the adhesive to dry and restore the connection.
Repair of the pipe that is responsible for collecting fluid
If the pipe that supplies the fluid has loose clamps, you can fix the problem by tightening them. If a serious breakdown occurs, the component must be replaced.
To diagnose the condition of the pipe, you need to proceed according to the following scheme:
- Remove the lid of the washing machine and find the tube that connects the water intake valve to the powder compartment. The pipe is held in place by fasteners on both sides.
- Using pliers, loosen the clamps and move them to the central part of the pipe.
- Carefully remove the pipe from the valve and cuvette outlet.
- Inspect the part and check for blockages. If available, you can use a bottle brush.
Replacing the rubber cuff
Most modern washing machines are designed in such a way that replacing the sealing lip does not require disassembling the body. The cuff is secured with two clamps. To remove the outer clamp, you need to bend the elastic band and pry the clamp with a thin screwdriver, pulling the cuff towards you.
To disconnect the internal clamp, remove the front panel of the machine. The process of disassembling the panel depends on the specific type of washing machine. If you cannot disassemble the equipment yourself, you should entrust the work to specialists.
Replacing the drain pump
Most washing machine manufacturers install non-separable drain pumps, so repairing them is not possible. In addition, separate repair kits are not available for models with a dismountable pump. It is possible to fix a problem in the operation of the drain pump only in a situation where its parts are intact and the pump is simply clogged.
If the blockage is not cleared in time, this may cause overload of the pump motor or breakdown of the impeller. Having discovered the first signs of a malfunction, you need to carry out diagnostics and, if necessary, replace the part.
Tank replacement
In case of mechanical damage to the tank, it is possible to eliminate the leak only by replacing the element. The old tank must be removed and the new one installed through the top of the machine.
Replacing the oil seal
The process of replacing the oil seal is labor-intensive and requires a series of steps to be performed sequentially. In particular:
- remove the top panel, back and front walls of the machine;
- remove the counterweights and disconnect the shock-absorbing springs;
- disconnect electronic and mechanical control units, remembering the location of the wire for reassembly;
- remove the tank and separate its parts from each other to gain access to the bearings and oil seal.
Before replacing the oil seal, it is recommended to inspect the condition of the crosspiece and shaft. If the washing machine operated in emergency mode for a long time, defects could form on the elements, and then replacing the seal would not bring the desired effect.
How to fix it?
Let's consider several options for fixing the problem.
If during the inspection it was discovered that water is leaking from the tank, the device will need to be repaired. Most likely the cause is a broken hose and will need to be replaced. If it turns out that water is flowing from under the device door, most likely the hatch seal was damaged. A leak does not always occur due to a breakdown - it could also be the fault of the user. If you notice a leak after a few minutes of washing, you need to check how tightly the filter door and the device itself are closed, as well as whether the hose is inserted well. This advice is most relevant if the machine's garbage filter has recently been cleaned. Sometimes, after cleaning it, an inexperienced user does not secure this part tightly. If the user is convinced that he has closed the lid tightly, he needs to carefully inspect the place where the drain hose and the pump connect. If the intersection is not tight, a sealant will help solve the problem (be sure to take a waterproof one), but it will be safer to simply replace the parts. Even though water accumulates under the machine, the cause of the problem is sometimes higher. It is necessary to carefully inspect the dispenser (compartment) intended for powders and conditioners. It is often located in the left corner of the machine. Sometimes the dispenser is too dirty, which is why water overflows when spinning and drawing.
It is necessary to inspect both from the inside and outside, paying special attention to the corners - more often than not, leaks appear in these places.
If the user doubts that the leak is due to the powder receptacle (located in the front), the tray must be completely filled with water, wipe the bottom of the compartment with a rag until dry, and then observe the process. If the water begins to flow out slowly, this is definitely the reason. Unfortunately, this part sometimes breaks even in new models of LG machines after 1-2 years of using the device. This problem is associated with the dishonesty of assemblers who wanted to save on parts.
If the user notices that water flows during washing, the reason definitely lies in a broken pipe. To carry out an accurate diagnosis, you need to remove the top wall of the device.
Sometimes the problem occurs due to a leak in the drain pipe, which is directed to the pump from the device’s tank. In order to check this, you need to tilt the machine and look at the inside of the case from below. It is likely that the cause of the breakdown lies precisely in the pipe. To inspect it, you will need to remove the front panel of the machine and examine the area where the connection is located.
If the cause of the leak is a crack in the tank, this is one of the most unpleasant problems. Most often, it is impossible to fix it yourself; you will need to replace the tank, which is expensive. This crack could occur due to frequent washing of shoes, as well as when sharp objects get into the machine: nails, iron inserts from a bra, buttons, paper clips.
The crack could also appear due to a defect made by the manufacturer, but in any case, the device will have to be disassembled in order to remove the tank and carefully inspect it. To carry out such manipulations, it is better to call a specialist, so as not to make things even worse.
If you inspect the unit and find that water is leaking from under the door, the seal lip may be damaged. In this case, the problem can be easily solved - a special patch or waterproof glue will help fix the problem. You can also simply replace the cuff with a new one; it is inexpensive.
The article discussed the most common causes of failure of the LG washing machine, as well as ways to eliminate them. In any case, it is better, if possible, to contact a specialist or service center if the machine is under warranty. To avoid problems in general, you should be more careful with the device and check things before loading them into the tank.
You will learn further about what to do if water is leaking from your LG washing machine.
Damage to loading hatch
First of all, you should pay attention to the location of the puddle. So, if water collects closer to the front side of the machine and its amount increases during the spin cycle, the hatch seal is most likely damaged. Punctures or cuts can be caused by sharp edges of accessories on clothing or items forgotten in pockets.
Sometimes leaks are also caused by a washing machine hatch that does not close tightly.
The integrity of the cuff can be damaged by exposure to aggressive substances contained in detergents or by fungal infection. You can replace the cuff yourself. Its outer part is slightly recessed into the hole in the front wall and is fixed there using a wire or plastic clamp.
It is easier to put on a clamp with an adjusting screw - after putting it in place, the clamp is gradually tightened and the screw is tightened in a certain position. After installation, the cuff should be checked for fresh leaks.
The plastic clamp can be removed by pulling towards the area where the latches meet. To remove the wire clamp, you need to pry the spring or unscrew the fixing screw. The next step is to locate the installation mark on the cuff. It is necessary to determine the fixed position of the cuff according to the tank.
If there is no such mark, use a marker to mark where the cuff is located to the tank. The mounting edges must be cleaned of dirt and deposits and thoroughly lubricated with soapy water. The more slippery the surface, the easier it will be to install the new cuff. Before installation, you need to align the cuff with the applied installation marks.
The cuff is taken from the inside and placed in a circle on the edge of the tank. When the replacement is completed, you need to examine the perimeter of the ring with your fingers to check the tightness of the cuff with the edge. The next step is to put on the outer and inner clamps. To install the spring clamp, you need to use a screwdriver, with which it is fixed in the initial position.
If inspection of the hatch cuff and dispenser did not lead to the detection of a leak, it is necessary to remove the top cover of the machine and carefully inspect the pipes that lead to the dispenser hopper from the inlet valve. Worn and damaged pipes usually let water through. To eliminate the leak, they must be replaced.
We invite you to familiarize yourself with Washing machine modes - types, application, features
The filler pipe may leak where it connects to the tank. This will be indicated by characteristic streaks on the tank. In this case, the pipe must be removed, thoroughly cleaned, dried and installed in its original place, fixing it with epoxy resin or glue. If the pipe is chafed, the part in the damaged area is sealed with a piece of thin rubber.
The pipes, including the drain pipe, may leak due to loosening of the tightening clamps. Damage to the drain pipe can also be caused by solid foreign objects entering it from the tank. To eliminate the malfunction, replace the clamp or lubricate the pipe connection with sealant.
The appearance of water during the spin cycle may indicate damage to the tank seal. The presence of a leak of this kind is indicated by drips on the tank leading down from the bearings. In this case, the bearings and oil seal need to be replaced.
Similar problems can also be indicated by the appearance of water from the rear wall of the washing machine. To check the bearings for serviceability, you need to spin the empty drum of the washing machine by hand. If you hear extraneous noises or a slight grinding noise when it moves, most likely the seal or bearings have failed. In this case, the car must be repaired immediately, otherwise water may get on the engine.
Some older washing machines use pumps with an external impeller to cool the coil. A shaft passes through the entire area of the pump, which fixes the outer and inner impellers. To seal the shaft, a rubber cuff is used, which can wear out over time and leak. This pump needs to be replaced.
What measures to take
And now the diagnosis has been established - what to do, you ask? If the machine is under warranty, I recommend entrusting the repair of the breakdown, no matter how difficult it may be, to a specialist. If you have signed up for an “exchange service” in the store, then it’s time to use it. In the case when the device is “a hundred years old,” you can try to repair it yourself.
The only thing you should not touch with your own hands is the bearings. Firstly, this is a rather labor-intensive process. Secondly, if you are not a washing machine repairman, you are more likely to destroy the unit than replace the bearings yourself.
And yet, how to fix the leak yourself. You can replace damaged parts: pipe or hose.
To replace the pipe, you need to determine whether it is attached with glue. In this case, take out a new part, if necessary, clean it from dust, dry it and wipe it with acetone to improve adhesion. Coat the joint with waterproof glue or epoxy resin, using a thin layer. Carefully glue the piece into place.
When replacing the drain hose, ensure free access to the pump by turning the machine on its side
Carefully unscrew the end of the tube from the pump using pliers and pull it out. Then disconnect the part of the hose connected to the body, first remembering how it is attached. In the same sequence, attach the new hose on both sides.
Make sure the mount is well secured
In the same sequence, attach the new hose on both sides. Make sure the mount is well secured.
Take care of your equipment and it will last you longer. Have a good mood, I’ll be happy to help again!
What to do if the washing machine vibrates a lot during the spin cycle? Read this article...
Stay up to date with the news
Could it be the drain pipe?
Rarely, the drain pipe located below the drum may leak. Its peculiarity is that it always contains liquid, so the puddle does not stop filling even after the washing machine stops and the water supply stops. If you notice that the leak does not stop, then this is definitely the problem.
To eliminate the problem, it is not necessary to contact the service department. Almost every owner of a Samsung washing machine can make a replacement. It is enough to drain the water through the garbage filter, turn the body on its side and carefully examine all the supply channels. Replacement parts are purchased at a regular store, and loose clamps are tightened by hand.
Design and principle of operation of a dishwasher
In order to carry out repairs, you need to know how the PMM is designed and how it works. Although different models have design differences, the operating principle and main components are the same.
The diagram shows the main components of the dishwasher
The work process is divided into several stages:
- pre-soaking (depending on the selected program);
- basic dishwashing;
- rinsing (one or two passes, depending on the program);
- drying.
For normal operation of the machine, the following household chemicals are loaded into it:
- regenerating salt for water softening;
- detergent;
- rinse aid
The principle of operation is that cold water from the water supply enters the PMM, where it is softened with salt in an ion exchanger and heated by an electric heater (hereinafter also referred to as heating element) to the desired temperature. Once heating is complete, soft water with detergent dissolved in it is pressurized onto the surface of the loaded dishes, washing away dirt and food debris.
Sprinklers release water under pressure
The liquid flow is distributed by the upper and lower sprinklers (hereinafter also referred to as sprayers), which begin to rotate under water pressure. The drainage pump (hereinafter also referred to as the pump) pumps liquid into the nozzles. Rinsing is done with clean water taken from the water supply. The waste liquid is drained after washing and rinsing by a drain pump.
The PMM contains coarse and fine filters that remove dirt from the liquid. Thanks to purification, water takes part in the washing process twice, which saves its consumption. Drying kitchen utensils, depending on the model of equipment, can be forced and quick, or natural and longer (condensation).
Forced and natural drying of dishes in dishwashers
You can read more about the structure and operating principle of a dishwasher here.
We offer our readers a video in which you can see what happens inside the dishwasher when washing dishes:
Detergent dispenser leaking
Questions related to a malfunction of the washing machine cuvette or distributor:
The powder is not taken in completely. A hard piece of powder remains. Tell me what this is connected with?
- low pressure of water supply to the compartment - the hole in the hopper is clogged - you are pouring a lot of powder, all of it did not have time to be washed off - poor-quality raw materials
Regardless of the shape of the dispenser, the principle remains the same: water is supplied to the compartments through the inlet pipe from the distributor.
The distributor ensures that water is supplied through only one supply channel, so that detergents are washed off only from the corresponding compartments.
In addition, there are three-section and four.
The numbers in the figure indicate:
1. Cold water solenoid valve 2. Hot water valve (not all models) 3. Water distributor 4. Water distribution channels 5. Tray
Pull it out, press it and pull it towards you. If there is no device, pull it from side to side and at the same time pull it out.
To remove, unscrew the mounting bolts as shown in the figure.
Source
Why does the washing machine leak when filling with water and spinning?
When water begins to leak immediately upon filling, the reason may be that the inlet hoses are not connected correctly. It is necessary to carefully inspect them along their entire length; perhaps in some places the connections have become depressurized. Also, the corrugation is often deformed at the bends, which also contributes to leakage.
The cause of water leakage from the washing machine may be damage to the pipe. It needs to be disconnected, the break area treated with sealant, and glued back. It is not necessary to replace the pipe with a new one.
Another possible malfunction is damage to the rubber seal at the hatch for loading laundry. This may occur due to improper use or wear and tear. If the deformation is severe, the part must be completely replaced, which will require dismantling the door, so it is better to contact a specialist.
If your machine starts leaking at the beginning of the wash cycle, the detergent drawer may be clogged. The soap solution then does not get into the laundry, but flows out. To avoid clogging, the cuvette must be maintained and washed periodically, completely removing it from the washing machine.
Let's collect tools and components
You won't be able to fix a leak with your bare hands. To work you will need a set of tools. Fortunately, the list is quite modest and easy to collect. Yes, this will be useful:
- “plus” and “minus” screwdrivers;
- pliers;
- file;
- hacksaw for metal.
As for materials, to repair the dispensary you will need silicone or automotive sealant. In advanced cases, a new replacement tray is also needed. But you don’t need to buy an analogue right away - you should first make sure that the old one is faulty.
Leakage due to dispenser
If the washing machine leaks as soon as water starts flowing, the problem may be in the dispenser. This is a retractable compartment into which washing powder is poured. It can become clogged for various reasons:
- Powder grains do not dissolve and clog the grate;
- Dirty water has left a layer of sediment in the dispenser;
- Excessive water pressure.
Take out the dispenser and thoroughly clean it along with the hopper. Then return it to its place and start the device again. Make sure that the water does not flow under high pressure - just close the supply tap a little. If the problem persists, you will have to call a technician and replace the inlet valve.
Calling a specialist: where to find and how much will it cost?
If water appears under the washing machine, it is necessary to determine and eliminate the cause of the malfunction of the device. In cases where it is not possible to carry out repairs and diagnostics on your own, or there is simply no time for this, you need to seek help from a washing equipment repair company.
You can select a company on the Internet. There you can also find prices for services and read reviews about the company.
The cost of work does not include the price of parts requiring replacement. The average prices for repairs in the capital are as follows:
- replacement of the drain hose - from 1,600 rubles;
- replacement of the inlet hose – from RUB 1,200;
- replacement of the drain filter – from 1,300 rubles;
- tank replacement – from 4,600 rubles. etc.
It is recommended to contact officially registered companies providing services for equipment repair, since private repairmen do not always have the proper qualifications and are not responsible for the quality of repairs.
Causes of leakage
To recognize the real causes of a leak, you need to carefully examine all possible problem areas. Diagnostics are performed after disconnecting the device from the network. It is also better to disconnect the hoses to free up space for moving the unit. There can be many reasons for a leak. Here's just a small part of them.
Incorrect operation
It leads to the fact that the washing machine does not work at full capacity, and blockages occur. If you follow all the recommendations for cleaning the filtration and drain systems, the risk of a leak will be minimal. A problem may arise if the hoses become mechanically damaged. Children and pets can become a source of danger.
If the leak is not under the body of the machine, but in front, you should pay attention to the condition of the cuff. They are the ones who most often suffer from mistreatment
Incorrect selection of chemicals
When, upon inspection of the washing machine, obvious traces of water leakage from the powder loading compartment are discovered, the cause may not only be a blockage. If too much detergent is added, or it has a higher foaming capacity than necessary, the excess foam will find its way out through the joints of the tray.
Manufacturing defects
Sometimes washing machines, even those produced by the most famous manufacturers, have a manufacturing defect if the cause of the leak is the failure of one of the system elements. Leaks are most often caused by the installation of low-quality seals and pipes - parts that are quite easily replaced under warranty.
Breakage of parts
As a rule, leaks are associated with the breakdown of parts only if we are talking about the drain system. In this case, a leak will occur during the spin or rinse stage, when water is discharged from the system. If the pump is faulty, water will accumulate at the back wall. A leak also forms there if the seals or drum bearings fail. A leak at the dispenser may be due to damage to the drain valve.
When water leaks through the cuff, you should definitely pay attention to the operation of the pressure switch. If this sensor, responsible for controlling the water level, fails, overflows will inevitably occur in the drum
Reasons for leakage from the powder compartment
A leak from the powder receptacle compartment can have various causes . To determine the nature of the malfunction, you should carry out sequential diagnostics of the washing machine. The defect may be a manufacturing defect or appear as a result of use.
Manufacturing defect
In the case where a new machine leaks from the powder receptacle, this is probably a manufacturing defect. It is extremely rare, but such a situation can arise.
The problem may be an uneven surface of the powder receiver tray, poor fit of the tray to the hopper into which it is inserted, etc.
In this case, you should not correct the defect yourself , since the machine is still under warranty.
High water pressure
If the water supply system has very high pressure, then water enters the washing machine at a pressure that the dispenser is often not designed for. It is necessary to check that the washing machine is installed correctly and ensure that it is not tilted forward.
If there is a slope, the position of the washing machine is leveled. Too much pressure also needs to be corrected . To do this, the water supply tap can be opened not completely, but partially.
Foreign object in the powder receptacle compartment
The release of water from the tray may be due to a foreign object entering the cuvette, which blocks the drain into the drum. It could be a dried lump of washing powder or even a toy tucked in by a child. To ensure the condition of the tray, it is better to take it out and inspect it.
In some cases, the “culprit” may not even be that part of the tray compartment that is intended for powder, but a clog in the compartment oriented for the air conditioner, which in LG machines has a complex design.
An example of a tray inspection is in the video:
Problems with the bunker
The box in which the detergent tray is placed can also cause water to leak out. The problem is in the holes overgrown with scale through which water flows. Clogged holes interfere with the proper flow of water , causing it to splash and may even leak out.
How to solve the problem is shown in the video:
Clogged pipe
The water that enters the tray, washing away the powder, passes through the pipe and flows into the drum. If the tube is obstructed, fluid may leak out.
The pipe may become clogged with undissolved lumps of detergent, mucus, dust and grease. To check its condition, the washing machine must be partially disassembled:
- Remove the back panel and top cover, gaining access to the internal structure of the machine.
- Disconnect the pipe. If necessary, clean it.
The danger of a breakdown associated with the pipe is that water may not pour out, but flow inside the washing machine.
If the leakage is not strong, then such a defect may not even be immediately noticeable. But at the same time, the parts inside the washer begin to rust, and the electrical contacts begin to oxidize.
Violation of norms for adding detergents
If too much washing powder has been poured into the compartment, it may not have time to be rinsed quickly into the drum. In this case, water and sometimes foam will flow out of the tray.
When pouring powder into a tray, you need to control its consistency . If the detergent has caked and formed lumps, then in this condition it cannot be placed in the cuvette.
Tray damage
The cause of leaks may be a crack or chip on the tray itself. In this case, water supplied under pressure may leak into the cracks. The solution to the issue is to repair or replace the tray, which is relatively inexpensive and is selected based on the model of the washing machine.
What's broken?
Before you begin repairs, it is worth finding out why the powder bin is leaking. Knowing the nature and extent of the problem, you can localize the breakdown and outline an action plan
First of all, we pay attention to the service life of the Samsung machine: in new models, leaks indicate a manufacturing defect, and in older models, they indicate worn out parts. If the reason is the erasing of parts, then we look at the localization of the stream
The washer usually leaks in one of the following places:
- along the perimeter of the tray, more precisely from above or below;
- where the dispensary meets the facade of the machine;
- through a crack at the end (when one of the compartments, the main one for conditioner or pre-wash, is damaged);
- through a loose or torn pipe (perhaps the clamp has become loose and the hose is leaking water).
Leakage often occurs due to the fault of the owner of the washing machine. When trying to get a powder receptacle for cleaning, the user does not understand how to fix the dispenser, but begins to pull the part until the “victorious” end. As a result, the tray body or locking elements are damaged. The use of aggressive detergents by housewives, which, due to strong abrasives, “corrode” the plastic and deform the hopper, also leads to problems.
What to check first if your washing machine is leaking?
First of all, let’s check everything around: perhaps the problem is not in the machine, but a leaky water supply, sewerage or heating system pipe, and water just flowed under the washing machine? If everything is in order with the “surroundings,” we proceed to inspect the communications that lead to the washing machine.
Very often, water leaks in the washing machine are associated with problems with the hoses: the inlet or drain hose could “move away” - children, pets, or simply too active cleaning could “help”. If you find that water is flowing from the connection points, try unscrewing the hose and screwing it back on, tightening the fixing nut. Also inspect the hoses along their entire length: it happens that the drain hose gets chafed if the washing machine is installed incorrectly. If you find a leak in the hose itself, it will need to be replaced. You can do this yourself, but please do not use hoses from the nearest market: it is better to take a slightly more expensive original hose from the washing machine manufacturer. It will last much longer than its “handicraft” brother!
If no signs of leakage are noticed in the area of communications, then the problem lies somewhere inside the unit itself.
Rinsing
Any laundry washing session includes a rinsing stage. Some mistakes made by the user at this stage may cause excessive water and foam to come out of the tray. It is necessary to replace the powder with a less foaming one.
Overflow is also possible: if the machine starts washing, but the water supply does not stop, then over time (after the drum is filled), the water will rise to the tray and flow out of it. Only an experienced technician can find a solution to this problem.
If you notice that foaming water is flowing out of the washing machine from the tray during rinsing, immediately call the service center, as this indicates a serious hardware failure.
To prevent leaks from recurring
Careful operation is the key to successful work of the “home assistant”. The service life of individual parts and components of an automatic washing machine directly depends on how you use the equipment. To prevent unit leaks, it is recommended to follow simple rules:
- items with metal inserts should be washed in special bags. Sharp and hard parts of clothing can damage not only the cuff, but also the drum and plastic tank. The same applies to small wardrobe items - they can be sucked into the drain pipe of the washing machine;
- After finishing the wash cycle, be sure to unplug the machine. A voltage surge can cause the failure of any element of equipment, and, consequently, lead to a leak;
- Do not exceed the maximum permissible drum loading weight. If you periodically overload the equipment, it will soon begin to leak during spinning;
- if the tap water is too hard and dirty, install a filter device at the entrance to the apartment or washing machine. This will avoid the formation of scale on the elements of the washing machine, and will also prevent clogging of the input filters;
- It is better to place the washing machine in rooms with less humidity, for example, in the hallway, corridor or kitchen;
- Owners of “vertical” ovens should make sure that the drum door is tightly closed before closing the main lid. This will reduce the likelihood of leakage during spinning;
- Do not use low-quality laundry detergents.
By following a number of simple recommendations, you can increase the maintenance-free service life of your washing equipment. If you take care of the machine, clean it, do not overload it, and use only high-quality household chemicals, the machine will not constantly leak.
Troubleshooting Possible Problems
A small amount of water remaining in the compartment is considered normal and no troubleshooting steps should be taken. It's another matter when the compartment is completely filled with water. Here you need to start looking for the cause, because you can eliminate it on your own. The most characteristic are:
- improper control and maintenance of the compartment into which laundry detergents and conditioners are poured is organized. Manufacturers of washing devices advise periodically washing the compartment to remove any remaining product from it. If you forgot about this recommendation and the compartment becomes clogged, you will have to remove the entire hopper and rinse it thoroughly under water pressure;
- The washing machine is not installed level. If there is an inclined angle forward, there will always be water left in the compartment intended for the air conditioner after washing. Read the accompanying instructions and install the machine in accordance with its requirements;
- Low quality laundry detergents are used. It is likely that the reason lies precisely in this - the remains of the air conditioner clog the compartment, and water remains in it. Rinsing is carried out, and it is recommended to try other formulations the next time you wash;
- excessive amounts of washing powders and conditioners. You may have poured too much detergent into the compartment. Check what the instruction manual says on this issue, reduce the measured dose of powder and conditioner;
- The water pressure in the pipes has weakened, or you have not fully opened the tap. The latter is easy to check, but to clarify the pressure you will have to check how water flows from the tap at another point in the system.
Programs for all types of clothing
It’s not only safety that sets Electrolux washing machines apart from a number of modern washing machines. Installing smart electronics allows you to perform washing with the highest quality and eliminate the most complex stains. The user has access to many different programs for types of clothing, quick wash, intensive and economical modes. Some models are also equipped with a water purity sensor, which detects soiled laundry and adjusts programs to achieve the best results. Also, its use makes it possible to reduce water and electricity consumption, which will be a pleasant surprise when you receive a utility bill.