What is damper grease? These are organosilicon liquid polymers of one or two-component compounds with high-quality bonds of silicon atoms in glycerin or silicone. Depending on the number of components, a liquid with a wide range of properties is obtained: for example, viscosity, which is measured in centistokes (drops through a calibrated hole at 50C, or measured by special hydrometers). The viscosity of the lubricant is slightly more than water and is designated 160 units. And in 250,000 units. Already, approximately, like solid oil.
Damper grease, or oil as it is also called, is a colorless liquid that works down to a temperature of -50 C. To work with a wider temperature range, ingredients from special additives are added, for example, gas soot to change the performance of the lubricant to -70 C. Aluminum oxides allow you to increase the range to +450 C. This type of silicone damper grease is used in plain or rolling bearings.
[content-egg-block template=offers_list next=2 title “Our offers”]
Damper and shock absorber - what is it?
You've probably noticed that at high speeds the washing machine starts to hum a lot and sometimes jump. It is to dampen these vibrations, the beating of the tank against the body, that shock-absorbing devices are installed. There are no particular differences between their types. The design is only slightly different.
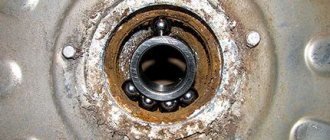
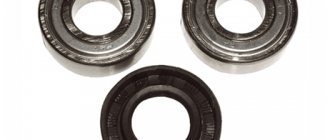
Earlier models of washing machines used shock absorbers. These devices consist of a cylindrical body. Inside it is a piston, the movement of which is ensured by a return spring. The device also includes gaskets to reduce friction.
A modern washing machine damper is also located under the tub. Its only difference is the absence of springs in the body. Now they are brought upstairs and the tank is hung on them. Thanks to this difference, parts break much less often, because the springs can now be replaced separately.
Restoring a shock absorber for a washing machine with your own hands is a doable job. To do this, you need to understand the principle of operation of the devices.
The operation of the product is based on the resistance that the gasket creates during friction. Over time, this seal wears out, which leads to the need for replacement. Main signs of failure:
- Strong vibration during spin cycle.
- The machine cannot stand still and moves around the room.
- The tank hits the walls of the hull hard.
It is unacceptable to operate the washing machine in this condition. This will lead to rapid wear of other components. Then expensive repairs cannot be avoided.
How to check if dampers are working properly?
It is not necessary to disassemble the equipment for diagnostics. Do this:
- Disconnect the SMA from the network.
- Unscrew the bolts securing the top cover. They are at the back.
- Remove the lid and press the tank down with your hands.
- Lower it and watch the movements. If it was difficult to lower the tank and it immediately jumped up and stopped, the parts are in good working order. If you easily lowered the tank, and then it quickly jumped up and began to swing, the shock absorbers need to be replaced or repaired.
To finally verify the breakdown and carry out work, you need to get to the parts. Therefore, how to remove and restore shock absorbers will depend on the brand and model of the SM.
DIY damper repair
In some models, it is enough to turn the washer on its side to gain access to the springs. How to do it correctly:
- After unplugging the machine, disconnect the inlet hose.
- Open the small door under the loading hatch.
- Place the container. Unscrew the filter plug counterclockwise.
- Wait for the water to drain.
Now you can turn the case on its side. If there is a bottom underneath, then unscrew the fasteners and remove it.
It’s more difficult if you have to dismantle the front wall to check:
- Remove the top cover.
- Remove the detergent drawer.
- Unscrew the screws around the perimeter of the control panel. Remove it and leave it hanging on the wires.
- Open the loading door.
- Pull the cuff, remove the clamp using a screwdriver.
- Thread the sealant into the drum.
- Unscrew the screws of the front wall and remove it from its place. Remove the UBL wires.
How to change and repair dampers?
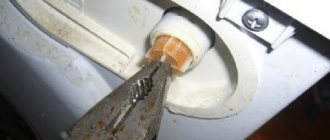
The parts are located under the tank. Remove the spring fastening to the SMA body, and also unfasten the latch on top. Sometimes the elements are tightly fixed to the tank, so you have to drill out the plugs using a drill.
Home craftsmen offer a solution to the problem with gaskets. A leather belt is used for this.
- Remove the rod from the body.
- Take the belt. Its thickness should not exceed 3 mm.
- Estimate by eye how much material you will need to replace the seal. Measure and cut the desired piece of belt.
What damage could have happened?
What caused the problem:
- Wear of gaskets due to frequent use.
- Defective parts, improper transportation of the machine.
- The rod that secures the shock absorber is faulty.
Whatever breakdown occurs, it is important to know how to restore the shock absorber in a washing machine with your own hands. Read about it below.
Properties of organosilicon liquids:
- low freezing point and preservation of its properties over a wide temperature range;
- chemical inertness to metals, rubber, plastics, many organic compounds, even when heated to 150C;
- high dielectric properties;
- good compressibility, 1L cylinder can be compressed by 14%;
- low flammability;
- resistance to dilute acids and alkalis (reacts only in concentrated solutions);
- not allergic.
Recommendations for replacing shock absorbers in a Bosch washing machine yourself
Shock absorbers in a Bosch washing machine serve to dampen excessive vibrations of the tub during the washing process and help stabilize its position.
With prolonged use, parts wear out, resulting in their functionality decreasing.
Dampers that have become unusable must be promptly replaced, since ignoring the wear of shock absorbers can lead to even more serious damage and costly repairs.
We will talk about replacing shock absorbers in a Bosch washing machine below.
Application
One of the main features of organosilicon lubricants is that it almost does not change its viscosity at temperatures from +100 to -30 C, which led to its use specifically in damper devices. Oil is used to fill the hydraulic systems of aircraft, trucks and cars, and clutch braking mechanisms.
Good water repellency with high adhesiveness forms a thin film on the product that is not wetted by water, does not decompose rubber and can serve as a lubricating preservative for rubber parts of a car. Electricians often use it to protect wires by lubricating the surface of the insulation, especially rubber, to prevent it from cracking.
Organosilicon oils are also used as a lubricant for engines operating in frosty conditions and in devices used at weather stations. Damper grease is also used for micro-lifting of vinyl disc players or moving parts that work with an aqueous environment, for example, toilets or other hygienic devices.
Car enthusiasts actively use grease to lubricate brake pad drive calipers, steering columns, and other plastic products that make unpleasant noise when touching each other.
You can buy damper lubricant for microlifts in any technical department that sells spare parts for office equipment or auto parts. You can also type the product name in the search bar of any browser. Beware of fakes.
You can get acquainted with the use of oil by watching the video below.
Reviews:
Alex: I drive a Toyota Land Cruiser Prado. I change the pads myself. There were cases where the caliper jammed due to lubrication, I switched to damper, it became smoother and the caliper never jammed. Highly recommend.
High temperature lubricant Litqui Moly 50 Litho HT 3400
The lubricant is intended for loaded bearings and assemblies. Operating range – -30С- +160С, briefly allowed up to +250С. It is used in components of cars, trucks, agricultural machinery, and tractors.
The grease is ideal for the initial filling of bearing races when changing them and for regular repressing. It is used to lubricate parts that operate under load and are heated. In cars, such parts include wheel bearings, suspension joints, and spring supports.
Well suited as a universal lubricant. Does not change its viscosity when heated, is not subject to melting and leakage from nodes, good adhesion. Supplied in tubes of 200 and 500g. containers of 5 kg. Parameters of the packaged goods in the container: Weight, 5.71 kg; Length – 202 mm; Height 25mm.
The results of the heating test and its lubricating properties of the grease can be viewed in the video below.
| Attention Bearing Buyers Dear customers, send your questions and requests for the purchase of bearings and components by email or call now: Delivery of bearings throughout the Russian Federation and abroad. Bearing catalog on the website |
Attention Bearing Buyers
Dear customers, send your questions and requests for the purchase of bearings and components by email or call now: +7 [email protected] Delivery of bearings in the Russian Federation and abroad. Bearing catalog on the website
themechanic.ru
Is it possible to make damper grease at home?
In principle, you can make everything at home. Even high molecular weight lubricant. A simple analogue of damper lubricant made at home is a solution of synthetic resin in oils, for example, industrial oil. It’s even easier to dissolve rosin in oil to the desired consistency. True, such a solution only works at positive temperatures and not higher than +50 C, since after this the resin begins to decompose and can become coked, which to a certain extent will only cause harm. Therefore, it is recommended to use a mixture prepared at home in cases where there is an urgent need or some kind of knocking is very annoying, followed by replacing it with normal lubricant. Damper grease can be purchased on the Internet or at manufacturer dealerships.
Installing a new part
- we take out the shock absorber and, applying force, place it in special grooves;
- take the previously used plug and carefully drive it into the hole on the damper through both partitions;
- we install the drill in the drill and, including the “reverse” movement, remove the self-tapping screw;
- check the reliability of fixation;
- repeat the steps with the other stand, turning the machine over to the opposite side;
- if the tank was removed, then install it back into the body;
- we return the engine to its place, securely tighten the screws and hook up all the supply wiring;
- put on the drive belt, not forgetting to rotate the pulley;
- We raise the machine gun “to its feet” and screw the back wall.
The final stage will be running the washing machine at maximum spin. If the machine is stable throughout the entire cycle, the vibration is moderate, and there is no hum or knocking, then the DIY repair was done correctly. Otherwise, we return to the disassembly stage and tighten the retaining shock absorbers of the mount.
Damper lubricant PMS-60
A lubricant with a viscosity of 60,000 units is intended for use in mechanical components to smooth out sharp impacts, more precise operation of the mechanism, reduce friction and reduce wear of parts. It is used for both metal products and plastic, rubber products, applied to wires to prevent their insulation from cracking.
It is supplied to retail outlets in 2 ml bottles. or in tubes with a capacity of 5-10 mm. Where to buy damper grease can be answered simply - it is sold in any auto parts store or online resource dealership centers.
Preparation
Before you start replacing Bosch shock absorbers, you need to prepare. At this stage, perform the following actions:
- The washing machine is disconnected from the electricity and the water supply tap to the device is closed.
- The laundry is taken out of the drum.
- The washing machine is pulled out to allow access to the device from all sides.
It is also necessary to ensure that you have tools and new dampers for replacement. The required set of tools includes:
- screwdriver;
- set of heads;
- drill 13 mm;
- screwdrivers;
- awl;
- pliers.
You will also need 2 13mm bolts and nuts to secure them.
DIY repair
So, you have prepared everything you need, get to work.
Remove the top cover of the Bosch washing machine
Take a Phillips or hex screwdriver and remove two screws from the back of the machine. Now slide the cover forward and lift it up. Be careful, the edges of the panel may be sharp. Set it aside.
Disconnect the control panel
Moving to the front, pull out the powder dispenser tray. Press the latch in the center, pull it towards you and remove it from the case.
Next, unscrew the bolts located behind the tray, as well as the bolts on the other side of the panel. Carefully release the plastic latches (you can pry them off with a flat screwdriver) and disconnect the panel. To completely remove it, you will need to disconnect the wire connectors - it is better to photograph them in advance. But it’s easier to hang the panel on the side, on the service hook.
Remove the bottom cover. It is located at the bottom of the front panel. To do this, simply release the latches. Set it aside.
Remove the front panel of the Bosch machine
First of all, open the hatch door. Before disassembling the Bosch washing machine door, remove it from its hinges by unscrewing the fastening screws. This must be done so as not to damage the sunroof glass.
Bend the hatch cuff and, prying the clamp with a screwdriver, pull it out of place. Place the sealing rubber inside the drum.
Unscrew the bolts securing the door lock. Place your hand behind the body and take out the UBL. Disconnect all wires from it and set the lock aside.
After unscrewing the screws around the perimeter of the front panel, carefully remove it and put it aside.
Detach the back panel and deal with the counterweights
Using a screwdriver, unscrew the bolts around the perimeter of the cover and remove it. Behind the panel you will immediately see the internal components of the Bosch washing machine.
Unscrew the screws on the top bar that connects the two parts of the body. Using a 14 mm wrench, unscrew the bolts and remove the upper counterweight. Do the same with the counterweights that are located around the hatch.
Remove the details at the top
How to further disassemble the Bosch washing machine? To remove the tank, you need to free up as much space as possible and also disconnect all the parts attached to it.
- To remove the dispenser tray cuvette, disconnect the pipe leading to it. If there is a clamp on it, loosen it with pliers. Also remove the inlet valve pipe.
- Now disconnect the pressure switch and noise filter. To do this, disconnect the wiring from the parts and unscrew the fastening bolts. Remove the tube from the pressure switch. Remove the parts from the housing.
The tank no longer holds anything on top.
Go back to the back
Now you need to disconnect all the fasteners and elements.
- Remove the drive belt by pulling slightly towards you.
- Disconnect the wires leading to the electric motor.
- Unscrew the bolts that hold the motor to the mounts.
Rock the engine slightly from side to side and remove it from the housing.
Be careful, the part is heavy!
Get to the pump
It is necessary to lay the washer on its left side, remove the bottom (if it has one) by unscrewing the screws.
We disassemble a Bosch washing machine:
- Using pliers, loosen the clamp of the drain pipe.
- Unplug it. Be careful, there may be water in it.
- Unclench the wires leading to the pump.
- Unscrew the bolts that secure the drain pump and remove it.
Remove the tank
There is little time left before dismantling the tank. Disconnect the wires from the heating element. The heating element in Bosch cars is located in the front part, under the tank.
Sometimes wiring is attached to the walls of the tank, secured with bundles. Cut the harnesses with wire cutters and move the wires to the side. Now you need to remove the shock absorbers.
- Place a socket on the back of the shock absorber rod to press in the latch.
- Pull the rod towards you with pliers and pull it out of the hole.
Do the same with the second shock absorber. All that remains is to remove the tank from the springs. Lift it up by the edges of the hatch and pull it out through the front compartment.
Diagnosis of typical faults
Shock-absorbing devices of washing machines belong to the mechanical part of household equipment. Their repair and replacement do not require fundamental knowledge in the field of electrical or even mechanics. This means that even the intervention of an amateur will not be able to cause serious damage.
Please note that unique technical documentation is issued for each model of washing unit. Service techniques are usually authorized and devices are patented. However, there are methods for repairing shock-absorbing devices that are common to almost all types of washing machines, the specifics of which are worth understanding.
The appearance of typical damage to shock absorbers or dampers will be signaled by a specific noise that occurs during operation of the machine, or too much knocking inside its body.
Symptoms of damage or wear of the shock absorber are unusual noise during washing/spin, strong knocking, excessively active vibration with body distortions
If alarming sounds are detected, their condition should be examined, and for this you need to provide yourself with access to the devices being tested. Depending on the model, for the examination you will need to remove either the top panel, the side panel, or the back panel.
Methods for diagnosing shock absorbers for washing equipment depend on the type of load:
- From the front. If, when applying force to the tank from above, folds form on the sealing collar of the loading hatch, the shock absorbers must be replaced. By the way, you can also notice a couple of folds while the machine is operating with worn-out accessories.
- From vertical. If, when applying force to the tank from above, no resistance is felt, and the tank, after interrupting the pressure, continues to swing like a pendulum, it needs to be repaired.
When carrying out diagnostics with top loading, you must definitely pay attention to how much the tank sags when pressed, if the indicated defect occurs. It would be nice to track the fact of sagging and its conditional value with a full tank load
The signal to replace the shock absorbers will be the folds on the sealing collar, which often has to be changed no less often than the shock absorbers themselves
In normal technical condition, front-loading washing machines should not have cuff folds at all, regardless of the function being performed. Note that the formation of a single fold on this rubber seal indicates that only one of the shock absorbers is damaged.
If the folds on the cuff of the washer do not indicate damage to the shock absorbers, it means that it is worn out or deformed from the use of substances undesirable for its structure. In this case, the seal should be replaced.
In normally functioning units with a top load, if the shock-absorbing devices are not damaged, after applying force to the tank from above and abruptly interrupting the load, i.e. retracting the hand, the tank should smoothly return to its original place without excessive swinging and vibration.
If the dampers of the washing machine are damaged, then this can be determined by the cuff even with a minimum load of the drum. The presence of two folds in the seal indicates that two devices require repair or replacement