Modern life cannot be imagined without a washing machine. The priority is automatic models, which relieve as much as possible from hard work. A smart machine does everything on its own, but it is necessary to create conditions under which the unit will work for a long time and uninterruptedly.
One of the important points to ensure reliable operation is the installation of the washing machine and its subsequent connection. How to do this correctly and what nuances may arise during installation? We will analyze all the points in detail in this material. We will also consider the features of installing a washing machine in various conditions - in the kitchen, in the hallway, in the bathroom, etc.
Selecting a location
Before connecting the washing machine to the water supply, sewerage and electrical networks with your own hands, you need to decide on the location for its installation.
In private houses, a washing machine can be installed in a special laundry room, and in apartments this equipment is sometimes installed in kitchens, and most often in bathrooms. When choosing a specific area in the bathroom, you need to take into account the availability of free space and the location of communications. You need to plan where the washing machine will be located before purchasing it in order to choose a model that will “fit” into the available space.
- proximity to the communications required to connect the washing machine (electricity, water supply, sewerage);
- the presence of a flat floor surface on which the washing machine will be installed;
- efficiency of placement in terms of ease of use;
- a harmonious addition to the interior of the room in which the washing machine will be located.
Some useful tips when choosing a location:
If the bathroom area is small, the space will be used most efficiently if you install the machine in a corner or niche of a suitable size
But it is recommended to maintain a gap of 2-3 centimeters between the body and the walls. It is extremely undesirable for the machine body to come into contact with metal - cast iron pipes, heated towel rails, radiators. There must be enough space in front of the machine (or above it, in the case of vertical loading) so that the hatch can be opened. It is very important to install the washing machine on as level a surface as possible. It is advisable to place the machine at such a distance from communications that the standard length of the included hoses for supplying and draining water is sufficient for connection to the water supply and sewerage systems. The hoses can be extended, but this increases the load on the machine pump, and any additional connection is an additional one. risk of leaks
Hoses can be extended, but this increases the load on the machine pump, and any additional connection is an additional risk of leaks.
What to do if the car “jumps”?
Most often, increased vibration occurs after the installation of machines. But time-tested units can show their “character” by bouncing and moving across the floor.
It is better to prevent the problem of vibrations in advance than to deal with it. This will save the unit from breakdown and the owner from repair costs.
To prevent equipment failure, it is necessary to establish the cause of the vibrations and eliminate it immediately.
Strong vibrations can be observed in the following cases:
- They forgot to remove the fasteners (brackets, bolts) that hold moving elements during transportation.
- Uneven floor causing the machine to wobble.
- The floor is slippery and too flat and should be covered with a rubber mat.
- The laundry inside the drum has curled up into a ball.
Excessive vibrations can also be caused by technical reasons, which can only be identified and eliminated by a specialist. Such reasons include breakdown of shock absorbers, wear of the springs that secure the tank, loosening of the counterweight fastenings, destruction of bearings, etc.
Any of the listed reasons must be urgently eliminated, since delay is fraught with breakdown. Self-confidence and previous experience are good reasons for installing household appliances yourself.
Professional advice on how to properly install a washing machine yourself, as well as clear instructions, will help you do it without errors.
The nuances of installation in cramped conditions
The most reasonable option, from the point of view of minimizing installation labor costs, is to install the machine in the kitchen or bathroom. All necessary communications have already been carried out there. But this is not always convenient for apartment owners. We have to look for another place.
In the corridor
You can park a car in the corridor if it is wide. But there are definitely no communications there. You will have to lay hoses there, and this is not at all aesthetically pleasing and not very reliable. This is a last resort option.
Under the sink
If you decide to install the machine in the bathroom under the sink, then this is convenient from an installation point of view. All the necessary pipes have already been laid. But the sink has a long drain that goes down. In this case, the best solution would be to replace the sink with a special flat one. A small-sized machine will fit well there.
Above the toilet
There is an option to install the machine above the toilet. The option is good from the point of view of saving space. But other problems arise. It will not be possible to hang the car on the wall there, since the walls in the toilet are usually plaster. You will have to build a special metal structure for the car. The unit must be placed so that it does not interfere with access to the button and the lid of the drain tank. In addition, it must be taken into account that during each repair the heavy device must be lowered from the rack and raised back after repair.
Recommendations for reducing vibration
There are several tips to reduce vibration:
- there is no need to overload the machine with things - modes with the maximum permissible weight are always described in detail in the instructions for the device;
- It is worth using anti-vibration stands and mats;
- It is worth checking the level of fixation of the machine and adjusting it;
- replacement of bearings and shock absorbers, when it comes to old equipment.
These tips will help reduce the noise level that occurs during spinning, but nothing more.
Anti-vibration stands and mats
Vibration reduction mats and stands are effective helpers in reducing vibration levels.
Vibration dampening mat
The mats are made of two layers - a rubber top layer to level the legs and a bottom foam layer to prevent vibration transfer to the floor. The stands are often rubber or consist of a mat with a special tray to dampen vibrations.
Subscribe to TechnoCouncil on social networks so you don’t miss anything:
Cost of connecting the machine by third party workers
If you have no hope of relying on your own, but want to install a home washing device using professional help, you should reasonably calculate all possible financial costs and make a decision as to how feasible this may be. How much does it cost to connect a washing machine? Cost calculations for services consist of several indicators.
- Electrical work. They may be needed only if there is no reinforced grounding in the house. The price of such services is about 1,500 rubles.
- Plumbing connection. Usually the costs fit into the same amount.
- Cost of necessary materials. The purchase is usually paid for separately, and everything needed is delivered by the mother. Costs depend on the availability of existing communications and their condition. The cost ranges from 300 to 2000 rubles.
The total connection amount can reach up to 5,000 rubles. Cheaper options are possible, but are controversial, since services and materials may be of questionable quality.
What’s better, rely on your own strength and save money, or play it safe and call a specialist at home? It all depends on the skills and capabilities of the owner of the washing machine, which cannot be overestimated. It should be noted that without sufficient skills and knowledge, it is difficult to carry out the entire process correctly, ensuring complete safety in the operation of the device.
There are known precedents when users carrying out self-installation were denied warranty repairs due to alleged miscalculations during connection that led to the breakdown of the washing machine.
Such refusals should be considered unfounded. Often, accusations against clients are caused not by negligent actions on their part, but by the desire of organizations to impose additional services on consumers.
Connecting the machine
Connecting a washing machine with your own hands is not difficult for those who understand technology, deftly handle various tools and have minimal knowledge of how to handle pipes, adapters and plumbing. If all this is unfamiliar to you, then it is better to contact specialists, having previously found out how much it costs to call a specialist to your home.
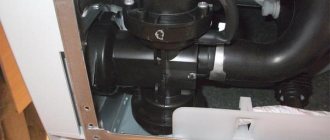
The diagram for connecting the washing machine to communications is shown in the photo; we will look at each action in more detail.
To the sewer
At first glance, organizing the draining of water from a car into a sewer is not a difficult matter, but in practice everything depends on the specifics of the connection, which is carried out using two main methods:
- Temporary connection when the drain hose is lowered into the bathtub or toilet (with a combined option).
- Stationary - a connection is made into the sewer, and here users often encounter certain difficulties.
Connecting the washing machine to the sewer is carried out taking into account the following requirements:
- the length of the drain hose should not be too long, as this will increase the load on the drain pump, and it may fail prematurely;
- When you connect the drain to the siphon, you prevent unpleasant odors from entering the machine from the sewer, which is an undeniable advantage.
The drain hose is connected to the sink siphon for washing or drainage, as shown in the photo. As a result, the connection will be quite tight.
To the water supply
A home handyman needs to know how to connect a washing machine to the water supply lines without adding an inlet hose with fittings from the manufacturer. If the machine is located at a distance of more than three meters from the water pipe, then the best option is to make a separate connection using a metal-plastic pipe to ensure that there are no leaks in the most inconvenient place.
If everything you need is within the length of the inlet hose, then connecting the washing machine yourself will not be difficult using one of the methods (see photo).
Let's consider the connection diagram through a separate valve (end tap). To do this, you will need a mortise clamp with a guide sleeve and a rubber gasket, or a tee.
Procedure:
- The clamp is carefully screwed into the water pipe with the sleeve facing outwards.
- The pipe is drilled with a drill and connected to a clamp or pipe section (an end valve is then installed on the latter).
- At the end of the pipe a thread is made identical to the thread on the clamp.
- The external thread is covered with a sealant or FUM tape.
- Next, the end valve is tightly screwed onto the outer pipe, and the washing machine hose is connected to its other end.
- The end of the hose is connected to the machine.
- At the final stage, everything is checked for leaks.
When connecting, you must fulfill the basic and quite important requirements:
- Do not lay the hose in places where there is a risk of possible mechanical damage.
- Under no circumstances should you allow the slightest tension, because deformation may occur due to vibration of the machine at maximum speed. The hose must lie completely free.
- All connections must be reliable and provide 100% tightness.
- Before entering the washing machine, you can install a filter to protect all systems from small particles and rust; this will only benefit the unit and extend its service life.
If you comply with these requirements, the floor in the room will be constantly dry while pouring water into the household appliance. That's all the tricks on how to independently organize the connection of the washing machine to the water supply and sewerage system.
Stages of installation work
Once your new machine is delivered from the store, it is stripped of any packaging materials and shipping fasteners. Then the height of the legs is adjusted, and the machine is connected to communications. From this moment you can start the first wash.
Step #1 - Removing the Shipping Bolts
To prevent the moving parts of the washing machine from being damaged during transportation, they are secured with special fasteners (bolts, bars, brackets).
If they are not removed when turning on the machine, the owner of the equipment will be disappointed. It will inevitably fail. To prevent this from happening, the bolts are unscrewed, the plastic spacers are removed, and the brackets are removed.
Bolts are used to secure the drum during transportation. Before turning on the washing machine, the fixing parts are removed. If this is not done, the chassis will break.
Fasteners should be packed in a bag or box and placed in a safe place. They must be saved in case of moving or delivering the equipment to a repair shop.
Special plugs supplied with the device are inserted into the holes for the bolts.
Step #2 - connecting to the water supply system
The machine is connected to the cold water supply using the included flexible hose. A hard connection is not recommended, since vibrations will affect the pipes, gradually destroying them.
The reliability and durability of the connection to the water supply depends on the quality of the parts and the experience of the person doing the connection. When connecting to a metal pipe, a connection is made into the water supply using a crimp coupling or a mortise clamp.
A filter is inserted into the water inlet, which is included with the unit. The nut connecting the hose to the machine is screwed in by hand. The rubber seal ensures tightness. The second end of the hose is also manually (without keys) connected to the cold water tap.
The hose is connected to the water supply through an embedded pipe or tee. As a rule, it has a filter to purify water from contaminants. It is connected to the machine using a conventional threaded connection.
Step #3 - arrangement of drainage of used water
The temporary and simplest solution for organizing water drainage is to place the end of the hose into the bathtub or sink. Typically, waste water is drained into a siphon located under the sink through a splitter.
Experts do not recommend lengthening the drain hose, as this will quickly wear out and create an increased load on the sump pump.
The hose must be long enough to allow it to sag and form a loop. The water that will be in the fold will block access to the unpleasant odor coming from the sewer.
To properly connect to the sewer line, you need to connect the drain hose. This is done in one of the following ways: directly into the sewer or through a drain in a siphon under the sink.
To prevent water from draining by gravity and the spread of unpleasant odors, a water seal is created by bending the hose. Its upper level should be 60 cm above the floor plane. Detailed instructions for connecting a washing machine to the sewer and water supply are given in the following article.
Step #4 - adjusting the legs according to the level
The rotation of the drum should be smooth, without distortions. This is achieved due to the strictly horizontal position of the upper plane.
The inspection is carried out using a building level. If the deviation is more than 2°, the legs will need to be adjusted. This is done by twisting them.
If the machine is not placed in a strictly horizontal position by adjusting the legs, it will “jump” and make loud noises, creating discomfort for others
To prevent the tightened nut of the leg from unscrewing, it is secured with a lock nut. Correctly aligned supports are one of the prerequisites for the correct operation of the washing machine.
Strong vibrations can lead to breakdown of individual parts of the machine and disable the unit. You should not level the position of the machine by placing pieces of wood, linoleum or other spacers under the legs, as they can easily jump out during operation.
Step #5 - connecting to power supply
The optimal solution is to connect to the panel using a three-core cable on which a circuit breaker is mounted. Protection against short circuit to the housing is provided by an RCD device.
The outlet also has special requirements. It is mounted above the floor level at a height that will not allow water to enter in the event of a leak - not lower than 30 cm. In addition, it must be grounded.
We recommend that you familiarize yourself with the principles of installing an outlet for a washing machine, which is supposed to be installed in the bathroom.
Correct placement of the outlet directly affects the performance of the washing machine in the future. Indeed, in the event of flooding, the equipment will be deprived of power supply, and the electrical point will require resuscitation work
Step #6 - Verify installation is correct
If all the steps have been carried out step by step, taking into account professional recommendations, and the machine is connected to all communications and the plug is inserted into the socket, then it’s time to test its performance.
And at the same time make sure that all actions are performed correctly. To do this, water is supplied and the operation of the unit is checked. those. it starts - washing without laundry. If leaks are detected in the hose connections, the nuts are tightened.
Compliance with a strict sequence of installation work, taking into account professional recommendations, is a guarantee that the machine will be installed correctly and its operation will not cause problems
Another important point to remember is preserving the packaging from the new washing machine. The fact is that it must be stored for 7 days in case of exchange if the machine turns out to be faulty, defective or damaged. The reason for the return may also be a discrepancy between the dimensions.
What you need for installation
The operating principle for installing modern standard household washing machines is the same. To do this you will need:
- Tools
- wrenches in sizes 10mm, 17mm and 30mm, a 30mm wrench can be replaced with an adjustable wrench;
- regular flat screwdriver;
- universal silicone sealant with a gun;
- construction level.
- Additional spare parts
- drain hose with brush for washing machine;
- two automobile clamps d 16-25 mm;
- rubber adapter cuff d 50-25 mm;
- inlet hose for washing machine.
Choosing a location for installation
It is necessary to choose a permanent place for the washing machine. The choice must be approached with all responsibility, since once the machine is connected, it will not be possible to move it without investing additional costs for dismantling and new installation. When choosing a location, they are guided by the size and functionality of the room. Usually they choose a bathroom, toilet, kitchen, and there are often cases of installation in the corridor.
Stage 2. Preparing for installation
The new washing machine is supplied for sale in the original packaging and is equipped with various transport locks . They are designed to protect internal mechanisms from vibrations and spontaneous movements during transportation. Before the first start, be sure to remove all protective elements to avoid mechanical damage.
The fixing fasteners are located in the following places:
- On the back of the case there are brackets that hold the power cord and hoses connecting to communications.
- Sealing bars are inserted between the tank and the body of the machine. To remove them, open the lid and slightly tilt the device forward.
- During transportation, any model is equipped with transport bolts that secure the drum from arbitrary rotation. For different models they can be located on the front or back wall. To determine their locations, you need to read the technical instructions.
The transport bolts must be unscrewed and pulled out together with the fixing brackets.
All fastening elements must be removed in case of sudden breakdown of the washing machine. They will need to be reinstalled in their places when transporting the equipment to the repair shop. After dismantling all the transport locks, you can proceed with further installation of the washing machine.
Selecting a location
There are different location options that owners choose when installing washing machines in the bathroom. Let's consider each of the methods in more detail.
Under the table top
An option with many advantages:
- you can install and immediately connect the washing machine to ready-made communications;
- the equipment will look not as a separate part, but as a single whole with the countertop;
- instead of emptiness, the space under the sink will be filled.
Let's highlight the disadvantages of this option:
- the possibility of water entering from the sink, which can lead to a short circuit;
- due to the low hatch, you will have to bend your back to operate the equipment;
- There is a lot of vibration not only from the machine, but also from the tabletop and everything on it.
Among the features of this installation option, it should be noted that the equipment should be purchased in sizes smaller than the sink (if the device is placed under it), and it is necessary to leave free space up to the wall so that the hoses can fit.
In a niche
In some cases you have to make a niche in the wall. In all respects, this installation method is the most convenient. The machine is located in the depths, without protruding or occupying a passage space. The recess can be either open or closed. In the second option, the equipment will not be visible. To close a niche use:
- roller shutters;
- swing doors;
- roller blinds;
- fabric curtains;
- blinds.
In the closet
In this case, a voluminous cabinet is built from floor to ceiling. A machine is installed in the lower part, and a place for storing household goods is equipped at the top. This is a kind of “storage room”. This option can be either open or closed.
On the wall
An unusual way to install a machine in the bathroom. It is used in the absence of other places. Before installing the equipment, it is necessary to thoroughly prepare the wall using high-strength materials. If placed correctly, you will not have to worry about the machine falling.
Accommodation options
There are several places where you can put a washing machine:
The most problematic option is the corridor. Usually there are no required communications in the corridor - no sewerage, no water. You will have to “pull” them to the installation site, which is not at all easy. But sometimes this is the only option. In the photo below there are several interesting solutions for how you can place the typewriter in the hallway.
The photo shows an option for installing a washing machine in a narrow corridor. Making something similar to a portal is also a solution. Hide it in a bedside table. Build it into hallway furniture.
The toilet has all communications, but in typical high-rise buildings the size of this room is such that it is sometimes difficult to turn around there - there is no space at all. In this case, washing machines are placed above the toilet. To do this, make a shelf so that when sitting on the toilet you do not touch it with your head. It is clear that it must be very durable and reliable, and the machine must have very good shock absorbers. In addition, they must be set perfectly, otherwise they may “jump away” during the spin cycle. In general, with this method of installing a washing machine, it doesn’t hurt to make several strips that will prevent it from falling off the shelf.
The shelf is solid and reliable, but slippery - a rubber mat is needed under the legs for shock absorption. Powerful corners are built into the wall, with a washing machine installed on them. The plastic stops were removed from the legs, and holes were drilled in the corners for the remaining screws
The installation is reliable, the only important thing is that vibration does not tear the corners out of the wall. You can close it with vertical blinds. This is already a whole cabinet. The only thing missing is the doors
In the bathroom and combined toilet there is usually not very much space either, but still more than in the toilet. There is a choice here. If you have space, you can place the washing machine next to the sink. You can install a table top on top, which will be a logical conclusion and will also solve the problem of water getting on the body. To make everything look organic, you need to choose a machine of such a height that it fits into the size, and the sink itself is better square - then they will be wall to wall. If there is not enough space, you can slide at least part of the body under the sink.
Place the washing machine next to the sink. Nowadays fashionable countertops in the bathroom can be decorated with mosaics. If space allows, simply place the machine next to the sink.
There is a more compact way - to place the washing machine under the sink. Only the sink needs a special shape so that the siphon is installed at the back.
To place the washing machine under the sink you need a special sink
One of the sinks under which you can put a washing machine
The next option for installing a washing machine in the bathroom is on the side of the bath - between its side and the wall. Today, case sizes can be narrow, so this option is a reality.
Narrow bodies are no longer a rarity Between the bathtub and the toilet The sink should not be smaller than the body No one bothers you to install a sink on top
Just keep in mind that installing such equipment in bathrooms or a combined bathroom is not the best idea. Due to increased humidity, the case begins to rust quickly (tested from my own experience). However, there is usually not a lot of space, although in principle, you can put the car under the washbasin or hang shelves above it. In general, it's up to you.
Another popular place to install a washing machine is in the kitchen. It is built into the kitchen set. Sometimes they close doors, sometimes they don’t. This is at the discretion of the owners. Several interesting photos are in the gallery.
Doors with a cutout for a “porthole” Place in a kitchen cabinet The washing machine looks quite organic in the kitchen unit
Stage 1. Selecting a location for installation
Rules for the location of the washing unit
The operating rules for washing machines require compliance with a number of mandatory conditions for their installation. The base on which the unit is located must be level and strong, without horizontal distortions.
Otherwise, vibrations and beatings of rapidly rotating components and parts may occur, which leads to premature wear of expensive equipment. For the same reason, you should not place the machine on soft carpets - it should stand rigidly and as stable as possible.
There should be ventilation gaps around the machine body to prevent overheating of the mechanisms and the electric motor during operation. It is desirable to provide an optimal working atmosphere in the room, without sudden changes in temperature and humidity.
Determining the installation room
The convenience of further use of the washing machine largely depends on the correct choice of installation location. Most often, washing machines are installed in the following rooms:
Bathroom
The most traditional place to place washing machines. There are all the necessary communications to connect - water supply, sewerage, electricity. The only problem may be the small area of the room. This is especially true for old-style apartments with combined bathrooms.
Kitchen
Another popular option for the location of the automatic machine. There are also water supply, sewerage, and electricity, so there are no special connection problems. The problems for placing the device in the kitchen of a standard apartment are the same as for the bathroom - lack of free space.
Corridor
An option that is occasionally used if it was not possible to install the washing machine in the bathroom or kitchen for some reason. Installing a washing machine in a hallway is possible if there are sewer and water pipes running through it that can be cut into.
Preparatory work
A new washing machine needs to be unpacked - sometimes this takes almost as much time as installing the unit.
Unpacking your washing machine can take a long time
Then you need to be sure to study the instructions, which schematically show the installation locations of the transportation bolts. Keep in mind that for each model of household appliance, the number of such parts and their location may vary. Even experienced craftsmen in such matters always follow the recommendations of the washing machine manufacturer.
Shipping bolts are installed to ensure that moving parts of the equipment are not damaged during transportation. In addition to them, temporary valves in hoses or pieces of foam inserted into the body can be placed in the machine. Before putting the washing machine into operation, all these elements must be removed, otherwise the unit may break.
Often, household appliances come with a key for removing bolts, and special plastic plugs are used to close the resulting holes.
The transport bolts are unscrewed with a special wrench included with the washing machine.
Only after completely unpacking the washing machine can you begin to connect it.
Wire size for washing machine
To connect the washing machine, it is recommended to lay a separate wire with a cross-section of at least 2.5 square meters. mm. It is recommended to connect the grounding wire to both the body of the washing machine and the outlet. This option will provide maximum security
Particular attention must be paid to the connection points of the wire with the automatic switch and the socket, ensuring the largest possible contact area. Increasing the wire cross-section is usually impractical
In conclusion, we note that the socket and residual current device must be in an easily accessible place for quick disconnection from the electrical network in the event of a malfunction. The photo below shows an example of installation in a panel next to the washing machine. If the apartment has a separate shield, then it is advisable to place the protection and grounding device in it, especially if there is not enough space next to the washing machine or you do not want to spoil the appearance of the walls. It should be remembered that following all the recommendations outlined in the article significantly increases your safety.
Getting to know the instructions
Before you start working with the automatic machine, read the instructions! It contains a lot of useful information: what kind of outlet should there be, how to connect the drain and water supply, how to adjust the position of the unit, what malfunctions occur most often and whether you can fix them yourself, and much more.
Reading technical documentation is a separate step, since rarely does anyone turn to the manufacturer's prompts before a problem arises. This is usually only done if something doesn't go according to plan. You shouldn't do that.
The instructions provide detailed recommendations regarding the model of your washing machine, compliance with which will prevent many troubles. Do not ignore the manufacturer's advice: in the event of a breakdown, failure to follow them may result in your case being considered non-warranty.
How does a washing machine work?
Today, a large line of products for washing soiled clothes is produced. The most popular types of equipment are automatic machines, which allow you to perform all the work with virtually no human intervention. His task is to choose the optimal mode for processing things, add washing powder + load dirty clothes into the drum.
How to connect a washing machine to the sewer
After installing the program, the electronics itself coordinates the operation of all modules.
- The hatch door is blocked and cannot be opened during washing.
- A signal is sent from the control module to the solenoid valve to which the inlet hose is connected. Cold water is poured into the machine from the water supply network. Its level is controlled by a sensor.
- Detergents flow into the drum under the influence of a stream of water from the dispenser.
- The heating element, converting electrical energy into thermal energy, heats the water to a given temperature.
- The motor begins to rotate the drum. During the washing process, the direction of rotation (clockwise and counterclockwise) and speed change. Spinning is performed at the highest speeds.
What does a washing machine consist of?
During one wash cycle, the water is drained several times. The main elements of the drainage system are a pump (pump), a filter that blocks foreign objects from entering it, and a drain hose, which is connected to the pump at one end and discharged to the sewer system at the other.
Factors that determine the duration of washing
The hose can have a length from 1 to 5 meters. The pump, most often of the synchronous type, consists of a motor, an impeller and a volute, to which the hose is connected. The pump operation is controlled by an electronic module. Before draining, the water passes through the pipe and filter element, from where, using the pressure created by the impeller, it is discharged into the sewer through a flexible drain hose.
Washing machine drain pump
Adjusting the legs
Electrical diagram of a washing machine.
The washing machine must be in a stable position. It is necessary to completely eliminate all possible distortions. The coating under the device should not be slippery. It is advisable not to install the machine in built-in furniture, otherwise the vibration created during spinning may destroy it.
It is necessary to correctly position the top of the machine in a strictly horizontal position. Leveling is done using a building level. Any deviations should not exceed 2°. In addition, the car should not sway. To provide stability, the machines are equipped with adjustable front legs. Before making adjustments, you must first loosen the fastening nut. The leg then rotates, lengthening or shortening, to the desired height. After this, by tightening the fastening nut until it stops, the leg is fixed.
In general, rigid fastening of the machine to the floor is not required. But sometimes this may be necessary, for example, if the installation is carried out on a plinth, slippery or wooden floor, etc. Special brackets are provided for attaching the adjustable legs.
Connecting the water drain to the sewer system
When connecting the drain hose to the sewer, please note that the drain hole should be located at a height of 60 cm - 90 cm from the floor level. This is achieved by connecting an additional drain hose to the standard drain hose, fixed around the perimeter of the rear wall of the washing machine. Both hoses are connected with a brush, which acts as an adapter. To ensure reliability, the junction of both hoses with the brush is tightened with automotive clamps d 16-25 mm using a regular flat-head screwdriver, without much effort. Then you should extend an additional drain hose to the drainage point into the sewer. If it turns out to be longer than the distance to the drain, then it is moderately shortened, cutting it with a knife to the required length. Then connect the drain hose to the drain pipe, using a rubber adapter cuff d 50-25 mm if the pipeline system is made of plastic with a diameter of 50 mm.
If the connection is planned with an old cast iron pipe, then a rubber adapter sleeve with a diameter of 70-25 mm will be required. Before connecting the washing machine to the sewer, the cuff and hose at the connection points should be coated with universal silicone sealant. In order to ensure optimal flow of drained water, you need to insert the drain hose into the sewer to a depth of no more than 5 cm.
Connecting to the water supply
There are three ways to connect the washing machine to the water supply:
- through the coupling;
- through an angle tap;
- through a tee valve.
The choice of connection method to the water supply depends on the location of the connection. For example, if the kitchen sink faucet is connected to the water supply through a flexible hose, you can connect at the same point. To do this, you need to turn off the water, unscrew the hose from the outlet and connect the tee.
There are special tees for sale for washing machines: the size of the fitting in them corresponds to the size of the nut on the intake hose, and they are also equipped with shut-off valves. Next, the previously disconnected plumbing fixture and the intake hose of the machine are connected to the tee. The connection point can be sealed with FUM tape for reliability.
If this method is not suitable, you will have to connect to the water supply in a different way - cut into a pipe in the bathroom or kitchen. To do this, you will need a coupling with a sealing gasket, screwdrivers and a drill with a metal drill. The insert must be in an accessible place so that it is possible to open/shut off the water.
Step-by-step instructions on how to properly insert.
- Check the fastening of the water pipe and, if necessary, secure additionally with clamps or clips.
- Turn off the water.
- Secure the coupling with bolts or clamps to the pipe over the sealing gasket.
- Drill a hole in the pipe by inserting the drill through the coupling.
- Tighten the coupling, making sure that the gasket does not move.
- Attach the shut-off valve and the intake hose of the machine to the coupling.
When connecting with an extension, you need to make sure that the extension hose is located in a safe place - under the bathroom or furniture in the kitchen. It is also possible to mount it to the wall and then cover it with plasterboard.
Water supply device
To properly connect the washing machine, the key is to ensure water pressure - at least 1 atmosphere. For permanent connection, durable flexible hoses with a diameter of 0.75 inches are used. If the equipment is installed away from plumbing units, an extended pipe is used. It is recommended to check the condition of the water entering the machine. Most often, a water purification filter in the form of a mesh is installed at the place where the hose connects to the washing machine.
Depending on the installation location and the type of plumbing used, there are different variations in the water supply to the device:
- Installation with tight crimp coupling.
- Installation using a straight fitting.
- Connection using a tee.
- Connecting a washing machine yourself if there is no connection with water supplies (alternative method).
If pipes made of metal alloys are used indoors, the water supply valve is installed using a crimp coupling. A bendable soft pipe communicates with the machine on one side, and with the supply tap on the other. The durable coupling is divided into two halves, placed on a metal pipe and secured with screws, and a threaded outlet is attached to it. A ball valve is screwed into it. Through a put-on coupling, a hole is cut in the pipe to allow water to flow through the pipe.
Installation of the ferrule
For metal-plastic and polypropylene means of communication with the water utility, a fitting will be required. To install it, it is necessary to remove a section of the pipe that serves to move cold water. A straight fitting is installed in the resulting hole, and a ball valve is installed on it. All joints are sealed.
Connecting a washing machine using a fitting
One of the most basic methods is to connect it to a water tap using a tee. To implement the method you will need a long hose. This type of connection looks unaesthetic, but the method is the most elementary and quick (does not exceed 10 minutes).
A more practical and simpler method is to connect to the hose that supplies water to the toilet cistern. Its implementation is possible provided that the washing machine and the tank are located at a short distance (within the same room). In this case, we also need a tee for connection.
In some situations, for example, in a private summer house, there is no connection with the water utility. There is still the opportunity to connect the washing machine yourself. You will need a large water tank located a meter or more above the floor level, to the bottom of which an inlet hose is routed. There is also a more expensive connection method; to implement it you need to purchase a small pump.
Useful tips from experts
There are many options for how to connect a washing machine to the water supply, sewerage and electrical networks. Some of them are not correct and can shorten the life of the equipment and negatively affect your health. To prevent this from happening, we provide readers of Sam Electrica with some important tips:
- Under no circumstances connect the grounding contact to radiators or gas and water supply lines.
- Instead of fulenta, you can also use flax and paste, which are no less effective at blocking leakage.
- Few people know, but an automatic washing machine can be connected not only to the central water supply, but also to an ordinary barrel of water. All you need to do is place the tank at least 4 meters above the equipment itself. A distance of 1 meter will give a pressure of 0.1 atmosphere, while 0.4 atmosphere will be enough for the machine to operate even without a pump. This idea is often used in villages at the dacha, where the water supply is unstable or there is no running water at all (a well or a borehole).
- Align the building to building level. The slightest misalignment will cause vibration.
- Do not place pieces of rubber or linoleum under the feet. You only need to adjust the height by unscrewing/twisting them. Substrates will also negatively affect the vibration of equipment during centrifuge operation. Even if the floor is uneven, to prevent the washing machine from jumping, adjust the legs correctly.
- Do not throw away the shipping bolts, as... they may come in handy in the future (for example, if you move and take all your equipment to a new place of residence).
- When installing a temporary drain, keep in mind that the hose may fall out of the bathroom (which happens very often) and flood your neighbors. If even a short hose is not enough, it is better to go to a plumbing store for a new, longer one, and then correctly connect the washing machine to the water supply and drain.
That's all the technology for installing and connecting a washing machine with your own hands. We hope that the information was interesting and useful for you!
Related materials:
- How to connect a dishwasher
- Why is the washing machine noisy and how to fix it
- How to replace electrical wiring in a house?
Stage 3. Leveling the washing machine
For proper operation of all components and assemblies of the washing machine, it is necessary that it stands on a solid and level base. The equipment should not wobble or vibrate while the drum rotates.
To dampen vibrations, you can use special anti-vibration stands, which are sold in household appliance stores as additional accessories for washing machines. You can also easily make such vibration-damping pads yourself by cutting them out of a piece of felt or rubber 3-5 mm thick.
When installing washing machines, it is very important to maintain a strictly horizontal position of the housing. When distortions occur, the wear of components increases, especially rapidly rotating ones: drum mounts, pulleys, rolling bearings
In this regard, the base on which the machine will stand must first be leveled.
Small unevenness in the floors can be leveled by turning the adjusting nut on the support legs to the right or left with a wrench. This allows you to change their height by 1-2 cm up or down.
To determine a strictly horizontal position, it is recommended to use a building level. The slope angle of the equipment ready for work should not exceed 2-3o.
Alignment
It is very important that the unit stands level relative to the floor surface, otherwise overloads will occur and the machine may quickly fail. To prevent it from “jumping” due to the imbalance of the drum, it is also important to set the technique correctly.
The machine should not swing under any circumstances; all four legs should be firmly installed on the surface. You can determine whether the washing machine is tilted relative to the floor by looking at the level by simply placing it on top of the unit.
To adjust the position of the equipment, do not use foreign objects, for example, wooden blocks or pieces of linoleum. The height of the unit is changed by twisting the legs.
The position of the washing machine relative to the floor is adjusted by changing the height of the legs
Connecting an automatic washing machine to the sewer yourself
Temporary option
The machine is connected to a ready-made sewer outlet to solve the problem of draining dirty water. There are two schemes. For a temporary option, use a special hose. Using special fixing parts, they are secured to the edge of the bathtub, sink or toilet.
Fixed drain
The permanent scheme provides for a non-movable drain device. It can be done using a siphon in the design, which has a separate outlet under the knee. It is used to connect automatic washing machines. Experts do not recommend using a regular siphon instead, because dirty water will accumulate in it, creating a plug and spreading an unpleasant odor.
Can be connected without a siphon. If the sewer pipe has a diameter of 4-5 cm, the outlet of the device is connected directly to this element. The drain hose, bent in the shape of an S, is inserted into the pipe so that it does not touch the wastewater. It is well surrounded with sealant and sealed. The distance from the inflection point to the floor should be more than 50 cm. If you take a larger size, the load on the pump will increase, as a result it will fail.
If the design does not provide for a check valve, then during assembly there is a height limitation regarding the location of the drain hose. The manufacturer provides specific information in the instruction manual.
The water drainage hose has a diameter of 22 mm, but there is no special socket for the 32 and 50 mm pipelines. For connection, a rubber reduction is used with a transition to 22 mm. It's convenient and sealed.
Using water softeners to prevent scale
I am surprised by a TV commercial that frightens housewives by flooding an apartment due to a failed tubular heating element (TEN) as a result of being coated with scale. Physically this cannot happen. The heater fails due to overheating, as scale impairs heat dissipation. As a result, the nichrome spiral melts, the circuit opens, and the heating element stops heating the water. Failure of the heating element cannot break the tightness of the machine's tank; in the worst case, the machine will simply stop working.
To check the functionality of the heater, it is enough to set the temperature with the regulator lower than the temperature of the water in the water supply. Then the machine should work. If it works, then the heater is definitely out of order and needs to be replaced. You can temporarily continue to use the machine, but you can only wash it in cold water.
Regarding the use of emollients. Numerous conversations with washing machine repair technicians allowed me to draw a clear conclusion - the uncontrolled use of all kinds of softeners does more harm than good. It's better not to use anything
since any water softener contains a weak acid that corrodes the parts of the tank.
The decision about the need to use emollients can be made by looking into the electric kettle. If its heater or bottom (if there is no external heater in the kettle) is covered with a thick white layer of scale,
Then the water in the tap water is hard, and
softening agents must be used.
Communications wiring diagram
Of course, you need a reliable CM connection diagram. To play it safe, you need to run a cable of the required cross-section directly from the distribution panel, also including three important components in this circuit:
- machine;
- emergency shutdown device;
- grounding
If it is not entirely convenient for you to pull the wire from the panel itself, because it is located in the corridor, or even in the entrance, then there is a simpler solution. You can connect it to another outlet - from the stove will also work. From the socket it is necessary to separate the wire into 3 wires.
As a result, all the wires converge in a good ceramic socket of the “Euro” type
It is important that such an outlet provides the ability to connect a ground wire
Next, put the wires in the box, and hide the disconnect device and the circuit breaker with special covers made of aluminum or plastic. This design will look good in the interior and will prevent the harmful effects of moisture on the wires.
Simplified option for connecting a washing machine
The connection diagram can be made even simpler if you buy a machine that already has a shutdown system built into it. But don’t expect to easily find a high-quality 2-in-1 device – there aren’t many of them on our market yet.
Having figured out how to connect the washing machine to electricity, you can safely proceed to other communications - sewerage and water supply.
Connection in the absence of running water
In the absence of running water, using an automatic washing machine is difficult. The design requires a pressurized water supply. How to connect the washing machine in this case.
To obtain the required pressure and water supply, you can use a container. It must be raised to the attic of the house or to the second floor. This type of installation of a washing machine is not entirely convenient. The water will have to be lifted manually to fill the tank. In addition, when using the tank in the attic in winter, it is necessary to additionally insulate it. This option is possible if it is used seasonally, for example, in the summer at the dacha.
If there is no running water, you can connect to the tank
If you have a well or a large container with imported water in your dacha or private house, it is better to install a water supply system. Small pumping stations are used to pump water under pressure. It includes a pump, automation and a water tank.
You can also use an existing submersible pump. Then you only need to buy a tank with a rubber bulb and automatic filling. This option is convenient because the pumping station is quiet and easier to maintain.
Equipment for creating a water supply system in a private house
You can use rainwater for washing, having previously purified it using a coarse filter.
If you liked the article and found it useful, share it with your friends. Still have questions? Write to us in the comments.
Connecting the washing machine to the sewer
To connect the washing machine to the sewer, you need to buy a siphon. And after installing the siphon, we will attach our drain hose to it. The hose must be securely fastened to prevent water leakage.
You can also connect the drain to a cast iron pipe. You can see how to do this in the photo below.
There is also an option with draining water into the bathroom. See photo:
After you have connected your washing machine to all the necessary communications, it needs to be leveled. To do this you will need a level.
The whole process is quite simple. Place a level on the machine, look in which direction the skew is and remove it. In order to change the tilt of the body in one direction or another, you need to increase or decrease the height of the legs. To do this, you just need to twist them in one direction or another.
After our machine was installed, it was time for a dry test wash. That is, without things. Add some washing powder and start washing. When the cycle is over, you can safely throw in your dirty laundry and enjoy the fruits of your new washing machine.
Below you can watch the whole process in video format. Happy installation!
Checking the correct connection
Before turning on the washing machine for a full wash, you need to perform a test run to make sure that the connection is made correctly.
The test begins with drawing water - the machine must fill the tank within a certain time specified in the technical passport. In this case, you need to monitor not only the speed of water collection, but also the tightness of all connections and hoses. Any leaks that occur should be repaired immediately.
The collected water should heat up to the set temperature in 5-7 minutes. No extraneous noise is allowed when the unit is operating. If the machine knocks or makes a lot of noise, you need to stop it and check again that the connection is correct. At the last stage, check the spin and drain.
After checking the connection of the washing machine, you can load laundry into the drum and start washing
So, you can connect the washing machine without calling a technician if you use the operating instructions and recommendations outlined in our article. Be careful and careful, and you will succeed!
First start
After connecting the washing machine to all communications, we proceed to a test run. To do this, choose a program with a short operating time.
During the test run, pay attention to the following:
- how quickly water fills the tank;
- did the water heat up after dialing (5-7 minutes);
- are there any leaks;
- does the machine make any extraneous sounds?
- are there any big vibrations?
In order for the machine to last for a long time, we recommend that you read the article - how and with what to clean the washing machine. In it you will learn the rules for caring for your washing machine, when and how to clean it.
Connection without grounding
For safe use of the washing machine, in order to avoid electric shock or damage to the unit, grounding is necessary, which requires a three-phase network. But the wiring in the old housing stock does not meet modern requirements and electrical safety rules. The way out of this situation is to use a residual current device or a residual current switch, which is equivalent. In the event of an electricity leak, these devices instantly turn off the faulty network, protecting a person from electric shock and fire. It is also necessary to install a circuit breaker (circuit breaker), which will provide protection against overloads and short circuits. The machine is selected depending on the power of the washing unit. If the power consumption of the machine is less than 2 kilowatts, then the machine should be rated at 10 amps; if it is more than 2 kilowatts, then the machine should be rated at 16 amps.
Compliance with these rules will ensure long and reliable operation of a standard household washing machine.
Stage 6. Connecting to the electrical network
To supply the automatic machine with electricity, a regular household network is used. Experts recommend making an individual connection to the washing machine with an electrical cable that is grounded.
Due to the increased humidity in washing areas, sockets with improved protection against moisture should be used. The cross-sectional size of a three-core electrical cable should not be less than 1.5 cm2. Do not use extension cords or tees when connecting the machine to the electrical network, as they can lead to heating at the contact points.
Choosing a location for installation
The first thing you need to do is choose the right place where the newly purchased washing machine will be installed and connected. This is a rather important question, since household equipment is a stationary device, and changing its location in the future will be problematic.
First of all, you need to proceed from the fact that the necessary utilities (sewage, water supply, electricity) must be located near the installation site. In this regard, the most acceptable options are placement in the bathroom or kitchen.
In the latter case, it is advisable to make the machine built-in, that is, place it in the kitchen unit.
Of course, if you wish, you can install the machine in the corridor, but in this case, serious difficulties may arise with connecting to all the necessary communications.
The place where the machine is installed must have a solid, level base. In addition, it must be freely accessible.
Please note that top loading models are less demanding in this case