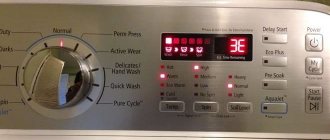
If you hear an extraneous hum while washing in a Samsung washing machine, this is the first sign that something is happening to the drum shaft bearing. Do not wait for the moment when it collapses and the shaft begins to wear out - repairs can be very expensive for you, and you may have to buy a new assistant. Timely replacement of bearings will save you from troubles.
Causes
There are two main reasons that contribute to bearing wear.
- Natural wear and tear is common to all washing machines . It is impossible to protect yourself from this process. On average, bearings last about 5-6 years. If a part fails after so many years of operation, then the failure is reclassified as natural wear and tear.
- The situation is different with premature failure. There may be several reasons for this situation to arise.
- Wear of the seals occurs due to a violation of the tightness of the structure, as a result of which the parts come into contact with water, which washes away the lubricant. Their protective functions are reduced, which leads to the formation of corrosion phenomena on the bearings.
- Violation of the norms for the weight of loaded laundry creates an increased load on the drum and bearings.
- Incorrect installation of the machine in violation of the rules and regulations reduces the performance of all parts and shortens their service life.
Why do you need to change bearings?
The bearings of a washing machine perform a very important task - they contribute to the correct and uniform rotation of the drum. Due to the fact that the latter makes a large number of revolutions, they quickly fail and must be replaced in a timely manner.
Worn bearings can cause a malfunction in the process of washing and spinning clothes, as well as loud noise when the machine operates. If parts are not replaced in time, the drum may fail, the repair of which will cost you a lot.
Replacing the bearing on the drum of an Ariston washing machine. Stage-by-stage execution of work
We will tell you how to change the bearing in an Ariston washing machine. Disassembly of the SM will be identical for Hotpoint Ariston Aqualtis, Hotpoint Ariston ARSL 105, Ariston Margarita 2000 and other models.
Covers and panels
Take a Phillips screwdriver. Walk around the washer, standing towards the back wall. Remove the two bolts that secure the top cover. Then slide it forward and remove it from the body.
Proceed to the back panel. Unscrew the screws around the perimeter and set the cover aside. At the same time, remove the drive belt - turning the pulley by hand, pull it towards you.
Control Panel
Go to the front of the washer. Pull out the detergent dispenser: pull the tray towards you by pressing the lock in the center; take it out and put it aside. There are several bolts behind it, and another 1-2 bolts on the opposite side of the panel. Unscrew them and unfasten the plastic latches.
Now the panel is supported only by the wires - you can throw it on top of the case. But if you decide to disconnect, it’s better to immediately take a photo of the location of the connectors for proper connection.
We recommend: What to do if the dishwasher does not drain water and stops: deciphering error codes
Top part
You need to remove anything from the top of the tank that might interfere with its removal. This:
Powder receiver. Loosen the clamp on the pipe leading from the hopper to the tank. Remove the pipe. Disconnect the inlet valve contacts and unscrew the fastening screws. Remove the valve together with the powder receptacle.
- Counterweight. Unscrew the bolts securing the upper counterweight and remove it.
- Pressostat. Disconnect the pressure switch hose that is attached to the tank, otherwise it may break during dismantling.
Front Panel
Open the hatch door. Having bent the sealing rubber, use a screwdriver to pry up its clamp and pull it out of place.
Unfasten the hatch lock wiring (UBL) by placing your hand behind the body. First unscrew the two mounting bolts.
If you are afraid of damaging the door glass, we recommend removing it immediately. To do this, unscrew the screws that secure the door hinges and set it aside.
All that remains is to unscrew the screws around the perimeter of the front panel and remove it. Now unscrew the lower counterweight bolts to remove it.
Rear end
Disconnect the wiring from the electric motor at the bottom of the tank. Unscrew the bolts (three to four pieces), move the engine first forward, then pull it back and remove it from the housing.
Disconnect the heating element wiring. The heater itself does not need to be dismantled. If you damage its sealing rubber, you will have to completely change everything.
Also, if there is wiring attached around the perimeter of the tank, use wire cutters to cut the clamps and move the wires to the side.
Shock absorbers
The tank is secured only by shock absorbers and hanging hooks. Unscrew the shock absorber screws, remove the tank from the hooks and pull out the tank.
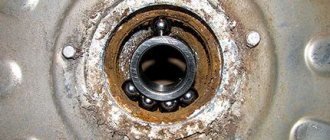
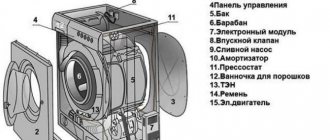
You have disassembled the washing machine. Now you need to get to the bearings.
The process of removing the drum from the tank
To disconnect the tank, it is necessary to position it so that there is a pulley in the upper part, which must also be dismantled. But first you need to remove the drive belt from the electric motor and pulley and disconnect the tank from the motor by unscrewing the motor fasteners. Only after completing these steps do we unscrew the bolt installed in the center of the pulley using a hexagon. Then we remove the pulley using the method of slightly scrolling the part.
We remove the clamps, divide the tank into two parts and remove the seal installed between them. One of them will have a drum. We knock out the shaft using a hammer and remove the drum from part of the tank.
Step-by-step algorithm for disassembling the machine
First, we dismantle the top cover on the washing machine by unscrewing the two fastening screws (or self-tapping screws) on the back side, which are located in the corners, then move the cover and lift it.
Then we remove the detergent dispenser; this is easy to do without special knowledge and skills:
- open all the way;
- With your thumb, lightly press the tab in the central section, at the same time slightly lift the device and pull it towards you;
- If you did everything correctly, the dispenser will come out of the place where it is secured.
Now let's dismantle the hoses supplying water to the dispenser sections and the pipe through which water with dissolved powder enters the tank. Maximum care is required so as not to damage the fastening of the clamps: using pliers, loosen the fastening, pull the hoses from their connection points.
We remove the counterweight - we disconnect it very carefully, holding its body with our free hand. We unscrew the two bolts using the appropriate head and remove it to the side.
When unscrewing the last mounting bolt, hold the counterweight because it is heavy and if it accidentally slides down, it can damage important parts of the machine.
Removing the hatch cuff
The cuff interferes with the removal of the front panel, so we remove it first. It is attached to the panel using a clamp, and the other side is placed on the drum. We find the spring connecting the ends of the holder, pry it up and remove it along with the clamp. Now you can remove the edge of the cuff and tuck it into the tank so it doesn’t interfere.
Removing the front panel
We close the hatch, find the screws at the top and bottom and unscrew them. Now the panel is held only on a small hook. Carefully remove it so as not to damage the wire connecting the hatch lock to the rest of the car's wiring. Disconnect the wire by removing the connecting chip. We put the panel aside so that it does not interfere with us.
Removing the bottom panel
To do this, carefully place the machine on its side, unscrew the four mounting bolts, and move the bottom to the side. Now we can clearly see the electric motor and drain pump. First, you need to disconnect all the wires, taking a photo, so that you don’t get confused in connecting them later.
Pay special attention! The connection contacts are quite delicate, so we show maximum caution; if you notice burning, replace the terminal.
We dismantle the tank mounting racks from the bottom of the washing machine by disconnecting the fasteners on the tank itself and the lower part of the body. There is no need to unscrew anything else except the engine: the drain pump does not interfere, you just need to disconnect the supply pipes.
Fill valve
The machine is also on its side, and we move again to its upper part and dismantle the sensors and filler valve pipes. First, disconnect the wire, then the mounting bolts, remove the valve body and put it aside.
Now you can disconnect the counterweights in the form of four springs, which hold the tank suspended with the drum inside. We dismantled everything that prevented the tank from being freely removed from the top; all that remained was to remove the control panel. It must be removed carefully so as not to damage the wires and connection terminals. We removed the front wall in advance; we still need to remove the small counterweight at the bottom of the machine.
Removing the tank
We carry out this operation with the utmost care so as not to damage any contact, otherwise additional repairs may be required, which is not our intention.
We recommend: 8 effective ways to remove a scratch from a leather product
Let's turn the tank over so that there is free access to the belt drive: remove the belt, dismantle the pulley housing using a hex key.
Advice! The pulley mounting bolt may become stuck on the thread. To avoid damaging the thread when dismantling, treat it with WD-40 lubricant - after a while it will unscrew quite easily.
The tank has been dismantled and is located outside the machine body, all the necessary photos have been taken, so we begin to disassemble the tank to get to the drum and replace the bearings.
Spinning up the tank
The racks have already been dismantled, so the two halves of the tank are held only by brackets and special clamps, the removal of which does not cause any problems - just pull them off with an open-end wrench and a screwdriver.
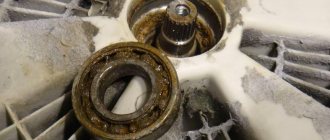
As a result of disassembly, we received three fairly large elements:
- upper part with a hatch hole in the middle;
- lower tank housing with heating element;
- the drum itself with the shaft.
When getting to the bearing installation unit, carefully examine other elements. If a breakdown or scale is detected, the defects should be eliminated: clean the tank and heating element from scale, test the element for failure, and replace if necessary.