Historians claim that the first shoes appeared in Eurasia more than 30 thousand years ago. Shoes were made from animal skins and woven from plant leaves. Since then, shoe manufacturing technology has stepped far forward; artificial materials are often used for their manufacture, which are not inferior to, and even superior to, leather in wear resistance.
But even the best quality shoes wear out over time, especially in women's boots and shoes with stiletto heels. Usually, not the entire surface of the heels wears out, but only the back part. Therefore, it is necessary to ensure that wear does not touch the base of the heel. If the base is worn out, it will have to be ground down to make the entire supporting surface flat, which is extra work and reduces the height of the heel.
Factory heels, as a rule, are made of plastic and they are fixed to the base of the heel of the shoes using glue and pins, tightly inserted into the holes provided for them in the heel.
How to work with Dismacol glue correctly?
Desmokol shoe adhesive must be applied to both surfaces that will stick to each other. After application, it should be left for 5-10 minutes to dry completely. If the mixture is absorbed into the structure of the material, it must be applied a second time and again wait 2-3 minutes.
Interesting materials:
How to set sound to Xiaomi notifications? How to build stairs to the second floor in Sims 4? How to construct a triangle using a side and two adjacent angles? How to spend Yandex money bonuses? How to spend Kari's birthday bonuses? How to spend Alfa Bank Cashback? How to spend gems? How to rotate the screen on a Samsung tablet? How to hang tulle without hooks? How to reapply self tanner?
How to remove the heel
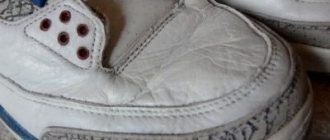
In order to change worn heels, you must first remove the factory ones from them. The contact line of the heels with the base of the heel is usually clearly visible. There is a light stripe in the photo above.
To remove a worn heel, you need to place the shoes on their side on a hard surface and apply forceful pressure with a shoe knife, rocking it in the plane of the blade, to the border between the base of the heel and the heel. You can also use a simple knife or even a flat-blade screwdriver. In this case, it is better to remove the heel from the side of the sole so that possible minor damage to the heel is not visible from the outside.
The heel has been torn off from the base of the heel of the shoes, and now removing it will not be difficult. In the same way, the heel is removed from the second shoe.
The photo shows a view of the removed factory-made heel from the installation side on the base of the heel of the shoes. Some factories include spare heels with shoes. Check to see if there are spare heels lying around in the box from these shoes. Then all repairs to replace heels will come down to spreading the factory heel with glue, for example “Moment”, and installing it on the heel of the shoes.
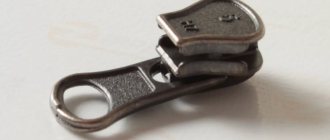
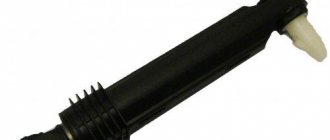
If there are no spare heels, then you can look in stores. Ready-made heels are available in plastic and metal. In the photo there is a metal powder heel for shoes with stiletto heels.
After removing the heels, you will see the heel of the shoes approximately the same as in the photo. Depending on the heel area, there can be two, three or even four holes for pins for factory heels. But the repair technology is the same for all cases.
How to restore completely damaged heels?
In fact, bad manufacturers and roads are not the only problems you have to face. Very often boots and their heels become unusable due to external factors. For example, heels can be pulled off by a cat or chewed by a dog. If it’s a shame to throw away new boots with completely damaged heels, then something needs to be done.
The repair includes the following stages:
- Tear off the insole.
- Unscrew the screws.
- Remove the heel.
- Open the heels.
- Clean off the old covering.
- Cover visible defects with epoxy paint.
- We sand the surface and cover it with glue.
- We cover the heel with leather and return it to its place using new heels.
- We enjoy a job well done!
Heel bindings
The strength of the heel attachment is determined by the materials of the parts that form the heel fastenings and the methods of attaching the heels. These two factors are to a certain extent interrelated, since the method of their attachment also depends on the properties of the materials and the height of the heels.
Adhesive heel fastenings used to attach rubber heels are quite reliable when shoes are worn: the significant thickness and high rigidity of rubber heels prevents them from partially or completely peeling off from the shoe. The strength of these bonds is determined by the same factors as adhesive plantar bonds.
The strength of nailed heel fastenings of low heels is most influenced by the method of driving nails (outside or inside the shoe), the length and diameter of the nail rods, the combination of nailing heels with their preliminary gluing, etc.
The strength of attaching heels externally with cylindrical nails with flat heads and long points is determined by the same factors as plantar nails. As in the latter, the points of the nails are bent on the inner surface of the insoles, and the heads are recessed into the thickness of the heels. The tearing of heels attached with cylindrical nails from the outside is usually accompanied by the nails being torn out of the insoles as a result of straightening and breaking off the bent point or breaking through the insole material. Only in rare cases is it possible for nail heads to break through the heel, so the strength of the fastening is almost independent of the properties of the heel material. With the correct selection of nails according to the diameter and length of the rods, the proper angle of inclination of the nails, good bending of the tips of the nails on the surface of the insoles (and when fastening with nails cut from spiral-knurled wire, also bending their opposite end), appropriate recessing (deepening) of the driven nails into heels on the running side, high strength and reliability of heel fastenings are achieved.
The strength of attaching heels from the inside with cylindrical nails with conical or flat heads and short points is determined by the contact friction forces developing between the surface of the nail rods and the walls of the punctures in the heel material. When heels attached from the inside with nails are torn off, the latter usually tear out of the heels, since the resistance to breaking through the insoles by the heads of the nails is much greater than the forces of contact friction. Only sometimes, when selecting particularly thick leather for heel fleeks or when the insole is insufficiently dense, nails remain in the heel that is torn off. The strength of attachment of heels from inside shoes is significantly influenced by the diameter and length of the nail rods, their angle of inclination, and the nature of the surface of the nail rods. In particular, the strength of attachment of plastic and wooden medium and high heels with screwed nails, despite the fact that they are driven in, is significantly higher than the strength of attachment with smooth nails.
Which shoes should be repaired?
Repairing shoes is much cheaper than buying new ones.
Any defects can now be corrected - be it a broken heel or a hole in the sole. The only things that cannot be repaired are, perhaps, either a pair that has been worn for many years, or low-quality, cheap shoes. Now in our markets and stores, for the most part, they offer light and comfortable-looking boots and shoes. However, when buying them, people are forced to contact the workshop within a few weeks, or even days. The fact is that most manufacturers save on natural materials. They are often replaced with ordinary paper and oilcloth, which wear out very quickly and begin to let moisture through.
Find a quick repair shop
Nowadays there are workshops at almost every step. Try to find out where the nearest one is. If you are located near a workshop you know, it is, of course, better to go there.
Carefully, slowly get there, try not to twist your ankle. When you contact a repair shop, you will have to wait a while, but unlike other DIY repair methods, you won’t have to throw out your favorite shoes. If you don't know where the nearest workshop is, ask passers-by or look for information on the Internet.
It is better to find an express workshop where shoes are repaired immediately and quickly. This, of course, will not guarantee that the shoes will be repaired efficiently and will last for many more years, but you will spend much less time waiting. The workshop services are also guaranteed, so you don’t have to worry about wasting your money.
Material for heels
The best material for new heels is sheet polyurethane with a thickness of 5-6 mm of medium elasticity. It can be purchased at junk dealers. When choosing, you need to check the rigidity of the polyurethane. When you apply strong pressure with your fingernail, it should bend slightly.
If polyurethane is not available, then rubber from car tires will work well. It also has high abrasion resistance. But to get a piece of flat rubber out of a round tire you will have to tinker.
What to do if your heels are made of plastic
Have you noticed that your favorite ankle boots have lost their attractive appearance? Are your plastic heels worn out and looking scary? There is a solution! If the main part of the shoe remains intact, then the heel can be painted with a special paint to match the color of the boots.
To hide the white protruding plastic, you must first degrease the surface with a solvent (eau de toilette or alcohol). Then you need to apply acrylic shoe paint with a small brush. It can be purchased at any hardware store. Another repair option is to paint it with nail polish.
Paint for heels
In hardware stores you can find a large assortment of coloring pigments and creams. But heel paint varies in properties, cost and quality. It is usually sold in bottles and with a ready-made brush. The average price is about two hundred rubles. To accurately select the color, take the damaged shoes with you to the store.
Special paint for heels can be of three types: powder, spray or water-based. You can also see the following types of dyes on the shelves:
- “Liquid leather” is a special composition for repairing leather products.
- Special automotive paint in cans for repairing things made of plastic and metal (varies in a variety of color shades, can be glossy or matte).
- Acrylic spray paint.
- Nail polish (without drying element).
- Dark, waterproof markers for touching up small chips and scuffs.
Preparing the heel for installation on the heel
To make a heel, you need to apply its outline onto a polyurethane or rubber plate. To do this, you need to attach the heel of the shoe to the workpiece and circle it around the perimeter with a marker or ballpoint pen.
The shape of the heels for the right and left shoes, as a rule, is different and this must not be forgotten when cutting the workpiece. You can also trace a worn out heel with a pen, but I prefer to trace the heel.
After applying the markings, it is necessary to cut out the heels. You can cut polyurethane with a sharp knife, wetting its blade in water to improve sliding. But polyurethane is very difficult to cut with a knife, and I prefer to cut it using a jigsaw with a wood saw installed. Polyurethane is easily cut with a jigsaw.
For cutting, the plate with the applied markings is clamped in a vice. As soon as a few millimeters have been sawn, the plate is pulled back by hand so that the jigsaw file does not get pinched. Then the heel can be cut out quite quickly. You need to cut along the outside of the line so that there is a margin. The protruding part of the heel due to the level of the heel of the shoes can then be ground off using an emery board or cut off with a knife.
The new heels are ready and you can start installing them on the heels of your shoes. But before that, the heels themselves need to be prepared for installing heels.
Methods for sealing summer and winter shoes
Spring and autumn, demi-season and winter shoes are often characterized by a honeycomb or lattice sole design. If the sole of such products bursts, as well as with prolonged wear, it gradually wears out. Voids form inside and the heel may fall through.
To restore such products, you must first remove the rubber that covers these honeycombs. To do this, tear off the insole and thoroughly clean each hole of dirt, debris, cardboard and glue residues. Then the empty honeycombs are filled with small micropore scraps and filled with silicone sealant.
Restoration continues once the sealant has dried and hardened. Prepare new insoles, soak them with sealant or glue, glue them to the sole of the shoe and press with a weight for the time specified in the instructions for the adhesive.
For summer shoes, sneakers, sneakers and other light shoes, you can buy a separate thin rubber sole and glue the products with rubber glue. This method is suitable if the products have flat soles. When gluing rubber to leather shoes, first make a 45-degree edge.
To ensure that the rubber sticks firmly and permanently to the polyurethane or nylon base of the shoe, first cut a template from cotton fabric to size and weld it to the base using a hot iron. Then glue on the new sole.
After repairs, it is important to monitor the shoes and care for the pair. Wash and dry items regularly. Which shoe polish is better to choose, see here.
Repair methods
Shoe soles can be restored at home in 4 ways. The choice of each depends on the type of material, the presence of a tread or studs, the nature of the defect and its location.
Important! To prevent your repair efforts from being in vain, seal the broken sole only after first washing it and completely drying it.
Classic method
Choose this method to restore the smooth bottom part of shoes made of rubber or polyurethane. The procedure involves stitching the sole in the area of the crack after gluing it, so you need to have the following materials:
- awl;
- nylon thread;
- shoe knife and hook;
- instant effect glue;
- matches or lighter;
- pencil;
- sandpaper;
- acetone or gasoline.
Repair of paper covered heels
The cost of materials for making high-quality shoes increases from year to year. Some manufacturers often skimp on product elements. If you find that your heels are made of paper, don't be upset.
If the back of an expensive shoe has lost its appearance, worn out and marks have appeared, then it is possible to save it. For the operation to restore your favorite shoes, you need to purchase the necessary materials at hand: a simple nail file, a hard lint-free cloth, solvent, hair dryer and paint.
Then go through the following steps:
- Gently heat the heel area with a blow dryer and remove the paper.
- Carefully treat the surface with a cloth previously soaked in alcohol or other solvent.
- Cover the required surface with acrylic paint in 2-3 layers.
- Leave in a dry place until the paint has completely hardened for a couple of hours.
How to paint heels
Before you start painting, you need to take care of the area of the boot that you do not plan to use. The paint should not get on the untouched surface. Often the shade of a hairpin can differ greatly from other elements.
To protect the shoe material, use construction tape. It will easily take the required shape, outline the border, and the tape that extends beyond the frame can be cut with scissors. It is necessary to paste over at the very beginning, before restoration.
You can also use simple tape. But there is a chance that the adhesive attached to the surface will be difficult to remove after painting. In some cases, a stream of air is used, which can "seal" the adhesive onto the "skin" of the shoe. Be careful.
Decoration
When restoring your favorite shoes, you can use decoration that will help revive the heels. In some cases, it is appropriate to apply rhinestones of various sizes. This will create a stylish accent to complement your evening outfit.
You need to glue the rhinestones carefully, after the second painting, pressing the crystals tightly against the sticky surface. If you choose small rhinestones, fix them with one layer of colorless varnish. Repeat application of rhinestones in several stages if necessary.
Heels with elegant guipure braid will look elegant. To do this, cut the appropriate material to size, adjust it in the desired position after applying the second layer of colored pigment. Leave to dry for an hour. Beautiful heels with an attractive element are ready!
The best option is to find a shoemaker
Stop a passerby and ask him if there is a repair shop nearby. If there are no passers-by nearby or you are simply embarrassed to stop them, then an excellent solution would be to look on your smartphone using the Internet for a list of shoe repair points in the area where the trouble happened to you.
If you don’t know how to use the Internet, then call your children or your friend and ask them to “dig up” information about shoemakers nearby for you.
Remember, no one can fix your heel better than a master shoemaker. Moreover, it often takes no more than 10 minutes to solve a problem.
How to repair sneakers: restoration of the heel
Over time, the following changes occur with the backdrop: the material tears, the inner lining comes out, and discomfort occurs due to deformations. To repair a torn backdrop, you must first cut off the frayed edges at the lining. Then a piece of thin soft leather is selected. A blank shaped like a small horseshoe is cut out of it. This part is treated with shoe glue (the edges are coated especially carefully).
The most important stage of the work is to carefully cover the “wounded” area of the back with a patch, and then straighten it with your fingers so that there are no wrinkles. Then place an object of suitable size inside to press the material tightly for several hours to securely fix the patch.
Recommendations for sole repair
Before starting work, the sole must be cleaned, dried and degreased. For degreasing, use a special solution, gasoline or acetone. After processing, the product is dried again.
Select the load so that the shoes do not become deformed. An L-shaped block with additional weight is ideal. Keep the product under pressure for at least ten hours.
The adhesive is applied up to three mm thick, then left for ten minutes and only then the parts are glued together. Choose only high-quality and proven glue. A suitable option would be classic Moment glue, a product with polyurethane or epoxy sealant. You can also use special rubber shoe glue or shoe glue.
According to experts, polyurethane glue will be the best solution due to its strength and elasticity. It provides a secure fit and can repair any type of shoe. In any case, these are toxic compounds, so ensure safety when working. If the product gets into your nose or eyes, immediately rinse your mucous membranes with running water.
Be careful when working, as the adhesive composition can damage the material of the products, especially if they are suede boots, leather or patent leather shoes. The glue is quite difficult to wash off. Now let's figure out what to do if the soles of your shoes crack.
How to prevent damage
To prevent this problem from occurring, follow these rules:
- buy shoes whose lower parts have good performance characteristics;
- when choosing it, consider the weather conditions in which you will walk in it;
- do not neglect the rules of care;
- Whenever possible, avoid stepping on sharp objects lying on the roads.
For this purpose, people recommend immediately lubricating the base with glycerin, wax or castor oil.
Installing heels
The heels are prepared for installation, wooden plugs are driven into the heels, and it’s time to install the heels on the shoes.
To securely fasten heels on heels, I use a combined fastening, gluing, followed by nailing with long shoe nails, which experts call Tex type TR. Shoe nails differ from ordinary nails in that they have flat edges, a diameter of 1-2 mm and a length of about 15 mm. The head of shoe nails is also of a special shape, small in diameter, but thick. The flat edges on the nail shaft prevent it from twisting when walking, and the shape of the head acts as a heel section and increases its service life.
If there are no shoe nails, then to attach the heel you can use simple finishing nails, shortening them and giving the rod a shoe shape, grinding it off with a file or on an emery column. Finishing nails are usually used to attach trim to doors.
To accurately hit the nails into the plugs driven into the heels, before gluing the heels, it is advisable to first mark the driving points on them. To do this, the heel is applied to the heel, the polyurethane is slightly transparent and the plugs are visible. All you need to do is put dots with a marker where the plugs are visible.
If the plugs are not transparent, if the heels are made of rubber, then you can attach the heel to the heel, move it toward you and make one mark at the level of the plugs, then move the heel to the side and apply a second line. You will get a cross into which you will need to hammer a nail. Since the diameters of the plugs are 5 mm, this method will provide sufficient accuracy.
You can nail the heel by placing the heel directly on the heel, but this is inconvenient, since the heel may move and not be installed accurately. Therefore, I prefer to first hammer all the nails into the heels so that the sharp ends appear on the opposite side of the heel. You need to drive the nails by placing the heel on the board so that the sharp ends of the nails do not flatten and become blunt.
For more reliable fastening of the heel, before nailing, the mating surfaces of the heel and heel are generously lubricated with waterproof “Moment” glue. After waiting for 5 minutes recommended by the rules of use, the heel is applied to the heel and pressed firmly.
There are special paws for repairing shoes using nails. But I make do with a large file with a wooden handle. I rest the file on a massive piece of metal, and rest the heel of my shoe on the handle.
As you can see in the photo above, the nails are hammered in, the heel is firmly installed on the heel, but the edges of the heel protrude somewhat beyond the contour of the heel. The protruding part of the heel must be removed by cutting it with a knife or using an emery column.
Shoes with new heels installed by yourself look no worse than new. If desired, the heels on the end side can be painted with a waterproof marker or paint.
Nuances of repair depending on the material
The method of restoration largely depends on the material of the shoe. There is no single restoration recipe for leather, suede and patent leather shoes.
The patent heel has peeled off
On patent leather, scratches will be less noticeable if you lubricate them with Vaseline and buff with a soft cloth. Larger damage is painted over with acrylic paint or nail polish to match, and topped with colorless paint.
Leather heel peeling off
Scratches or nicks on shoes made of thin leather can be eliminated as follows:
- the material collected at the site of damage is slightly heated with a hairdryer to make it softer;
- smooth;
- BF-2 glue is applied to the damaged area and to the back of the skin;
- The skin is slightly stretched and pressed.
- Remains of glue are removed with a damp cloth, and areas with scratches are covered with a marker, varnish or paint in color.
The leather material must be pulled carefully so that new holes do not form.
Elimination of cracks
Is it possible to repair the cracks that traditionally disfigure the folds that accompany the junction of the top and the foot (this phenomenon is inevitable over time for leather models)? It turns out that in order to repair these defects, you need to carefully trim the sole, bend it, and then seal the cracks with pieces of suede with the nap facing outward. In addition, it is permissible to eliminate defects with a leather patch.
As for cracks that make sneakers less presentable, some measures will help initially prevent or reduce their formation:
- keep your shoes clean, as dirt causes cracks to form;
- during storage (for example, in winter), fill the sneakers with paper, this will allow their body to flatten; it is also good to use special mold holders, spacers, and pads.
- wear styles that fit only (because if they are too big, cracks appear faster);
- Avoid excessive bending of the feet and prolonged pressure when walking.
How to repair sports shoes
If sneakers or sneakers are worn out at the location of the socks, treat the damaged areas with sandpaper and degrease. Take rubber or polyurethane of different thicknesses and cut out a patch. A thicker material is applied to the site of damage, and a thinner thickness is applied to the normal sole.
Sand the patch where it is adjacent to the damaged area. Then cover the material with glue and press it to the sole of the sneaker or sneaker. Keep under pressure for a day.
If a hole has formed in the sole of a sneaker or sneaker, the edges of the hole must first be cleaned and degreased, then an adhesive compound must be applied. A fiberglass mesh (serpyanka) is inserted into the large hole.
To repair a broken sole on figure skates, special glue is also used. Such shoes can only be helped if the rupture does not occur in the places where the blade is attached. We looked at how to seal the damaged shoe sole. How to properly clean and wash sports shoes, read the link.
Cautions:
Don't be shy to ask people around you for help.
See a doctor immediately if you feel you have injured your leg.
If you fall, do not stand abruptly on your injured leg; in the event of a fracture, this may lead to displacement.
Periodically check your heels for wear or looseness. Don't risk leaving the house on loose heels! This could result in serious injury. Avoiding a problem is always easier than dealing with it.
No woman is immune from the fact that at the most inopportune moment a shoe may tear or a heel may break. Don't worry, I have a couple of tips that will help you get to your destination barefoot.
Preparing the heels of shoes or boots for installing heels
Probably, looking at the photo above, you noticed the appearance of the heels after removing the heels. The plane is almost entirely filled with holes and the question arises, how to attach new heels?
The answer is simple, you need to install wooden plugs in the holes for attaching standard plastic heels. The holes for the pins usually have a diameter of 5 mm and a depth of 10-15 mm. First, measure the depth. If it is less than 10 mm, then using a hammer, you need to drill out the base of the heel to a depth of 15-20 mm.
If you drill with an electric drill, you need to take into account that the drill can “pull” the soft material of the heel and the depth of the hole will be greater than necessary. I usually perform this operation manually, holding the drill in a special handle.
Plugs in heels for installing heels can be made from any piece of wood by sawing off the required piece to length and pricking with a knife of the required diameter. You can also use ready-made ones, for example, wooden Japanese chopsticks fit well in diameter.
It is enough to cut them into pieces of the required length. If the stick is a bit thick, then trim it a little with a knife. After making the plugs, they can be driven into the holes of the heels. The diameter of the plugs should ensure that they fit tightly, but you should not make plugs that are much larger in diameter than the holes in the heel, since driving in the plugs may cause the heel to crack. The plugs should not protrude beyond the surface of the heel; it is better to let them be slightly recessed.