Now the issue of saving occupies one of the first places for every owner or housewife. You can provide decent lighting for your home with little energy consumption by equipping the lamps in your home with LED bulbs. Moreover, due to certain circumstances, even such lamps can fail. That is why information on how to disassemble an LED lamp will be useful for those who want to repair the lamp themselves.
LED design Source z-led.ua
What is the design of LED light bulbs
An LED lamp can have a different structure. It must be studied before repairing it. Consider the design of a two hundred twenty-volt light bulb. It consists of several LEDs, semiconductor devices in which, when an electric current is passed, charge carriers move. These in LED devices are electrons and holes (negative and positive charge). Moving from one electronic level to another, they emit light in a narrow range. LED light bulbs burn out most often due to the breakdown of diodes or other elements included in their composition.
The current source for series-connected LEDs is the so-called driver (sometimes a power supply), a current converter. Between the LEDs and the driver there is a heat-conducting board with radio elements and an aluminum radiator (for some lamps the housing is made of plastic with ventilation holes, inside of which a radiator is placed to remove heat). The entire structure is housed in the housing, under a protective cap. At the bottom, the lamp is equipped with a base to which two wires are soldered; It is through them that the voltage is transmitted to the driver.
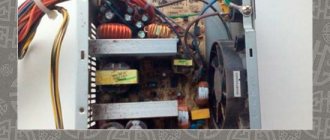
What the driver looks like Source hsto.org
The design of an LED lamp and its successful repair depend on which driver is installed in it. It can be without stabilization at all, or with current or voltage stabilization. In fact, only the first type of the three listed can be fully called drivers. Depending on the type of lamp assembly, the repair will be slightly different.
One of the types of LED lamps is filament lamps. This is a special type of LED device in which instead of a circuit board there are filament rods in a glass bulb. They are thin sapphire or glass tubes, each about 2 mm thick and about 3 cm long. The rods contain 28 miniature LEDs. This type of light bulb cannot be repaired.
Why LED lamps break
Before you start repairing a light bulb, it is worth understanding why LED lamps burn out. First of all, a malfunction in the operation of any lighting device should be looked for in voltage drops. If there is such a problem in your home, then you do not need to repair the light bulb, but install a stabilizer.
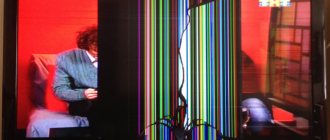
Unpleasant consequences of voltage surges Source electrik-domoy.ru
Important! If the voltage “jumps” very much, it can break through the diode bridge and damage the lamp.
When installing new LED bulbs, you need to remember to have good ventilation. If it is insufficient and the heat generated during operation of the device is not regularly removed, overheating may occur. In this case, you need to take a closer look at the lamp: if the design is too closed, ventilation will not be provided, then you will have to buy another lighting device.
Another common mistake when arranging electrical wiring in a room is incorrect placement of wires or incorrect calculation of their cross-section. If it is not possible to change the wiring, the right solution in this case would be to unload the lighting line by choosing another, less powerful light bulb.
Also, the failure of an LED light bulb is caused by the incorrect choice of IP degree, that is, protection from external influences. If the lamp is exposed to high humidity, dust, or its body experiences impacts, you need to think about choosing lighting fixtures that are appropriate to the environment. Now that you know why LED lamps burn out, you can start repairing them.
An LED lamp will work well if you choose it correctly Source multiwood.ru
In addition to the above options for incorrect operation, LED light bulbs may fail due to manufacturing defects. Another implicit reason for the combustion of an LED lamp is its connection to a backlit switch. There are two ways out of this situation: if the design of the lamp (for example, a chandelier) has more light bulbs, you need to change at least one of them to a regular one. The second solution to this problem is to replace the switch.
When a lamp breaks down, the capacitor located in the power supply along with resistors and a diode bridge, or one of the LEDs, is most often damaged. If cheap elements that do not correspond to the rated voltage are used in the production of the lamp, as well as with poor-quality solder connections, the entire structure may break after just a few on/off cycles.
Typical breakdowns
Since you have decided to repair an LED light bulb with your own hands, it is assumed that you have a tester or multimeter and you know how to carry out basic measurements. You will also need a soldering iron, but with a thin tip and low power. You can do without it, but you will have to look for a replacement. You also need to know at least a little how to solder with a soldering iron. You should also have tweezers, wire cutters and utensils. Utiki or duckbills are hand tools that look like miniature pliers with long grips - they are convenient for holding small parts, but you can get by with tweezers. And also spare parts. They will have to be purchased as the malfunction is identified. It's good if there is a second non-working lamp. It can be used as a donor to take the necessary parts from there.
The declared service life of LED lamps is almost half a century, and after six months several non-working pieces accumulate
LED breakdown
As already mentioned, in an LED light bulb the crystals are connected in series. From the output of one, the wire goes to the input of the other and so runs around all the elements. The scheme is very simple. But if at least one crystal is not working, the light bulb will not light. And crystals often fail, so the first thing we do is check them. Moreover, they are easy to find in any model. A circuit diagram is not needed for verification.
First, carefully examine all the crystals. Those that “feel” normally have a light, even color. Dark spots should alert you. If there are dark, almost black dots on the crystals, these LEDs are most likely broken. We are definitely changing them. If the surface is a little darker, the crystals are still shining, but are on their last legs and will soon burn out, then it is also better to replace them now.
A burnt-out LED has a dark spot on the surface
To check whether the LEDs are working or not, you can use a multimeter. It is switched to the dialing mode, the probes are applied to the LED contacts. If a small current is needed to operate the LED, the working LEDs light up. The second test option is a 3-4 Volt battery, the contacts of which have wires soldered to them. We apply these wires (observing polarity) to the crystals. The working ones light up, but the faulty ones remain dark.
How to desolder damaged LEDs
Up to this point, everything is simple and clear; repairing an LED light bulb does not present any difficulties yet. Now we need to decide how to solder small LEDs. The whole point is that they are soldered onto a substrate that conducts heat well. That is, by heating the contact of one LED, you simultaneously heat the entire board. If you use a low-power soldering iron, it will take too much time. Powerful is also not an option, since it is very easy to overheat. The maximum temperature that crystals can withstand without consequences is 80°C. With further heating, destruction quickly occurs, so when repairing an LED light bulb, the main task is to cause as little damage as possible to the remaining elements.
Spot heating still won't work, but you can try to cause minimal damage to neighboring crystals. To do this, we first bite out/break out the crystal plate, and heat the remaining metal legs with a low-power (20 W) soldering iron and remove it.
Soldering damaged LEDs
If you don't have a low-power soldering iron, you can use an iron. It must be firmly secured (for example, using a clamp) and set to medium mode. To minimize the “heating field” it is better to use the tip of the iron. In this case, we will heat the entire board. More precisely, we will heat the edge on which the damaged LED is located, but the entire board will warm up. And this is the disadvantage of this method - from overheating, the crystals become cloudy and quickly fail. Therefore, the trick is to quickly remove the damaged crystal as soon as possible.
Before starting work, we color all faulty crystals with a marker. We turn the board so that the place with the burnt elements is on the iron platform. We constantly pull the damaged element up, holding it with tongs. As soon as it comes off, we try the damaged ones located nearby. If they come off, great. No - we rotate the board so that the damaged element heats up more. Then we immediately remove the board and leave it to cool. No special means for quick cooling! Just put it down and let it cool on its own.
How to solder new LEDs
Contact pads remain in place of the soldered LEDs. We apply a drop of soldering flux to them, put the good ones on top (observing the polarity) and heat them up again, but this time we press on the crystal. When its legs “enter” the solder, remove the board or turn it over. If there is no LED, you can solder a piece of wire instead. The lamp will shine a little dimmer, but it will work. Yes! This trick only works if there are ten or more crystals on the board.
In some cases, jumper wires can be used instead of burnt-out LEDs
The video shows another replacement method. You need to find a similar LED on the strip, cut it out and solder it together with the substrate in place of the removed one.
Another way to solder small LEDs. It seems to be the most realistic without the use of special equipment. You can remove the diodes using a small gas torch.
Damage to the driver
If all the LEDs are visually normal or have already been replaced, we continue repairing the LED light bulb by looking at the driver. Some damage is easy to identify visually. Blackened or cracked resistors, swollen capacitors. If you look closely, this is all noticeable. If nothing is visually determined, we take a tester and check the integrity of the components.
There may be burnt resistances and leaking/swollen capacitors
It also happens that all the elements are absolutely normal, but the LED light still does not light up. Most likely this is a bad build. You need to check all solder joints. If you do not warm up the soldering area enough, over time the contact will deteriorate or disappear completely due to constant temperature changes. In the first case, the light is either on or off. In the second, it simply stops working. We hold all solder joints up to the light and look carefully. If we find a crack in the solder joint, that’s it. Cold soldering. Next, we simply warm up this place well with a soldering iron.
Cold soldering is one of the reasons why LED lamps fail
Diode bridges very rarely fail, so we check them last. If the diode is broken, we unsolder it, check it again (in theory, they should only be checked by unsoldering it), if the damage is confirmed, we install a similar one. Don't mix up the connection, otherwise nothing will work. In general, repairing an LED light bulb is not too difficult a task. It will cost significantly less than a new light bulb. And you, along the way, can improve the design. As a result, LED light bulbs will burn out less often. Either way, you have (almost) nothing to lose.
Disassembling an LED lamp for repair
Before repairing an LED light bulb, study the instructions, as well as the design of the broken lamp. Due to the fact that there are no gases inside the LED lamp and the housing is not sealed, if it fails, you can try to repair the device yourself.
This is what a disassembled LED lamp looks like Source tauray.ru
See also: Catalog of companies that specialize in electrical work of any complexity
Step-by-step instructions on how to repair an LED lamp:
- Open the lamp to get to the internal structural elements.
To begin disassembling the light bulb, you must first open the clips holding the light-diffusing dome. If the matte top of the lamp is held in place by screws, you need to unscrew them; if the restraining factor is sealant, it needs to be carefully removed.
- Remove radiator.
After disconnecting the diffuser, take a screwdriver and carefully remove the heatsink (it will be located under the board with the LEDs).
- Separate matrix.
After removing the insides of the light bulb, the LED matrix must be separated from the entire structure. To do this, you need to unsolder it: warm up the contacts with a soldering iron, then carefully separate the part with tweezers. In this case, you need to start with the central board, which must be separated from the two contacts. You should also remove the sealant located around the perimeter of the lamp, or unscrew the retaining screws.
After nothing will interfere with the removal of the matrix with LEDs, you need to arm yourself with a thin metal tool like an awl or a needle. Carefully sliding it under the board, walk around in a circle so that you can pick it out.
Working with the LED lamp matrix Source masterpotoku.ru
By the way! Before you begin repairing a lamp, you should determine which LEDs are in the 220 bulb that needs to be repaired.
- Remove the matrix.
To remove the matrix with LEDs, which is no longer held in place, you will need to insert the central element into the slot. After this you can remove the matrix.
- Identify the broken link.
To identify a breakdown, in most cases you just need to look at each of the LEDs, which look like very small yellow squares. On one of them, upon closer inspection (you may need a magnifying glass), a small dark spot (black dot) will be noticeable.
- Remove the non-working element.
Now we’ll tell you how to repair an LED lamp after non-working diodes have already been detected. To remove all non-working LEDs from the matrix, you can heat it from below, then the process will be simplified (open flame cannot be used). Don’t forget to first fix the circle with diodes in the desired position above the work surface. After a good warm-up, the desired LED element can be simply removed with tweezers.
- Clean the contacts after removing the diode.
After cleaning the location of the burnt diode, you should also apply a special paste.
Another option for an LED lamp Source vodakanazer.ru
Remember! The ground corner of the diode indicates the location of the negative terminal.
- Change a non-working element.
In order for the lamp to work again, you need to replace the burnt out LED with a new one. As a last resort, you can install jumpers on the old one. To solder a working LED to the space vacated by the old element, you first need to look at what LEDs are used in 220 V lamps, and during operation, use a heating element.
- Allow the matrix to cool.
Important Notes
If the lamp is made using sealant, you will need an awl, a syringe and a solvent to remove the cap. It is necessary to run an awl along the edge (the connection between the cap and the lamp) so that a groove is formed. After this, you should fill the syringe with a needle with a solvent and inject it around the entire perimeter into the groove made. When half a minute has passed, you can unscrew the cap, because the sealant should have dissolved by this time.
At the fourth stage, when determining a non-working LED, in some cases you can use a multimeter.
A multimeter can be used to test some diodes Source mineavto.ru
How to disassemble
Repairing an LED light bulb begins with disassembling it. There is no vacuum in it, so this is possible. The diffuser and base can usually be separated without problems. They are connected using notches on various parts.
Most parts of the LED lamp are held on by clips
There are two options. Easier to disassemble and more complex. In a simple case, the lamp parts are connected only by mechanical latches. In the more complex one, in addition to the latches, there is also silicone, which ensures the waterproofness of the lamp. Such specimens can be used at high humidity. You need to disassemble the LED lamp as follows:
- Hold the base in your hands and turn the radiator counterclockwise. The diffuser is removed in the same way.
- In some LED light bulbs, the connections are filled with silicone. In this case, turn, don't turn, nothing moves. If you look closely, you can see the sealant. In this case, a solvent is needed. You draw it into a syringe (without a needle or with a thick needle), carefully inject the liquid around the perimeter. You need to hold it for 5-10 minutes, and then try again. It is usually not possible to disassemble an LED light bulb the first time, but three or four passes help.
The boards inside the lamp are either inserted into slots or are also held in place with latches. It’s easier to push them away with a flat-head screwdriver while simultaneously pushing the board up. The effort should not be excessive, as the latches are plastic and may break.
Video description
About how to disassemble an LED lamp with sealant (second part):
Some craftsmen try to do this by heating it with a hairdryer, but this method will not be successful, because at the bottom (under these LEDs) there is an aluminum radiator. To remove an unnecessary LED from the board, you first need to remove the yellow film from it. A small, thin screwdriver or needle is best for this. When the elastic filter is removed, under it you can see a metal surface with a crystal, which in a working lamp should give light.
On the metal surface of the damaged LED, you should put a little gel-like flux, solder or low-melting alloy (for example, Wood's alloy, which has a melting point of only 60-68.5 degrees Celsius, is suitable). You will also need a well-heated soldering iron with a power of about 60-80 W. The tool must be applied to the diode until it is unsoldered.
Important! When using Wood's alloy, be aware of its toxicity and do not touch it, and also do not inhale the fumes generated during operation.
Wood's alloy Source ozone.ru
Thanks to the use of the specified alloy, mixing with the main solder occurs and, as a result, the melting point of the latter decreases. Thus, the use of this method eliminates the possibility of overheating the printed circuit board.
Replacing LEDs
When replacing LEDs, you must observe the polarity.
If the cause of the lamp failure is a burnt-out diode, it is replaced with a serviceable part. This procedure should be performed in the following sequence:
- Turn on the soldering iron, having first placed it on a non-flammable stand.
- Mark where the positive and negative wires are located. Disconnect the bar with crystals from the case. This is done using a soldering iron by melting the contacts.
- Clamp the board into the holder. Grasp the defective crystal with tweezers or a surgical forceps.
- Bring the soldering iron to the contacts on the back of the part. At the same time, pull the diode away from the base.
- Separate the burnt part. Similarly, remove the working crystal from the donor board.
- Clean the scale from the place on the radiator where the burnt diode was located.
- Prepare a working part for installation. To do this, its contacts are adjusted in width to the holes on the board, after which they are treated with rosin and tin.
- Insert the new element with the contacts into the holes. It is necessary to act carefully, observing polarity.
- Apply a soldering iron with a drop of solder to each wire and fix them to the base.
- Treat the soldering area with varnish to protect against corrosion.
- Restore the layer of thermal conductive paste. Install the board onto the radiator.
- Solder the wires to the contacts.
- Check the functionality of the product by connecting it to a carrying case or a table lamp with a switch. If problems arise, make improvements by replacing diodes or driver parts.
- Glue the cap to the base. For this it is better to use silicone glue. You can use the repaired product in a couple of hours.
If you don’t have a soldering station and a hair dryer, you can use a lighter with a turbo mode. To perform delicate work, its flame is set to a minimum to limit the thermal effect to one contact.
What else can be repaired?
Now you know how to fix an LED light bulb if one or more LEDs have burned out. When it turns out that the problem is in the driver or power supply, even in this case the lamp can also be fixed.
Device drivers
If your LED lamp has a current-stabilized driver, it has the following design. The mains current is supplied through the fuse and then passes to the LM7812 diode bridge. Next, the rectified mains voltage goes to smoothing capacitor C1; when it becomes constant, distribution occurs into ten LEDs connected in series (LED 1 to LED 10).
Driver for a ten-watt lamp with current stabilization Source uk-parkovaya.ru
Safety precautions
When working with an LED lamp and its components, you should follow simple rules that will keep your health, as well as the things and tools around you, safe. Before repairing LED light bulbs, you should familiarize yourself with these simple but important rules:
- Any manipulations with the lamp (disassembly, soldering, desoldering) must be done only when the device is disconnected from the network.
- All capacitors must be manually discharged after turning on the lamp, even if they are bypassed. To do this, you need to briefly short-circuit the leads of the capacitors with a metal tool or a dielectric pen.
- After repair, when checking the functionality of the lamp, you need to protect your eyes: an explosion of one of the elements is possible. You can use special safety glasses or simply turn away with your eyes closed while you plug in the repaired lamp.
Summing up
LED lighting is not slowing down in its popularity. But even with the prices for lighting devices based on them falling, they remain expensive. Why overpay if you can repair a light bulb or lamp yourself. You don't even need to purchase parts for this. You just don't need to throw away the ones that are broken. Then from two or three it will be possible to assemble one working one.
We hope the information presented in our article will help the reader save on purchasing lighting equipment. If you have any questions, you can ask them in the discussion below. And finally, we suggest watching a useful video on the topic: