Many people forget
Before work, adjust the adjusting screw according to the material of the surface you are going to work with.
If it is hard plywood, strong penetration of the material will be required, therefore, it is worth setting a high force. If it is a loose surface, the force must be reduced so as not to break through the fabric, or for example the PVC panel that you are shooting.
During operation, it is recommended to press the lever with one hand and press the adjusting screw with the thumb of the other hand. Then the recoil will be minimal and the load will be distributed evenly in the stapler. You will be able to nail the brackets much better.
Types of staplers
In 1997, the stapleless stapler was invented. This stapler binds sheets together with small strips cut from paper. Therefore, its owner does not have a question about how to charge the stapler. There are three types of staplers: standard, mini and construction.
They are equipped with a manual or electric drive. A stationery stapler is used to staple paper sheets with metal staples. It is used to make brochures and notebooks. A regular stapler staples up to 50 sheets. One pack contains 20 plates of 50 staples. When you press the handle of the device, the spring, which is located inside, is tensioned and released, driving in the bracket. It passes through the paper and hits a deflection plate, which bends its ends. Some stapler models bend staples in two different ways: inward or outward. In the second case, the bracket is easily pulled out. This stitching method is used to temporarily secure sheets. Some models have a tab on the back for removing staples. They are also equipped with a mechanical amplifier. The best material for a stapler is metal coated with plastic. To prevent the device from scratching the surface of the table, plastic or rubber pads are placed on its bottom.
Construction staplers are used for upholstery of furniture and walls. It has a high rate of fire and fires up to 60 strikes per minute.
Stapler cartridges are also found in some models of copiers and printers.
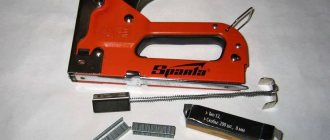
How to insert staples into the receiver
The design of all mechanical hammers is almost the same. There is a handle-lever, due to which pressing occurs, and at the bottom of the stapler there is a metal plate that opens the receiver. This is where we have to load the staples.
Before you buy brackets at a hardware store, you need to find out what size will fit your device. As a rule, the size and type of suitable staples are indicated on its body.
For example, the body of our stapler indicates a width of 12 mm and a depth of 6-14 mm. This means that you will only be able to charge staples in this range.
Smaller or larger brackets will not fit into the receiver. The size of the staples in millimeters is also indicated on their packaging.
To insert projectiles into the stapler, you need to open the metal plate on the back surface.
To do this, you need to take it with your thumb and forefinger on both sides, then pull it towards you and slightly down. Thus, we press the metal tab on the back surface of the plate, and pull out a metal spring, similar to the one found in a regular office stapler.
If there are any staples left in your stapler, they will fall out once the spring is pulled out. If they are not there, then it’s time to install new ones for further work.
The staples are inserted into the receiver (the hole is in the “P” position). Next, insert the spring back, closing the metal tab. That's all, the tool is loaded and ready to go!
How to choose a mechanical stapler
A mechanical stapler is one of the most common tools. It costs very little, but is used for many jobs and operations. In terms of structure, mechanical staplers come in two types: with a coil spring and with a spring (plate).
Mechanical stapler with coil spring
Coil spring staplers are the cheapest models. This tool belongs to the household category. They are simple, but during operation they require significant effort to cock the mechanism again. In addition, over time, such springs lose some of their elasticity and begin to work worse. Another unpleasant moment is the high recoil force. Such models are suitable for short-term use - the load is too heavy.
Professional mechanical construction staplers are made using flat leaf springs. They provide smoother operation, less recoil, have a longer service life, but are more expensive.
Mechanical stapler with leaf spring
If you plan to work for several hours, get this type of tool. It will justify itself, and there will be applications - a lot of different operations can be done with such a device. It is especially useful for those who try to do a lot with their own hands. It is used very often during construction, and will come in handy later on the farm.
Important points
When choosing any mechanical stapler, pay attention to:
- The case must be dismountable - with screws. Then it is possible, if necessary, to disassemble it, clean and lubricate it.
- How far is the handle from the body? The closer it is to the body, the easier it will be to work.
- Possibility of adjusting the punching mechanism. When working with soft materials (pine, for example), the minimum value is set. So that the staple fits in, but the material does not jam. When working with hardwood, plywood, chipboard, etc., you will have to put in more effort, otherwise the staples won’t go into the material, and finishing them off with a hammer is not the most fun thing to do.
- Double strike function available. This is just for working with hard materials. This mode of operation allows you to re-hit a staple that is not completely hammered. In this case, a new one is not supplied.
Also, for safe transportation and storage, it is desirable to have a “stressless release” function or the ability to jam the mechanism - often this is just a metal loop that fits over the handle.
How to refill
A construction stapler can have two types of magazine. It is more convenient to use if the store opens. Then refilling a construction stapler is as simple as a stationery stapler: the spring is pulled back, a block of staples is inserted, and the spring is released. That's it, you can work. During operation, at any time you can remove the stuck bracket, correct the block, etc.
If the magazine is retractable, inserting staples into the stapler is also easy: after releasing the latch, pull out the spring, insert the staple block, return the spring to its place, fixing it in the flap.
How to fill a staple gun with staples
With such a structure, removing a stuck staple can be problematic. You will need to pick it out of the striker, and this can be dangerous - do not forget to block the release mechanism.
What kind of fasteners can it work with?
There are three types of staples that mechanical staplers work with: U- and U-shaped staples and pins (shaped like the letter T). Naturally, it is better if the device can work with all types, but these are usually not cheap models. Yes, and U-shaped brackets are needed mainly when laying cables, and this, you see, is a specific job, and T-shaped ones are used infrequently, since they do not provide stable fastening, but they are indispensable if it is necessary to make the fasteners as inconspicuous as possible.
You also need to choose the type of staples
However, U-shaped staples are most often needed. They are almost universal, available with different back thicknesses and leg heights, and are selected for the type of work. The characteristics of the stapler usually indicate the maximum length of the legs that this unit can handle. On average it is 10-15 mm. By this indicator you can judge the power of the impact - the longer the staples a construction stapler can hammer in, the more powerful it is and the easier it will cope with the job.
What to do if a bracket gets stuck
It is worth noting another very important point that will help you in your work. It happens that the staples become bent and get stuck in the exit hole. They cannot be hammered into the surface and cannot be pulled out by hand.
In this case, we will need to pull out the feed magazine completely.
This option exists for almost all professional staplers.
First you will have to repeat the opening of the metal plate and pull out the spring.
Next, in the middle of the lower part of the stapler you need to find an iron part, slightly protruding from both sides. Grasp it tightly with your thumb and forefinger on both sides and pull down forcefully.
This will remove the entire feed magazine that was in the tool.
You will see a jammed staple that can now be easily pulled out by hand.
Putting the stapler back together is not difficult: the entire pulled out block returns to its place with a press. You should hear a click when you do this. Afterwards, do not forget to replace the spring.
Operating principle and purpose of construction staplers
A stapler is a device for attaching sheet material to a base. A construction stapler looks like a pistol.
Its action is reminiscent of driving nails with a hammer. To play a blow, you need to pull the trigger or the cocking lever, depending on the type of instrument. And then release the trigger. Using a system of springs located in the gun body, the staple from the clip is fed into the output channel and is instantly driven into the material. At the moment the trigger is released, the bracket moves towards the exit. Therefore, in the passive state of the stapler, the equipment is already ready for driving. In some models, the staple legs are bent, in others they are simply driven in. Not only staples, but also nails can be used as equipment. There is no need to put in any special effort, so the process is easy and quick. It can be used by women and older people.
Stapler at work
The stapler is designed to perform two types of tasks, which expands the scope of the tool:
- nailing one part to another. The base is plastic, wood, plywood, chipboard. The attached part is any material that the stapler will pierce: carpet, boards, baseboards, lining;
Nailing boards with a stapler
Stapler for stitching parts with a folded edge of the staples
In both cases, the fastening is reliable. To increase its resistance to deformation, consumables are used in which the sharpening is asymmetrical, or the coating melts.
Staplers are used in various industries:
- in construction;
Stapler in construction
Nailing baseboards with a stapler
Upholstery of furniture using a stapler
Stapling the cable with a stapler
Stapling cardboard with a stapler
Making greenhouses using a stapler
Not just parentheses
Some staplers can work not only with staples, but also with studs of various shapes. The designations of what the stapler works with are indicated on its body or in the instructions.
I tuck the nails into the stapler in the same way as with staples, but you need to be careful after pulling out the spring. A row of nails must be loaded along one of the outer edges of the letter “P”, and not inside this very letter!
If you want it to produce two nails side by side when working with a stapler, load the second row along the second outer edge. Next, the spring is inserted and the stapler is closed.
Source: narodnyeokna.ru
Tips for using the device
To maintain safety when working with a furniture stapler, you must follow the following recommendations:
- Before fixing the staples with a mechanical stapler, it is adjusted on an unnecessary piece of material. To do this, after the shot, they look to see if the staple has entered completely into the base. If yes, then you can start working right away. If not, you will have to turn the screw mechanism from minimum to maximum to achieve a good position.
- When working, be sure to hold the material to prevent displacement with your free hand.
- After finishing work, the handle must be put on the safety lock to avoid accidental pressing and operation of the device.
Stapler with safety handle
A construction stapler allows you to fasten any material to the surface of furniture in the shortest possible time. The tips in this article will help you choose the right tool and correctly approach working with it.
Share on social media networks:
These convenient and ergonomic devices have won well-deserved appreciation from both professional furniture makers and home craftsmen. There are even models of staplers on sale that can work with small studs. Using a hammer, with almost inevitable injuries, is gradually becoming a thing of the past. In addition, the speed of work increases significantly. However, this design sometimes becomes unusable. Frankly speaking, I don’t want to throw away my old stapler. Let's talk about how to repair a furniture stapler yourself.
How to insert staples into a stapler
To understand the specifics of refilling a stapler, it is necessary to determine the principle of its operation and the type of driving force. The following types of staplers are offered on the market:
They are also divided into 3 groups depending on the moving mechanism:
- Mechanical.
- Electrical.
- Pneumatic.
Representatives of the first group work using arm strength and demonstrate weak power. They hold a small number of staples and are not capable of nailing thick or hard structures.
At the same time, mechanical models are characterized by compact size and lightness, so they are convenient to use in hard-to-reach places. Such devices are also in demand due to their low cost and availability.
Advantages
The tool has a number of undeniable advantages , regardless of the type of stapler used:
- Reliability and high degree of safety when working with the tool.
- Thanks to the use of a stapler, you can significantly save your energy and time in the process of repairing or reupholstering furniture, as well as when carrying out other specific repair and construction work.
- The convenience is that you can operate the device with only one hand.
- The device, regardless of its type, is easy and simple to use. That is, no special skills are required when working with a stapler.
- All risks associated with the likelihood of mechanical damage to the product to which the device is used are minimized.
- Installation using a stapler takes much less time than when working with nails and a hammer.
- When stitching with a tool, you can use different types of material.
- With proper operation, the device can operate uninterruptedly for a long time.
- Thanks to the powerful impact force, the workpiece always remains in its original form.
- The tool is very multifunctional, since various stapler models can use not only staples, but also nails or screws as consumables.
- Materials for stitching products are not subject to corrosion.
- The tool can be used even in hard-to-reach places.
It should be noted that for household needs you should always choose a mechanical device. It is easy to use and maintain and, importantly, has an affordable price.
What to do if a bracket gets stuck
When using a construction stapler, a problem such as breakage of the staple inside the receiver often arises. Fasteners often become bent or stuck in the outlet, causing many problems. To restore functionality, you will need to completely remove the magazine with staples. Professional models have a removable receiver, so repairs will not take much time.
First of all, you should open the metal plate and take out the spring. Next, in the middle of the stapler you need to find an iron part and tightly clasp it with your fingers. This will allow you to remove the entire magazine and remove the jammed bracket.
Reassembling the tool does not require much effort: the removed magazine is put back in its original place, after which a characteristic click should sound. Next, all that remains is to return the spring to the groove.
If you are using a power tool, be sure to adjust the special screw when using the rough material to check. During this stage you need to rotate it from minimum to maximum. If the bracket is well secured from the first shot, proceed to work on the “finishing” part. In other cases, the procedure will need to be repeated.
A furniture stapler is a universal construction device that is suitable not only for upholstery activities, but also for more complex work. If you use this tool correctly, it will serve you for a long time and with high quality.
Which to choose?
Construction staplers are divided into several types according to certain parameters. For example, according to the principle of operation - mechanical, electric and pneumatic tools.
By purpose:
- Typical (classic) stapler. It usually uses U-shaped staples, but special nails can also be installed. It has a universal purpose.
- The cable stapler is capable of securing cables and wires with a diameter of up to 8-10 mm, for which rounded staples are used. Such fastening can be carried out in electrical networks with a voltage of no more than 50 V. At higher voltages it cannot be used due to the risk of a short circuit. The main purpose is telephone, computer, communication lines.
- The packaging tool is designed to work with cardboard (including corrugated cardboard) and various film materials. It resembles a stationery device, because... bends the ends of staples, but has significantly greater power and size.
- The window option is capable of securing glazing beads and other elements using metal pins. The length of these fasteners can range from 10 to 50 mm, depending on the principle of operation of the stapler.
- Thacker uses V-shaped staples. This fastener design allows you to connect workpieces located at an angle to each other. An example of use is assembling photo or painting frames.
- The rivet stapler (rivet gun) is capable of installing aluminum, copper and steel rivets.
- The staple hammer uses the inertial principle, i.e. it is used like a hammer, but the impact force is increased due to a special mechanism. The main purpose is installation of roofing and floor coverings.
According to technical characteristics:
- Impact force. This is an important criterion for choosing a tool, because it determines the depth of driving in the fastening element (staple, nail). For household construction, this parameter is in the range of 3-16 mm. Low-power tools work with staples up to 8 mm high, while higher-power tools work with staples higher than 10 mm.
- Bracket width. The area of pressing of the elements when they are fastened depends on this indicator, and therefore the speed of the operation and the reliability of the connection.
Mechanical
The most widely used mechanical stapler is the operating principle of which is based on increasing physical strength using a spring mechanism. During operation, the user presses the handle with his hand, which bends the spring.
At the maximum point of bending, the spring is released and all its accumulated energy is directed to strike the fastening element (clip, pin or nail). This force is enough to drive it into the base.
The spring in a mechanical stapler can be of a twisted or plate (spring) type. When choosing a tool, it is better to give preference to the second option, because it provides significant impact force with almost complete absence of recoil. In modern designs, the impact force is adjustable, which makes it possible to configure the tool to work with materials of different hardness.
Electric
An electric stapler differs from a mechanical tool in that the spring bends using electricity. When you turn on the device, it immediately enters the ready state, and to strike the bracket you just need to press the start button. This stapler can operate from mains power or a built-in battery.
Usually, preference is given to battery power, because... The connection to the outlet is eliminated and there is no cord that interferes with operation. The most commonly used batteries are nickel-metal hydride type (2 cells at 14.5 V) and lithium-ion type at 18 V. The second type of battery is the most reliable.
The main advantages of an electric stapler are the elimination of physical effort, which is important for large amounts of work; acceleration of work; convenience and practicality. Disadvantages - higher cost, less reliability and greater weight of the tool
Pneumatic
In a pneumatic stapler, the shock load is provided by compressed air. Such a tool can be produced in stationary and manual versions.
In the first case, the air supply is regulated by the pedal, and in the second - by the start button.
To operate a pneumatic tool, you need an air compressor, which creates the main disadvantage - the bulkiness of the equipment.
Among the positive aspects of this stapler, there is a locking system against accidental inclusions, prevention of jamming of staples, and adjustment of shock load. The most important advantage is the highest speed of operation and enormous penetrating ability.
Stapler, how to charge a construction stapler?
There is nothing easier after work to unload a construction manual stapler.
You just need to remove the persistent spring that presses the staples in the stapler, pressing the latch and removing it from the groove.
Simply shake out the remaining staples from the stapler and reinsert the tension spring.
Squeeze the handle, an idle blow will occur and place the safety hook on the handle of the stapler.
Everything can be put away for storage.
By the way, the stapler absolutely does not need to be discharged, it does not have any kinetic (accumulated energy), it works solely from squeezing the handle with your hand and does not pose any danger if it lies with staples inside (charged).
With electric or pneumatic staplers, a little more serious.
They need to be discharged, but before discharging, be sure to disconnect them from the mains or disconnect the compressor - check by pressing the trigger that the stapler is not working and only then discharge.
Manipulations are the same, open the bolt (spring-pressing brackets), shake out the brackets and return the bolt back.
I can’t speak for all models, but with absolute confidence I can tell you how to charge the construction stapler that I use myself. This is a tool from ZUBR (a solid tool, I tell you!) The design of the tray and staple feed mechanism of this stapler is slightly different from others. In order to charge the staples, you need to remove the entire sole along with the spring.
We turn the stapler over with the handle down, so that its working surface (sole) is facing up. On the back of the stapler, we see a chrome tongue that rises about a centimeter above the sole. We press it towards the sole, and without releasing it, we remove the entire staple feed block, in the backward direction. Having removed the block with the spring, without turning the stapler over, we place the block of staples in the formed trench closer to the front, with the “legs” up (during operation, they will be at the bottom). Insert the block back, squeezing the spring, until the tongue snaps into place. That's it - the stapler is loaded. All that remains is to cock it once by lowering the handle.
For greater clarity, I will provide a video -
Source: www.remotvet.ru
Safe work techniques
Using a mechanical stapler.
By following safety precautions when using the device, you will avoid unnecessary injury. And the device will last longer:
- Before replacing staples, you need to put the tool on safety. This way he won't shoot by accident.
- Do not point the stapler at yourself or other people or animals.
- When transporting or storing the device, always switch the safety switch on.
- The tool can only be used in a sober mind. Persons in a state of intoxication are prohibited from handling a stapler.
- The work place should be well lit.
- Care must be taken to ensure that staples hit metal surfaces to avoid rebound. It is important to use special glasses to prevent the charge from flying into the eye.
- If the fastener is stuck in the product and is not completely clogged, you must carefully remove it.
- If small parts are used in the work, they need to be clamped in a vice. Driving staples into small surfaces directly in your hand is very dangerous.
- During work, the body position should be natural, clothing should be comfortable, and the sole should not slip.
When working with an electric or pneumatic stapler, you must follow the safety rules described for mechanical tools. More important:
- An electric stapler cannot be used indoors if there is a risk of explosion;
- you need to make sure that the switch on the device is off before plugging the cable into the outlet;
- the device body, electrical cable and plug must be undamaged;
- The power tool cannot be used outdoors during rain and snow, or indoors in high humidity;
- there should be no people or animals in the work area;
- all components of pneumatic tools must be in good working order and not damaged;
- During operation, the power cable must not come into the worker's area.
Mechanical, electric or pneumatic staplers are easy to use. But it is important to use the tool correctly. You need to charge it with fasteners with the markings indicated for your model. It is also necessary to adjust the mechanism for the required force of driving in staples. The main thing: follow safety rules when using. Careful handling and careful use are the key to productive work with any stapler.
Video “Master class on replacing staples in a stapler”:
open the box of staples, take a batch of staples, open the stapler, insert the staples, pointy ends down.
I don’t know if the procedure for inserting staples is the same in all staplers, but I just looked at my stapler and can write this:
- Open the stapler
- Pull the spring device that held the brackets in position downwards,
- Insert the brackets into the space provided (so that you get the letter P standing on a support, and not upside down),
- Slowly return the spring to its place and it will rest against the brackets.
- Close the stapler.
A construction stapler is a multifunctional mechanism. It is used when it is necessary to connect identical or different not particularly hard materials to each other, for example, plastic, wood, film, insulation, plywood. This tool is called differently: tacker, staple gun, staple gun, nailer, staple gun. The individual elements are fastened to each other using staples, pins or small nails. To know how to properly work with a construction stapler, you need to understand its design, the types of fasteners suitable for it, and the method of setting up and replacing staples.
How to insert staples into a furniture stapler?
Today, the variety of specialized staplers for various types of work is numerous. You can buy them in stores for a variety of purposes; in a stationery store you can buy products intended for papers. But in a hardware store you can see what you need for repairs.
The favorite type remains the furniture option. After all, it is used to carry out restoration and insert other furniture elements during construction and repair work. It can be used for cosmetic and major repairs of an apartment.
To use a furniture stapler, let’s explain some points. Namely, what types of staples are there and how they are used. An important issue will be the use and change of brackets in the operation of the device, since the issue of changing brackets worries users.
How to use a furniture stapler: device, operation, tips
A furniture stapler is a fairly universal tool with which you can not only perform furniture upholstery procedures, but also a number of other construction operations.
Today, there are several types of similar equipment, differing in their operating principle:
- pneumatic,
- electric,
- manual.
Pneumatic staplers are used in industry, and electric and manual staplers are used in everyday life. Models belonging to the latter type are the most common in the furniture industry due to their mobility and ease of use. Let’s use this example to look at the principle of operation, operation and repair of furniture staplers.
However, before moving on to this procedure, I would like to say a few words about staples and their varieties.
Characteristics of furniture stapler staples
There are a variety of staplers on sale, but most work on so-called standard staples. And only type 53 belongs to them. There are 104 and many others. But the main difference is in characteristics and thickness. After all, the higher the number in the indicator, the thicker the staple increases. Application differs on different materials.
But the 53rd model has average width and thickness of 11.4 and 0.7 mm, respectively. These numbers are not so important, but to find out what type of brackets your model runs on. It is worth carefully studying the operating and replacement instructions. Everything will be spelled out in detail there.
When purchasing, you should ask your consultant about the types of staples. After all, there are models that are difficult to find on sale or the cost will be much more expensive.
Depth will be a factor when choosing staples. The depth indicator affects how deep the bracket itself will go. This indicator has different values, as it will depend on the material of manufacture and the purpose of use.
Simple ones are 4–8 mm. They are made mainly of plastic and are designed to attach and insert small materials. It is used infrequently, and the cost is low - 100 rubles.
- From 4 to 10 mm is the best option, but still not suitable. True, they are made of metal and correspond to 53 types of staples. But there is no adjustment screw.
- Staples 4–14 mm are a suitable option both in terms of cost and frequency of choice. Yes, and there is also a blow control screw. With its help, you can increase the force of the required blow, otherwise the staple may not fit well into the material.
There are types of hardened and simple staples. Tempered ones are intended more for materials such as particle board, since they can be held in place for a longer time using a furniture stapler gun.
Simple staples do not have such characteristics. They are simpler and not very reliable. True, this does not stop people from purchasing them.
Repair furniture stapler does not hammer staples repair. Main types of models
The manual stapler does not require careful maintenance. You just need to lubricate it periodically.
- Manual staplers. This group includes mechanical staplers equipped with a manual drive. They are divided into several types, based on the task that needs to be completed.
- Stapling hammer. This staple gun hammers the staple into place with a strong blow. The speed of this model is much higher than its manual counterparts, but the accuracy of driving staples leaves much to be desired. In most cases, such staple hammers are used for:
- insulation fastenings;
- laying roofing felt.
In other words, the stapler is used where speed of work comes first, and not its accuracy.
Cable construction stapler. This tool is specially designed for installing cables that can withstand a load of 50 V. The cable diameter for operation must be no more than 7.5 mm. When choosing such a stapler, the diameter of the wire you will have to work with is taken into account. Most often, cable devices are used for large volumes of work, when the following is required:
- fix the cable;
- lay an electrical network;
- install communication lines.
Regular models. This instrument has already become a classic among such devices. It has a manual drive, which is pressed against the surface, and after pressing the release lever, the staple is driven into the material.
Electric staplers are considered one of the most powerful because... have reinforced springs.
Combined models. This construction stapler simultaneously combines operations performed by various types of staplers equipped with a manual drive.
In addition to the models presented above, there are also other varieties of this tool. They are divided into:
Professional models are distinguished by their positive characteristics:
- great resource;
- ergonomics;
- no plastic parts.
The negative side is the high cost of the stapler.
Electric staplers. This variety is widely used for domestic needs. The electric stapler is very easy to operate, just connect the electricity. However, the cost of such a stapler is much higher than its manual counterpart. To simply repair furniture, it is not economical to buy such a model. A manual stapler is more suitable for this job. But if we are talking about constant furniture repair, then it is better to use the electric option.
Pneumatic models. Mostly professionals use such tools in their work. This type of construction stapler is not used for household needs. The staple is driven in by a pneumatic shock. This air method is used in production where an air compressor operates.
In case of special need, you can install your own compressor, but it is better to purchase a compact model, the dimensions of which correspond to the size of a small suitcase. To carry out the work, you only need an electrical network.
The price of such devices is incredibly high. This device is used by professionals who repair furniture. This type of pneumatic stapler is also available from private manufacturers.
Operating principle
Depending on the type of drive, tools are divided into electric and pneumatic.
Electrical
These devices are widely used in everyday life. Working with an electric stapler is a pleasure; you just need to connect the device to the power supply. However, an electrical device, in comparison with its manual counterpart, is much more expensive. It is profitable to buy it for professional craftsmen who are constantly repairing furniture. Naturally, it is not profitable to buy such a model for a one-time repair. Manual models are suitable for household use.
Pneumatic
These models are not used in everyday life, since their use requires a compressor unit. You can buy your own compact compressor, but how quickly such a purchase will pay off is the question. Therefore, buying a pneumatic device is beneficial for companies producing and professionally repairing furniture.
Video review of staplers
You can also watch a short video on the review of furniture staplers, as well as the principle of filling, setting and working with them:
Good luck to all home craftsmen, if you have any questions - write!
When doing independent restoration work, a stapler is often used to repair furniture. Using such a tool is simple, but it is important to follow safety precautions and operating rules.
Do-it-yourself repair of a construction stapler
Often during the operation of tools, their malfunction occurs. A mechanical stapler is no exception, repair of which may be required soon after purchase if the cheapest option is purchased.
Let's look at the features of repairing a furniture stapler using the example of a malfunction when two staples shoot out.
Why does the stapler shoot two staples, and is it possible to fix such a breakdown? First we need to figure out why it shoots two fasteners. The reason for this malfunction is the weakening of the clamping force of the staple cassette. The pressure is provided by the rammer. Over time, the spring loses its clamping properties, which leads to a defect when the device fires two staples at once.
You can fix this in the following way:
- For staplers with a spring type of spring, make a U-shaped plate and place it between the latch and the rammer. Such a plate will eliminate free movement of the rammer, and as a result the stapler will hit exactly one staple
- For staplers with coil springs, increase the force of the rammer spring. This can be done by adding spacers in the form of washers
A detailed description of the mechanical stapler repair process is presented in the video material.
No less popular is the problem when staples do not fly out of the stapler.
If in the first case the problem is solved without the need to disassemble the device, then here you cannot do without it. It is easy to disassemble the stapler, depending on its model. To do this, remove the cotter pin washers, and then disassemble the tool. Next you need to get to the impact mechanism, since the malfunction is associated with it. Repairing a construction stapler with a malfunction such as staples not firing is as follows:
- The sides of the striker are inspected
- There should be no licked areas where they come into contact with the handle. The presence of such indicates that the striker does not move to the upper position, but jumps off almost immediately when you press the handle
- The licked areas of the edges must be ground off with a grinder, after which we can assume that the tool has been repaired
- All that remains is to assemble it and check the proper functioning
Another type of failure of a mechanical stapler is when the staple shoots out in the shape of the letter “M”.
This type of fastening is not reliable, so the problem must be corrected as quickly as possible. We will consider the reasons for this malfunction and the features of its elimination below:
If the staples jam in the shape of the letter “M”, then the reason is that the striker has worn out. The striker is a plate that is connected to the striker. This type of breakdown often occurs due to the fact that the striker is made of low quality steel
With prolonged use of the tool, abrasion of the end part of the striker occurs, which contributes to the creasing of staples in the shape of the letter “M.” The alignment of the striker is carried out using a fine-grain file. It is important to take into account that removing a large amount of edge from the striker is not recommended, as this will affect the reduction in impact force
After repairing the construction stapler, you can continue to use it. The instrument in question is distinguished by its versatility, for which it has gained wide popularity. In conclusion, it should be noted that, like any other type of tool, a furniture stapler needs lubrication. The impact mechanism is lubricated with lithol or grease, which reduces friction and therefore increases the service life of the device.
How many shells will fit into a stapler?
There is a wide range of staplers with different working holder sizes. Staples can be purchased in small rows that are separated into sections by hand. 1 stapler can freely accommodate 1-1.5 rows, which contain more than 20 staples.
When choosing brackets, builders and furniture makers are guided by their depth. This figure varies from 4 to 14 mm depending on the type of work being performed.
So, to upholster furniture items with fabric surfaces, you need to purchase a bracket with a depth of 8 mm. Fixing thicker structures requires choosing staples with greater depth.