Assembling puzzles is a fun and educational activity that adults and children enjoy. They develop fine motor skills, have a positive effect on mental activity, relax and make you take your mind off everyday problems. But still, many often wonder how to glue puzzles into a picture so that it turns out smooth and durable?
First, you should consider popular techniques and prepare the necessary materials. It is important to choose a solid base that will hold the painting and prevent it from deforming. To frame the resulting puzzle creation, you can use a beautiful frame.
Gluing a painting from the face
You can fix the small parts of the puzzle so that they do not fall apart using film or special glue. One of the disadvantages of this method is its durability, since after gluing it will no longer be possible to disassemble the picture into segments.
Apply the self-adhesive film in an even layer to the front side of the canvas to ensure stable fixation of the puzzle elements. To prevent the image under the film from looking blurry, it is better to use a glossy film. High-quality material fits tightly to the picture, does not stretch or become covered with bubbles. In case of uneven adhesion, it is better to remove the film and re-coat it.
Adviсe:
- A transparent adhesive composition is suitable for work, as it does not dry out, crack or become cloudy over time;
- when choosing PVA, you need to monitor the quality and shelf life of the product;
- Pasting with rolled tape leaves stripes on the surface; this method is also suitable if you have an assistant.
Before gluing, it is necessary to clean the surface of hairs, threads, lint and other contaminants. When working with glue, in order not to spoil the table, it is better to lay a piece of old wallpaper or parchment under the picture.
What glue is suitable
The most inexpensive and popular glue for puzzles is PVA; it is perfect for a base made of wood, fiberboard or thick cardboard.
Advantages of PVA:
- does not leave greasy marks or yellow streaks on the drawing;
- after drying it becomes transparent.
Among the disadvantages, it is worth noting that PVA is not moisture resistant. Therefore, it is recommended to varnish the front side of the panel several times, for example, for decoupage.
Advice! Apply each subsequent layer of varnish after the previous one has completely dried.
Products specifically designed for gluing:
- "Step Puzzle";
- Fix Puzzle Conserver Permanent;
- "Ginger cat".
The “Dragon” or construction “KS” composition is suitable for the same purposes.
Important! The selected composition should have a thick consistency and not spread. Otherwise, the wrong side of the parts will be deformed.
Sometimes a set of puzzles comes with a product specially designed for gluing them together.
One of the least labor-intensive methods is to use double-sided tape, similar to children's appliqué with rhinestones. Glue it to the base and assemble the puzzle, while the image details are immediately glued. The main drawback is that the fastening is not the most reliable. However, if you plan to place the picture under glass, this is not of fundamental importance.
Gluing from the inside out
The most difficult moment is turning the puzzle face down. Initially, the picture should be collected on a mobile basis. The basis can be a sheet of fiberboard, a mat or a piece of plexiglass. The puzzle must be covered with thick material and turned over.
Flip using film:
- Flipping with film is suitable if the puzzle is assembled on a backing base that is slightly larger in size than the picture.
- Wrap the puzzle on the base with film in several layers.
- Turn the structure over and cut the film along the base.
Unscrew the edges of the film, remove the backing and proceed to gluing the picture. In this case, the film will act as protection for the table from glue. It is better to glue puzzles with a large number of segments from the face, wait for drying and repeat the fixation from the back.
How to glue puzzles with tape?
Since we've sorted out the frames, now let's move on to the question of how to glue puzzles together with tape.
STEP 1.
Assemble the puzzle on whatman paper or a piece of cardboard that extends slightly beyond the actual size of the puzzle. The cardboard needs to be sturdy as you will have to turn the puzzle over.
STEP 2.
With the puzzle facing up, use wide packing tape such as duct tape or masking tape that is 5cm or slightly wider. Carefully place the tape across the rows of the puzzle so that the entire back is covered with tape. Trim the edges and then flip the puzzle over.
STEP 3 (OPTIONAL)
If you need a more durable base for your puzzle, you can purchase poster board from your local craft or office supply store.
Although this method may seem simple, it is not recommended for jigsaw puzzles. The tape can dull the colors, it can reflect light so that the picture is not visible from certain angles, and if you apply the tape incorrectly, you will not be able to remove it. Therefore, we recommend using special glue for puzzles.
In frame
A puzzle picture in an original frame looks especially impressive. Ways to make a frame:
- The easiest way is to purchase a ready-made frame in a store that matches the dimensions of the finished mosaic. For large-sized paintings, it can be made to order.
- A beautiful and light frame will be made from a ceiling baguette. It should be divided, folded the corners and glued along the perimeter of the mosaic using Moment glue or liquid nails. After drying, the frame can be painted in the desired color and hung on the wall.
- An original solution is a frame made of old colored pencils, slats, shells, stones, rope or buttons. The base should be larger than the picture. Glue a frame along the edges of the product, prime it or paint it.
Features of base selection
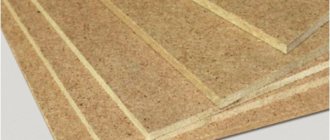
The first step is to select a base for the puzzles; it will hold them in place and preserve the shape of the picture. If the product is small, then whatman paper or a cardboard sheet will do. For options that consist of 100 parts or more, it is worth using a strong and level base. Sheets of plywood or chipboard would be suitable; various adhesives stick well to them.
When considering what to glue puzzles on, you should not miss another option - PVC ceiling tiles. This is an average product, about 500 small parts fit on it. There is a chamfer along the edges; it should be cut off using a stationery knife with a sharp blade. If the future panel will be large in size, then you can combine several PVC tiles.
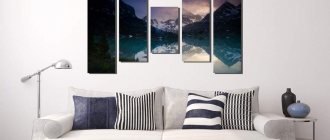
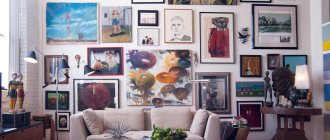
Placing a puzzle without a frame
The folded puzzle will look stylish on the wall even without a massive frame. And in loft interiors the frame would even be out of place. A glued and thoroughly dried puzzle can be placed in the interior in the following ways:
- Sewing pins if the picture is small.
- Double-sided tape. It is enough to cut out a few squares for a small panel, glue it in the center and along the edges. To attach a three-dimensional picture, it is better to stick tape around the entire perimeter of the puzzle or completely along the upper edge.
How to glue a puzzle onto cardboard?
If you decide to decorate your home with mosaics, the best way to do it is with the new mounting system from Unidragon. One set is enough to glue 6 puzzles of size S, or 3 puzzles of size M, or 3 puzzles of size KS.
In the kit you will receive:
- Cardboard base for turning over the mosaic;
- Special stickers for attaching the base to a flat surface;
- 3 adhesive sheets for holding mosaic pieces;
- Adhesive heels for placing the puzzle on the wall;
- Instructions.
You can watch detailed instructions on how to glue a puzzle on our YouTube channel.
Rating of the best
You can buy the following types of special adhesive compositions on the Internet or in craft stores: Step puzzle, Ravensburger Puzzle Conserve, KSK-M, Educa.
- First in the Step puzzle . It has high adhesion, is easy to apply, and dries quickly (within 1.5–2 hours). Packages 80 ml. enough to treat a surface of 0.4 square meters. meters. Does not deform the cardboard surface. Cost from 30 rub.
- Ravensburger Puzzle Conserve. It comes in a can with a foam nozzle. Forms a transparent, elastic coating, drying time 1 hour. Bottle 200 ml. enough for a canvas of 4 thousand segments. Cost from 580 rub. Not always available.
- KSK-M. A cardboard spatula is included with the adhesive material. Volume 80 ml. enough to treat a surface of 0.4 square meters. m. Has no color, forms a glossy film. Coupling time 2 hours. Price from 35 rub.
- Educa packaging of polymer solution 250 ml. enough to glue puzzles of up to 6000 pieces. Unlike other formulations, you can work with children from 3 years old. Also applied to the front side, it forms a transparent coating. Dries in 2.5 hours. Cost from 600 rub.
All adhesive mixtures, except Educa, can be used by children from 6 years of age.
What is the best way to glue Unidragon puzzles?
Complete your home decor with interesting wood mosaics. This will be a beautiful decoration for:
- Bedrooms
- Children's
- Living room
- Kitchens
- Game room
- corridor
- and also for your office!
How to hang a picture correctly? As with any aspect of decorating, you need to understand the basic principles first and then improvise—the most pleasing arrangement may be the one you least expect. Have someone hold the painting up against the wall while you stand back and appreciate it. If you're going to group several items together, arrange them on the floor and rearrange them until you find an arrangement you like.
As for the exact placement, conventional wisdom says that pictures should be hung at eye level. This concept is a good starting point, but hardly definitive. There are many good reasons for hanging pictures higher or lower than the standard height. In any setting, you will have to react to the architecture and furniture, as well as follow your instincts.
Learn to trust yourself. If it feels right, don't be afraid to do something a little differently.
How to glue a wooden puzzle and not make mistakes
Mistakes are normal, but it’s still better to learn from other people’s mistakes than from your own. Therefore, we bring to your attention the most common problems that users encounter:
❌ First cut out the film and then glue it onto the puzzle.
✅ There is no need to cut the film in advance, because you may not guess with the size!
❌ Glue the film onto a dirty or dusty puzzle.
✅ Clean the puzzle before sticking the film.
❌ Glue the film onto the unassembled puzzle.
✅ Gluing should be done at the very end, when all the puzzle elements have been collected.
Main types
Puzzle rugs are classified according to various parameters. So, if we talk about functionality, they are divided into:
Developmental. Thanks to bright colors and different designs, the child gets to know the world around him. This way he can learn colors, letters, numbers and more. Experts note that such rugs develop spatial and geometric thinking in children.
Gaming. From the modules you can build not only a flat floor covering, but also three-dimensional figures. They are very bright and soft. The baby will be happy to play with them.
Decorative. Thanks to the variety of colors and patterns, the puzzle set will become a unique decorative element. Basically, such models are of considerable size and are used permanently - they cover the entire playing area.
Wellness. Some categories of products have a special pimply surface - it performs a massage function.
In the video: bumpers for soft floors and puzzle rugs.