A little dark humor: putting together puzzles develops not only logic, imagination and fine motor skills, but also myopia and osteochondrosis. To justify such a hobby, we will decorate the interior with puzzles. How to make a picture from puzzles so that it looks beautiful and neat on the wall?
Let's learn some nuances so that the design of pictures from puzzles will be successful. Our tips will help you avoid annoying mistakes so that glued puzzles do not have to be thrown into the trash.
How to assemble puzzles
Those who are not in the know will think that this is just a toy for children, but in fact, adults are mainly interested in assembling puzzles. A great hobby to unwind after work. But a beginner, without understanding the nuances, can, on the contrary, undermine the nervous system.
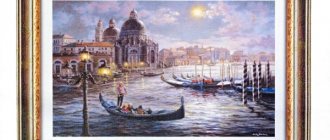
The picture from the puzzles will not come out soon, but a fragment is already emerging clearly
To enjoy the process of assembling puzzles into a mosaic, you should prepare a little:
- find a place to assemble and store the puzzle;
- learn selection methods;
- sort the parts;
- figure out what to do with the finished puzzle.
It's fun to put together large puzzles, but you'll need a lot of space to lay out and fold the pieces like this. Leaving it on the floor or on the table is not an option, since this is not an activity for one day. The solution is to purchase a special mat for putting together puzzles. See how it looks in the video:
You can make a mat yourself from any thick, non-slip fabric. Replace the inflatable roller with foam rubber, and use elastic instead of belts. It is comfortable to work on even on a soft sofa. After the “meditation” session, the mat with the assembled fragment is wound onto a roller, secured with straps and placed in a corner until the next day or transported, for example, to the country house.
The work begins with sorting the parts by color and individual objects and patterns. As always, there will be a lot of blue details from the sky, sea, and ocean. It is convenient to store individual piles or collected small fragments in organizers or in candy boxes.
There are a lot of techniques on how to assemble them correctly; there is even a forum online for those who like to assemble puzzles. You can search for a part by sample, by puzzle, or by brute force. Everyone chooses their own option, but you need to start with the simplest section. If you want to become a cool puzzle collector, don't think about techniques, try experimenting instead.
Either way, you'll have a good time. It’s natural that one would want to be proud of such titanic work. For example, hang a puzzle on the wall, and how to glue it and arrange it into a picture, read below.
Methods for gluing a puzzle
How to secure puzzles into a picture so that they do not fall apart? At home, you can only glue the parts together from the front side or the back, and then glue the finished canvas to the base. It can be cardboard, plywood or canvas - with or without a frame. Alternatively, you can take the completed puzzle to a framing workshop, where it will be beautifully decorated and laminated.
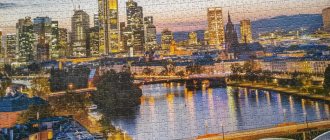
Large puzzles on the entire wall
Mixed option, universal method
Universal gluing is often used. Several technologies are used here at once. For example, before gluing puzzles with tape on the front side, fabric is glued to the back side. Due to this, the picture holds up more confidently. But this method requires a double flip of the finished mosaic. The fabric can be made of any material: cotton, linen, cotton blend. It is advisable to give preference to natural fabrics, since they are the easiest to glue.
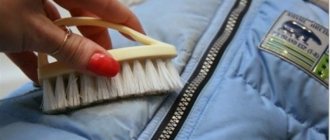
Another universal option is a mixture of glue and tape, which are attached to one side. For example, the front one. Before gluing the assembled puzzles together, you need to remove all debris, dust and dirt. To do this you will need a fan brush or a simple thick brush. Apply diluted liquid PVA glue, let it dry for 2 hours, then stick on strips of clear tape. There is no need to apply varnish on top. The picture will be glossy.
Gluing the puzzle from the front side
Fixation occurs using glue or using a special film for fastening puzzles. Glue is poured between the parts, holding everything together tightly. The disadvantage of the option with glue is that you can’t take anything apart later.
The self-adhesive film for the puzzle is glued to the front side and holds the pieces together well. To make the design clearly visible, choose a glossy film. A good sample does not stretch or bubble. If it sticks unevenly, you can peel it off and try again.
Tips from the pros:
- Choose transparent glue that does not become cloudy or dry out over time.
- PVA glue is fine, but make sure it's a quality product.
- There is no need to skimp on film.
- Don't even think about roll tape unless you have someone nearby.
Before starting the gluing process, it is necessary to clean the painting from dust, lint and other contaminants. To avoid staining the table with glue, place tracing paper, parchment or a piece of wallpaper underneath.
Gluing the puzzle from the wrong side
The main question is how to turn the puzzle face down. You will initially need to assemble on an easily movable surface if you plan to attach the finished painting from the wrong side. This can be a sheet of fiberboard, plexiglass or a special mat. In this case, simply cover the top with a durable material, for example, another sheet of fiberboard, and quickly turn the entire structure over to the other side.
Another option is to use cling film:
- In this case, the canvas needs to be assembled on a substrate, which is slightly larger in size than the assembled puzzle itself.
- Wrap the finished puzzle together with the backing with cling film. You can make several layers of cling film.
- Then the entire structure needs to be carefully turned over, placed face down, and the cling film cut along the backing.
- Turn the edges of the film to the side and carefully remove the backing. Now you can glue the puzzles, and the cling film will protect the table from glue.
It is better to glue large paintings first from the front side and then from the back side. First, coat the front side with glue and wait until it dries completely. Now turning the mosaic over will not be difficult. Turn over carefully and coat the wrong side with glue.
How can you glue puzzles?
Now you need to figure out what to glue the puzzles on to make a picture.
PVA
PVA glue is used for gluing products made of wood, paper, cardboard, glass, leather, fabrics, etc. It is also perfect for gluing puzzles. It dries quickly and becomes transparent after drying, so don't be fooled by the white glue stains - they will soon disappear.
Important! Suitable for both back and front sides.
Step Puzzle
This is a special glue for gluing puzzles. It is often included in the kit. It is distributed over the entire surface with a piece of foam rubber or a brush.
Powder glue from Clementini
This is glue from Italian puzzle manufacturers, which, as a rule, comes complete with the puzzles themselves. It must be diluted in water in a ratio of 1 to 3. The glue is quickly absorbed and, when diluted correctly, leaves no traces.
Silicate office glue
Even though it is not intended for such purposes, it nevertheless does an excellent job and gives the picture a glossy shine.
Scotch
Regular adhesive tape has become very popular among puzzle lovers. They can easily glue the wrong side together. First glue your picture vertically, then horizontally.
How to make a picture from puzzles into a frame
There are many ways to make a picture frame from puzzles:
- The most obvious is to purchase a ready-made frame that fits the size of your mosaic and follow the instructions. Frames for large-sized puzzles can be made to order.
- A beautiful frame emerges from the ceiling plinth. You just need to cut it and glue it to the base around the perimeter of the picture using liquid nails or instant glue. Ideal, because such a frame can be painted in a variety of colors.
- An interesting idea is to make a frame from unsharpened colored pencils, colored slats, pebbles, shells, and buttons. The base in this case should be larger than the drawing itself. The selected material of the required size is glued along the edges and the picture is ready.
What do you glue puzzles onto to make a picture? As a basis you can use:
- fiberboard sheet;
- ceiling tiles;
- Styrofoam;
- cardboard, canvas;
- fabric, gauze, tulle.
You know how to make a picture from puzzles. All that remains is to find out how to insert the glued picture into the frame:
Base for gluing the puzzle
What do you glue puzzles onto to make a picture? The following materials can be used as a base.
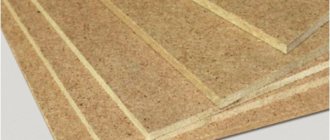
Fiberboard sheet
It must be cut exactly to the size of the picture. Trimming the edges after the puzzle has been glued may damage the puzzle.
- Apply PVA glue in a thin layer so that there are no dry spots left.
- Excess glue must be removed immediately so that it does not leak onto the front side.
- Place the glued sheet on the inner surface of the assembled puzzle, press down and immediately turn it face up.
- The glue that appears after pressing must be removed with a clean cloth.
- Leave until completely dry.
Important! Such sheets are optimal for creating large paintings; their surface is smooth, the puzzle is easy to glue, and does not lose its appearance over time and does not deteriorate. But along with the advantages, there are also disadvantages: these sheets need to be cut with special tools, in addition, the picture turns out to be quite heavy and requires special fastenings.
Styrofoam
A good alternative to fiberboard can be thin polystyrene foam, which can be purchased at hardware stores. This is a lightweight material, which is also easy to cut and convenient to use. It is not deformed by the glue and does not become distorted after it dries, since it is about 15 mm thick. But such a thickness is rather a disadvantage, since to decorate a picture with a frame you will have to look for a fairly massive structure that will hide such a thickness.
Ceiling tiles
These tiles come in different thicknesses and sizes. They are easy to cut, fit into standard frames in thickness and are quite affordable:
- For the base, you need to choose a tile without a relief pattern, about 4 mm thick.
- One tile holds a puzzle consisting of 500 pieces.
- If you have a large pattern, you can glue several tiles together with PVA glue.
- It is best to make the joints between the tiles jagged.
- The puzzle is glued to the back of the tile.
- After gluing, you need to remove excess glue and put the picture under pressure. You can simply put a board on top. If this is not done, the structure may become deformed as the glue dries.
Gauze, tulle
It can be done very simply:
- Apply glue to a regular piece of gauze or tulle of a suitable size and attach it to the mosaic.
- Excess glue must be removed immediately with a rag or napkin.
- After the glue has dried, you can apply another layer on top to secure the result.
- The remaining edges of the gauze can be trimmed or used to stretch it over a frame or other surface.
Important! With this method, it is recommended to glue the puzzle from the front side, otherwise the structure will be fragile.
Adhesive or self-adhesive film
It is sold in rolls of different widths. The surface must be dry and clean without dust. The size of the film should be a couple of millimeters smaller than the size of the mosaic.
Further:
- Cut the required piece of film.
- Separate the paper from the film by about 5 cm.
- Apply the self-adhesive film to the surface and glue the separated edge.
- Then slowly and carefully pull the paper away from the remaining part.
- You need to smooth the film with your other hand. You can use a towel, you can do it with your hands - whatever suits you.
Important! To avoid bubbles, iron from the center to the edges. If bubbles do appear, pierce them with a needle.
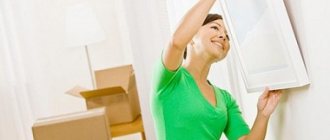
How to hang a puzzle without a frame
The puzzle picture will look good on the wall even without a frame. In some room decor styles, a frame will even be out of place. How to carefully hang a pre-glued and well-dried puzzle on the wall:
- Using double-sided tape. If the canvas is small, it is enough to cut out a few squares of about two by two centimeters. Glue one in the corners and one in the center. Peel off the paper on the other side and apply it to the wall. If the puzzle is large, then glue it with tape around the entire perimeter and one strip in the center.
- Using sewing pins, but this option is suitable for small paintings.
If you are absolutely sure that a puzzle on the wall will be appropriate, you can firmly glue it to the wall. The glue moment in this case is the most suitable. But if anything happens, you definitely won’t be able to restore the wallpaper and will have to repair it.
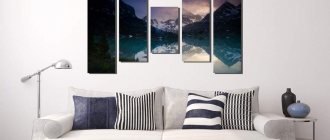
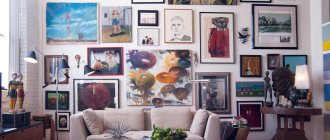
Pictures from puzzles in the interior
Puzzle mosaics will perfectly decorate the walls of any room. Of decisive importance will be the fact that the picture also depicts the framing option itself:
- For a living room or hallway in a classic style, a baguette would be a good solution.
- For a children's room, you can make a frame from scrap material. Laces, ribbons, colored slats, and pebbles are perfect.
- In the bathroom, you can hang a sea-themed painting framed with shells, pieces of sea salt and corals.
- For the kitchen, a puzzle depicting a fruit still life would be a good option. The frame in this case can be either classic wooden or decorated with twigs, dried leaves or artificial fruits.
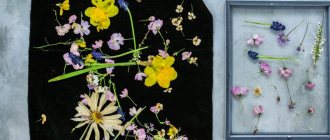
Picture puzzle in the living room interior
The amazing is nearby. It used to be just a children's puzzle, but suddenly for many adults, the puzzle became a hobby for many years. Moreover: it has become interior decor. It's all about the image itself and your perseverance. Go for it and you will definitely be able to collect not only 200 parts, but also 2000!
Cardboard photo frame
So, first of all, let's look at the simplest job of making a photo frame from cardboard.
Such a frame can successfully fit into any interior and become an iconic item in your family. To make it you will need the following materials:
- Standard cardboard (can be multi-colored).
- Several old magazines (preferably in good condition).
- PVA glue, super glue or hot glue.
- Needle and thread.
- Stationery thick scissors.
- Pen, pencil, ruler, compass.
Once you have all the necessary materials, you can safely get to work.
- Take cardboard and draw a frame of the size that suits you on it, and then draw another frame in the very center.
- Next, start carefully cutting everything out.
- Then you can start decorating the frame. To do this, you can use threads and embroider a pattern you like, draw a design with a pencil, or cover cardboard with colored paper.
- Then take black cardboard and cut out a frame that would completely match the 2nd frame drawn at the very beginning of the work. Glue it on the back side.
- The final part of the work will be mounting your photo.
By following these instructions, you will have a wonderful DIY photo frame.