Automatic washing machines (hereinafter also referred to as SM, SMA) of the Ariston brand are well known and popular in Russia. But just like any mechanical product, washing machines sometimes fail. The reasons are most often wear and tear or manufacturing defects in components and parts, leading over time to various breakdowns of Ariston washing machines.
A washing machine is an appliance containing many mechanical and electronic parts.
Problems in the Ariston Aqualtis series CM, as well as in other models of washing units, are associated not only with manufacturing defects, but also with improper installation and operation of the CM. Many of the errors in your work can be corrected yourself.
What types of malfunctions are there?
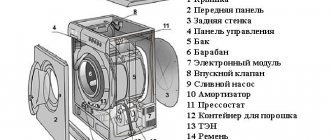
Ariston produces automatic drum-type washing devices. The models are of the same type and include:
- housing with loading hatch and shock absorption system,
- Control block,
- drum tank,
- Electrical engine,
- tubular electric heater,
- bearing unit,
- inlet valve,
- pump for draining water.
If a machine breaks down, you can quickly find and eliminate the defect based on characteristic signs. Let's look at typical malfunctions of the Ariston Hotpoint washing machine and other models of the Italian manufacturer.
Water does not drain
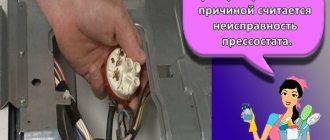
When washing is completed, water is not pumped out of the tank. Possible reasons:
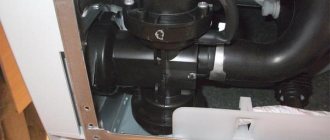
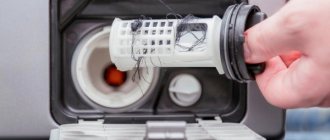
- The pump connection or drain hose is clogged.
- Drain filter clogged.
- The pump has failed. Signs:
- the pump hums, but there is no drain;
- stops during washing;
- slow drain.
Doesn't start
The washing machine does not turn on, the display does not work. Possible defects:
- damage to the power cable;
- network filter defect;
- control unit malfunction;
- Damage to internal wiring.
Doesn't take up water
The indicator works, but no water flows. Causes:
- clogging of the intake valve filter;
- valve malfunction;
- water level sensor malfunction;
- malfunction of the hatch locking device.
Water does not heat up
Possible malfunctions:
- water level sensor malfunction;
- damage to the wires supplying the heater;
- heating element malfunction;
- temperature sensor failure.
Spin mode does not work
The wash has been completed, but the laundry has not been spun. This is possible for reasons:
- the permissible weight of the laundry has been exceeded;
- clogged drain filter;
- pump malfunction;
- failure of the rotation speed sensor;
- electric motor defect.
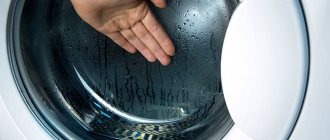
Water leak
Main defects leading to leakage:
- wear of the bearing seal;
- damage to the drain hose or internal pipe;
- destruction of the door seal;
- damage to the hoses supplying water to the detergent tray;
- drum damage;
- incorrect installation of the drain filter.
Extraneous noise
Extraneous sounds (grinding, rumble, creaking, whistling, etc.) or an increased level of normal sounds may indicate:
- foreign objects in the drum (coins, keys, etc.);
- destruction of drum bearings;
- shock absorber wear;
- foreign objects in the pump;
- pump shaft failure;
- engine malfunction;
- counterweight damage.
The loading hatch does not open
This leads to:
- water sensor failure;
- program crash;
- malfunction of the hatch lock or opening handle.
If the screen is missing
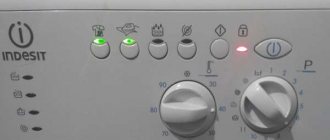
Automatic Ariston machines that are not equipped with a display signal faults detected by the self-diagnosis system by flashing the display on the control panel. Most washing machine models have only two indicators - a symbol confirming the hatch is locked and a power light. The door lock LED is usually in the form of a lock or key and is always on. When selecting the desired washing mode, the selector knob rotates in a circle, while clicking slightly.
Certain Hotpoint Ariston models indicate breakdowns by flashing the “lock”, the “Spin” light and the “Program End” LED. You can find automatic machines without a display that tell you about an error by showing the temperature indicators at 30°C and 50°C. At the same time, the LED will light up to indicate washing in cool water and indicators 1, 2 and 4 will flash.
Error codes (F01-F18)
Ariston machines with a self-diagnosis function indicate a malfunction with a sound signal and display an error code on the display. This makes it easier to find the defect and reduces repair time. The following codes are displayed:
- F01 – malfunction of the motor or control unit;
- F02 – failure of the rotation sensor or motor;
- F03 – temperature sensor defect;
- F04 – water level sensor malfunction;
- F05 – clogged drain hose or drain filter;
- F06 – door lock malfunction, control unit error;
- F07 – the heating element does not heat up;
- F08 – malfunction of the heating element or electrical wiring;
- F09 – control unit failure;
- F10 – defect in the inlet hose;
- F11 – failure of the pump or level sensor;
- F12 – control module malfunction;
- F13 – drying temperature sensor defect;
- F14 – drying heating element burned out;
- F15 – damage to the wiring of the drying heating element;
- F16 – door not closing tightly;
- F17 – door deformation, no power to the electric door lock;
- F18 – control unit failure.
Refuses to turn on
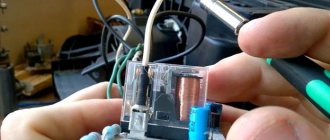
The reason that the machine does not want to turn on is most often a broken power cord, a broken socket or a damaged control module. First of all, you should check whether the electricity supply to the house has been cut off. If not, make sure that the outlet is working properly by plugging another device into it. Next, the power cord is inspected - defects on it are visible to the naked eye. Repairing the main control unit can only be done by an experienced technician; it is not worthwhile to delve into the electronics of the SMA on your own without the necessary knowledge.
The Hotpoint Ariston washing machine may not start if:
- The inlet hose is clogged or the water intake valve is broken. Due to the inability to collect water for washing, the equipment will not be able to work;
- the engine is faulty. In this case the cycle cannot be started either.
To find out the reason why the washing machine refuses to work, you will have to perform equipment diagnostics. If the problem is in the power cord, you can replace it yourself. If there is a problem with the control unit, it is better not to start repairing it yourself.
DIY Ariston washing machine repair
If you have the necessary knowledge and experience, you can repair your washing machine yourself. There are many videos on the Internet that describe in detail how to troubleshoot problems.
Important: during the warranty period, it is not recommended to repair the device yourself - this may void the manufacturer’s warranty.
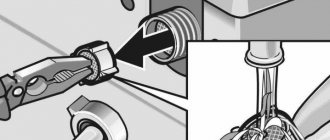
Replacing bearings for an Ariston model with a plastic tank:
- Drill the protruding edges of the seam around the perimeter in several places to bolt the place where the tank will be glued together after repair.
- Use a fine-toothed hacksaw to cut around the perimeter of the tank, strictly following the seam line. Start cutting from the bottom base of the tank.
- Divide the tank into halves. Use a knife to cut off the burrs at the cut site.
- Unscrew the pulley mounting nut.
- Remove the pulley from the shaft.
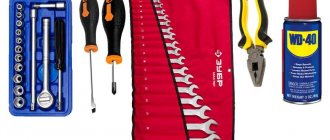
- Use a rubber or wooden mallet to knock out the shaft with the drum from the inner ring of the bearing in the central hole of the tank. To do this, place bricks around the perimeter of the tank cut and treat the bearing assembly with WD-40.
- Use a screwdriver to remove the bearing seal.
- Use a metal drift to knock out the shaft bearings.
- Clean and rinse the tank halves and drum.
- Use a flat metal drift to push the new bearings into the mounting locations.
- Install the bearing seal.
- Lubricate the oil seal and shaft with grease.
- Install the shaft with the drum, put the pulley on the back of the tank and tighten the nut.
- Degrease the cut edges of both halves with white spirit.
- Using a gun, apply sealant evenly around the perimeter of the cut on both halves and connect them.
- Insert the bolts into the pre-drilled holes and tighten.
- Screw self-tapping screws around the perimeter into the protruding edge of the seam in increments of about 10 cm.
- Allow the sealant to dry overnight.
Video
In the video below you can see how to resolve error F5
Mom, wife and just a happy woman. She draws inspiration from travel and cannot imagine life without books and good films. She strives to become an ideal housewife and is always ready to share her experience.
Found a mistake? Select it and click the buttons:
Washing machines equipped with the “No Iron” or “Easy Iron” functions can wash clothes with little to no wrinkling. This effect is achieved through a special approach to spinning - it is performed at low speeds, with long pauses, and a small amount of water is retained in the tank.
In the 19th century, washing ladies' toilets took a lot of time. The dresses were first ripped open, and then each part was washed and dried separately so that the fabric did not become deformed. After washing, the clothes were sewn again.
Washing machines have something to do with the origin of the expression “money laundering.” In the 1930s, American gangsters used a network of laundries as a cover for their illegal activities. By passing off the proceeds of crime as proceeds from cleaning clothes, they turned “dirty” money into “clean” money.
There are a variety of balls that are used in the washing machine. Antistatic ones will prevent the fabric from sticking to the body after washing, balls with special loops will “comb” the lint and prevent the appearance of pills, and silicone ones with pimples will prevent fluff from matting when washing outerwear.
For washing small items on the road or in a hotel, it is convenient to use a regular plastic bag. Socks or tights are kneaded inside a tied bag along with water and a small amount of detergent. This method allows you to pre-soak things and wash them without damaging the fabric or wasting a lot of powder and water.
The expression “soap opera” (“soap”) did not arise by chance. The very first series and shows that had a female audience were broadcast on television at a time when housewives did cleaning, ironing and laundry. In addition, to attract female viewers to the screens, commercials for detergents: soaps and powders were often played on air.
Astronauts, while in Earth orbit, solve the problem of dirty things using an original method. Clothes are dropped from the spacecraft and burn up in the upper atmosphere.
The first officially patented washing machine was made of wood and was a box with a frame, half filled with wooden balls. Laundry for washing and detergent were loaded inside and the frame was moved using a lever, which, in turn, made the balls move and grind the laundry.
History knows the fact that a kitten fell into the drum of a washing machine and, after going through a full wash cycle on the “Wool” program, got out of the unit unharmed. The only trouble for the pet was an allergy to washing powder.
Source
Repair features
Due to differences in design, repairs vary between models.
Ariston Margarita 2000
The Margarita 2000 car has a stainless steel tank. The bearings are installed in a removable crosspiece mounted on the rear wall of the tank - it does not need to be removed to repair the bearing assembly. Repair sequence:
- Tighten the transport bolts.
- Remove the hatch on the rear wall of the device.
- Unscrew the fastening nut and remove the pulley using two screwdrivers.
- Remove the top cover and remove the counterweight.
- Place the machine on the front panel, having first removed the door.
- Unscrew the fasteners of the removable crosspiece of the tank.
- Using gentle blows, remove the cross from the shaft.
- Remove the oil seal and bearings from the crosspiece. Replace, lubricate and reinstall.
- Place the crosspiece on the shaft and carefully hit the bearings with a rubber mallet.
- Secure the crosspiece and pulley, put on the belt.
- Place the machine vertically and check the smooth rotation of the shaft.
- Install the front door, top cover and rear hatch.
Do-it-yourself repair of the Ariston Margarita 2000 washing machine is completed.
AVSL 100
The AVSL 100 model has a malfunction that is not found in other Ariston machines. When the washing mode starts, all the indicators light up, but the wash does not start, water does not fill, and the drum does not spin. The device is not equipped with a self-diagnosis function, so the malfunction cannot be determined by the error code.
Users have determined that the malfunction occurs due to wear on the motor brushes. To replace the brushes, you need to remove the electric motor, which is not difficult. To do this, you need to remove the top cover and back panel. Disconnect the wires, unscrew the bolts holding the motor and remove it. Replace the brushes, install the electric motor in place, and reassemble the housing in the reverse order.
AVTF 104
The peculiarity of replacing the drive belt in the Ariston AVTF 104 model is associated with the design feature of vertical machines. Access to the pulley and drive belt is through the side wall, rather than through the back, as with front-loading models. Sequencing:
- Remove the lower decorative apron, unscrew the 2 bolts securing the side cover.
- From the rear side, unscrew the 7 bolts securing the right side wall.
- Using caution, remove the side panel - it is attached to the top with plastic hooks.
- Remove the belt that has become unusable.
- Buy a belt with the same number of grooves. Model 1213 H8.
- Place a new belt on the motor shaft, pull it halfway around the drum pulley, insert a screwdriver under the belt and, turning the pulley counterclockwise, put the belt on the rim.
- Check belt tension. It should not sag or fly off. To increase tension, move the belt 1 or 2 grooves of the motor shaft closer to the edge.
- Reassemble in reverse order.
Vertical models
The main breakdowns of a top-loading machine are identical to those of front-loading models. However, there are several defects unique to them, related to the design feature. The following can be distinguished:
- Rapid wear or deformation of the rubber door seal.
- Failure of the loading hatch lock during operation. The hatch doors open, become deformed, and damage the heating element and tank walls. As a result, the drum and tank may need to be replaced.
- Quite frequent ruptures of the drive belt.
The peculiarities of repairing the vertical model are due to the fact that access to the internal components for troubleshooting them is easier than the Ariston Hotpoint washing machine due to the removable side walls of the device. The complexity of repair work is determined by the more compact and inconvenient placement of mechanisms. To replace some parts you have to disassemble almost the entire machine. It is believed that vertical models are less suitable for self-repair.
Problems with the door, cold water
One day the user may discover that the hatch does not close. There may be mechanical damage (such as deformed plastic latches) or an electronic failure that is causing the door to not lock. When using the washing machine for a long time, the hinges on which the door is hung may also sag.
A frequent breakdown can be considered the failure of the heating element. If the machine does not heat the water, it is worth inspecting the element. In most cases it will need to be replaced. The heater becomes covered with scale, which provokes its combustion.
The wash cycle does not start
The machine turned on successfully, but does not start washing?
- Check that the hatch is closed well; if it is not completely closed or is not closed tightly, the machine will not start the wash. Also, if you are sure that the hatch is really closed, the locking mechanism may have been damaged.
- Have you pressed the wash button?
- If the machine does not react at all, check whether it is turned on by pressing the appropriate button.
- It is possible that the water tap is turned off and no water is flowing, so the machine cannot start washing; the problem may also be caused by a water outage or some kind of interruption in the water supply system.
- The cycle start delay may have been set, check to see if the timer is enabled.
How to replace the sunroof cuff?
Initially, it should be noted that the sealing rubber is attached to the tank and the front wall of the device with clamps. In a simplified version, the whole process boils down to removing them from the damaged cuff and installing them on a new one. At the preparatory stage, it is necessary to disconnect the machine from the network and turn off the water supply. After this, the hatch door opens.
The next step is to remove the outer clamp. If it is plastic, then it will be enough to pull the elastic band towards you at the junction of the latches. The clamp can also be secured with a screw that will need to be loosened. In other cases, you need to pry off the spring with a screwdriver.
Removing the inner clamp involves the following steps:
- dismantling the top cover of the machine;
- removing the front cover (for models in which the first manipulation will not provide access to the clamp);
- unscrewing the tightening screw;
- prying the spring and tightening the clamp.
After the above steps are completed, you need to clean the seats and install a new cuff. To do this you need to do the following:
- thoroughly wash off the dirt using detergents;
- apply a soap solution to the installation areas for better glide;
- align the marks on the tank and the new rubber band;
- Pull the cuff over the edges, making sure it fits snugly;
- install the internal clamp;
- securely fasten the cuff to the machine body using an external clamp.