Indesit washing machines gained popularity due to their low cost. But for the initial cheapness you have to pay additionally with repairs - the reliability of the brand is in question. But many causes of malfunctions can be eliminated without any problems with your own hands.
We will tell you how to repair an Indesit washing machine yourself. The article we presented describes in detail the causes of common breakdowns and methods for restoring the functionality of equipment. Our recommendations will help you achieve optimal results.
Video
How to disassemble an Indesit washing machine is described in more detail in the video below.
About the author:
Mom, wife and just a happy woman. She draws inspiration from travel and cannot imagine life without books and good films. She strives to become an ideal housewife and is always ready to share her experience.
Found a mistake? Select it and click the buttons:
Ctrl + Enter
Interesting!
For washing small items on the road or in a hotel, it is convenient to use a regular plastic bag. Socks or tights are kneaded inside a tied bag along with water and a small amount of detergent. This method allows you to pre-soak things and wash them without damaging the fabric or wasting a lot of powder and water.
C. button to lower the drying temperature, Door
Page 10
- Image
- Text
R. Spin off button
G
Press this button if you do not need to spin the laundry, e.g.
when you just want to hang the laundry so that the water can easily drain from it.
Attention!
When the spin stop button is pressed, the drying time selection knob
should be in the "O" position.
C. Button for decreasing the drying temperature
Pressing this button lowers the drying temperature. It should be pressed
if delicate fabrics are being dried (on the label (2)
).
Door
The car door has a locking device that prevents access
into the drum while the machine is running and does not allow you to turn on the machine with
open door.
The car door can be opened approximately one to two minutes after
the end of the washing program or turning off the machine.
Don't try this before.
This limitation does not apply to the drying cycle, during which the machine
can be opened at any time.
Comments
Why not dry
Danis 01/26/2021 19:34 GMT
Select → I found the instructions for my washing machine here! #manualza
- Click →
- You will be engaged in fraud. - But i can not. “It’s all written there in the instructions for the ointment for hemorrhoids, patient.”
Manualza!manualza.ru
Still not with us?
Possible difficulties when removing the tank and ways to eliminate them
A welded, non-separable tank is a problem that can only be discovered after the washing machine has been disassembled piece by piece. Cutting the tank along the soldering line with a hacksaw will help eliminate the difficulties.
Algorithm of actions:
- Carefully inspect the plastic tank and mark a cutting line along the factory weld seam.
- Holes are drilled along the marked line (steps of 4-5 cm).
- Use a hacksaw to cut the tank.
- Remove the wheel securing the drum with the plastic body.
- Remove the drum.
After installing the new drum, the plastic body of the non-separable tank is connected (the edges are pre-coated with sealant) and fixed with bolts and nuts (the connection points are drilled in advance).
During the process, the hacksaw must be kept as straight as possible. The slightest misalignment in any direction increases the risk of leaks of the assembled tank in the future.
It is not recommended to cut the tank with a hacksaw (it leaves a rough, sloppy cut). It is forbidden to use an angle grinder (there is a high risk of damage to the part).
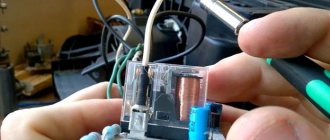
Replacing a faulty pump with a new one
To replace a broken pump, it is not necessary to seek the services of a specialist. You can do the work yourself, following the recommendations described above.
This is not at all difficult, the main thing is to take precautions and install the terminals and connections in the same way as they were placed before
To carry out the work, you will need a complete drain pump, impeller, cuff, axle, pulley, sensor, all necessary contacts and gasket. The tools used are a Phillips screwdriver, a knife and a multimeter to measure voltage.
Replacing the pump on a top-loading washing machine
The top-loading machine design allows access to internal parts through the rear cover. In this case, you must act very carefully, since there are boards and functional parts on it. Otherwise, the step-by-step execution of the work fully corresponds to the “horizontal” models:
- Unscrew the screws along the edges of the cover and remove it;
- remove all the bolts that are responsible for fastening the rear panel;
- If it is necessary to remove the side wall, you must also first unscrew the bolts. They can be in front or behind the machine body;
- Unscrew the pipe clamp on the drain; if it is secured with a screw, it should also be unscrewed;
- disconnect the pipe and all wiring connectors;
- remove the outlet valve and drain the water;
- Unscrew the screws that secure the pump and remove it. Install a new part;
- connect the contacts and put everything back together.
Replacing the pump on washing machines of German brands
Well-known German manufacturers such as AEG, Kaiser, Bosch, Miele and Siemens are renowned for their durability and excellent performance. But if a problem occurs with the drain pump, getting to it is not so easy. To do this, you must strictly follow the following instructions:
- Unscrew the two screws from the back, slightly move the top cover forward and remove it.
- Carefully remove the detergent tray, taking into account its design features.
- Unscrew all screws located around the perimeter of the panel. Unfasten the plastic latches using a flathead screwdriver or any other convenient tool.
- The disconnected panel can be carefully removed to the top without disconnecting the wires, or hung on a special service hook.
- Disconnect the latches of the lower plinth panel, which is located under the hatch.
- Open the hatch door, bend the rubber cuff, pry the clamp with a screwdriver and remove it. For convenience, the cuff should be tucked inside the tank.
- Place your hand behind the body in the place where the hatch lock is located and disconnect the wiring.
- Unscrew the fasteners that hold the front cover of the machine, slide it and remove it. Then access to the pump is open. In some washing machines, the drain pump can be removed by turning it counterclockwise.
Vertical loading
Top-loading appliances are very convenient in rooms with limited space. The service life of the drum in a washing machine of this type increases several times, since it is secured on both sides. Accordingly, its disassembly will be slightly different from the previous version:
- Unscrew all the screws from the bottom front and on the back wall.
- The side panel is removed.
- All wires are removed, after which the remaining screws are unscrewed.
Sometimes the plastic cover can be tightly soldered; you will have to get rid of it with a drill. As for the second side panel, it must be removed in the same way as the first. After all this, the screw that secures the shaft is removed and the drum is removed.
Other options
Some machines, such as Ardo models, require the cover to be removed a little differently.
After unscrewing the screws at the back of the device, the cover should move not to the back, but forward (towards you if you are facing the hatch). In this case, the lid will shift only at a certain angle, which you will have to determine.
You may also come across the option of mounting the top cover not on the back, but on the front wall. For example, such a mount can be found in older devices from Siemens and Bosch.
After removing the plugs, unscrew the screws, then slightly lift the cover up and move it to the front in relation to the machine. As with the Ardo machines, you will need to find an angle at which the lid can be easily removed.
How to remove the drum
There are many brands of washing devices. The most famous are: LG, Samsung, Whirlpool, Indesit, Zanussi, Bosch, Kaiser. Each of them has design features, but the main elements, as well as their location, are almost the same. For this reason, the procedure for disassembling will be approximately the same.
Removing fasteners
Removing the drum, as well as other repair work on the unit, begins from the top panel. As a rule, the bolts for fastening the latter are located on the rear side. But it happens that they are found on the sides.
The back panel is removed after unscrewing the screws that hold it in place. To separate the drive belt, you need to carefully rotate the pulley wheel in a clockwise direction.
The dashboard is secured with screws located in the niche of the detergent tray.
Before dismantling the front cover, the hatch door is removed and the rubber cuff is disconnected. Then, after unscrewing several fixing screws, the front panel is carefully removed.
Removing parts
To release the upper part of the tank, it is necessary to remove the pipe, counterweight, water intake valve, and pressure switch.
In the lower part, the heating element, engine, drain pipe, lower counterweight, and shock absorbers are removed. In most devices, the heating element is located under the tank. To remove it, the contacts are disconnected and the nut, which has a central location, is unscrewed.
Unscrewing the “stones” is done very carefully so as not to accidentally drop them on the body of the washing machine or on your feet. To remove the electric motor, you need to remove the power plug and grounding wire from it, and only then unscrew the mounting bolts (usually four)
To remove the drain pipe and shock absorbers, place the machine on its side. Using pliers, the clamp is removed and the pipe is disconnected from the pump. Only then are the shock absorber mounts unscrewed and the tank freed from the hooks. To dismantle the pipe, loosen and remove the clamps that hold it
To remove the electric motor, you need to remove the power plug and grounding wire from it, and only then unscrew the mounting bolts (usually four). To remove the drain pipe and shock absorbers, place the machine on its side. Using pliers, the clamp is removed and the pipe is disconnected from the pump. Only then are the shock absorber mounts unscrewed and the tank freed from the hooks. To dismantle the pipe, the clamps that hold it are loosened and removed.
After completing all the procedures described above, the tank can be removed from the body of the washing unit.
Removing the tank alone will not be easy. It is best to perform this procedure with a partner. One person must neutralize the springs, and the other must remove the tank. In addition, you should be very careful, since the part is heavy and easy to drop.
Pulling out the drum
It is possible to remove the drum from the “remains” of the tank only after unscrewing it (with a wrench) and removing the pulley. Then return the bolt that held the pulley to its original position (all the way). Finally, using a hammer to lightly tap the shaft, tap the drum out of the tank.
If the washing device is to be reassembled, it is recommended to carefully check the integrity of the bearings and replace them if necessary. It is imperative to install a new oil seal and treat it with lubricant.
When thoroughly disassembling the washing machine, you need to check all its parts for functionality. An ordinary tester will help assess the condition of all electronics. A visual inspection will also be helpful. You should definitely take a closer look at the heating element: if there is scale, it is recommended to clean or replace it.
Let's get ready without haste
It is necessary to prepare for any manipulation, and disassembling a washing machine is no exception. In order not to lead to a flood and not to aggravate the situation with a breakdown, it is worth planning all actions in advance. First of all, we provide free access to the machine by disconnecting it from communications and moving it as far as possible from the wall. Ideally, it is better to move the equipment to a garage or workshop, but 2 square meters is enough. m. kitchen or corridor. Next, we prepare the “arsenal” necessary for repairs:
- screwdrivers (positive and negative);
- set of open-end wrenches;
- set of socket heads;
- pliers;
- WD-40 type cleaner.
It is recommended to record each action with a camera to facilitate the reassembly process.
You will definitely need a large container, such as a basin, as well as dry rags or paper. A camera will not hurt; it is recommended to record the location of the wiring for correct reconnection of contacts.
The main thing that is required to analyze the “verticals” from Indesit is experience, free time, desire, patience and accuracy. If at least one item is missing, then it is better not to tempt fate, but to immediately contact the service center for help.
Methods for determining failure
First of all, you need to determine what kind of breakdown occurred. An initial diagnosis will help you decide whether it is possible to fix the problem yourself or whether you will still have to spend money on professional repairs.
The right step would be to first familiarize yourself with the circuit diagram of the washing machine in order to have an idea of where everything is located.
In many cases, a breakdown in the Indesit washing machine can be repaired with your own hands. But to do this, you at least need to familiarize yourself with the design of the machine.
Sometimes, to determine the cause of the failure of household appliances, it is enough to read the instructions for use, which, among other things, contain recommendations for eliminating breakdowns.
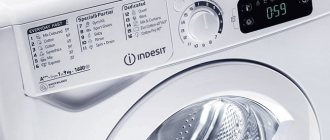
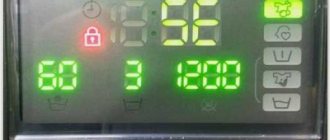
The first thing you need to do is look at the display. If it is impossible to complete the specified process, the washing machine displays special codes on the display.
Models of Indesit washing machines produced in recent years are equipped with displays, the signals of which will be the first to report the occurrence of a malfunction
Error codes in the operation of the washing machine are given in the instructions that the manufacturer necessarily attaches to its product:
- F01 – in the control of the drive motor the triac semiconductor device is closed;
- F02 - due to an open circuit or short circuit, the tachogenerator has lost the ability to signal the rotation of the drive motor, another reason for such an error is the motor is blocked;
- F03 – the temperature sensor circuit has been short-circuited or broken;
- F04 – failure of the water level sensor;
- F05 – due to an interruption in the operation of the drain pump, a clogged drain tract, or a malfunction of the water sensor, the “empty tank” signal is not given;
- F06 – due to errors in the front panel buttons, the program code is not defined;
- F07 – the heating element does not heat up;
- F08 – faulty wiring, relay or tubular electric heater itself;
- F09 – EEPROM memory has failed;
- F10 – the water level sensor suddenly lost signals of both a full and an empty tank;
- F11 – the supply voltage has disappeared in the drain pump;
- F12 – communication between the controller and the display module is broken;
- F13 – open or short circuit in the sensor circuit responsible for the drying temperature;
- F14 – malfunction in the drying heating element;
- F15 – damage to the heating element relay responsible for drying;
- F16 – drum blocking;
- F17 – power is not supplied to the hatch door lock or they forgot to close it;
- F18 – on the main electronic module there was a communication error between the controller chips and the processor that controls the asynchronous drive motor.
A complete explanation of error codes in the operation of Indesit washing machines and ways to eliminate violations will be provided in an article entirely devoted to these important issues.
It is possible to check various contacts, wiring, sensors using a very useful device - a multimeter. The device will show whether there is power everywhere.
If you have dealt with electrical repairs before and know how to use a multimeter, it will help clarify the situation and point out some errors
Sometimes it is enough to listen to the sound made by the unit. When the washing machine begins to creak, make excessive noise, and sometimes even rumble, then, most likely, problems have arisen in the bearings or drum, the oil seal is damaged, the counterweight fasteners are loose, and the shock absorbers are in poor condition.
Disassembling the Indesit washing machine
There are points that you need to know when disassembling any model of washing machine.
First, and this is the main thing to remember, turn off the power and water supply.
Secondly, you need to prepare all the tools and parts that will be needed during the repair.
And thirdly, you need to know the cause and location of the breakdown.
The work will require 3-4 hours of free time. You may need help at the stage of removing the tank from the car, because the process is labor-intensive and you will need to lift approximately 30 kg to a height of about a meter.
Let's start with choosing a place for repairs
This can be any room, with the possibility of free access to all sides of the machine, as well as tilting the equipment and free space for the removed tank. A 2x2 space will be enough to freely disassemble the indesit.
It would be nice not to stain the floor, so it is better to cover it with rags and newspapers.
Preparing for work
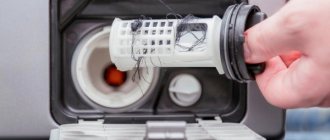
Before use, remove the machine filter and drain the remaining water.
It’s good if you keep a photo report of the stages of your work so that you can tell others how to disassemble an indesit machine.
However, the most important thing for which photographs are needed is so that later there will be no problems when assembling the equipment.
Working with the body
You need to remove the back cover
- We remove it by unscrewing 6 screws. It would be nice if all the screws and small parts were put into a box, for example. You will need tools: screwdrivers, wrench and pliers.
- Looking under the back cover, the star screw on the wheel and on the lower weight catches your eye. If you have the right tools, these parts can be removed to lighten the weight of the tank. Otherwise, you can leave and take out the tank with them.
- Now remove the top of the machine by unscrewing two screws. The lid must be pulled towards you so that it comes out of the grooves and set aside. Three screws with 10mm heads hold the top weight very tightly, we take it out too. You will have to strain to unscrew the screws.
- We remove the front panel, which is held on by only two screws.
- Take out the detergent tray. You need to lift it up and pull it out, shaking it left and right. We found three screws, which we also unscrew.
All electrics inside turn off
- You need to disconnect the wire coming from the front panel to the board.
- The powder receptacle is a large part the width of the entire machine. You will see two wires - blue and white. We disconnect them, but you need to remember which one is inserted where.
- Where the water is supplied, there is a screw that we also unscrew. A tube is attached to the bottom of the powder receiver using a rubber eyelet. We also remove it; to do this, the eye is pryed off and the pipe is pulled down. That's it, the part can be put aside.
- Now let's disconnect the power cord. You need to find the rectangular piece to which it is attached, unscrew the screw and pull it out of the grooves by pulling it up.
- Between the tank and the hatch there is rubber, which is supported by a spring. To remove it, just push the rubber up and grab the spring from the top from inside the car.
Removing the heating device
- It is secured with clamps that need to be disconnected along with the wires (wires leading to the motor, a bunch of wires under the shade).
- Unscrew the nut and remove the heating element. It happens that it is not very easy to get it, since it fits very tightly!
- It's time to put the machine upside down. It’s better not completely upside down, but at an angle of about 45 degrees.
- From below, you need to unscrew the bolts on both sides on which the shock absorbers are attached. After this, the tank is held in place only by the upper springs.
- We return the car to its original position.
- It's time to take out the plastic tank. Help won't hurt, because you still need to remove the springs.
Attention! The hatch cover must be open, otherwise it will interfere with the process of emptying the tank.
It's just a matter of little things and we can assume that we have managed to disassemble the indesit washing machine.
Remaining works
- We remove the shock absorbers attached to the tank on plastic pins. To pull them out, you need to lightly squeeze them with pliers.
- Next, remove the motor and rubber pipe.
- To further work with the tank, you will need to remove the lower weight.
First stage
What's next? And then we will need to resolve the issue with the workplace, namely where we will disassemble the washing machine and lay out the disassembled parts so as not to lose anything necessary. The ideal place is a workshop, or at least a barn or garage. If there is neither one nor the other, nor the third, then you will have to disassemble the car right in the apartment, you just need to properly prepare the place.
- Clear a 2x2 meter section of the floor from carpets and other furnishings.
- Cover an area of the floor with rags and newspapers.
- Unplug the washing machine and drag it to the disassembly site.
- Remove the powder cuvette and set it aside.
- Unscrew the garbage filter with your own hands and drain the remaining water from the tank. Place the filter aside.
The tools, work place and Indesit machine are prepared, you can begin the analysis. First, remove the upper part of the machine body, namely the cover. There are two self-tapping screws at the back in the upper right and left corners of the washing machine; they need to be unscrewed with a Phillips screwdriver. Then we slide the lid back towards us and lift it up.
Next, we will remove the service hatch cover with our own hands. It is located on the back wall of the Indesit washing machine; to do this, you will need to unscrew the 6 screws that hold it.
How to get to the tank?
By opening the service hatch and the top cover, we immediately gain access to some parts of the washing machine; this must be taken advantage of.
Remove the belt from the pulley. To do this, you need to grab the drum pulley with one hand, the belt with the other, and twist the pulley - the belt will “jump off”.
We pull the wires from the contacts of the heating element and the temperature sensor, unscrew the central nut and carefully pull out the heating element
You can leave the heating element in the tank for now, but then you need to be very careful when disassembling it so as not to break off one of the protruding contacts. Removing wires and chips from the washing machine motor
Take a 10 mm wrench and a 10 mm socket, or a long 10 mm socket wrench and unscrew the two bolts that secure the motor
We remove the wires with chips from the washing machine motor. Take a 10 mm wrench and a 10 mm socket, or a long 10 mm socket wrench and unscrew the two bolts that secure the motor
We remove the engine and put it aside. Let's go upstairs. A heavy counterweight is attached to three bolts above the top wall of the tank; it must be removed. We take the same socket wrench and unscrew these bolts with our own hands, and then pull off the counterweight and move it to the side. When disassembling, be careful not to drop the counterweight on your foot.
Our tank is almost empty, there are some small things left, for example, removing the control panel. First, we unscrew the fasteners located near the niche for the powder receptacle. Then we unscrew another screw from the left front corner of the case. Now the control panel is held in place only by relatively weak latches.
We pull the panel up, and it safely pops out of the latches. In this case, the craftsmen have only one wish - do not pull the panel too sharply, otherwise you will tear off the wires and add problems to the Indesit washing machine. We disconnect the wires going to the intake valve and remove the control panel to the side, let it hang from the edge on the remaining wires.
Let's get to work on the hatch cuff. This large elastic band is secured with a special clamp; it must be removed without piercing the cuff. What are we doing?
- Find the cuff clamp.
- Carefully pry it up with a flat screwdriver.
- We go around the circle and find the mount.
- Unscrew the fastening and remove the clamp.
- We tuck the cuff deeper into the machine body.
What do we do next? And then we go around the back of the washing machine and unscrew the screw in the area where the inlet hose is connected to the machine. After this, we will be able to immediately pull out the inlet valve along with the powder receiver niche.
Disconnect the wires from the water level sensor and remove the sensor itself from the plastic mount. At the same time, be extremely careful not to damage the mount itself and the sensor, otherwise you will have to buy and replace these elements; they still need to be found.
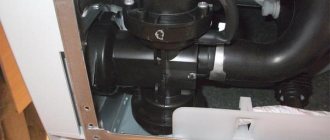
Now we place the washing machine on its left side. The Indesit washing machine has no bottom, so we immediately get access to the drain pipe and racks. It is these elements that will prevent us from removing the tank in the future, which means they need to be removed, without this further disassembly is impossible.
- We remove the two clamps that secure the drain pipe.
- We pull off the pipe.
- Using a 10 mm socket wrench, unscrew the screws that hold the posts in place and remove them.
- We put the car “on its feet” and we can consider that we have completed the main stage of disassembly; all that remains is to remove and disassemble the tank.
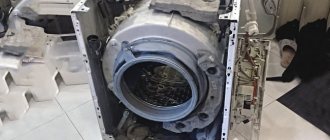
How to disassemble a soldered tank
Why do manufacturers still use one-piece plastic drum shells? The answer is simple: this technology simplifies and reduces the cost of production. In addition, it is beneficial for them to use this type of tank due to the fact that if the bearing assembly wears out, the consumer will most likely purchase a new washing machine rather than choose to pay for repairs that cost almost the same as a new device.
Therefore, this trick is often used: the body is sawed, the necessary replacements are made, and it is glued back together with special glue. Here's how to describe this process.
- In front of you is a plastic tank of a machine with a drum inside. Inspect it to determine the location of the weld. To mark the sawing site, make small indentations around the entire circumference. Use a drill with a thin drill bit for this.
- Armed with a hacksaw for cutting metal, begin to carefully cut the tank along the prepared marks. Separate the cut section from the drum.
- When you turn the drum over, you can see the wheel that connects the parts together. Remove it and you will finally be able to free the drum from the body.
- After the new parts are installed, the two halves of the disassembled tank can be glued together with silicone sealant, and additional screws can be installed.
Thus, now you have the opportunity to carry out repair work yourself and save on service costs.
Price issue
One of the most common malfunctions encountered by employees of washing machine repair service centers is wear of bearing units. This set of parts, which ensures rotation of the drum, experiences the greatest load due to high centrifugal speeds, so it wears out faster than other parts of the apparatus.
The bearing assembly is located just in the washing machine tank, on the drum cover. To replace bearings, in the vast majority of cases, almost complete disassembly of the device is required.
It should be noted that not every Indesit machine model has a collapsible tank; very often it is made fused with the drum.
In such cases, specialized centers do not even undertake disassembly, but offer a complete replacement of the old tank with a new one, which can result in an amount equal to 2/3 of the price of a new car.
Meanwhile, there are unofficial appliance repair centers that can offer you sawing and gluing of a plastic washing machine tub. Of course, such repairs will be much cheaper than replacing the drum, but the technicians will immediately warn you that they do not provide any guarantees for the proper operation of the machine after repair. What to do in this case is up to you to decide. You can try to carry out such “handicraft” repairs yourself and absolutely free. In this article we will look in detail at how to disassemble different models of Indesit washing machine tanks, and what tools will be required for this.
Which bearings and oil seal are suitable for Indesit washing machines
When replacing new seals and bearings for an Indesit washing machine, they must be of exactly the same brand and marking as the failed ones. What to do if there is no necessary information about the standard size of oil seals and bearings? Don't experiment. Masters recommend that before purchasing new parts, remove old ones from the unit, on which their markings will be visible.
As a rule, the Indesit machine is equipped with 2 single-row sealed ball bearings ZVL 6204-2RSR and ZVL 6205-2RSR (one is an order of magnitude larger than the other) and 1 sealing gland.
You should replace the drum bearing in the Indesit washing machine yourself at the same time as the cuff. Otherwise, it is possible that the repair process will not give the desired positive result.
Necessary tool
To disassemble it yourself, first of all, you need to prepare a tool, decide on a place for repairs and prepare instructions. If this is your first time, prepare paper and pencil to write down the sequence and sketch individual operations. You can also use a camera.
Be sure to stock up on clean rags, a brush, and WD-40. The latter is sold at any auto parts store and will be needed for soaking loose nuts and screws.
Tools you will need:
- screwdrivers - flat and Phillips;
- open-end wrenches 17*19, 8*10;
- pliers for self-clamping clamps;
- pliers, side cutters, bent long pliers.
Now all that remains is to lay it all out in a well-lit, fairly spacious place and begin disassembling.