Thanks to household appliances, home owners gain complete comfort. Using the same vacuum cleaners significantly reduces the physical effort spent on cleaning. Meanwhile, even super-reliable equipment, for example from Samsung, does not last forever, which says one thing: someday the time comes for repair or replacement.
However, convenient and practical units quickly make users get used to working with them. Therefore, most of their owners prefer to restore their devices to their functionality rather than buy new ones. We will tell you what repairs of Samsung vacuum cleaners can be successfully carried out with your own hands.
Minor faults and their elimination
If the vacuum cleaner begins to act strangely - to perform its functions incorrectly, to make loud noise, to vibrate - it needs help.
Most often, the cause of the malfunction is the cleaning process itself: the dust bag is completely filled or one of the filters is clogged with debris.
Some vacuum cleaners are easy to disassemble, while others require certain knowledge. To avoid mistakes, we recommend that you often look at the instructions, which are equipped with diagrams and tips.
Usually you can solve the problem on your own. But if you are not good at repairing equipment, it is better to take the device to a service center, to specialists.
Problem #1 - suction power has dropped sharply
If you notice that dust is poorly absorbed, and small debris remains completely untouched on the floor, you will have to find out the reason through partial disassembly. First you need to make sure that everything is in order with the pipe, hose and brush.
Procedure:
- disconnect the hose from the vacuum cleaner;
- separate the pipe from the hose;
- remove the nozzle;
- carefully inspect each part;
- try to blow out the pipe and hose.
If a large object (a plastic bag, a sock, a sheet of paper) gets into one of the elements, you need to carefully remove it, then reassemble it in the reverse order and try to start the device.
Sometimes the traction weakens simply because you accidentally touched the power regulator and set it to minimum. Be sure to check it before any disassembly.
Problem #2 - the vacuum cleaner filters are clogged
Unusual sound, weak traction, stoppage of operation - the consequences of clogged filters. For devices with a fill indicator, this can also be determined by the red light coming on. Modern devices provide everything to ensure that filters can be accessed quickly and easily.
Usually there are two main elements that need to be cleaned - a plastic cyclone filter (a transparent reservoir with compartments) and a sponge enclosed in a plastic container. But sometimes it is necessary to replace the HEPA filter, and for washing units - additional engine protection.
Photo tips for disassembly, cleaning and replacement:
Image gallery Photos from
To get to the fine filter, you need to remove the cover located at the back of the device
If the filter is clean, then the reason is not in it - we install it in place. It is better to replace a dirty part with a new one, although some try to wash it
The finest dust remains in the sponge filter. It is usually inserted into the reservoir lid and enclosed in a small plastic container. The sponge washes well with soapy water
Container with cyclone filter
Plastic grille to protect the HEPA filter
New HEPA filter for Samsung
Sponge filter in container
As you can see, disassembling a Samsung vacuum cleaner to clean the filters is simple and quick. The elements are washed in warm water with a non-aggressive detergent. Then they need to be dried and reassembled.
Problem #3 - the device does not turn on
The standard test when the device is not working is to plug it into the network. Make sure the power cord is plugged into the outlet and the power control button is set to the correct setting.
If the indication does not work and the vacuum cleaner does not make noise, most likely the motor will have to be repaired or replaced. But problems with the board are also possible, so disassembling the case is necessary in any case.
How to repair a vacuum cleaner hose
If the hose from a vacuum cleaner breaks, do not rush to get rid of the equipment, as the breakdown is easy to fix.
If the rupture occurs at the point where the hose is attached to the vacuum cleaner, the rupture site can be wrapped with tape or tape, although such repairs are short-lived. You can try cutting off the damaged part by making the hose a little shorter.
If the gap occurs in the middle, then this problem can also be fixed independently. The vacuum cleaner hose is a spiral of steel wire with a PVC or fabric cover on top. Armed with pliers, wire cutters, a screwdriver and a piece of copper wire, you can get to work.
Cut the wire into pieces of 7-8 centimeters. Their number depends on the size of the gap. Make small hooks out of them, which you insert into the holes made on the hose at the break point. After this, the wire is aligned, as shown in the photo, and tightened together in turns so as not to damage the insulation.
Excess parts are removed with nippers, and the twists are bent, after which the sharp edges are processed with a file. The top of the seam is wrapped with electrical tape and such a patch will allow you to continue to fully use the vacuum cleaner.
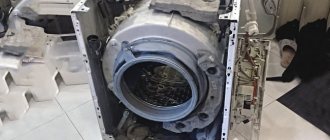
Repairing the washing machine power supply
Geographically, the power supply of the washing machine is located on the electronic board of the device. You can determine it by the presence of one or two transformers. As shown above, the power switch is sometimes integrated with the pulse generator, and sometimes there is protection inside. Therefore, for the structural division of the board, it is useful to find descriptions for all relevant microcircuits.
At times, the power supply is represented by a separate miniature PCB plate, in the manner of an expansion card for the motherboard of a personal computer, inserted into a slot perpendicular to the electronic brain of the washing machine. But the main thing is that the power bus should go to this place. 230 volts can go to various relays (sometimes located nearby) that power the sump pump, intake valve. As needed, the programmer (on-board computer, electronics unit - call it what you want) gives a signal to use the selected equipment.
Basic principles of self-disassembly
Regardless of what type of vacuum cleaner you need to disassemble, you should follow these instructions:
• First, determine what kind of disassembly is required, complete or not. In the first case, it is necessary to dismantle absolutely all parts; in the second, it is enough to remove
only those that are out of order. Partial disassembly is usually required when you need to change filters or clean them. Regularly carry out partial disassembly in order to clean the turbine blades and remove dirt and dust. In the case of cleaning types, this is not necessary, since the compartment with water, where all the dirt settles, is located on the outside. Study the manual for your model, since each with an aquafilter or washing machine has individual characteristics;
• to carry out any type of work, it is necessary to disconnect the unit from the network in advance. If you can disconnect the wire from the device, do so. Remove all possible attachments, clean and set aside for a while;
• find all the screws that secure the device body. Unscrew them and set them aside carefully so as not to mix them up later. They may differ in length and width; if you mix them up, you will disrupt the entire system;
• after carrying out the work, feel the latches holding the body together. Press them down and remove the housing. It is advisable to use a special rubber device that will not disturb the material. Never use screwdrivers or iron objects for this, as they can cause cracks.
After removing the body, disassembling
completed. Clean every part. If you want to carry out further analysis, you will have to do desoldering, which requires the use of special equipment.
How to disassemble a washing vacuum cleaner
If the equipment is from manufacturers Zelmer, Karcher
, it is better to use the services of a service center so as not to damage expensive equipment. Such washing machines consist of an outer plastic box containing containers with water and detergent, and compartments for dirty liquid. There is also a motor with a turbine and an air filter. There are two types of systems in washing models: vertical and horizontal. The first type allows you to place two containers on top of each other. In the second case, placement occurs within each other.
Thanks to this device, high-quality cleaning and collection of wet debris from surfaces is guaranteed. In this case, filters are also needed, only aqua, which protects the system from dirt and dust. Monitor its condition by periodically disconnecting the system to check the serviceability of each part.
• Disconnect the unit from the power supply.
• Remove the water container and discard the liquid. Wash the container immediately and leave to dry.
• If there is a filter, clean it. Refer to the manufacturer's instructions. If you do not clean it, there will be a favorable environment for the development of bacteria, which later lead to the development of various diseases.
If you need to examine the device in more detail, use the instructions for the dry model. Unscrew all the bolts and disconnect the housing. After this, remove the wire from the system. By removing all the fastening elements, you can separate the device into individual elements. After examining them, replace the faulty elements with new ones.
How to disassemble a cyclone view
The disassembly procedure is the same as for other models. If you want to clean the system, it will not be difficult to do. There is a plastic container inside the device; it contains several sponges and plates that clean the air and the surface as a whole. After disassembling the equipment, shake out all the dust, wash each part, and dry each element. Thanks to this procedure, you can improve the performance of the device.
How to disassemble a model with a turbo brush
If you use a household electric vacuum cleaner with a turbo brush, you may experience difficulties with its functionality.
The device is disassembled like any other, but the turbo brush should be given attention. It is located in the nozzle on the pipe. To remove it, you need to disconnect the nozzle from the pipe, then unscrew the screws and remove the brush
To remove it, you need to disconnect the nozzle from the pipe, then unscrew the screws and remove the brush.
How to work with a vertical model
If you are the owner of a vertical electrical appliance, you will need to pay special attention to disassembling this system. The waste collection bag is located on the outside, so remove it before carrying out restoration work. Then disconnect the unit from electricity
To divide the device into separate elements, simply unscrew all the bolts
Then disconnect the unit from electricity. To divide the device into individual elements, simply unscrew all the bolts.
Reason #4: Software glitch
It's no secret that modern mobile phones are controlled by software specially created for them. The software of today's cellular device is as complex as Windows, Mac OS or Linux computer systems. Therefore, we can assume that the phone cannot be started due to some damage to the software part of the device. It is worth noting that the previously existing problem “Samsung phone does not turn on” was relatively easy to fix. With the help of a service cable and a program freely distributed on the Internet, everything was resolved within a few minutes. Now, reprogramming phone software is an incredibly difficult task. Since a generally accepted update is nothing compared to flashing the program code of a modern mobile communication device. By the way, not every cell phone repairman is a specialist who can restore the functionality of the phone’s software components.
Tip #4
Diagnosing the “collapse” of a mobile system is elementary. As a rule, a phone with damaged software will boot only until the company logo appears. Then the device may go into a “stupor” or “freeze”. Most often, an unsuccessful cyclic reboot occurs. Less often - absolute inaction. Paradoxical as it may seem (after all, we all know about the excellent Japanese quality), nevertheless, the situation “Sony phone does not turn on” is a fairly common occurrence in the world of “software failure”.
Step-by-step instructions for complete disassembly
Partial disassembly is performed when replacing or cleaning filters, but in order to remove the engine, it is necessary to disassemble the device completely. We offer detailed photographic disassembly instructions that will help you cope with the repair of the Samsung vacuum cleaner yourself.
Stage #1 - we diagnose the breakdown
When you use one device for a long time, you can perfectly imagine how it behaves during operation.
An experienced user does not need to look at the bag or tank full indicator; it even determines by sound when it is time to empty the dust container or filters. Consequently, he will also determine the fact of a malfunction by the unusual behavior of the assistant.
If an overfilled vacuum cleaner begins to hum or hiss, then a mechanism with a broken motor or board makes intermittent sounds, begins to “spit” dust, smells like burnt wires, or simply does not respond to being plugged in.
If you doubt the serviceability of the vacuum cleaner, you can try to disassemble it. This is a simple procedure that does not require special knowledge or special skills. As instructions, you can use videos or photo instructions from craftsmen, carefully filmed by them and posted on the Internet.
Stage #2 - selecting tools and materials
To disassemble the vacuum cleaner body, you do not need to purchase a special tool. Most likely, a pair of screwdrivers, Phillips and slotted, which can be found in the household of any city dweller or rural resident, will come in handy.
No tools are required to disassemble the filters as this is a regular maintenance procedure. You just have to manually remove the covers or open the plastic boxes.
On some models, to change the HEPA filter, you need to remove the rear grille by unscrewing 2-4 screws, also using a screwdriver.
But if manipulations with the motor, board elements, and wires are to be done, the following tools and materials may be required:
- pliers;
- file;
- awl;
- sandpaper;
- vice;
- construction knife;
- spare connectors and wiring.
Small parts are inexpensive, but a faulty engine requires replacement - an average of 1,650-2,600 rubles.
Instead of an expensive original part, you can look for an alternative mechanism, but you should pay attention to the materials from which it is made
Stage #3 - disassemble the vacuum cleaner body
It often happens that during the process of disassembling the device there is a problem, that is, the cause of the breakdown is not necessarily a failed engine. The thermal relay connector may have come loose or there may be damage to the board.
All actions can be performed by an untrained person, since disassembling this model requires attention, accuracy and the ability to use screwdrivers - flat and Phillips. The disassembly process can be stopped here.
If you are sure that the engine is really broken, then you need to take the damaged part to a service center in order to buy a sample or order a new one.
The disassembly process can be stopped at this point. If you are sure that the engine is really broken, then you need to take the damaged part to a service center to buy a sample or order a new one.
But if you think that you can restore the engine yourself, then we offer instructions for subsequent disassembly.
Stage #4 - we repair the engine
Engines are different, so there is no guarantee that you will be able to disassemble the unit and find a breakdown. As a last resort, take the broken mechanism to a repair shop for replacement. But if you have already had repair experience, then you can hope for a positive outcome of the operation.
After repair we carry out testing. To do this, connect the tester terminals to the crimped wire and call. Finally, you can pressurize the plug covering the impeller and clean the insides of the engine.
After reassembly, it becomes clear how successful the repair was. In this case, the reason was a broken wire that was in plain sight.
Impeller imbalance or bearing failure also often occur. But there are cases when the technicians never find the fault, then the only way out is to replace the entire part. Sometimes it makes more sense to pick up a new vacuum cleaner than to spend money on an expensive spare part.
Software problem
When malicious applications are active, there is no anti-virus cleaning, no cleaning of software junk (cache), or installation of a large number of applications from little-known and unreliable manufacturers, the Android operating system often crashes.
There are several options to solve this problem:
- reset the system to factory settings;
- flashing.
Remove the SIM card and flash drive and get started. You must get to the Recovery menu for a hard reboot or factory reset. To do this, hold the volume control “up” and the power button for a long time.
If there is no reaction, then contact a specialist for flashing. You can change the firmware yourself, just use the software product from the official website of the manufacturer Samsung.
Difficulty of repair depending on the type of damage
The complexity of the repair depends on the type of fault.
| Electrical breakdowns | Mechanical failures |
| The cord at the base of the plug broke | For example, a bearing failure. Most often, such breakdowns occur as a result of not very careful handling of the vacuum cleaner, for example, if it was dropped, stepped on the hose, and so on. Such breakdowns are visible to the naked eye, they can be easily eliminated - you just need to replace the parts with new ones. |
| switch fault | |
| cord break along length | |
| filter or capacitor burnt out | |
| the rotor or stator winding has broken | |
| winding burnt out |
Electrical repairs are easy. Often it is only necessary to replace the listed parts. It is important to understand that you should purchase only high-quality licensed parts. You cannot save on this, otherwise the situation will repeat itself or become more complicated. If the stator or rotor of an electric motor has been rewinded, several points must be taken into account:
- cross-section of copper wire;
- number of turns of copper wire.
In this case, it is better to replace the electric motor. Seeing electrical faults is not easy and may take time. When repairing a vacuum cleaner, it is important to remember that there is a difference between the motor for a Samsung 1600w and 1800w vacuum cleaner, which may affect what type of repair.
If the cause of the breakdown is difficult to determine after an initial examination or is too complex, then it is better to contact a specialist. This especially applies when the problem concerns engines.
What to do
To understand the cause of the breakdown, it is necessary to analyze possible problems. This work is not difficult, it can be done at home yourself.
Clogged filters
There are several categories of filters, so each type has its own nuances. Cleaning filters:
- filter bag - emptied or changed as it fills;
- cyclone filters - washed with cold water after each cleaning;
- water - disassembled and washed under the tap;
- fine filters - disposable ones are blown with air, reusable ones are washed.
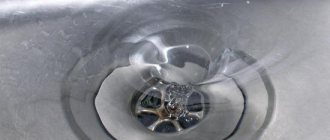
Hose clogged
If during operation the vacuum cleaner suddenly stops sucking in dust, you need to check the flexible hose for stuck objects.
You can get rid of them in several ways:
- The hose is disconnected from the device and accumulated dust and foreign objects are removed with long tongs.
- If an object is stuck in the middle of the hose, then you need to use a thin wire.
- You can also clean the hose under a strong stream of water.
Outlet fault
If the motor does not work when you turn on the equipment, the cause may be a faulty plug or lack of voltage in the sockets.
If the place where the cord attaches to the plug is broken, the entire power cable must be replaced. For this:
- You need to remove the back cover and unscrew the bolts holding the diaphragm.
- Carefully remove it and move it towards the pad with the gasket.
- Replace damaged elements and wiring.
The voltage in the outlet can be checked with a multimeter. A value of 198 B is considered to be within normal limits; if the numbers are lower, it means that the malfunction lies precisely in this reason.
You can replace a burnt wire yourself
Problems that only a specialist can handle:
- broken power buttons;
- burnt out engine;
- overheating of the control board.
To prolong the performance of the vacuum cleaner, it is important to follow simple rules:
- After each cleaning, clean the filters and change them as they wear out.
- Empty the bag from dust and dirt.
- Store the equipment in a dry place, as moisture getting on the motor can cause it to malfunction.
- To prevent the engine from overheating, the operating time should not exceed 60 seconds.
A vacuum cleaner is an indispensable equipment for cleaning an apartment. But it often happens that the vacuum cleaner does not turn on or suddenly stops working.
In order not to lose equipment and not be subject to unnecessary waste, it is important to follow the operating rules, as well as find problems in a timely manner and begin repairs.
Repair
One of the reasons why a Samsung vacuum cleaner does not turn on is a broken button. Over time, the button mechanism wears out and it ceases to perform its functions. The solution to the problem is to replace the faulty button.
Algorithm of actions:
- Unscrew the bolts in the upper part of the housing, remove the cover with the handle;
- remove the dust container and fine filter;
- touch the multimeter probes to the button terminals;
- press the button; if the resistance readings have not changed, the button is replaced with an element similar in technical parameters.
Another, quite serious reason why the vacuum cleaner does not turn on is a motor breakdown.
You can test the engine as follows:
- The vacuum cleaner has already been partially disassembled, the casing and insulating covers are removed from the electric motor.
- The engine is carefully inspected for burnt elements or broken contacts, and the dust is swept away with a soft brush.
- Check the motor brushes. Erased elements are replaced using graphite brushes of similar sizes.
- Using a multimeter, test the motor winding. If testing confirms possible ruptures, the engine must be replaced.
If smoke comes from under the vacuum cleaner housing and there is a smell of burning, the household appliance must be immediately unplugged from the outlet and not used until the problem is completely eliminated.
To prevent a situation where the vacuum cleaner turns on and immediately turns off, you must carefully monitor the cleanliness of the filters, empty the dust container on time, and do not use the household appliance for more than thirty minutes. If cleaning requires more time, the vacuum cleaner must be turned off for five to ten minutes every half hour. You can find out how to clean the filter here.
Disassembling the LG vacuum cleaner motor
The design of the electric motor of LG vacuum cleaners is practically no different from the motors of other household appliances. Only the dimensions and location of the mounting holes may vary.
- The disassembly process begins with removing the brushes from the brush holders. To do this, use a screwdriver to unscrew the screw terminals (or spring clamps).
- Next, using a screwdriver, pry up and remove the impeller casing (in some models, additional extension of the sides may be required).
- The impeller itself is fixed to the armature shaft using a nut with a reverse thread, which can most easily be unscrewed with a socket wrench (clockwise). After this, the impeller can be easily removed from the shaft by prying it off from opposite edges with a screwdriver.
- After the impeller, remove the air separator.
- Unscrew the coupling bolts on the housing and remove the armature with bearings and the top cover from the stator.
Engine repair
When starting to repair an electric motor, you need to pay attention to the following points:
- A common cause of engine failure is bearing failure. To diagnose them, visual inspection or scrolling is used. If replacement is necessary, a puller should be used. The procedure itself is simple; problems can only arise if the bearing is completely destroyed and devoid of balls. Then the inner race may stick to the shaft and one side will need to be ground off to loosen it. It must be taken into account that the actions must be as careful as possible, since the sharpening stone can damage the rotor shaft. You can also try heating and knocking it out.
- Also, the cause of motor failure may be the armature commutator, which will require cleaning. To do this, place the anchor on an emery cloth (abrasive grit 1000) and turn it easily without pressing. Next, grinding is performed, using sandpaper with 2000 abrasive.
After this, the electric motor is reassembled according to the same scheme, but in reverse order.
How to make a HEPA filter for a vacuum cleaner
Most models of modern vacuum cleaners have a Nera filter, which quickly breaks down, which affects the suction power and the quality of cleaning. If this happens, you should not rush to the store to buy a new part, but you can try to make it yourself.
To make a HEPA filter, you will need an old filter and a cabin filter for your UAZ. The further process will consist of the following steps:
- using a screwdriver, squeeze out the paper component of the filter, doing this in the direction from the plastic grid;
- Clean the remaining plastic part from any remaining glue;
- take a car filter and use a cutter to make it according to the size of the vacuum cleaner filter;
- Use a glue gun to coat the perimeter of the filter so that there are no air holes left;
- wait until the glue dries and you can use the HEPA filter.
Why doesn't the robot vacuum cleaner's wheel spin?
With constant use, various breakdowns may occur. Often users are faced with the fact that the wheel of a robot vacuum cleaner has broken. Hair and pet fur can cause malfunction. During the harvesting process, they are gradually wound around the wheel. If you do not constantly clean the device, over time the wheel will stop rotating. You will need to carefully remove all hairs from the wheel.
Some owners note that the robot cannot move. But if you turn the wheel manually, it turns. The problem may also be small hairs. More serious problems include a malfunction of the motor that is responsible for rotating the wheels. Sometimes the control board or sensors fail. Only a technician at a service center can identify the exact error after a thorough diagnosis.
Should I do it myself or take it to a service center?
A similar dilemma faces every owner who has at least once encountered the problem of a home assistant failing. By following the above instructions, you can easily determine the cause of the breakdown and take appropriate measures to eliminate it. To carry out repairs, you may need certain skills in handling electrical appliances and knowledge of the basic fundamentals of electrical engineering, at least at the level of school physics. If for any reason you doubt your own abilities and awareness on any issue, it is better to use the services of real specialists and professionals. Remember - the choice is always yours, as is the responsibility for the result. If you are afraid that you could make things even worse and completely ruin your broken vacuum cleaner, also contact the service center or support center.
The vacuum cleaner does not turn on
Perhaps the most frightening situation is that the vacuum cleaner stops turning on, or suddenly turns off during operation. The thought of the need to buy a new one immediately scrolls through my head. And the reasons for this may not be so terrible:
- A sudden shutdown of the vacuum cleaner may be caused by the thermal switch tripping due to overheating of the device. Excessive heating may be due to clogged filters or garbage bags. Simply clean or replace them.
- The power cord is broken. It happens that the wire breaks at the point of attachment to the plug or to the vacuum cleaner, causing contact to be lost. During the repair process, the cord will have to be completely replaced.
If you have some soldering skills, it won't be too difficult to do it yourself. The cost of 1 m of cord averages 200-300 rubles (3-5 $).
- The fuse has blown. Replacement will cost 600-900 rubles ($9-14), including the cost of the element itself.
- The button doesn't work.
Restoring the part will cost around 900-1200 rubles ($14-18).
More serious breakdowns, such as a faulty motor, are also possible, but they are less common.
Why won't my Samsung vacuum cleaner turn on?
A vacuum cleaner is an indispensable assistant in the home, helping to keep your apartment clean every day. The device helps save time on cleaning carpets and floors, upholstery, etc. Sometimes we encounter problems such as the vacuum cleaner not turning on. What to do?
There are many reasons why a vacuum cleaner stops working. The reason may or may not be serious. To fix a serious breakdown, you will have to take the device to a service store or contact a specialist for subsequent repairs. Contacting a specialist will entail financial costs, so minor damage can be repaired yourself. But repair the device yourself if you are confident in your abilities. Otherwise, you will damage the equipment more, which will lead to severe damage.
Let's look at the Samsung sc4740 model. Samsung sc4740 is a device with a dust collection container. The volume of the plastic bowl is 2 liters. The suction power is 360 W, with a consumption of 1800 W. There is no power adjustment. There is a fine air filter. Distinctive features include automatic winding of the network cable, the presence of a foot switch, and the ability to vertically park the telescopic suction tube. The noise level produced is 83 dB. Weight 4.6 kg.
To begin troubleshooting the device yourself, you should determine the cause of the breakdown. And before you start repairing a vacuum cleaner, you should understand its structure. For example, let’s look at the main features that prevent Samsung sc4740 from turning on:
- Engine failure
- Start button sticking
- Clogged filters
- Dust container clogged
Main reasons
There can be many reasons for equipment failure. Starting from the breakdown of the components of the vacuum cleaner, ending with more serious difficulties such as stopping the operation of the electric motor. The following are the reasons why home vacuum cleaners do not turn on:
Damage and breaks in the power cord of the vacuum cleaner. Sometimes the damage can be visible - cracks, kinks, breaks in the network cable. But sometimes the damage can be hidden - a tear in the conductor where the current flows
Be sure to check the network cable for integrity, and also pay attention to the connections. Damage to the plug. Often this damage is detected by the smell of burnt smoke and the color of the plug. Damage to the power button
The button may simply get stuck, fall out, be faulty, etc. To prevent this breakdown, you should completely disassemble the structure of the household unit, check the operation of the button, if possible, replace the board and put the structure back together. Damage to the electrothermal relay. An electrothermal relay is a thermal motor protection that is responsible for protecting the motor from power supply overloads. Modern models are designed so that the device does not turn on without turning on the thermal relay. Engine damage. Check the motor for debris, sand or dust. The motor may also stop working due to wear and tear caused by prolonged or active use. The engine may also deteriorate due to water ingress. You won't be able to disassemble the engine yourself, just inspect it. Damage to the triac. A triac is a semiconductor equipment responsible for regulating current parameters in the network. Reduced network voltage. Most modern models are equipped with a protective shutdown function during power surges. The device simply turns off automatically to avoid engine failure.
Why doesn't a working vacuum cleaner turn on? Sometimes the cover may be hidden in a faulty socket. The absence of a network power source can be determined using any other electrical equipment. To do this, turn on the device, and if there is no power, then the problem lies in the power supply. This is the most harmless breakdown and does not affect the operation of the device in any way.
The vacuum cleaner vibrates and makes noise
It happens that during seemingly normal operation, a loud noise is heard and the unit beats. In this case, repairing a Samsung vacuum cleaner (you can’t always do it yourself, but it’s still worth trying) will consist of the following:
If you have a vertical model of vacuum cleaner, then most likely the noise is from a damaged fan - inspect it. Replacing and balancing the fan yourself is not an easy task; it is best to entrust it to a specialist. If the vacuum cleaner is a washing one, inspect the pump that pumps water into the hose. The recommendation for repair is the same - see a specialist. In most vacuum cleaner models, the cause of rattling is “broken” bearings on the brush. If you are confident in your abilities, you can try replacing them yourself
Take the roller and carefully unscrew the end cap and remove the metal shaft from it. Holding it with pliers, unscrew the next limit switch, then replace the bearings, boots and gaskets
Put everything back in its place.
What to check first
Some of the problems that caused the device to fail can be fixed by owners themselves, without the help of specialists.
Is the socket working?
First of all, check that the outlet is working properly:
- Plug in another household appliance and see if it works. It is best to turn on a small lamp or table lamp - if the socket is working, the lamp will immediately light up.
- Try plugging the vacuum cleaner into a different outlet and see if it works there.
Is the bag too full?
Quite often, the vacuum cleaner does not turn on because the garbage container is full. When the dust bin is completely clogged, air passes through it more heavily and the suction power decreases. The load on the electric motor increases, and eventually it will overheat, shut down, or fail.
Modern models are equipped with an indicator that signals when the bag is full. If there is no such “red light”, listen to the sound of the engine: when it is working for wear, you can hear an increasing hum. Often the unit starts to “stink”.
If the bag is not overfilled in time, the engine will overheat. Electronics or a thermal relay can track this moment and turn off the engine itself - then just empty the bag and let the car cool down. If there are no sensors, the motor will burn out and the equipment will have to be repaired.
Have large objects gotten into the hose?
Debris stuck in the hose will lead to a drop in suction power, and as a result, overheating and engine failure. Usually the culprit is large objects (rags, children's toys) that got inside the sleeve or telescopic tube and could not move into the dust collector. But sometimes small objects also get stuck - for example, a toothpick stands across the channel, catches other debris and forms a plug.
Is the engine protection filter dirty?
The motor protection filter, located immediately behind the garbage bag, is subject to regular contamination. Small dust particles seep through the dust collector and settle on the filter: as a result, the passage of air becomes difficult and the engine heats up again.
Is the cable or plug broken?
The cable of the vacuum cleaner is constantly in motion during cleaning - the cable clings to corners, gets under furniture, and the unit itself often runs over it. All this negatively affects the integrity of the cable.
- Check the cable. Sometimes the damage can be determined by torn insulation, but often the metal strands are damaged internally, and the insulation does not cause suspicion. Open the case and find the place where the cord connects to the electrical board. Plug the cable into the outlet, take a multimeter and measure the voltage at the connection point. If there is no current, the problem is either the cable or the plug.
- Replace the plug or its parts. If the plug is removable, open it and look for burnt contacts or other defects. Simply cut off the permanent plug from the wire and replace it with a new one.
If the other plug does not give a positive result, then the final cause is in the cord - replace the whole thing.
How long did the equipment work?
If the vacuum cleaner stalls, check how long the equipment was running before. It is possible that after a long cleaning it simply overheated, and the electronics turned off the motor to cool it down. Wait a while (at least 20-30 minutes) and your assistant will be ready to work again.
Is there a burning smell?
If during cleaning you smell a burning smell, then most likely the armature or stator winding has burned out. In this case, you cannot do without qualified repairs - you will have to replace the burnt part, and in some cases the entire engine.
Sometimes they suggest rewinding the armature and stator windings; we recommend looking at the economic feasibility. Most often, a new assembled module will be cheaper.
How the vacuum cleaner works
Vacuum cleaners are equipped with an inertial-type air pump, called a “snail”. The pump, driven by a brush electric motor, works to suck in air, along with which dust and small debris enter the device.
Air suction occurs thanks to special nozzles, after passing through which the air with debris ends up in the pipe, then through the hose it enters the dust collector. Dust collectors can be of several types:
- bags;
- water;
- cyclones.
All debris that gets into the vacuum cleaner settles on the filter, which should be cleaned periodically.
The brushes on the robot vacuum cleaner do not spin
Almost all models of robotic vacuum cleaners have two or one brush installed at the bottom. They help remove dust and debris from corners and other hard-to-reach places. Some devices are equipped with a turbo brush for more effective cleaning. Most often, the brushes on a robot vacuum cleaner do not spin because they are heavily clogged with dirt or pet hair.
This problem can be easily fixed by cleaning the parts. They must be cleaned periodically. While cleaning, hair and fur constantly wrap around the brushes. It is enough to carefully remove the brushes to remove dirt. After installation, noise may occur in the brushes. This indicates that they were not secured correctly. You will need to remove the brushes from the robot vacuum again and install them correctly.
But banal cleaning of hair and animal fur does not always help. If the part has been thoroughly cleaned and installed correctly, but still does not work after being turned on, the problem is more serious. In this case, the problem lies in the operation of the brush motor. It's hard to fix this on your own. If the robot vacuum cleaner breaks down, it is recommended to contact qualified specialists.
Prevention of breakdowns
In order for equipment to last as long as possible, it must be properly cared for. If we talk about vacuum cleaners, then you need to adhere to some simple rules:
- promptly replace garbage collection bags and wash the dust collector;
- clean the turbo brushes. For example, improper care of the turbo brush can lead to its breakdown and then you will have to pay about 1000 rubles for a new spare part;
- do not forget to regularly check the air channel to ensure that there are no foreign objects in it that interfere with the operation of the equipment. Checking the channel is simple, just put your hand on the suction hole with the vacuum cleaner turned on, and then put your hand on the hole of the vacuum cleaner itself with the hose turned off. A difference in suction power will indicate that the hose needs cleaning;
- do not use a vacuum cleaner to collect sharp objects, water and construction debris if this vacuum cleaner model is not designed for this;
- do not use damaged equipment. A damaged wire or housing indicates that the equipment requires repair;
- if the vacuum cleaner model has a fabric filter, then it should never be washed, otherwise it will lose its functionality;
- Lubricate the bearings every few years and check the carbon brushes once a year.
- Repair of refrigeration units
- Do-it-yourself minor household repairs
- Opening locks is the work of professionals
Other causes of problems and solutions
- The device has entered sleep mode. To wake the TV from sleep mode, you need to press the on/off button on the remote control;
- The power indicator is not lit. When the indicator light is off and the TV stops turning on, you need to check whether there is voltage;
- The power indicator blinks and the TV does not turn on. The flickering indicator light means that the TV is independently searching for the type of fault. The amount of flickering determines the problem in the device.
To find out the cause of the breakdown, you need to read the instructions - to determine how many flickers are responsible for what.
If you are unable to identify the cause yourself, you should contact the service center.
Prevention of the problem
If the TV starts to turn on or off on its own and this is not caused by internal wear of parts or external problems, then such breakdowns can often be avoided.
For this:
- Connect the TV to a stabilizer to prevent power surges and, as a result, replacement of burnt TV parts;
- Unplug the TV from the socket when the device is not in use;
- Regularly clean dust and dirt from under the TV panel.
Expert advice
Many questions can often be answered on various websites and forums. Some TV breakdowns associated with problems turning the device on/off may be beyond the capabilities of the average user. And it is strictly prohibited to independently eliminate a problem that in one way or another can create a health hazard. Therefore, if in doubt, it is better to contact the service center.
Conclusions and useful video on the topic
On the topic of repairing corrugated hoses, you can watch a video where the author talks about all the nuances of this operation, which is simple for the home craftsman:
The method of cutting a groove along the end of the shaft when disassembling the motor from a vacuum cleaner is discussed in detail in the following video:
As it turns out, minor breakdowns are easy to fix at home. Moreover, it is not necessary to have knowledge of electromechanics and experience in repair work - most problems disappear after cleaning or replacing individual elements and accessories, such as filters, brushes, pipes.
If your vacuum cleaner has a more serious problem related to the motor or microcircuit, and you do not understand these issues at all, then it will be easier to contact the service department to provide qualified services.
Moreover, Samsung brand equipment provides free service during the warranty period.
Would you like to tell us how you restored the functionality of a Samsung vacuum cleaner with your own hands? Do you have valuable information on the topic of the article that is worth sharing with site visitors? Please write comments in the block form below, ask questions and post photos.
Source
Call the master
When attempts to independently solve the problem of a Samsung vacuum cleaner not turning on are unsuccessful (even if there is no visible damage, the household appliance still does not work), a professional technician will come to the rescue.
A faulty vacuum cleaner can be taken to the nearest service center, or you can call a specialist at home (contacts are not difficult to find on the Internet). When filling out an application, you must indicate the model of the Samsung vacuum cleaner (information can be found in the device’s passport or on a plate located on the case), and clearly describe the problem that has arisen.
Depending on what exactly caused the vacuum cleaner to not turn on (the exact reason is determined by the technician after diagnostics), repairs can cost from 400 rubles. up to 1500 rub. Additionally, the cost of replaced parts and assemblies will be charged.
Full payment is made only upon completion of repair work, followed by testing of the household appliance. Any demands for full prepayment for repairs that have not yet been completed is a reason to refuse the services of a master!
3 ways to unscrew the rotor mounting nut
Let's call them conditionally according to the technology of performing the work:
- cutting a slot;
- fixation with a noose loop;
- fastening in a vice through adapters.
Each of these methods has its own advantages and disadvantages and can be used depending on the availability of equipment and tools.
Slot on shaft
A little history
This rotor mounting technology was used on the collector motor of any vacuum cleaner produced during the Soviet era. For ease of manual assembly and subsequent repairs, a groove for the screwdriver blade was always created at the end of the shaft at the factory.
Its force fixed the position of the rotor shaft, and the torque from the wrench clamped or loosened the nut. I still have a similar engine that was used in the design of a homemade trimmer. This slot is clearly visible in the photo below.
Modern technologies
Nowadays production widely uses industrial robots and automation of all processes. In addition, the marketing policy of well-known manufacturers is designed to:
- long service life of manufactured equipment within the declared resource;
- performing repairs by block-by-block replacement of failed devices without disassembling them.
For these reasons, the manufacturer simply replaces the defective commutator motor with a new one without disassembling it: it’s faster, easier and more profitable. Well, our home handyman likes to fix everything with his own hands the old fashioned way.
How to make a slot
The vacuum cleaner motor mounting nut and rotor shaft are made of ordinary steel. You can make a cut in them. However, in our case, it is not possible to do it in the usual way due to the recess of the fan housing in which they are hidden. Therefore, you will have to use an ordinary homemade electric drill and a circular saw of the appropriate diameter at the end.
Then we place a wrench on the nut, and a screwdriver on the cut in the motor shaft. All that remains is to apply force to create the opposite torque and use it to disassemble the mount.
I did not use this technology: I did not have a small circular saw at hand for cutting metal. I tried two other methods.
And you can watch its implementation in the video by Alexander M “How to unscrew a nut.”
Loop
The method is based on holding the anchor by the collector plates using a noose assembly. I had to check two options for unscrewing the nut using:
- soft copper wire:
- plastic rope.
Wire fastening
In principle, the polyvinyl chloride insulation of the mounting wire squeezes the rotor shaft well onto the commutator plates, maintaining the integrity of their surface, and allows it to be held for unscrewing the nut.
I used copper wire with a diameter of 2.5 mm square. However, the design of the loop turned out to be loosely tightened and did not completely provide a noose. When working with the key, I felt that the shaft was turning and did not apply much force.
When I pulled my wire out of the engine, I saw frayed insulation on it. I didn't experiment with this method anymore. However, I suggest watching this technology in the HamRadio video “How to unscrew a nut on an engine.”
https://youtu.be/5Wm_ODawTgA
Fastening with cord
He took a piece of thin rope and folded it in half in length. In the middle I threaded a soft wire that acts as a needle.
With its help, it was possible to conveniently place the soft cord in a loop on the noose and pass it around the collector plates.
I tied a fastening knot around the housing window.
My attempt to unscrew the nut using this method did not work: the structure of the cord turned out to be weak - it simply broke due to the applied tension forces.
If you repeat this method, choose a stronger rope, cord or belt.
Clamp in a vice
To fix the anchor in this way, it was necessary to make two adapters in the form of rectangular blocks from wood.
Their cross-section should fit into the hole in the housing for attaching the brush, and their length should reach the collector plates and protrude slightly outward. It is better to first measure these distances using a caliper or ruler.
Moreover, the side adjacent to the rotor must be sharpened with a round file in the form of a segment for a tight fit to the motor shaft.
With the help of these adapters, it was possible to fix the engine rotor in a vice, pressing with medium force.
All that remains is to set the socket wrench to 12 mm and rotate it clockwise.
The nut is safely unscrewed. A machined factory cavity is noticeable on its inner surface.
Reasons for software failure
Modern TVs have a very large number of settings, which are quite difficult to understand. Therefore, a problem often arises due to incorrect settings by the user, after which the device may begin to turn on and off spontaneously.
One of the popular problems can also be automatic software updates: the received Internet update can independently change the TV settings.
If such a failure does occur, it is quite easy to fix it. You need to go to the settings and uncheck the box next to the self-shutdown section.
Alternatively, you can turn off automatic software updates.
If all these methods do not help, you need to look for failures elsewhere.
What kind of damage can you repair yourself?
All damage found at home can be fixed with your own hands. Change or wash filters and dust collection containers, remove objects that have fallen into the hose.
Experts do not recommend trying to repair the power cord or disassemble the equipment. Unprofessional actions can completely damage the device and harm a person. For example, if you accidentally damage the cord during repairs, it may spark when plugged into an outlet.
Recommendations
- Connect equipment through a voltage stabilizer. The protective device will protect not only television equipment from power surges in the network, but also other household appliances.
- When the first malfunctions occur in the operation of the television panel, immediately disconnect the device from the network. “Bad” signs include regular clicking sounds and a burning stench.
- If the TV receiver is “flat”, do not place it close to the wall. Especially if the wall is covered with carpet. The equipment gets quite hot inside. Hot air needs to escape through vents at the back of the case.
- It is better to eliminate periodically occurring failures immediately. Over time, the problem may worsen, and the TV receiver will no longer turn on completely.
- Do not unplug the cord from the outlet while TV is on. First turn off the device using the remote control.
- Let's "rest" the TV set to cool down. If you go away for a long time and leave the panel on, in the settings, enable the function to automatically turn off after a certain period of inactivity. So, if no button is pressed, for example, for two hours, the TV will go into standby mode.
Studio and small apartment with single coverage
The easiest case for cleaning is, of course, a small studio. Such a space is distinguished by its unity, uniformity of coverings and, of course, size.
The compactness of studio apartments greatly simplifies and speeds up their cleaning. Therefore, it does not make sense for them to buy a large and powerful vacuum cleaner, which will be overly functional in such a space and will take up too much space when stored.
We believe that an electric mop would be the ideal cleaning equipment for a studio apartment. It will remove dirt from the tiles near the front door and clean the linoleum or laminate flooring of the living space. One of the best electric mops on the market is the KARCHER FC 5.
KARCHER FC 5 is a powerful electric mop (460 W) with mains operation. Thanks to its composite design, it is convenient and quite easy to use. The weight of the device does not exceed 4.6 kg. KARCHER FC 5 is designed for washing hard surfaces: laminate, parquet, linoleum, tiles... it is also capable of collecting small debris from fleecy substrates. The volume of the clean water container for this electric mop is 400 ml - which should be enough to clean 70 m2. In fact, there is enough water for about 30 m2 - which is also a lot. The disadvantages of KARCHER FC 5 include the fact that it is still an electric mop (albeit with minimal suction functions) - therefore it is not suitable for cleaning floors densely strewn with dust or small debris.
That is why we recommend purchasing a small hand-held vacuum cleaner in conjunction with the KARCHER FC 5, which will work as an analogue of a broom: where you need to collect scattered crumbs, remove dust from hard-to-reach places, and so on. Note that many people call hand-held vacuum cleaners “car” and complain about their low power
Therefore, when choosing a model, our experts paid special attention to its versatility and sufficient performance. As a result, the hand-held vacuum cleaner Clever&Clean HV-100 was chosen
has been on the market for quite a long time, so users could evaluate all its advantages and disadvantages. The first include high suction power (up to 100 W), elegant appearance, good ergonomics and low weight - only 1.5 kg. Clever&Clean HV-100 is universal: it is positioned as a hand-held vacuum cleaner for both dry and wet cleaning. The set includes several attachments that help remove dust from hard-to-reach places, collect spilled liquids, and even wash windows. The disadvantages of Clever&Clean HV-100 are that its owners include significant noise during operation (charge for power) and the absence of a battery charge indicator - which does not allow monitoring the autonomy of the device during operation.
Overall, a compact handheld vacuum cleaner is an extremely useful cleaning device. Of course, it cannot be considered basic, but buying it in addition to the main one is a good decision.
A hand-held vacuum cleaner is also useful where the living area is combined with a single floor covering without the use of thresholds, doors and ledges. The main device in this configuration can be a robot vacuum cleaner - which does not have to overcome fleecy surfaces and obstacles.
A single “seamless” space (most often made of laminate, but parquet, linoleum or tiles are also found) looks very interesting, but has one unpleasant feature - dust, debris or dirt, appearing in any one place, very quickly spreads throughout the house . It has to be cleaned, albeit little by little, but almost constantly - this is precisely the mode that is ideally supported by the robot vacuum cleaner. One of the popular models is Xiaomi Mijia Sweeping Vacuum Cleaner 1C.
The Xiaomi robot combines the capabilities of both dry and wet cleaning - for which its body includes not only a 600 ml garbage container, but also a 200 gram water container
Another important advantage of the device is the powerful NIDEC brushless motor, which provides suction with a pressure of 2500 Pa. The autonomy of the device is stated at 90 minutes, which is enough to clean a space of 100 m2
The main advantage of Xiaomi Mijia Sweeping Vacuum Cleaner 1C is the presence of 15 optical sensors and a visual surveillance camera produced by Omnivision - which is extremely rare in robot vacuum cleaners of the mid-price category. A quad-core processor based on ARM Cortex-A7 architecture with two Mali-400 cores is responsible for managing sensors, building a room map and creating routes. Like all robot vacuum cleaners produced by Xiaomi, this model is controlled through the proprietary Mi Home application and is compatible with the Yandex smart home platform.
Engine
As can be understood from the above, failure of the electric motor of a vacuum cleaner is classified as a rather complex malfunction. Typically, modern models use axial-type motors that have a rotation speed of about 20,000 rpm. This part is a design that requires special attention if repairs are necessary. To carry it out you will need to have the following tools:
- a pair of screwdrivers for various sizes of Phillips screws and a pair of flat-head screwdrivers;
- tweezers;
- wire cutters or pliers;
- bench vice;
- motor lubricant.
It should be noted that you should follow safety rules and under no circumstances repair the electric motor of a vacuum cleaner connected to the electrical network. If we talk directly about repairing the device, then to carry it out you first need to disassemble the device. Moreover, this should be done in a clearly established order:
- the container for collecting dirt, rear and front filters is removed;
- Unscrew the screws located under the filters with a screwdriver;
- we dismantle the device body, lift the front part and only after that the rest, the body is usually removed very easily;
- Now we clean the body of the electric motor itself using a brush or rag.
Read more: Do-it-yourself tire cesspool The device should be inspected and further repaired, the last process will be carried out according to the following algorithm:
First, use a screwdriver to unscrew a pair of side bolts that are located in the upper part of the case; turn it a little and inspect the motor (it will not be possible to dismantle it now due to the fact that the coil will interfere with this); carefully free the motor from the wires, disconnect all the connectors and remove the coil wires so that the coil itself is still on the body; Now we remove the engine, after which we repeat cleaning it from dust; Next, we dismantle the rubber seal, for which we unscrew a couple of side bolts; using a screwdriver, separate the two halves of the motor housing; now you need to remove the motor itself from the plastic housing; when examining the upper part of the motor, you can see the so-called folding, they should be bent in the opposite direction, and a screwdriver should be inserted into any gap so that the halves are separated from each other (this will free the turbine from the housing); using a 12mm socket, you need to unscrew the bolt (the thread is left-handed, so when removing the screw you need to turn it clockwise); the motor stator must be wedged using small wooden blocks, and the entire structure must be supported during operation; we dismantle the turbine; take out the washer and unscrew a couple of bolts; at the bottom there are 4 more bolts that need to be unscrewed; Next, remove the brushes, first unscrewing all the bolts; now you need to knock out the anchor, then insert the key into the hole and knock on it with a hammer; after these manipulations, it should seem to jump out; Now you should pay close attention to the bearings: if they are in good condition, they can be lubricated with oil; use tweezers to pull out the boot; If the bearing rotates with a sound that resembles the rustling of leaves and at the same time remains dry, then it should be cleaned and well lubricated (you can use carburetor cleaner to clean this part).
You can learn how to disassemble the motor of a vacuum cleaner from the following video.
Engine repair can only be started if you have experience working with electrical equipment. In addition to knowledge, to perform the work efficiently, you must have special measuring instruments.
The main signs of a broken drainage device in different models
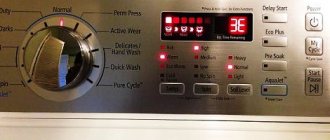
Most models of Samsung, LG, Indesit washing machines are equipped with a self-diagnosis system, which allows the owner to independently determine the cause of the breakdown by looking at the display (read more about how to identify faults and repair washing machines yourself, read here). The information screen contains error data in the form of numbers and symbols, the meaning of which can be found in the operating instructions.
If the machine does not have this function, the malfunction is determined by the following signs:
- after starting the pumping program, the system does not drain water;
- the draining process is accompanied by extraneous noise and hum;
- some of the water remains in the tank after draining or pumping is slow;
- the washing machine turns off without draining the water completely;
- the pump motor is running, but water does not flow out;
- The control panel freezes while draining water.
Depending on the type of breakdown and model of the machine, the malfunction is expressed by one or more symptoms or is supplemented by others. To figure out that the pump is the reason for the incorrect operation of the washing machine, first the unit is inspected for other damage and the functionality of other components and parts is checked.
LG
The following signs are typical for pump failure in LG washing machines:
- strange, uncharacteristic noise in the lower right part of the body;
- poorly drained water during draining;
- problems when turning on or off the pump;
- error code on the display.
Samsung
The first signs of a pump malfunction in a Samsung washing machine:
- An error code appears on the digital screen. It usually appears after the washing process freezes while water is being pumped out of the tank.
- The machine stopped working mid-cycle with a full tank.
- The pump runs without stopping.
- Water leaves the tank irregularly.
To make sure that the pump has failed, perform the following steps:
Check whether the program has set the spin function
If not, the mode is restarted. Check that the drain hose is positioned correctly and that there are no blockages in the filter. Pay attention to the pump impeller. If the part stands still or turns with difficulty, you will have to work on the pump.
Ardo
A breakdown of the drain pump in the Ardo machine is indicated by error code E03, F4, which appear after increasing the drain period. Typical symptoms of a malfunction:
- complete stop of the pump in the middle of the wash cycle;
- the motor runs loudly when pumping and draining water;
- pumping out water during spinning is not complete;
- the machine does not respond to the specified programs;
- the washing machine turns off when the tank is filled with water;
- water enters the tank in insufficient quantities;
- the pump does not turn on or does not turn off.
A common reason for stopping is that foreign objects get inside, for example, buttons, coins and other small things that block the operation of the part and prevent the impeller from rotating. Or failure of the pressure switch, which does not send a signal to the control module about the need to supply water (how to repair the pressure switch yourself?).
Indesit
A malfunction of the pump in the Indesit machine is indicated by error code F 05, which appears on the information panel screen. If there is no display, a problem is indicated by a combination of indicators that light up on the panel:
- spin;
- soak;
- additional rinse;
- super wash.
If self-diagnosis does not work, the following signs indicate a broken pump:
- remaining water in the tank after washing;
- the process of pumping water is accompanied by a strong hum;
- water does not drain under the specified program;
- turning off the machine while draining the water after washing.
How is the problem solved, and is it possible to prevent it?
Why doesn't the vacuum cleaner work? Let's look at some trivial reasons that any user can deal with. Automation failure can occur for the following reasons:
- Filling the dust container. This will be indicated by the presence of a dusty smell.
- Ingress of large debris. Large sizes of dirt stuck in the air duct interfere with the flow of air sucked by the vacuum cleaner.
- Debris stuck in the hose. Evidence of this is a change in sound when the device is turned on.
- Pre-engine filter is dirty. During this process, an unpleasant burnt smell appears.
Let's consider the possibilities of repairing a faulty Samsung vacuum cleaner, and what to do when the vacuum cleaner does not turn on. You can fix the above problems yourself, but it’s still better to avoid them in the first place. To do this, you will need to disconnect the equipment from the power source, then disassemble the device and clean the debris accumulated inside.
To access the dust container, remove the top cover. Some dust containers can be cleaned, or you can replace them with new ones. It is also advisable to wash the dust collector and dry it. In order not to spill dirt and dust, you should close the existing valve for a tight seal. When installing the dust collector back into place, make sure that the neck fits snugly against the bag holder. If this does not happen, then dirt and dust will seep into the structure, which will lead to overheating of the motor and accumulation of dirt on the components.
Filters require additional care. Be sure to read the instructions and find out how many filters are installed in your particular vacuum cleaner model. All filters installed in the structure should be checked. Some types of filters can be washed with running water to clean them. But before installing it in the structure, you should definitely dry it. Starting a vacuum cleaner with a wet filter will cause damage. Periodic replacement is carried out according to the manufacturer's recommendation. When the filter has served its useful life, it is replaced with a new one. The filter life is indicated in the operating book.
All replacement consumables, filters, brushes and other accessories can be purchased at a specialized store.
To remove blockages in the nozzle, unscrew the corrugated accessory from the body, inspect its integrity, remove the accumulated dirt and screw it back. Dirt stuck in the bellows prevents air flow.
But still, if the vacuum cleaner does not turn on, what should you do? If the repair of the breakdown is serious, it is better to contact specialized technicians who can solve this problem.
But it is worth remembering that the main possible breakdowns occur due to engine overheating. You should adhere to the following rules:
- To prevent overheating, use the vacuum cleaner for no more than 30 minutes when cleaning. At maximum mode, use the device for no more than 10-15 minutes. Longer operation may lead to overheating; to do this, allow the device to rest and cool down.
- Make sure the dust bin is full to remove accumulated dirt and dust. An excess of dirt and dust will not allow air flow to pass through, which will lead to overheating of the electric motor. Also, an excess of dust in the dust collector will lead to clogging of the structure inside the device.
- Clean the pre-motor protection filter in a timely manner. Excessive contamination can lead to the formation of an unpleasant burnt odor.
- Avoid sucking large objects that may block the blower. Before using a vacuum cleaner to clean the floor covering, you should collect large debris and accidentally fallen items by hand.
- You need to monitor the level of noise produced. If the sound changes, this may indicate a clogged brush or bellows accessory.
Monitor the performance of your home assistant, and provide timely care for the vacuum cleaner and its replacement consumables. Then it will be easier to avoid breakdowns of equipment to maintain cleanliness in the house.
Required Tools
The set of tools needed will depend on the type and model of Samsung vacuum cleaner. When disassembling and repairing, preventing or cleaning the device, as well as its individual elements, you cannot do without the following devices:
- Phillips and slotted screwdrivers - their sizes are selected in accordance with the type and depth of the screws;
- pliers;
- a stationery knife, or better yet a professional construction knife;
- lubricant;
- electrical insulating tape;
- electrical tester.
The type of work performed will largely influence the choice of tools. For example, to clean the surface of a suction hose before gluing cracks, you will need sandpaper and a degreaser (acetone, solvent). It is convenient to remove dirt on the shaft of the vacuum cleaner brushes with scissors, but to remove blockages you will have to use a long, stiff wire. For gluing cracks or chips on the body, universal super glue is suitable, but for moving parts, such as a hose, a more elastic adhesive material is needed.
The main malfunctions of vacuum cleaners from different manufacturers
For each manufacturer, we can identify the most common problem encountered in manufactured models. The analysis below is based on online customer reviews.
Samsung
Samsung vacuum cleaners are quite reliable, but they also require careful treatment and timely maintenance. It is necessary to monitor the condition of the filters and dust collector and clean them regularly. There are also problems with the motor and the power button.
LG
Judging by user reviews, vacuum cleaners from this manufacturer quickly clog filters and lose suction power; fragile attachments break faster than wear out. There are cases of excessive heating and shutdown during operation.
Philips
Those who at one time preferred vacuum cleaners from this company say that over time the suction ability is lost and the noise during operation increases. There are complaints about an unpleasant odor during operation and a poorly winding cord.
The Philips vacuum cleaner caused the following reaction from our author: Philips FC 9184
Bosch
Over time, the rubber seals of these vacuum cleaners suffer, and the parts fit less well to each other. Bosh often releases cordless models, and the batteries also sometimes require replacement. Often the engine also fails.
Dyson
In reviews of Dyson vacuum cleaners, there are practically no complaints about their performance. The only thing is that with wireless models, the battery discharges faster and faster over time and it has to be replaced (which, in principle, is natural).
Step-by-step disassembly sequence
Here we will tell you how to get to the vacuum cleaner motor and consider the disassembly process in more detail.
Disconnect the hose and disassemble the housing
As a rule, you need to use a long Phillips screwdriver to unscrew the four bolts holding the two halves of the case together. Sometimes you will have to remove some overhead elements, for example, a turbine. The main thing is not to damage anything and unscrew all the bolts before separating the body parts.
Removing the motor
Before removing the motor, disconnect the power terminals and other electronics.
Removing the engine cover
The lid is seamed around the entire perimeter. To remove it, gently press out the seam with pliers. When exposed to light impacts, the cover should separate from the main body.
We take out the brushes by unscrewing the holding screws
As a rule, the brushes are pressed to the rotor by small springs - if you unscrew the clamps, the springs can fly out in an unknown direction.
Check the carbon brushes for wear: they should fit evenly and tightly to the motor commutator and be of sufficient thickness. The thickness must be compared with the depth of the grooves into which they are inserted on the engine, having previously measured it with a caliper.
Some motors do not have brushes at all: these are brushless motors with an asynchronous motor and a squirrel cage rotor. They are rare, but if you do not find brushes on your vacuum cleaner, do not be surprised and continue disassembling.
Unscrew the rotor mounting nut
To remove the fastener, first spray it with WD-40 or similar. Then make clamping bars in place of the brushes so that the commutator (the part of the engine between them) does not turn when unwinding. The size and shape are the same as the brushes, but slightly longer so that the bars protrude from the body.
Clamp the manifold with blocks using a vice or clamp. After this, the nut can be easily unscrewed clockwise with a wrench.
Disassembling the air pump wheel
The procedure greatly depends on the brand of the model and, as a rule, does not cause difficulties. The main task is to free the working shaft of the electric motor. Look carefully at how the working tool is mounted on the shaft, to see if it has additional fastenings in the form of screws or cotter pins. Carefully remove everything and remove. As a rule, there are friction washers on the shaft along with the wheel, which also need to be treated with WD-40.
We carefully inspect the rotor, stator and bearings for damage
If the bearings are worn out, the guide mounts often become loose due to vibration. Check - if everything is in order, move on. If a bearing fails, do not try to repair it: take it for repair or replace it with a new one. In specialized stores, sellers will 100% find an analogue, the main thing is not to throw away the part that has fallen apart.
The windings or their insulation may be damaged—scuffs or burnt insulating varnish are visible. Ideally, you would test the winding with a multimeter (more on this below).
Disassemble the engine further so that the armature can be rewound. If everything is fine with the windings and only the bearing is broken, try assembling the device and turning it on after replacing the bearing.
If there are no obvious burn marks on the winding, it may be intact and there is no need to rewind. But if there are abrasions with a metallic sheen of copper, it is better to be safe.
If the bearings are damaged: how to remove them
In a good way, a special puller is needed here, but the bearing races can be removed from the shaft using a screwdriver and a hammer. The main thing is to do everything carefully and take your time: the impacts on the bearing races should not be too hard.
If the windings are damaged: how to disassemble the armature
To disassemble the anchor, you need to rewind the motor. It is very difficult to rewind at home, so we recommend that you take the part to professionals.
Let's summarize the instructions with another example in the video: