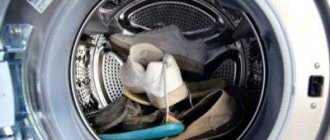
The washing machine worked diligently for a long time, but one sad day a strange noise appeared while spinning clothes at high speeds.
Most likely the bearings have worn out and you need to react to this as quickly as possible to avoid wear of the housing. Perhaps nothing bad happened and you only need to lubricate the washing machine drum bearings, which, of course, will significantly extend the life of the equipment. How to do it?
What and where to lubricate
Not many people know that bearings require maintenance, but oil seals are also required to be lubricated.
Usually the bearings already have grease in them. If this part is original, made at the manufacturer and bought in a specialized store, then you can put it in the car without additional processing.
Otherwise, questionable quality necessarily requires preliminary care, because cheap materials and lubricants are usually used, among other things. It's better to update it yourself.
Everything needs to be lubricated! Bearings, seals and bushing. But! There should be one lubricant for them. You cannot mix different products.
Disassembling the washing machine
Lubricating the bearing of a washing machine without disassembling is not possible, so the process of lubricating the internal parts is labor-intensive.
This is necessary in order to get the tank with the drum in which the part we need is located. Before work, the equipment is de-energized and disconnected from the water supply. The machine is placed in a place with free access to it. You will need pliers and screwdrivers.
- The top cover of the machine, which is held on by two bolts at the back, is removed.
- The compartment for detergents is pulled out.
- The wires from the board are disconnected and the control panel is disconnected.
- Using a slotted screwdriver, the clamp is removed, which is removed by pressing the spring. Then the edges of the elastic are tucked into the drum and the cuff is removed.
- The bottom panel must be removed. It is secured with latches.
- Next, the front panel is removed. To do this, the bolts are unscrewed behind the powder receiver.
- All wires and pipes that go to the tank must be unhooked.
- The pressure switch with wires is removed and the front panel is pulled out.
- Both counterweights are removed to make the tank lighter.
- The tank is removed from the springs, having first unscrewed the shock absorbers. The tank is placed on the floor with the pulley facing up.
- The belt is removed from the engine, and then the engine itself.
If something cannot be disconnected or removed during operation, do not use force. You can fill soured screws with WD-40 and drill out broken ones.
Often, in order to be able to reassemble the machine in reverse order, users take photographs of each stage of work and the correct connection of the wires with the pipes.
You need to pay attention to the tank. There are two types: collapsible and solid
If you have a Hotpoint-Ariston washing machine, for example, then most likely the tank is non-separable. In this case, it will have to be cut to get to the bearings. It is sawed with a hacksaw along the joint seam. The halves are connected back together using bolts and sealant.
If the tank is collapsible, then it needs to be opened by unscrewing the bolts.
How to remove bearings
So, the tank is disassembled.
Now you need to release the drum pulley, which is held in place by the nut. If the bolt does not want to come out, use WD-40. Next, the drum itself is removed by rocking the pulley housing.
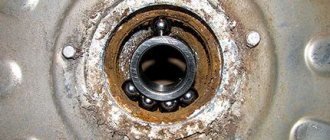
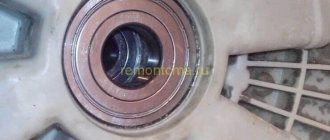
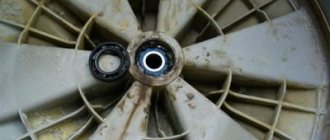
To separate the drum from the tank, the shaft is carefully knocked out. There are bearings in the seat on both sides that need to be knocked out.
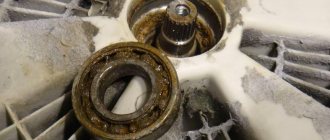
After this, an inspection is carried out: which bearing is worn out or broken?
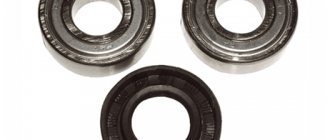
If damaged, you will have to buy a new bearing and seal.
How to lubricate bearings in a washing machine? If there is no damage, then they are cleaned of dirt using WD-40, wiped with a cloth and then filled with lubricant. Such maintenance of this part should be carried out once every five years. If the bearing is dismountable, then the protective cover is removed from it (it is convenient to do this with a scalpel) and treated with lubricant inside the part.
If the bearing is new, it does not need to be lubricated, unlike the oil seal. This is done simply, the product is applied in an even layer to the side that comes into contact with the bushing. First the installation is done, and then the seals.
The bearing lubrication process itself is not complicated. It is difficult to get to it, which is why the services of a specialist are much more expensive than the cost of a new part.
Without knowledge and experience in such a matter, there is always a risk of damaging the drum, which will lead to a complete replacement of the washing machine. But, despite this, it is quite possible to cope on its own.
Algorithm
Modern washing machines are disassembled according to one principle. The main difference is in the design of the tank. For example, LG has a collapsible one. Similar ones are installed in Electrolux, AEG, Samsung. To remove the drum, you need to release the mounting screws.
Cars like "Ariston" or "Indesit" have a solid tank. Replacing the entire structure is quite expensive, so experienced craftsmen use several tricks that allow them to replace or lubricate bearings and other parts without updating the entire tank.
- First of all, you need to open the door slightly and unplug the machine.
- The easiest way to replace pumps in modern devices. They are located at the bottom of the machine and are accessible through the bottom. Therefore, the first thing to do is to put the car on its side or tilt it back and rest it against the wall.
- Remove the front lower panel.
- In many models, shock absorbers and other elements are attached to the bottom. If inspection and repair of defenders is not necessary, it is better not to touch such a bottom, but to remove the face shield. To do this, remove the powder tray (it is secured with self-tapping screws and the water supply valve).
- Remove the control panel.
- Unscrew the screws of the front shield.
- Using a screwdriver, carefully pry off the clamp that holds the cuff, so as not to damage the rubber, and remove it.
- Press the cuff inside the drum and remove the panel.
- Disconnect the wires and set the shield aside.
- Now you can easily disconnect the pump. The most common breakdown in this unit is a blockage or a hole in the pipe (which causes water to leak under the machine) and wear of the armature/motor (which causes vibration when spinning and draining water).
- Clean the pipe and filter from accumulated debris.
- If there is a gap or defect in the motor, replace the pump parts.
After the first stage, access to the shock absorbers/defenders opens. The simplest case is grease abrasion. To restore it, you need to unscrew the parts, extend the rod as much as possible, apply a thick, high-temperature, wear-resistant lubricant to its base and fold and unfold the mechanism several times.
After 10 years of operation, most often the depreciation fails completely. The drum begins to “beat” and make noise during the spin cycle, the machine begins to vibrate and “jump,” and leaks are possible. In such cases, experts recommend replacing the shock absorbers.
Life hack Home craftsmen have found a way to restore defenders and shock absorbers. To do this, you need to remove the rod, as well as the sealing ring-locker. Pour out the “dust” of the gasket and replace it with a piece of leather belt, 2-3 mm thick and approximately 21 mm wide. The section is inserted into the defender body as a ring, with the smooth side facing the body. Next, the gasket together with the rod is treated with a wear-resistant and necessarily viscous lubricant. Machine oil will quickly drain and wear out; such repairs will only last for a couple of months.
Second phase:
- Remove the back panel.
- Remove the weight - the layer that lies on top of the tank.
- Next, remove the clamp that transmits rotation to the tank.
- Using a small screwdriver, press the tabs on the plugs to disconnect the wires from the heating element, tank and motor.
- Unscrew and set aside the motor.
- Disconnect the heating element and water sensors.
- Loosen the fasteners of the tank itself and carefully remove it.
- Remove remaining weight.
After the second stage, the tank is opened, which contains the drum of the washing machine. The detachable one can be easily disassembled, but most modern machines have a one-piece design. It will have to be opened by first treating the seam with sandpaper.
- Cut or unscrew the tank and set aside the top half.
- Remove the gasket or sealant, if there was such a layer.
- Turn the structure over and remove the flywheel on the rear wall of the tank.
Finally the bearing opened. But in order to remove it and lubricate or clean it, you need to free the drum. To do this, place the screw where the flywheel was, and use a hammer to knock the structure out of the “saddle” through the fabric. The pin will come out of the tank and the drum will be separated.
Advice If you have little experience in disassembling washing machines, photograph each significant step and sort the screws so as not to confuse them later. This is especially important when connecting wires.
- Remove the oil seal.
- Use a pipe of suitable diameter to pull out the bearing.
It's easier to throw away a broken part. The collapsible one should be washed in oil or gasoline, and then filled with semi-liquid lubricant. Most often the bearing is simply replaced.
Important If you want your work not to be in vain, buy replacement high-quality German or Polish bearings that are resistant to moisture and high temperature, vibration and wear.
Often the problem is found in the oil seal - the gasket remains without lubrication and breaks or becomes deformed. The faulty part must be replaced with a new one. When assembling, be sure to apply moisture-resistant grease (it is applied to the inner diameter along which the bearing will slide.
Having removed everything, you need to carefully inspect the bushing (the pulley on which the bearing and oil seal are actually put on). All rust and limescale must be wiped off. If scratches are exposed, it is useless to mask and polish them - the bushing will have to be replaced. The same thing happens if the original bearing has become stuck. Trying to cut it with a grinder will only risk the drum. Most likely, trying to free the bushing will damage it - it’s easier to install another one.
If the bearing is non-separable, it can be washed. To do this, the part is spilled with oil, placing a bag and rotating the disk to remove as much dirt as possible.
How to assemble a cut tank The cut tank is covered along the cut with polyurethane or silicone sealant, and then closed with screws, nuts and self-tapping screws strictly along the entire perimeter. If the fastening is not secure, the tank will separate during startup!
According to experts, there is nothing difficult about disassembling a car. It is enough to be careful and know exactly what needs to be done. In practice, inexperienced craftsmen often make mistakes that cause the machine to fail. Miss Clean magazine suggests that novice repairmen start by replacing components that are easier to dismantle, such as pumps or shock absorbers, and try more complex operations first on an old machine that needs to be recycled.
Video: analysis of errors that led to machine breakdown after repair
In general, all operations are accessible; there are enough video tutorials posted on the Internet that will help you cope with repairing a washing machine yourself.
Disassembling the drum
How can you lubricate the bearings and change them in a washing machine? To do this, divide the tank into two parts and remove the drum placed in it. The parts of the tank will be fastened using special latches or using bolts located around the perimeter.
Disassembling the washing machine tank
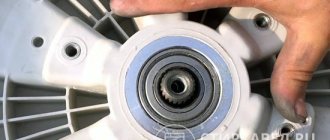
To be able to remove the rear half of the tank, first remove the pulley
Using a wrench prepared in advance, carefully unscrew the special bolt that allows the pulley to stay on the drum axis. When the pulley is removed, the bolt must be tightened back so as not to damage the shaft when the drum is knocked out
Pulley removal process
After this, use a hammer. Lightly tap it directly on the shaft. Continue to do this until the shaft is completely buried in the head of the screwed in bolt. Then unscrew this bolt and pull out the drum from the back of the washer tank.
Carefully inspect the bushing, as well as the shaft, which is located directly on the drum itself. If you make untimely repairs, then the cross may also be broken or damaged. Walk over the shaft with a clean, damp cloth and inspect for damage, check if there is wear on it. To eliminate its presence, place purchased bearings on the shaft. This will allow you to determine whether or not there was at least a little play in the new part. If there is still play, then in this case it is impossible to do without replacing the cross and shaft.
Shaft in the drum of a washing machine
In addition, it is necessary to check the bushing located on the shaft. You will need to put a seal on it. The bushing should not have too pronounced wear or grooves. If there is wear on the bushing, the new oil seal will leak a small amount of water. This will cause rapid failure of the new bearings.
Tips for use
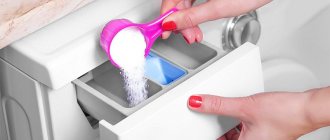
Do not overload the detergent hopper. This may cause the detergent hose to become clogged with excess powder. Apply exactly the amount of detergent required for a specific wash program.
Don't forget to clean the drain filter. It is located at the bottom of the machine and collects all large fractions that can harm the pump. If this is not done, then sooner or later it will clog to such a state that water will stop draining from the tank.
Washing machine lubricant
When performing preventive maintenance of household appliances, it is recommended to use exclusively specialized lubricants. Lubricant for washing machine bearings must meet the following requirements:
- Moisture resistance. The material used for lubrication should not lose its inherent properties during prolonged contact with moisture.
- Non-aggression. The chemical composition of lubricant for washing machines should not have a destructive effect on the oil seal and metal shaft.
- Heat resistance. The substance used must be resistant to temperature changes and not be destroyed when heated.
- Density. Bearing lubricant must have a certain level of viscosity and thickness so that it is not washed off with water for as long as possible.
Important! You should not use folk remedies, such as fats or sunflower oil, as a lubricant. This attitude towards technology can lead to unpleasant consequences, because a seemingly more economical lubrication option can completely damage the mechanism.
Where can I buy?
You can purchase lubricant for your washing machine at a store that specializes in selling household appliances or their spare parts. Due to the narrow purpose of this product, its price usually has a significant impact on the consumer’s budget.
Important! Preventive measures aimed at preventing various breakdowns of washing machines consist not only of periodic lubrication of bearings. No less important is protection against scale, power surges, and mold.
All this will not really require a tremendous effort from you if you develop a clear schedule and follow the instructions from our following articles:
Among the lubricants offered, you can often see formulations for certain models of washing machines, which are produced by famous manufacturing companies. However, you should know that most lubricants are interchangeable, and therefore you can use a less expensive substance, but similar in composition.
Important! Titanium and silicone materials are very popular today, because they can withstand heating up to 200 C and repel water quite well
Symptoms of a problem
No matter how good and expensive a particular Candy washing machine model is, this does not mean that it will work forever. Any mechanism has its own service life. Bearings have an average service life under average statistical conditions of 5-6 years. But it can also be less if a particular washing machine was operated in an unfavorable environment. When the bearings reach the end of their life, they need to be replaced to extend the life of your home appliance.
Areas of use
Aerosol and liquid lubricants are used mainly to create a separating layer, to protect and restore rubber seals, and also to lubricate lightly loaded plastic parts.
Greases are less often used as release agents, but they are used in more heavily loaded mechanisms, bearings, hinges, guides, and gears.
The use of silicone grease will help increase the level of electrical insulation or get rid of squeaking in plastic parts or in the brake system.
Industrial Applications
In industry, these materials are also widely used for lubrication of molds, dies, dies, lubrication of knives and sealing jaws in packaging equipment, lubrication of conveyor belts, bearings and guides, lubrication of pneumatic equipment, lubrication of working tools for storage, etc.
One way to protect surfaces from welding sparks and splashes is also to treat them with silicone fluids.
Auto applications
To better understand what silicone lubricant is needed for, let's look at some examples of its most popular automotive applications:
- Restoring the color of plastic parts
- Preventing rubber parts from aging
- For lubrication of disc brake system parts
- Lubricating plastic parts of the car body interior to get rid of squeaks
- Restoring the elasticity of rubber parts and seals
- For lubricating wheel tires during their upcoming long-term storage
- For lubrication of car locks, hinges, hinges
- For lubrication of seat guides, sunroofs, window regulators
- To protect door and hood seals from freezing in winter
- For lubrication of control cables in sheaths
- For lubricating rubber bushings, pipes, engine mounts, etc.
- To improve the electrical insulating properties of high-voltage wires
Silicone grease can ensure absolute sealing of spark plugs before extreme trips.
But silicone lubricant has many uses not only in the automotive field.
Household applications
In domestic conditions, it can be used to lubricate door hinges and locks, window and furniture fittings, treat window rubber seals, and be used for the repair and maintenance of small household appliances (electric shavers, hair clippers, mixers, sewing machines, coffee machines, fishing reels, computer fans), sports simulators.
Bearing device
It's worth starting with the main bearing parts. In this case, we are considering a ball one, but, for example, a roller one has approximately the same design. So, it consists of four main parts, which provide rotation:
- outer ring - this part is mounted in the seat so that it serves as an external support. Thanks to it, the bearing is held in the mechanism;
- inner race - a place that serves as a support for the shaft;
- balls or rollers are the main rolling elements that absorb all radial loads;
- separator - needed to maintain the same distance between balls or rollers.
Bearing device
These 4 elements provide the bearing with stable operation. The new ones have no play, but at the same time they should rotate smoothly, thanks to the balls. However, for smooth and silent operation, lubrication is required. Without it, the service life is reduced until the first overheating of the part, after which it must be replaced.
General qualities of various oil seals
The type of seal used by the manufacturer may vary. However, it will always be based on a special metal insert. It is necessary to ensure that the part retains its correct shape for a long time. It performs a reinforcing function.
IMPORTANT! Please note that during operation of the washing machine, the axle shaft on which the tank and drum are mounted constantly rotates. Since this element of the washer is in direct contact with the oil seal, it wears out very quickly. After all, the friction force is great.
It is clear that this process can be slowed down today. Lubrication reduces the coefficient of friction. After all, it provides sliding. At the same time, any lubricant moisturizes the oil seal. And that’s why it doesn’t dry out.
Typical causes of breakdowns
Depending on the settings, the brand of the unit and the functions performed, the washing machine drums make from 700 to 1800 revolutions per minute. Such an impressive load, and even with the application of rotational force, can easily damage contacting parts and weaken components and connections.
If shock absorbers had not been developed to dampen the vibration of the drum and the tank containing it during the spin period, the machine would have to be repaired after each washing “session”. Their purpose is no different from the functions of similar car devices.
Shock-absorbing devices of washing machines perform work equivalent to similar parts of cars. They are designed to dampen the vibrating movements of the tank during the spinning/washing process (+)
Shock absorbers, coupled with suspension springs, eliminate direct contact between the machine’s tank and its metal body, steel and plastic parts. In the form of original supports, they are located under the main rotating part of the equipment, which is fixed in the upper part of the unit by hanging springs.
During operation of the washing machine, the supports and springs are unstable, due to which the drum, rotating at breakneck speed, can slightly shift relative to its resting position.
Those. These devices, performing spring movements, provide the drum with the ability to make the required rotations according to its status, without transferring the load to adjacent parts and assemblies.
The tank of the washing unit is suspended from above using springs, from below it rests on shock absorbers or dampers, which prevent the transmission of vibration from the drum to the body of the machine
The structural components of the washing machine, protected from vibration by shock absorbers, last much longer and are less likely to fail. True, the shock-absorbing devices themselves gradually lose their original strength during the execution of the assigned task.
Worn-out devices may require repair or replacement at an extremely inopportune moment, for example, before an evening wash, the timing of which does not allow calling a technician urgently. Or we will have to wait quite a long time for his arrival. This is where you will need information about the specifics of restoring shock absorbers and their structure.
If there is an urgent need to repair shock absorbers, work on their repair or replacement can be done with your own hands
When does a part need to be replaced?
Provided that the washing machine is used correctly, the period of uninterrupted, high-quality operation of the bearings is calculated by the manufacturer for 6-10 years. However, exceeding the norm for loading laundry and improper installation of the washing machine significantly reduce the service life of the metal rings.
A signal that a bearing requires replacement is:
- Rumble and vibration during washing (most pronounced during the spin phase).
- Water leakage (leaks through a loose bearing and a worn oil seal and flows down the back wall of the drum).
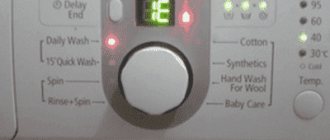
The latest generation Indesit washing machines are equipped with a self-diagnosis system. Understanding the error code (the decoding is most often indicated by the manufacturer in the instruction manual), it is not difficult to determine the cause of the malfunction and decide on how to eliminate it.
Lubrication requirements
- Oil seal lubricant must be moisture resistant. This is necessary so that it does not wash out with water over time.
- The lubricant should not be aggressive and “corrode” or soften the rubber. If you lubricate the oil seal with a lubricant that is not intended for this purpose, it can shorten its service life.
- Heat resistance - since when the washing machine is operating, there is constant friction between the shaft and the oil seal, as well as the operation of the bearings, and they heat up. Also, when washing in hot water, the lubricant is affected by temperature, so the lubricant should not lose its properties when the temperature changes.
- The consistency of the lubricant should be thick so that it does not leak out during long-term operation.
As you can see, oil seal lubricant must be taken seriously, since the “wrong” lubricant can ruin all your work on replacing bearings and hasten a new similar repair.
There is a category of washing machine owners who, instead of specialized compositions for caring for oil seal devices, prefer to use folk remedies, for example, vegetable oil or fats. This solution is certainly more economical, but it does not have the best effect on the condition of the mechanism.
- are moisture resistant, that is, they do not lose their properties when in constant contact with water;
- have a non-aggressive chemical composition that does not destroy the surface of the oil seal and metal shaft;
- resistant to temperature changes, do not disintegrate and do not lose their qualities when exposed to heat;
- have sufficient thickness and viscosity to not be washed off with water for a long time.
Oil seal lubricant is usually sold in stores that specialize in selling washing machines or spare parts for various types of household appliances. The price of this consumable may unpleasantly surprise you: this is due to the fact that this is a narrow-purpose product that is quite difficult to find on sale.
Sunflower or other household oil is not suitable here. The substance used to lubricate the sealing ring has special requirements.
- High moisture resistance. Otherwise it will quickly wash out.
- No aggression towards rubber - it should not corrode or soften. By choosing the wrong substance, you will shorten the life of the seal.
- Heat resistance. Due to the friction of the shaft and the operation of the bearing unit, the rubber heats up. Hot water should also not affect the properties of the sealing element.
- Sufficient thickness. Liquid consistency is not suitable - it will leak out after some time.
Why are seals needed?
As mentioned at the beginning of the article, seals are designed to provide a tight seal. They create a barrier that prevents the penetration of dust and contaminants from the external environment, and, conversely, prevents the leakage of various substances.
For the production of seals, elastomers are most often used - elastic and soft materials that can easily take the shape of mating surfaces.
Rubber seals must:
- Ensure tightness for a given service life
- Be resistant to working environments and external factors
- Provide ease of installation and dismantling
- Prevent corrosion of metal surfaces
- Reduce heating and friction losses in components of various equipment
During long-term storage or during operation, seals can be exposed to high loads and temperatures, various working fluids and substances, and negative environmental factors. All this leads to the aging of elastomers: they lose elasticity, swell or shrink, and lose their insulating properties.
If a non-separable bearing is installed
Is it possible to treat bearings with lubricant without removing their caps?
If there is a closed type element in the washing machine, you can lubricate it using a plastic bag:
- Pre-cleaning is carried out using WD-40.
- The inner ring is filled with a polyethylene bag.
- The neck of the tube containing the lubricant is cut off.
- After installing the tube on the inner ring, you need to squeeze out the contents until it appears on the other side.
- To evenly distribute the lubricant, you will need to rotate the bag.
- After removing the excess, the part is placed in its original place.
Sources
- https://mcgrp.ru/article/5747-sposobyi-smazki-podshipnika-v-stiralnoy-mashine
- https://tehnika.expert/dlya-chistoty-i-poryadka/stiralnaya-mashina/kak-smazat-podshipnik.html
- https://stroy-podskazka.ru/stiralnye-mashiny/smazka-dlya-salnikov/
- https://stiralnihremont.ru/zapchasti-aksessuary/kak-smazat-podshipnik-v-stiralnoy-mashine/
- https://cosmo-frost.ru/stiralnye-mashiny/remont-i-zamena/kak-smazat-podshipnik-v-stiralnoj-mashine/
- https://1stiralnaya.ru/uhod/smazat-podshipnik
What can replace lubricant with?
Sometimes it is not possible to find a special lubricant for oil seals. In this case, craftsmen replace it with similar oil-based products, for example, grease or lithol. Experts warn against using these products, as they contribute to rapid wear of the seals. Such lubricants are used in the automotive industry, but they cause more harm than good to household appliances. Therefore, it is better to spend time and money purchasing specialized products that have a lasting effect and are completely safe for washing machines.
Lubricant for washing machine oil seals increases the service life of bearings Very often, the need to replace or lubricate the oil seal arises due to frequent washing at high temperatures. If greasy oil stains appear on freshly washed laundry, you need to think about lubricating the part for further operation of the unit. It is possible that you will need to install a new oil seal or bearing in the washing machine.
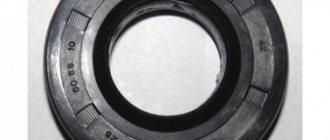
The oil seal is a small part in a washing machine that plays a very important role. It protects the moving parts of the washing machine from water that spins in the drum during washing. Thanks to the seal, water cannot enter the electronic parts from the tank. The oil seal is put on a special bushing and fits tightly to the outer part of the drum.
Oil seals are a sealing material, which is also called a rubber shaped seal.
Typically, the seal is made of durable rubber to perform the sealing function, and it also connects the fixed and moving parts of the automatic washing machine.
The oil seal, also known as the cuff, can be made of different rubber - silicone rubber, fluorine rubber or nitrile-butadiene material. This part is constantly subject to friction and very often its wear causes malfunction of the washing machine.
To extend the service life of the oil seal, you need to constantly lubricate it so that it does not dry out. When the rubber seal dries out, water can enter the bearing and cause serious damage.
It is quite difficult to understand that the oil seal is being rubbed. A washing machine sound specialist can determine this malfunction. It is better to replace the oil seal at a service center, but you can install it at the client’s home - in this case you will have to disassemble half of the unit.
The process of lubricating the bearings and oil seal of a washing machine pump is not difficult in itself. The difficulty is how to get to them. In order to replace or lubricate these parts, you need to see them.
The grease on the oil seal must not be washed away with water during operation.
Most often, before they fail, bearings begin to knock. In any case, a change in the sound of a running machine indicates that it would not hurt to check it, lubricate it, clean it, etc.
First you need to determine whether the oil seal and bearings need lubrication or whether they should be replaced. If bearings are replaced with original parts from the manufacturer's factory, for example, Indesit, this option is the most acceptable. But if the bearings are fake or not of very good quality, then it is better to lubricate them additionally, even if they are new. Cheap quality lubricant leads to rapid wear, so it is better not to skimp on it.
So, you've reached the right part. Lubricating the oil seal is as easy as shelling pears - you need to apply an even, thick layer of lubricant to the inner ring, where the oil seal comes into contact with the shaft. After lubrication, carefully put the oil seal back in place.
Please note that there is no need to push the lubricant anywhere else!
Before installing the bearing, it should be cleaned. To lubricate the bearing, you need to remove the protective cover from it with a scalpel or knife and fill the entire space with lubricant. If the bearing is non-separable, it is more difficult to lubricate it, but nevertheless possible. The goal is to create pressure and force the lubricant into narrow crevices.
After lubricating the bearing and oil seal, your task is to correctly reassemble the entire machine in reverse order.
Right choice
Before you get started, you need to find out what kind of lubricant to lubricate the bearings with. There are only a few types of lubricants that meet these requirements:
- They are moisture resistant. Since the CM shaft parts are constantly in contact with water, you need a water-repellent bearing lubricant. If water washes away the substance that makes the bearing slide without wear, it will soon wear off.
- They have heat-resistant properties. Hot water in the tank and heating of the shaft during rotation can deprive a cheap lubricant of its properties. Then water will get on the parts and corrosion will begin.
- They should not have an aggressive effect on the rubber. Otherwise, the seal may become stiff, which will lead to water leakage.
- Bearing grease should be thick. Otherwise, it will simply leak out during operation.
Many users are interested in whether it is possible to lubricate bearings with Litol and other automotive lubricants. It is not advisable to use such means. They provide poor protection, so soon you will have to repair the washer again.
Which remedy should you choose?
AMPLIFON is offered by Italian manufacturers MERLONI. This is a moisture-resistant lubricant that is not washed out by water.
Anderol is known for its convenient dosage of 100 grams in jars or syringes for two uses. The product is produced by the manufacturers of Indesit washing machines.
STABURAGS NBU 12 is a water-resistant bearing lubricant that will provide a high level of wear protection. Heat-resistant and resistant to aggressive environments (cleaning solutions).
LIQUI MOLY "Silicon-Fett". Silicone grease for washing machine bearings. It has a thick texture and heat resistance (withstands from -40°C to +200°C). Adheses well, providing a high lubricating effect.
Huskey Lube-O-Seal PTFE Grease. Sticky, homogeneous texture, cannot be washed off even with a water jet. Heat-resistant, withstands from -18°C to +117°C. High corrosion protection.
What is better to lubricate
Some people think that the oil seal is processed first, while the support bearing does not need to be lubricated. This is only true if you purchased the original part.
Note! When processing the oil seal and bearing, never mix lubricants, as they may not be compatible with each other.
Features of replacing drum bearings
If a breakdown is identified during diagnostics, measures must be taken to correct it. There are two possible solutions to the problem: you can take the washing machine to a workshop, you can remove the tank and replace it yourself. Do-it-yourself repairs are possible, but you must be aware that this is a difficult task that requires experience and perseverance.
In most models of modern washing machines, the tank is non-separable. It is made from durable synthetic materials, which guarantees durability, but makes it difficult to replace something as simple as a bearing. Owners of such washing machines need to be prepared for the fact that they will have to either buy the entire tank, which is not cheap, or carefully cut it, replace the bearings and glue it back together.
Particular attention should be paid to the selection of bearings. There is no need to save on them; it is better to overpay once for a quality part than to disassemble the washing machine again after a few months
The same requirements apply to adhesive compositions. The glue is selected based on the material of the tank, and the work is performed according to the manufacturer's instructions.
Drum bearing failure is a real problem, but it can be dealt with. To do this, you need to detect a malfunction in a timely manner, prevent it from developing into an accident, and take immediate action. Do not ignore the obvious signs of a washing machine breakdown; this can lead to serious consequences.
Summarize
Despite the fact that the work of repairing automatic machines is not easy and quite labor-intensive, if you have free time, it is better to do it yourself. This will save money, and it’s not for nothing that they said from time immemorial: “If you want to do it well, do it yourself.” But before you disassemble the bearing, you should soberly assess your strength. Remember that a normal technician will not assemble the unit you disassembled.
We hope that today's article was useful to the reader. If you have any questions while reading it, you can ask them in the comments below. The editors of electric-220.ru will be happy to answer them. If you have experience in producing such work, please share it with novice home craftsmen. Write, communicate, ask. And finally, according to the already established good tradition, we bring to your attention a short but quite informative video on today’s topic.
How to lubricate a bearing in a washing machine?
In order to lubricate the bearings of the washing machine, you need to prepare a set of materials and tools in advance:
— specialized lubricant for washing machines; - scalpel; — three-legged puller; — a set of wrenches; - a Phillips screwdriver.
Lubricating the bearings of a washing machine will require you to almost completely disassemble the device. You will even have to remove the tank and drum from it. In order for your goal to be achieved, you need to adhere to the following algorithm of actions:
— We dismantle the top and back covers of the washing machine body. Remove the drive belt from the drum pulley.
— Use a wrench to unscrew the drum fixing screw. Unscrew the fixing bar from the back of the case.
— We disconnect the drum pulley from the axle with a three-legged puller. Disconnect all the wires that you can see.
— We remove the counterweight. To do this, you will need to tighten the mounting screws. We disconnect the flange with bearings from the washing machine tank.
— With a screwdriver in hand, remove the oil seal. Use a scalpel to pry off the protective bearing cover. Let's take it off. Lubricate the bearings and oil seal with lubricants.
— We are assembling the washing machine. We repeat each action in reverse order.
IMPORTANT! Please note that when lubricating the oil seal, you must apply a protective substance from the very beginning. Apply a thin, even layer to the outer surface of the part. and then intensively treat the inside
and then intensively treat the inside.
Preventive measures that are aimed at preventing various breakdowns of washing machines include not only periodic lubrication of bearings. The washing machine also needs protection from scale, power surges, and mold.
Start by removing the panels
Remove the top cover by removing the screws from the back that hold it in place. Then push it forward and out of the way.
Remove all the screws around the perimeter of the back panel that hold it in place. Now move to the front of the case.
Pull out the detergent tray by pressing the lock in the center.
- Unscrew the bolts that are located behind the tray, as well as on the opposite side of the control panel.
- Release the plastic latches and remove the control panel. If you decide to unfasten all connections, take photographs of their locations in advance.
- Open the hatch door. Bend the cuff and remove the clamp. Place the sealing rubber inside the tank.
- Remove the two screws holding the hatch lock. Unfasten the wiring from the lock.
- Unscrew all screws holding the front panel.
Remove parts from top of tank
Remove the upper counterweight by unscrewing the mounting bolts.
Now you need to get the powder receptacle. Using pliers, loosen the clamp that secures the pipe to the cuvette. Disconnect the pipe. The filler valve hoses are also attached to the powder receiver. You can disconnect them, but it is easier to remove them together with the valve. For this:
- Unscrew the bolt on the back wall that holds the valve.
- Disconnect the wiring from the valve and remove it from the housing along with the cuvette.
Also unfasten the pressure switch hose that is attached to the tank.
Move to the front of the body
Remove the front tank counterweights by unscrewing the bolts.
If the heating element of your washing machine is located in front under the tank, disconnect its connectors. Then, using wire cutters, remove the wiring clamps and remove it from the tank. Unscrew the screw of the drain pipe clamp. Remove it from the tank.
Disassemble from behind
Remove the drive belt by pulling it to the side and turning the pulley.
If the heating element of the car is located at the rear, unfasten its wiring, as well as the engine connectors. Now unscrew the motor bolts and pull it out of the housing.
Unclench the plastic clip and unfasten the pressure chamber that is attached to the tank. Unscrew the shock absorber bolts. Lift the tank and remove it from the hooks, pulling it out of the housing.
Place the tank on a flat surface. Remove the sealing rubber of the hatch by removing the inner clamp. Turn the tank over and remove the pulley by unscrewing the central bolt. Pre-secure it with a wooden plank.
Separate the two parts of the tank by unscrewing the screws around the perimeter. Take out the drum. Now you get to the bearings. Now you will learn how to properly lubricate a bearing in a washing machine.