By “does not wash,” users of washing machines may mean completely different problems. Here are the main ones:
- the machine fills with water, but then the drum does not rotate;
- water enters the tank, then the washing machine drains the water and stops, perhaps an error appears on the display;
- SMA pours water and turns off.
Let's figure out the reasons for this strange behavior of the washing machine.
What to do if the washing machine does not wash after filling with water
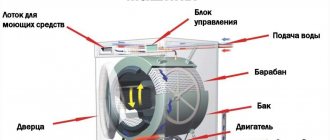
There are a huge number of washing machine models on the modern household appliances market.
They all differ in power, control, volume, color, etc. But each of them can be classified into one of two available categories: activator or drum.
Of course, there are many more drum models and their popularity is enviable because they are more economical and gentle. But their downside is that they are capricious and more often fail.
What are the likely breakdowns?
Frequent breakdowns include:
- water leakage from under the bottom;
- “freezing” of the machine;
- strong noise and vibration;
- water intake without drainage;
- The washing machine draws water, but does not wash.
Let's focus on the last point.
The machine draws water, but does not wash
The machine is turned on, the laundry is loaded, the washing program has started and even the water has already been filled, but bad luck... the washing process has ended and the machine does not wash. It's like she's frozen! The drum does not spin, the machine does not react to anything.
What happened? What could have happened:
- Drum stops completely.
- Damage to the heating element.
- The motor has failed.
- The bearings flew off.
- The belt came off.
- The control module is faulty.
Let's take a closer look at each reason.
Drum lock
This is a mechanical failure and if you remove the interfering object, the problem will be solved.
Heating element failure
This is probably strange, but yes, problems with the heating element affect the performance of the drum and a situation arises when the machine takes in water, but does not wash.
The engine does not receive a command from the sensor to start running. In turn, the sensor cannot record the desired heating temperature.
It turns out that the motor cannot turn on, and therefore the drum cannot either. To check and inspect the heating element, you will need to remove the back cover of the machine or the front, depending on the model.
The heating element is located at the bottom of the tank. To get it out, remove the wires and unscrew the nut in the middle of the heating element. If black spots are visible on it, most likely it has broken through and requires replacement.
If there are no visible faults, you will need diagnostics with a tester . If in good condition, the resistance should be from 20 to 40 Ohms, otherwise less than 20. The heating element must be installed back carefully.
Washing machine motor malfunction
Most often, only the brushes in the motor have to be replaced, and not the entire part. To change the brushes you will have to remove the engine, and all the sensors and belt from it. Armed with a screwdriver, remove the terminal on the brush. To remove the brush, a plate is inserted into the hole, bent and pulled out.
The same steps will help you get another brush. Insert the new brush into the brush holder, press it with a spring and secure it. All. Unless, of course, we are talking about an asynchronous motor, where brushes are not provided.
Such engines basically lose the capacity of the starting condensate and it does not have enough current to start; naturally, there can be no talk of speed.
In this case, replacing the capacitor will help. It is less common to have to rewind due to engine combustion. There are situations when the engine cannot start due to overheating and then the machine fills with water and does not wash. Usually the cause is running several washes in a row.
Bearing failure
The bearings are difficult to reach; they are located in the very center of the washing machine tub. Thanks to them, the drum rotates.
If the bearings have fallen apart, the machine will notify you with obvious creaking and noise during operation, and also knock.
Untimely replacement threatens more serious repairs, since a broken bearing can break the belt and damage the drum.
Drive belt doesn't work
The washing machine draws water, but does not wash - diagnostics can be safely started with the belt, unless of course the machine is not direct drive.
A common cause of belt problems is regular overload of equipment with laundry. Constant loads on the drum axis loosen it and wear out the belt, which can deform or even break the part.
It happens that the belt falls off while transporting equipment. You'll have to disassemble the washing machine and check your suspicions. The belt is installed behind the rear cover when loading frontally, and behind the side when loading vertically. If the belt is fine and just fell off the pulley, this is not a problem. Otherwise, you will need to replace the torn belt with a new one.
Putting on or replacing requires simple steps. Take it out of the car and check for any defects. To put it on, you first need to put it on the engine, then pull it up with one hand, and put it on the pulley with the other. To secure the belt, turn the pulley counterclockwise and place the belt on it.
Control module malfunction
You will need to diagnose and test the module on a special stand, because it is difficult to determine by eye what is burned on the board if there are no black marks on the parts and traces. Even if there is, you will need professional soldering of the board. The work is painstaking. Without experience and skills, there is a high chance of buying a new board and replacing it with an old one.
How to identify the problem yourself
There are simple and uncomplicated issues that you can identify and try to correct yourself. You yourself can:
If you have a tester, you can check the heating element (heating element) and the engine. If strong sparking is visually noticeable, the brushes will need to be replaced. When purchasing them, you need to consider the type of motor of your washing machine.- Emergency drain the water from the machine using a special valve or hose if the washing machine fills with water but does not wash.
- Visually inspect the tank and drum to identify foreign objects stuck between the parts. To do this, you will have to remove the side walls of the washing machine. If a disturbing object is found, you just need to remove it.
- You can check the drive belt yourself. If it just fell off, you need to put it back in place so that there is a reserve of 1 tooth. And if it is torn, then it is necessary to replace the part with a new one.
If you don’t know what happened to the machine or why it doesn’t work, then the smartest thing to do would be to contact a service center.
To prevent breakdowns of this kind, all you need to do is:
- do not overload the drum with laundry,
- install overcurrent protection,
- use a filter, because many people know what water is best to wash in and what consequences can result from neglecting this fact.
Calling a master: where to find and how much to pay?
If it is impossible to carry out diagnostics and repairs yourself, you must call a specialist. It is better to search for a company that repairs household appliances on the Internet.
The companies' websites have contact information and prices. You can read reviews about companies on the Internet. Firms that have been operating in the market for a long time are fighting for their reputation.
The cost of work depends on the company’s pricing policy and the complexity of the breakdown.
Average prices are:
changing the drive belt – from 900 rubles;- replacement of motor brushes – from 1,400 rubles;
- replacement of tachometer – from 2,100 rubles;
- engine replacement or repair – from 2,000 rubles;
- repair of the control unit – from 2,000 rubles;
- replacement of heating elements - from 1,400 rubles;
- repair of the pressure switch - from 1,600 rubles;
- replacement of a temperature sensor – from 1,300 rubles, etc.
It should be borne in mind that the cost of work does not include the price of new parts if replacement is required. If a new part that needs to be installed instead of a worn one is already in stock, this must be reported to the dispatcher accepting the order.
Contacting random repairmen whose phone numbers were found through an ad may result in poor-quality repairs. In addition, there is a chance of falling for scammers who will carry out the work negligently. After the repair work is carried out, the company representative gives a guarantee .
A lot of important and useful information about repairing Indesit washing machines is presented in this section.
The washing machine fills with water but does not wash
Every home has a washing machine that serves as a woman’s assistant when washing clothes. This device is quite complex and can sometimes fail for various reasons. If this happens, you don’t need to immediately run for a new one or call a repairman, because you can often fix the breakdown at home. There may be several problems due to which the machine has stopped functioning normally, so before doing anything, it is necessary to determine their source. We will look at why the washing machine fills with water but does not wash.
Causes of malfunction
Sometimes it happens that the washing machine takes in water, but does not fulfill its intended purpose. If this happens, then you should not panic right away. Often the problem can be solved without contacting a service center. Let's consider the reasons for this malfunction:
- The drive belt may fall off.
- Motor malfunction.
- The heater has burned out, therefore the water does not heat up and the wash does not start.
- The failure occurred in the control board. This happens quite rarely, but such a possibility cannot be ruled out.
See also -
Ariston washing machine error codes
Drum lock
First you need to check the drum - it may be mechanically blocked. Foreign objects stuck between the drum and the tank interfere with normal rotation. If this “interference” is removed, work will resume.
The heating element is broken
When you add water to the washing machine, the heating element starts working - thus, the water heats up. When the water heats up to the required temperature, the sensor that drives the motor is activated. If the water is not heated, the sensor will not start working. In this case, an error should appear on the screen indicating problems with the heating element. To check the heater, you need to open the back cover of the washing machine. Sometimes this element may be located at the front, in which case it is necessary to open the front panel.
The heating element is mainly installed in the lower section of the tank, to which various wires are connected; they need to be disconnected. To remove the heating element, you need to unscrew the central nut. The protruding bolt must be pushed inside. After this, use a flat screwdriver to pry off the housing of the heating element and, using loosening, pull it out of the tank.
Initially, you will need to clean the heater from accumulated scale. If during the inspection of the heating element there are dark spots on it, then there is a high probability that there is a breakdown. In this case, the heater must be replaced with a new one. If there are no stains, then you can check it with a tester. For this purpose, you need to switch the device for measuring resistance. If the heating element is working properly, then the resistance will be 20–40 Ohms, and sometimes 60 Ohms. If the resistance is less than 20 ohms, this indicates a malfunction of the heater.
Belt problems
Problems with the belt are typical for belt-driven washing machines. Therefore, if you have such an assistant, then it is better to start looking for a breakdown with this element, because this is one of the first reasons why the washing machine constantly takes in water and does not start washing.
Removing the wall is quite easy; to do this, you need to remove all the screws that hold it in place.
A belt that has come off must be carefully inspected. If abrasions or minor cracks were noticed on it, then it is likely that they were the reason that it flew off. In this case, replacement is necessary. You can put the belt back in the following way: put it on the motor pulley and rotate it counterclockwise until it is completely in place.
After replacing the faulty belt, you need to turn on the test washing mode to make sure your actions are correct and, as a result, the correct operation of the machine.
The control module has failed
Another cause of failure may be in the control module. Using an electronic board, the washing stages are switched, but due to a breakdown this does not happen. But this is quite rare. Note that if the electronic board has failed, then only a professional can help solve this problem, because the master will be able to tell whether it can be repaired or whether it will have to be replaced with a new one.
Faulty electric motor
Another reason for problems with washing may be a breakdown of the electric motor. Main faults:
- The brushes in the electric motor are worn out.
- The starting capacitor located in the asynchronous electric motor has failed.
Experts note that the engine may not turn on due to prolonged washing, for example, a series of loads lasting more than 1.5 hours. To change the brushes you need to:
- Unscrew the bolts and remove the engine.
- Disconnect the sensors and belt.
- Unscrew the terminal from the brush using a screwdriver.
- Unscrew the bolts and remove the carbon electrode or do this by releasing the spring. If the removed electrode is shorter than one and a half centimeters, it must be replaced.
- When removing the brush, it is necessary to note in which direction the ends of the coal are ground, because if they are placed with the opposite side, the motor may spark.
Very important: it is necessary to replace two brushes at once; it is not recommended to change one at a time. Next, you need to clean the commutator from scratches and coal dust: you need to use fine sandpaper, which you need to apply to the commutator and rotate the shaft. Rotations must be continued until the collector is cleaned.
After these manipulations, it is necessary to install the engine in place, connect all the elements and test the unit.
In the article, we looked at possible reasons why the washing machine fills with water, but does not wash. Now you know how to deal with these problems yourself.
Possible causes and solutions
| Probable Cause | Photo | How to check | How to fix |
| No flow or low pressure from the water supply | When you open the taps of the water supply system, water does not flow or flows weakly | Turn off the machine and wait for the problems in the plumbing system to be resolved | |
| Clogged inlet hose or inlet strainer | Disconnect the supply hose and filter, inspect them and blow them out | Clean the hose and filter from debris and rinse under running water. | |
| The side door is not closed tightly, the lock does not work | Check the tightness of the door, the condition of the locking mechanism and the fastening of the door hinges | Press the door firmly until the lock clicks. If necessary, clean the latching mechanism and tighten the hinges | |
| Damage to connecting wires or their insulation, oxidation of contacts | Inspect and test the internal electrical wiring with a tester for open circuits and short circuits. | Restore the integrity of electrical wires and their insulation, clean contacts | |
| The inlet (fill) valve does not work | Check the operation of the valve when 220V is applied to it. Inspect and test the valve windings, electrical wires and contacts with a tester | Restore the connecting wires, clean the contacts. Replace the faulty valve. | |
| The electric door lock is faulty | Test the blocker winding with a tester for open circuit and short circuit. Check the status of contacts | Clean contacts. Replace the faulty lock. | |
| The level sensor (pressure switch) is faulty | Check if the sensor receiving tube is clogged. Test the sensor and connecting wires with a tester for opens and short circuits. | Clear the sensor receiving tube of any accumulated debris. Replace faulty sensor. | |
| The software control module is faulty | The module does not receive control signals to trigger the machine components when they are working properly | Use a tester to check the receipt of control signals to individual nodes. Repair the module in a workshop or replace it with a working one. |
Most of these problems can be fixed on your own, but in some cases you cannot do without contacting a service workshop.
If you decide to carry out the repairs yourself, we offer the best range of spare parts for washing machines.
View all valves »
View all hatch locks »
View all pressure switches »
View all control modules »
Why does the washing machine not wash after filling with water?
A modern automatic washing machine is a complex, sometimes capricious technique. It happens that the washing machine takes in water, but stops and does not wash after starting the washing program. There may be several reasons:
- drum blocking;
- stopping due to a belt problem;
- the heating element—tubular electric heater—has burned out;
- the electric motor has failed;
- The control module burned out.
Drum lock
First of all, check the drum for mechanical blocking. Rotation may be interfered with by foreign objects stuck between the tank and the drum. After removing this item, the operation of the machine will be restored.
Stopping due to belt problem
Direct drive machines do not have a belt. Therefore, for such units the first point of troubleshooting is not relevant. For other machines, it is better to start searching for the reason why the drum does not rotate by checking the belt. If you have a machine with a vertical type of loading of laundry, the belt is located behind the side wall of the unit. In front-loading automatic washing machines (AWMs), it is located behind the rear wall of the housing.
Removing the wall should not be difficult, you just need to unscrew all the mounting screws holding this panel in place.
A belt that has fallen off must be carefully inspected. If there are abrasions or small tears on it, they could cause it to jump off. The defective element must be replaced with a new one. In order to put a working belt back on, first put it on the motor pulley. After this, put one side on the large drum pulley, and begin to rotate it counterclockwise until the rubber element is completely seated.
Burnt out heating element - tubular electric heater
When water fills in the washing machine, the heating elements are turned on for heating. When a certain water temperature is reached, a sensor is triggered and starts the engine. If the water did not heat up, the sensor did not start rotation. To get to the heating element, you will need to open the back panel of the AFM. On some models, the heater may be located at the front, so you need to remove the front panel.
The heating element is installed in the lower section of the tank. There are wires coming to it that need to be disconnected. In order not to confuse the position during assembly, they can be photographed.
To remove the heating element, unscrew the nut located in the center. Then you will need to deepen the protruding bolt inward by lightly tapping it. Taking a flat screwdriver, pry the heater body with it and, loosening it, pull it out of the tank.
Checking the heating element
First, the heater should be cleaned of scale. If, when examining the heating element, you see black spots on it, there is a high probability that a breakdown has occurred. This heater needs to be replaced with a new one. If there are no stains, it is advisable to “ring” it with a tester. To do this, switch the device to measuring resistance, and measure it between the two contacts of the heater.
With a working heating element, the resistance can be from 20 to 40 Ohms, and in some models 60 Ohms. If this indicator is less than 20 ohms, then the element is faulty.
Reinstalling the heating element
The principle of sealing between the tank and the heater is as follows: on the body of the heating element there is a sealing rubber gasket with a bolt in the center. When you screw the nut onto this bolt, the rubber seal expands, and due to this, it is tightly fixed in the tank.
Try to carefully insert it into its place, into the hole in the tank. If you position the element a little higher, the heater will catch on the rotating drum (after installation, rotate the drum to prevent contact).
The electric motor has failed
A malfunction of the electric motor can also cause things to not be washed. Common engine malfunctions include:
- wear of the brushes inside the electric. motor;
- The starting capacitor in the asynchronous electric motor does not work (asynchronous electric motors do not have brushes).
Note - the engine may not turn on due to overheating, which may be caused by long-term washing (several loads in a row for 1.5 hours).
To replace the brushes, do the following:
- Remove the engine by unscrewing a few bolts. Disconnect all sensors and belt.
- Using a screwdriver, disconnect the terminal from the brush.
- Next, you need to remove the carbon electrode from the engine by unscrewing the bolts or releasing the spring. If it is shorter than 1.5 cm, a replacement is needed. When removing the brush, pay attention to the coal, in which direction its end is ground. If you insert it backwards, the motor will spark.
- We take out the second brush and remember where the coal is ground (you can take a photo).
Note - the brushes must be suitable for this electric motor model. The engine model can be found out by reading the markings on its body. Coals should only be changed in pairs. You cannot replace one brush and leave the other half worn out.
Now the collector needs to be cleaned from coal dust and scratches. Take the finest sandpaper, preferably “zero”, apply it to the commutator and rotate the shaft. Continue rotating until the commutator surface is free of dirt and scratches. Place the carbon elements in place at the correct angle, and secure them with screws.
To complete the repair, install the engine in the ACM housing, connect all sensors and the belt. Close the back cover of the washing unit.
The control module burned out
If checking the above points confirms the absence of malfunctions, then there is a possibility of a breakdown of the control module. But this fact can rarely be the reason why the washing machine does not wash after starting the program and drawing water into the tank. A broken electronic board is a problem that only a professional technician can solve. Only a specialist can determine whether it makes sense to repair it or whether replacement is needed. Even if you are knowledgeable about electronics, it is not recommended to start fixing them yourself. Such “repairs” can cause even more problems.
As a result, if an ASM breakdown takes you by surprise, then in most cases you can do without calling a repairman. You can easily deal with the problems described above on your own and save money.
Inlet valve failure
If the inlet valve in the washing machine has stopped functioning correctly, this may also be the reason why the device constantly fills with cold water. If the valve has lost its technical characteristics, then water will continuously flow into the washing machine
In this case, it doesn’t even matter whether the machine is on or off
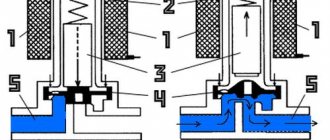
The fill valve is needed to allow a certain amount of water to enter the machine. When the machine is connected to the network and the program is started, a magnetic field appears, which helps tighten the rod and open the membrane. Then the water penetrates into the hopper of the powder dispenser, and then into the tank of the machine. When the required amount of liquid is collected, no electricity is supplied to the coil and the water stops flowing.
Water inlet valve location
If the inlet valve of the washing machine breaks down, water constantly fills into the tank. This problem can be resolved as follows. If the machine is equipped with a horizontal loading type, you should remove the top cover, under which the valve is located. For a machine with a vertical loading type, it is located at the bottom, so you will have to remove the side panel.
It is not difficult to dismantle the old valve and install a new one; the main thing is to select a part that is identical to the one being replaced when purchasing. After removing the cover behind which the valve is located, you should disconnect the wires and hoses attached to the clamps from it. Some manufacturers attach hoses to disposable clamps, so when purchasing an inlet valve, it is better to immediately purchase clamps. Next, unscrew the valve itself or bend the latches, after which it is turned and removed. Installation is carried out in strictly reverse order.
The washing machine constantly fills with water
During operation, the machine can draw water at least twice - during washing and during rinsing. Depending on the washing program, the number of such cycles may increase. You should be concerned if the machine begins to fill with water uncontrollably - this is considered one of the most dangerous breakdowns . In the best case, the machine will constantly drain the collected water; if the drain is clogged, this can lead to failure of the electronics or flooding of the neighbors. In addition to the huge water consumption, in such a situation many parts of the washing machine suffer, which are subject to an excessive load. The heating element, which is forced to constantly heat the incoming water, especially suffers in this situation. You cannot use a machine that constantly fills with water , as this can lead to rapid breakdown of the remaining components of the machine. If you need washing machine repair in Saratov, contact our company. The company’s specialists will complete it as quickly and efficiently as possible.
If such a malfunction is detected, first of all you need to disconnect the washing machine from the network. The remaining water in the tank can be removed using a hose designed for emergency drainage. It is also advisable to turn off the tap that leads from the water supply to the washing machine before diagnosing.
One of the most common reasons that the machine constantly fills with water may be the siphon effect. As a result of operation, a rarefied pressure may be created in the sewer pipe, which is sufficient to periodically pump water out of the washing machine tank. A special low-power valve (anti-siphon), which is attached to the drain hose, will help solve the sewage problem.
Other reasons why the machine constantly fills with water:
Incorrect connection
If the machine was installed relatively recently, it is quite possible that the cause of the water overflow is its incorrect connection. So, if the drain hose is located lower than the washing machine tank, water can drain uncontrollably into the sewer. In such a situation, the water level sensor will signal the need to add liquid. Due to the constant flow of water into the sewer, its flow into the tank simply cannot stop.
A connection in which the drain hose is fixed at a height of about 60 centimeters from the floor level is considered normal. It is usually connected to a sewer pipe or siphon.
If it is impossible to check at what level the hose is located due to a protrusion on the wall, a cabinet or other reasons, you can conduct a small experiment. To do this, you need to start the machine in the usual mode and wait until the tank is filled with water. The next step is to activate the drain, after 5-7 seconds - pause. Now you need to monitor the water level in the car for a few minutes. So, if the drainage stops when the pause button is activated, it means that the machine is connected correctly and the reason for the constant unauthorized intake of water is a malfunction of some other component. An incorrect connection will be indicated by continued drainage, which will be accompanied by a characteristic murmur in the pipes. After discovering the cause of the malfunction, you should reconnect the machine, following the instructions. No special skills are required to perform this washing machine repair.
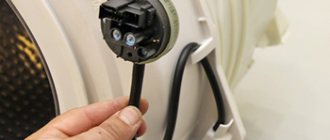
Breakdown of the pressure switch
If the washing machine worked properly for a long time, and suddenly began to constantly fill with water, then the reason lies in the breakdown of one of the components of the device.
Control over the amount of water entering the tank is carried out by a special sensor - a pressure switch. Once the amount of water in the tank reaches a certain level, the sensor is triggered and the washing machine stops drawing water.
The most common reason for non-stop water supply may be a breakdown of the pressure switch. The sensor may become unusable due to oxidation or short circuit of contacts, or loss of membrane tightness.
Tube going to the pressure switch
A faulty sensor can be repaired or replaced with a new one. If cracks are found in the tube leading to the pressure switch, normal operation of the part can be restored by sealing the damage.
If it is necessary to replace the sensor, when choosing a new part, you should base it on the data printed on the old pressure switch. The sensors are marked with a contact and group number - it is with the help of this information that you can select a new pressure switch.
When the pressure switch is working properly, its malfunction can be caused by the formation of a blockage in the pressure tube of this sensor (this can be small debris, sediment or scale). The performance of the water level sensor may also be affected by a malfunction of the hose or pressure switch valve, which can also become clogged.
If the pressure switch tube is clogged, you can clean it simply by removing it from the mount and thoroughly blowing it out.
In order to get to the pressure switch, you need to remove the back wall of the washing machine. In most devices it is located in the upper left section of the case and is a noticeable part against the background of other spare parts. Before removing it, it is advisable to check its contacts for functionality. Cleaning the oxidized contacts can revive the water level sensor. If this does not help, the part needs to be replaced. To remove the pressure switch, you need to disconnect the tube connecting the pressure switch and the compression chamber. The next step is to disconnect the terminals and unscrew the screws. After this, the sensor is easily removed and a new serviceable part is installed in the reverse order.
Damage to the inlet (fill) valve
When diagnostics show that the pressure switch and associated parts are working properly, the cause of the uncontrolled drainage of water may lie in a malfunction of the inlet valve. Due to prolonged use, the valve's membrane may weaken, which leads to liquid leakage even when it is closed. Also, the valve may fail and not shut off the water at all. In this case, a situation similar to an incorrectly connected machine is repeated - the water from the tank is constantly decreasing, as a result of which the pressure switch gives constant signals about the need to fill the tank and the circle is closed.
Another sign of incorrect operation of the inlet valve is the situation when, even when turned off, the machine continues to draw water.
To eliminate the malfunction, the inlet valve must be replaced. Most front-loading washing machines have the inlet valve located at the rear of the unit near the top lid. You can access the part by removing the top cover. For machines with a vertical loading type, the valve should be looked for in the basement area - in the lower part of the rear wall. By separating the side wall you can gain access to the valve.
To replace this part, turn off the water and disconnect the inlet hose from the washing machine. The next step is to separate the wires leading to the valve and the hoses from its fittings. If possible, you can replace the disposable clamps installed there with worm clamps. After this, you need to unscrew the fastening screws with which the valve is fixed to the body of the washing machine. Some machine models provide for fastening the valve using a latch. You can remove the valve by retracting the latch tab and turning the valve body to the desired position. After this, the part can be removed without any hindrance. Install the new part in the reverse order.
Failure of the electronic module
If all of the above parts of the unit are working properly, most likely the electronic module - the device that is responsible for controlling all components of the washing machine - has broken down. If it breaks down, it can send incorrect signals to the water level sensor, which lead to unauthorized water intake . There are many factors contributing to module failure - high humidity in the room, power surge, etc.
To repair the washing machine module, you should contact a professional - doing it yourself is problematic.
When you can fix the situation yourself
To begin with, it’s worth discarding all standard situations when there is no breakdown, and the machine has stopped precisely because this is what its “iron brain” provided:
- Overloading of the washing machine: if the machine stops at the very beginning of the wash and is equipped with an intelligent weight sensor, it may be due to too much weight. Check if you have put too many things in the drum?
- Mode without draining and spinning: if the stop occurred during rinsing, check the program selection: maybe you chose a mode with a stop with water? Such modes exist for delicate, easily wrinkled items. If so, turn on the drain forcibly.
- Unbalanced laundry: if the machine freezes at the beginning of the spin cycle, check to see if the laundry has gathered in one lump? Often, when there is a large imbalance of laundry, the machine stops, refusing to spin, in order to avoid excessive vibration. In this case, simply place the items in the drum manually.
If your case is none of the above, then most likely some kind of breakdown has occurred. Be sure to pay attention to what stage of the cycle the freeze occurs: this will greatly help narrow down the range of possible problems.
Washing program failure
Your washing machine turns on but does not start the wash, washes for a long time, draws water but does not wash, freezes during the wash - there can be a great many reasons for the washing program not working correctly, and most of them mean a serious breakdown. Next we will talk about the most common problems.
A failure in the washing program can manifest itself in different ways: from a relatively harmless skipping of a spin cycle to a switch to modes that lead to damage to the laundry. In any case, if the machine does not wash as you told it to, this is a reason to urgently look into the problem.
First, try rebooting the control unit by pressing the power button and holding it in this position for several seconds. After a few minutes, try starting the wash again. If the machine does not respond to button presses, unplug the power cable from the socket and wait 10-15 minutes: sometimes with one-time failures of the control board, such a reboot helps.
If your model has a test mode or self-diagnosis, try to find out the error code using it before contacting the workshop. Also try to “drive” the machine in different washing modes: perhaps you missed something.
Most often our clients are concerned about the following problems:
- The washing machine turns on but does not start washing
- The washing machine turns on and then turns off immediately
- The washing machine washes for longer than the specified time
Initial diagnosis
First, conduct an initial diagnosis on your own: often the causes of the problem are ridiculously trivial.
The washing machine may not turn on at all, for example, due to problems with the electrical wiring: possible reasons are described on the page “Indesit washing machine does not turn on”.
Just in case, make sure that the water supply tap is open: it also happens: maybe you temporarily closed it to perform some operation, but forgot to open it.
The machine may not wash due to problems with the drain: check if the drain filter is too clogged, make sure that the hoses are not pinched or cracked anywhere, find out if there are any problems with the drain in your house.
Modern washing machines are often equipped with numerous control functions that can block washing: more details in the next section.
Violation of operating rules
Modern washing machines are equipped with numerous functions that control every “sneeze” of the washing process: this, of course, is not so bad, but the more complex the equipment, the more often it breaks down. But even if everything is in order, you can somehow cause dissatisfaction with overly vigilant electronics. And no one has canceled simple forgetfulness.
Make sure the hatch door is closed tightly. If the machine has an electronic display, make sure the corresponding light is illuminated.
Check what program you currently have installed: maybe the previous one has already been completed, and you simply have not installed a new washing program. You may have selected the wrong wash mode, causing the machine to stop at some point in the program. Please read the instructions carefully again.
If the machine starts to wash, but suddenly stops, it is possible that the laundry weight limit sensor is triggered (if there is one, of course). Usually, in this case, a corresponding warning lights up on the electronic display, and you only have to unload the machine a little.
It often happens that during washing, laundry gets bunched up into a large lump in one part of the drum, which can lead to strong vibration: the washing machine with the corresponding control function simply stops and does not start spinning. Open the machine, and if this is the case, redistribute the laundry manually and run the laundry separately.
The protection may be triggered if water gets into the pan or if there are any other leaks.
No water supplied
Without water supply, the wash will not start: if the program started, you heard a slight hissing and crackling sound, after which the machine froze - it means it could not draw water and stopped the program. The reasons can be very different.
First, make sure the water supply tap is open. Then check the condition of the hoses: they should not be pinched anywhere and there should be no cracks or other visible damage. It is possible that your apartment has low water pressure: in this case, either the wash will take a very long time, or the program will not start at all.
The inlet valve could be broken, causing water to flow into the drum too slowly or not at all. The valve will have to be replaced. If your washing machine has a fill filter, over time it can become clogged and slow down the water flow: take it out, check it, and clean it if necessary.
Sometimes the water level sensor fails, which confuses the machine's electronic control system.
Problems with draining water
If the washing program freezes during the rinse or spin phase, there is a high probability that the reason is poor water drainage. The most obvious and simple solution is to clean the drain filter in the washing machine, which naturally becomes clogged with all sorts of debris over time. The drain hose and pipes inside the machine also become clogged - they also need to be cleaned: however, this operation is much more complicated than cleaning the drain filter. Just in case, also check the drain hose to ensure that it is not pinched anywhere and does not have cracks or other mechanical damage. After cleaning everything that is possible in the washing machine itself, check if there is a blockage in the drain: in this case, problems with drainage will be observed not only in the washing machine, but also in the bathroom, sink, and toilet.
If you notice that the washing machine takes in water and immediately drains it, the reason is most likely due to the incorrect connection of the washing machine to the sewer. If the drain hose is not raised to the correct level or a siphon is not installed, water may drain from the machine by gravity. To prevent this from happening, it is strongly recommended to use a siphon, and if this is not possible, raise the connection point of the drain hose to the sewer at least half a meter from the floor.
The water level sensor (pressure switch) may break, which misleads the electronics of the machine: the control unit will not know that there is enough water in the drum, it will continue to accumulate indefinitely, and its excess will be drained.
The most unpleasant thing that can happen is a breakdown of the drain pump, which usually happens because it is clogged. The pump needs to be cleaned or replaced. In any case, this is a job for a qualified specialist.
Sources: https://tehrevizor.ru/remont/78-krupnaja-bytovaja-tehnika/stiralnaja-mashina-nabiraet-vodu-no-ne-stiraet.html https://tehnika.expert/dlya-chistoty-i-poryadka /stiralnaya-mashina/nabiraet-vody-no-ne-stiraet.html https://profservice64.ru/docs/stiralnaya_mashina_postoyanno_zalivaet_vodu.html https://bistriyservice.ru/neispravnosti/stiralnykh-mashin/sboi-v-programme https: //tehrevizor.ru/kak-vybrat/krupnaja-bytovaja-tehnika/plyusy-i-minusy-nastennoj-stiralnoj-mashiny.html
Characteristics of the causes of liquid accumulation inside the washer
One of the reasons when water is drawn into the washing machine tank when it is turned off may be that it is connected incorrectly. We are not talking here about connecting directly to the water supply network, since the design of the device is such that it is simply impossible to install a flexible hose incorrectly due to the absence of any additional connectors and inputs.
There is only one hose responsible for supplying clean water to the machine, and it can only be fixed in one way. Based on this, it follows that the problem is not in the supply of cold water, but in its removal. Incorrect connection to the sewer often becomes the very factor responsible for the appearance of liquid inside the washing machine after its use. This is due to the fact that the outlet hose is incorrectly connected to the sewer hole, as a result of which water from the drain pipes penetrates into the washing machine.
This nature of the problem is very easy to determine, since the liquid filling the tank is dirty in color and emits a sickening stench. Solving such a problem is very simple: you just need to adjust the outlet tube and position it in such a way as to eliminate the flow of liquid, preventing it from penetrating inside the washing machine.
Most likely, water leakage in the washing machine may be caused by damage to the following elements responsible for collecting and controlling the liquid level inside the tank:
- inlet valve;
- pressure switch
A malfunctioning inlet valve is one of the most common problems that can arise when operating an automatic washing machine. It occurs as a result of functional wear of parts due to prolonged use of the device or poor quality of liquid in the plumbing system. All factors lead to a violation of the valve’s tightness and create the preconditions for its incorrect operation. The result of such violations of functionality is the inability of the device to perform its direct duties and the formation of leaks that continuously fill the tank of the washing machine. This type of failure only requires a complete replacement of the inlet valve, which must be carried out immediately.
Malfunctions of the pressure switch form the next reason for the accumulation of liquid inside the washing machine. Its purpose is to control the level of water entering the drum. It consists of using a special pressure sensor, which takes readings of how full the system is and regulates the level of liquid supply. Its wear or loss of integrity leads to the fact that it fails and cannot perform its functions. Replacing the device can solve this problem and guarantee full operation of the washing machine.
How to determine the nature of the malfunction
Almost all washing units with horizontal and vertical loading are equipped with a self-diagnosis function. And if the AFM is equipped with a display, this is especially convenient for users and technicians who repair this equipment. Fault codes are displayed on the dashboard; you just need to know their meaning. This saves time and money spent on repairs.
Many Indesit washing machine models - such as IWSB 5085, WISL 82, WISL 83, WISL 85, WISL 103, WISL 105, WITL 86 and WITL 106 - do not have a display. The nature of the breakdown in such units can be determined by a combination of glowing indicators, and the methods for deciphering them differ depending on the type of control panel. The previously listed models, as well as machines of the WIL, WIUL, WIDL series, belong to the AVL line of the EVO-II generation.
The same generation includes the Low-End line (for example, models WUIN 81 and WISE 10), in which indicators and control buttons are located differently.
Washing machines made on the Arcadia platform (for example, models IWSB 5085, IWSB 5105) have their own fault indication.
All photographs contain values for indicators 1, 2, 4, 8 and 16. Depending on which of them are blinking, error codes are generated. For example, in the Indesit WISL 102 washing machine, a malfunction corresponding to code F03 will be indicated by two flashing indicators on the right. If you add their values (1 + 2), you get a total of 3.
In AFMs manufactured on the EVO-I platform (for example, models W84TX and W105TX), the error code can be determined by counting the number of blinks of the network indicator. At the same time, the program selection knob rotates, indicating a breakdown.
Next, we will consider the main malfunctions of Indesit washing machines.
Errors related to the ECU board
The memory chips located on the control unit board contain all service algorithms and washing programs. If a failure occurs, the memory must be removed from the ECU (unsoldered or removed from the microcircuit connectors) and reprogrammed with a special device - a programmer.
If the connection between the display module and the ECU board is broken, this malfunction of the Indesit washing machine manifests itself in the lack of response to buttons and the inability to execute programs. If after disconnecting from the 220 V network and rebooting the ACM nothing has changed, check the condition of the connectors and the reliability of the switching connections. The most likely fault is in the display module board or ECU.
Prevention
Do not wash things too often at 95-100 degrees. Do not add excessive amounts of powder and descaling agent. High temperatures and concentrated chemicals age the cuff rubber and contribute to faster wear of the tank, drum and boiler.
If you have a pumping station on a well in your country house or country house (or a pressure switch with a powerful pump), do not create a pressure in the water supply of more than 1.5 atmospheres. A pressure of 3 or more atmospheres squeezes out the membranes (or flaps) in the suction valve, contributing to its accelerated wear.
Make sure that the intake and suction pipes are not kinked or crushed and that water flows through them freely.
If you have excessively contaminated water, use mechanical and magnetic filters at the same time, they will protect the SMA from unnecessary damage. Check the strainer in the suction valve device from time to time.
Do not overload the machine with excess laundry. If it can withstand up to 7 kg (according to the instructions), use 5-6. An overloaded drum moves jerkily and swings to the sides, which leads to its breakdown.
Do not load carpets and rugs, heavy capes, or blankets into the SMA. They are more suitable for hand washing.
Don't turn your washing machine into a dry cleaning station. Some solvents, such as 646, which liquefy plastic, can damage hoses, cuffs, flaps and valve connections.
The machine can only be serviced when it is switched off.
The following video will help you understand the causes of the breakdown.
The control module has failed
Another cause of failure may be in the control module. Using an electronic board, the washing stages are switched, but due to a breakdown this does not happen. But this is quite rare. Note that if the electronic board has failed, then only a professional can help solve this problem, because the master will be able to tell whether it can be repaired or whether it will have to be replaced with a new one.
What else can cause the wash cycle to take longer?
The above factors are the most frequently encountered problems during equipment operation. But that’s not all. Also, the reasons that the washing machine does not wash or takes a long time to wash may be not only damage to the elements of the machine itself, but also improper operation of the power supply networks.
For example:
- Weak pressure. Such interruptions occur both in centralized systems and in individual ones. In the first case, call the housing office, in the second, check that the pumps are working properly.
- Damage to wiring. This causes interruptions in the power supply, due to which the consumption of the machine is reduced significantly and it works longer. Find the damaged area and repair the defect.
Changing the drive belt
If the washing machine has a direct drive, then we eliminate this malfunction immediately, since such a machine does not have a drive belt. Otherwise, it is best to start diagnosing the washing machine with the belt. This is one of the most common reasons why the machine fills with water, but the wash does not start.
What can happen to the belt? It may fly off due to improper transportation or installation, or wear out from long-term use, which requires its replacement. In all washing machines with a belt drive and front loading of laundry, the belt is located behind the rear cover of the housing . On top-loading machines, the belt is located behind the side cover. There shouldn't be any problems removing the cover; you just need to unscrew all the bolts holding the cover in place.
If the belt has come off, it must be pulled out of the housing and carefully inspected for any defects; if any are found, it must be replaced with a new one. To put on a working belt, you need:
- first put it on the engine.
- With your left hand, pull the belt up, and with your right hand begin to put it on the pulley;
- then carefully turning the pulley counterclockwise, we put on the belt completely.
After replacing the faulty belt, run a test wash cycle and make sure that the machine performs the wash cycle as expected.
Checking the heating element and the engine of the machine
The second reason why a washing machine may stop washing is a malfunction in the electric motor, or rather wear of the brushes inside it. But the motor in a washing machine can be asynchronous, that is, without brushes. In this case, the starting capacitor fails.
For your information! The engine may not start if it overheats, for example, after 2-3 hour-and-a-half washes in a row. In this case, you just need to leave the car for a while and let the engine cool.
To replace the brushes in the motor, the motor must be removed. It is usually secured with a couple of bolts. In addition, you need to remove the existing sensors and belt from the engine. Now we take the motor and use a screwdriver to remove the terminal from the brush.
Now we insert a small plate into the slot, bend it and pull it out. The second brush is removed in the same way.
Next, insert a new brush into the brush holder, compress the brush spring and secure this spring with a plate. We put a terminal on the plate. We install the second brush in the same way. We assemble the washing machine.
In some models of washing machines, after the machine fills with water, the wash may not start due to a broken heating element. In this case, there is no heating of the water, and the temperature sensor does not send a signal to continue the washing process. But at the same time, an error code regarding the breakdown of the heating element must appear on the display. You will need to check the performance of the heating element and, if necessary, replace it with a new one.
Control board problem
If checking the engine, heating element, and drive belt does not reveal the reason that the machine draws water and does not start washing, then there is a high probability of failure of the electrics or control module. Electrical testing is a painstaking job involving inspection of all terminals and wires. Perhaps some wire has burned out or a terminal has oxidized; by cleaning it, you can restore the operation of the machine.
It's a completely different matter if there is a fault in the electronic board. It is through it that the washing stages are switched, in particular, when the machine takes in water and the water reaches a certain level, a signal is sent to the module from the pressure switch, then a signal should go from the module to the engine, but due to a malfunction this does not happen.
If the control board is broken, it is better to contact a professional who can determine whether the board can be repaired or replaced completely. If you are good with electronics, you can try to test the board yourself. But we would not recommend taking risks - why? Because this could lead to even bigger problems.
Some users note that if the machine fills with water but does not start washing, the reason may be a clogged drain filter or hose. And after cleaning the drain system, the machine begins to work as expected. In our opinion, users in this case do not explain all the “symptoms” of the washing machine, or describe them incorrectly, meaning by the phrase “does not erase” the symptom “does not drain”, “the program freezes”, etc.
It is very important for an accurate “diagnosis” to correctly describe the symptoms when a washing machine breaks down.
So, we note that the washing machine may not start washing after filling with water for several reasons. Most of these reasons are fairly easy to determine on your own and then fix the problem. There would be desire and patience, and everything else would follow. Happy renovation!
Problem #2 - clogged pump filter or drain hose
Such a malfunction will result in a smaller passage inside the drain hose for water supply and drainage. This is why the washing machine takes a long time to wash.
Important! This problem most often appears when the system is not used correctly. For example, if you do not check the contents of your pockets or do not use special laundry bags. Then coins, hair, debris, small buttons, hooks and other objects get into the drain hose or filter and clog the flow.
Solution
Unscrew the hose and get to the filter, clean it and continue to carefully sort and prepare things for wet cleaning, then the problem will no longer arise.
Important! The pipes inside the unit may also become clogged. Solving this problem also requires cleaning them.
Recommendations:
- When installing the device, do not forget about the laws of physics - if the height of the drain hose is less than 0.5 m, water will accumulate and drain immediately.
- For hard water, use special softeners or install a magnetic converter.
- To prevent the device from being damaged by voltage surges, install a protective relay.
- After the wash cycle, do not use the appliance immediately, let it rest and cool down.
- To avoid damage, clean the device filter once every two months.
- Once every six months you can carry out preventive descaling. To do this, you should use only certified products suitable for your machine model.
- Use detergents designed for automatic washing.
Incorrect information from the water level sensor
This device has another name - pressure switch. It measures the pressure level in the tank when water enters it or when it is absent. When a certain liquid level is reached, the pressure switch is activated and closes the inlet solenoid valve. If there is a malfunction, the sensor may simultaneously send signals that the tank is full and at the same time empty.
The cause of the problem is the sticking of one of the contact groups that informs about an empty or full tank. The problem may also be hidden in the control unit and wiring contacts. If these components are working properly, you will have to replace the water level sensor.
Diagnostics
The electronics of any washing machine released in the 2010s have software self-diagnosis modes. Most often, an error code appears on the display. The meaning of each code is deciphered in the instructions for a specific model. The generalized meaning is “Problems with filling the tank.” More specific ones are “The intake/exhaust valve is not working”, “There is no required water level”, “Exceeding the maximum permissible level”, “High pressure in the tank” and several other values. A specific malfunction according to the codes makes the repair less time-consuming.
Activator machines, unlike SMA (automatic), do not have software self-diagnosis. You can guess what is happening by observing the operation of the SMA from several minutes to an hour, which is fraught with unnecessary costs for water and consumed kilowatts.
Only after preliminary diagnostics can the unit be disassembled.
This is interesting: A bra wire got into the washing machine - what to do and how to get it out? Expert advice
Incorrect connection
If the machine constantly takes in water and then drains, the reason for the incorrect operation is the incorrect installation of the connecting hose. The flexible hose for pumping out liquid should not touch the floor; the farthest bending point is located at a height of 500-600 mm from the floor covering. To hold the hose, standard plastic clamps are used on the back wall of the case; if the bracket is broken, then it is necessary to install a loop (for example, from a plastic clamp for electrical wiring).
To check the correct operation of the drain you need to:
- Start the work cycle without loading laundry.
- Wait until the tank is filled with water.
- Activate liquid drain mode.
- Stop pumping water by pausing.
- Visually check the change in fluid level through the glass hatch. If water continues to flow out, then additional adjustments to the position of the drain hose are necessary. If the liquid level does not drop, then you should continue to search for the reason for the constant operation of the pump. The technique is not used on top-loading machines due to the lack of a glass hatch.
Malfunctions of SMs equipped with a drying function
If code F13 appears on the display, this means that there is no signal from the drying temperature sensor. During diagnostics, an open or short circuit in the sensor circuit is detected. A working temperature meter should have a resistance within 40 kOhm. Causes: sensor malfunction or contact failure in the connecting circuit.
If there is a break in the circuit of the heating element intended for drying clothes, the reasons for the breakdown are the same - failure of the heater or failure of contact in the connecting circuit. A malfunction of the relay that turns on the heating element for drying may occur. The heater does not turn off, which indicates either a stuck relay or a broken contact in the connecting cable.
Repair
First, disassemble the washing machine.
- Disconnect the SMA from the power supply.
- Turn off the water supply at the supply valve. Temporarily remove the inlet and drain hoses.
- Remove the back wall of the case.
The suction valve is located at the top of the rear wall.
- Unscrew the existing bolts. Use a screwdriver to pry out the latches (if any).
- Slide and remove the faulty valve.
- Check the valve coils using a tester set to ohmmeter mode. The norm is no less than 20 and no more than 200 Ohms. Low resistance indicates a short circuit, too high - a break in the enamel wire that is wrapped around each of the coils. The coils are completely identical.
- If the valve is OK, install it in reverse order. A faulty valve is almost beyond repair.
You can change one of the coils if you have a spare one, or rewind it with the same wire. The compartment itself, in which the coil is located, can be partially collapsible. In other cases, the valve is changed. You will not be able to change the flaps and return springs yourself; they are not sold separately. Ring the drain valve in the same way.
The washing machine tank is checked for integrity by the trace of a water stream or by drops seeping into the hole formed. It is easy to notice - it is the largest structure, up to several times larger than the motor. A small hole can be soldered (or welded using a spot welder). In case of significant and multiple damage, the tank is definitely replaced.
There are permanent tanks welded to the internal frame holding it.
If you are not a mechanic, it is better not to remove such a tank yourself, but to contact a specialist.
The cuff, unlike the vast majority of other parts and assemblies, is changed without completely disassembling the MCA. Open the hatch of the washing compartment, unload the laundry (if there is any).
- Unscrew the screws and remove the plastic frame holding the cuff.
- Remove the wire or plastic loop that runs along the perimeter of the hatch - it holds the cuff, gives it shape, and prevents it from falling out when opening/closing the hatch.
- Pry the latches inside (if there are any) and pull out the worn cuff.
- Fix exactly the same new one in its place.
- Put the hatch back together. Check that water is not leaking out by running a new wash cycle.
Some washing machine models require removal of the hatch door and/or the front (front) part of the machine body, including the detergent tray. If the cuff is not the problem, the door lock may be worn out: it does not latch or does not keep the hatch tightly closed. The lock will need to be disassembled and the latch replaced.