No man can understand women's experiences due to a ruined manicure. But we are upset not only because of the lost beauty, but also because of the time and money spent on its creation. In addition, a cracked fingernail clings to various surfaces, threatening to tear off to the meat and cause bleeding, and this is an injury and pain that one would really like to avoid. There is not always enough time and money to visit the salon, and we begin to think about the question of whether it is possible to fix the nail ourselves.
It is important to understand that the measures to restore your real nail and the extensions are different, therefore, based on the situation, do not waste precious time reading and viewing material that is not suitable for you.
So, there are two options: the natural nail is cracked or the extended nail is broken.
How to fix a natural nail
The first thing to do is remove the varnish from the damaged finger . It is not at all necessary to redo the manicure on your entire hand if it was recently done and is still aesthetically attractive. Craftsmen have long come up with a way to fix a nail at home alone, when all the others are left long, without redoing the manicure on the entire hand, having tools and gel polish on hand.
Removal of gel polish is carried out with special devices and chemicals. You can do this either independently or by seeking professional help from a specialist.
If you decide to do without visiting the salon, then to remove the old gel you will need:
- file;
- fat cream;
- cotton pads;
- orange stick;
- alcohol or acetone-containing liquid;
- foil or a material replacing it.
So, having collected all the necessary tools, let's get started.
- File off the top layer of the coating and file the top of the nail , lubricate the finger up to the second phalanx inclusive with cream, moisten the discs in liquid and wrap the injured nail, wrap foil over the disc (so that the acetone and alcohol vapors do not evaporate quickly), leave for 15 minutes and remove the foil and cotton pad disc together with gel polish, using a cotton swab. If once is not enough, repeat all the above steps in the same order again.
- Thoroughly polish the broken or cracked area.
- Place foil folded in 4 layers or a special form under the plate, secure it with tape or adhesive tape.
- Perform degreasing.
- Treat with primer and dry in a UF lamp.
- Apply the base to the treated broken area and foil to the desired length. To obtain the missing part of the nail, the layer applied to the foil must be thicker than the layer applied to the nail itself.
- Dry in a UV lamp. Drying should take 2 times longer than usual.
- Paint the prepared nail with 2 layers of gel polish, drying them alternately according to the same principle as the base.
- Apply top. Dry in a lamp.
- Get rid of the stickiness of the finishing layer.
- Remove the foil and use nail scissors and a nail file to straighten the nail to the required length and shape.
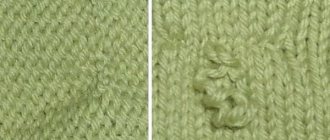
To avoid mistakes, watch the video where a specialist explains how to properly fix a cracked nail.
The video talks about a nail that cracked on the side
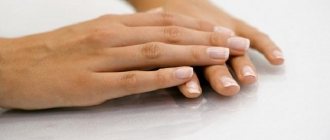
That's it, the manicure has acquired its original appearance.
Descriptions of diseases
Simultaneous diseases of the fingernails and toenails are quite rare; usually the nails of the upper extremities are affected.
Hippocrates nails
The extreme phalanges of the fingers thicken, the nails become convex and round. Hippocrates was the first to describe this phenomenon affecting the hands, which is why it got its name. It is not an independent disease, but may appear as a symptom when:
- emphysema;
- pulmonary tuberculosis;
- long-term endogenous intoxication;
- disorders of the cardiovascular system;
- cancer, especially in the lungs.
Sometimes Hippocratic nails can be a hereditary or congenital pathology. In cancer, it develops rapidly over months or weeks; in other cases, the process of change can last for years.
Scleronychia
Hypertrophic changes occur in both the arms and legs. Nails harden, become transparent, taking on a yellowish-gray tint, and over time may separate from the nail bed. This is considered a manifestation of endocrine diseases, although the main causes of scleronychia are still not known.
Onychogryphosis
Another name is “bird's claw”. It can develop as a result of frostbite or severe bruising.
The nail becomes dense and uneven, taking on an unnatural color from gray-yellow and brown to almost black. In addition, its free edge is bent, like a bird's, or twisted into a spiral.
Treatment consists of softening the surface of the nail with a salicylic patch or ointment; in advanced cases, it can be scraped off or surgically removed.
How to save an extended nail
Reconstruction is carried out in several ways: using special silk, medical plaster, tea bag, acrylic, biogel, acrylic powder.
Provided that the damage under the shellac is minor and the nail can still be saved, it is not necessary to file it down and grow a new one or glue a new tip. You can repair it by following these simple steps:
- Cut a patch of the required size from a tea bag, plaster or special silk.
- Using instant glue or “superglue”, glue the patch to the injuries.
- Apply another layer of adhesive to the glued patch. Wait until it dries and repeat these steps again.
- Polish the repair area with a nail file.
- Degrease, apply base, gel polish and top, alternately drying in a UV lamp.
Well, if the extended nail breaks off completely and simply covering it with a patch won’t work, we recommend watching a video in which a professional explains how to glue a broken nail.
The video shows how to repair a nail that has broken in the middle and broken off.
Repair with acrylic powder
To get rid of a crack in the middle of the nail, use acrylic powder and special glue.
- Remove shellac.
- Polish, disinfect, degrease.
- Coat the crack and the area around it with glue.
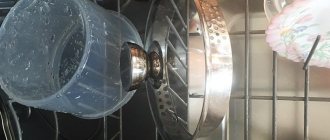
- Immerse the first phalanx of your finger in a jar of acrylic powder and wait 1-2 minutes.
- Shake off excess and dry in a UF lamp.
- Sand, degrease, apply primer, base coat, gel polish and top coat. After applying each material, dry it in a UV lamp.
What is construction fluid used for?
Beginners often wonder why a construction fluid is needed at all; is plastic polygel really not enough?
No, acrylic alone is not enough for quality work. Without a special liquid, it is impossible to achieve an easy and uniform distribution of the material over the nail plate - the brush will pull it, it will lie in lumps. Many people are afraid to work with polygel liquid because of the pungent odor. The nail industry does not stand still, and we at ParisNail have developed a special composition that not only does not smell of chemicals - it has the aroma of ripe berries!
In addition, the product has a number of other advantages! Thus, it does not have adhesion properties and allows you to interact comfortably with acrygel without clogging the brush. It has a neutral composition, does not contain activators (monomers), therefore does not affect the condition of the artificial surface, does not change its structure and does not leave greasy marks. It does not pull the material behind the brush - it does not frizz or clog. Does not dry out or irritate the skin even after prolonged use.
Now the process of repair or extension will not give you a single unpleasant moment!
You can’t do without a construction fluid when working with polygel.
What to do if your nail breaks until it bleeds?
Firstly, if the gel polish on the nails is cracked and along with it the nail is injured to the core, then it is better to forget about the perfect manicure until the plate is completely restored. You have to sacrifice beauty for health!
If a nail breaks to the point of bleeding or at the root, you should not start thinking about how to glue it, but first properly treat the wound with chlorhexidine, hydrogen peroxide or any antiseptic. Beauty is beauty, but health is much more important!
You need to completely remove the manicure to give the nail time to recover.
Next, wrap it with a plaster or bandage and leave the injured finger alone until the wound is completely healed, after which it is recommended to seek professional help at a salon. During healing, you need to promptly change the dressing material and lubricate the cuticle with products that promote rapid nail growth. If you plan to contact the hand, the nail on which has broken at the root, with water or chemical reagents, you must wear a rubber fingertip or even special protective gloves.
To avoid aggravating the situation, it is strongly not recommended to repair a deep plate rupture yourself.
After the wound has completely healed, you can think about how to fix the situation with your damaged manicure. The ideal option is to contact a professional. In the salon, to the question “Gel polish is cracked, how to save it,” the master will most likely answer with an offer to fix the broken nail with biogel. This is an innovative drug containing many healing substances, including protein. With the help of biogel, damaged layers of the plate and nail bed will be restored in record time. In addition, it perfectly protects wounds from infections and germs.
Biogel restoration technique
This is a universal tool that can be used for both extension and restoration of a broken nail.
This is an easy way to restore your nails and takes less than 30 minutes. There are only three stages:
- Apply biogel.
- Dry.
- Apply base, decorative gel polish and top. Dry in a UV lamp after each application.
Biogel does not tolerate the proximity of household chemicals, so cleaning the house and washing dishes should only be done with rubber gloves.
Tips for preventing the problem
To keep your nails in good condition, you need to adhere to the following recommendations:
- saw in one direction, this way you can prevent the appearance of cracks;
- do not cut it too short to avoid nails growing into the meat;
- massage your hands regularly;
- steam the nail plates before the manicure procedure;
- eat meat and fish dishes, herbs, vegetables and fruits daily;
- thoroughly dry your hands after contact with water;
- use only high-quality tools and materials for nail care.
You can keep your nails in good condition not only by following the necessary rules, but also by using the services of specialists. Salons offer the following procedures:
- wax or paraffin applications;
- spa or aromatherapy;
- Japanese manicure;
- ultraphoresis;
- sealing;
- biogel.
Such procedures should only be performed by trusted specialists.
Healthy and neat nails indicate not only the neatness of a person, but also the condition of his internal organs. Therefore, you need to regularly take care of your body, consume as many vitamins as possible and give up bad habits. It is quite difficult to prevent nail damage, but if it has already happened, you need to approach this situation wisely.
Why do nails break?
There are many reasons that can be divided into 2 groups: external and internal.
Let us list and discuss the external ones in more detail.
- One-time mechanical impact (strong blow of nails on a hard surface).
- Systematic mechanical influences (typing on a keyboard, opening packages, cans, bottles, tapping fingers on the table).
- The use of an aggressive remover, which leads to overdrying of the plate and, accordingly, fragility.
- Application of gel polish without preliminary strengthening.
- Incorrect filing technique.
- Interaction of hands with chemical reagents and household chemicals
- Hand contact with low and high temperatures.
As for the internal causes of failure, they are as follows:
- lack of vitamins,
- dehydration of the body,
- hormonal imbalance.
What to do to prevent nails from breaking: 20 recommendations
- Timely correction.
- Before applying new material, completely remove the old one.
- Periodic strengthening.
- Be sure to apply a base coat before painting.
- Use of quality materials.
- Compliance with the rules for performing a manicure and subsequent cleansing of nails.
- Using a ceramic nail file. In no case is it made of iron.
- Polish the upper border exclusively at right angles.
- Consultation with a doctor.
- A complete lunch ration including phosphorus, calcium, zinc, sulfur, magnesium and vitamins E, D, A.
- Daily consumption of clean water is at least 1-2 liters per day.
- Sleep at least 8 hours a day.
- Use rubber gloves when your hands come into contact with household chemicals and other chemicals.
- Avoiding mechanical stress on nails.
- Do not chew or bite your nails. You cannot remove gel polish “on the spot” (with teeth, scissors, a knife, etc.).
- Carefully process the cuticle with special forceps. Hangnails should not be bitten off with teeth or torn off.
- If possible, do an unedged manicure using modern cuticle removers.
- The use of caring and strengthening products (creams, wax, iodine, sea salt, baths, essential oils, masks).
- Periodic rest of nails.
- Protection of hands from exposure to high and low temperatures.
How does gel polish compare favorably with regular polish?
Firstly, it is easier to apply - if a simple varnish, even the freshest one, is prone to gaps and stripes on the nail, then the gel, due to its density, instantly lies on the nail plate in an even layer. Often, gel polish does not require reapplication.
The second well-known advantage is the durability of the coating. This advantage can be a disadvantage for girls whose nails grow quite quickly, but if the length of your nails does not change much over the course of a week, long-lasting polish will be your salvation. Gel coating is also suitable for those with fragile, brittle nails: the gel literally “walls up” all the defects of the plate.
How to do a manicure with gel polish at home?
We will talk about all stages of this process.
Nail preparation
Any manicure should always begin with proper nail preparation. First of all, you should work with the cuticle - it should either be trimmed or carefully pushed back.
How to remove cuticle?
Even those with thin skin prone to injury can remove it, but do not forget to steam your fingers first. Soak your hands in the hot bath and then begin removing the cuticles. First, lift it with a special spatula - the skin should completely move away from the nail. After this, trim the cuticle using a sharp trimmer or well-sharpened thin scissors. If you do injure the skin around your fingers, immediately treat the wounds with peroxide and lubricate your nails with coconut or apricot oil.
If the skin around the nails is quite dense and not prone to injury, you can remove the cuticle “dry” - in this case, the procedure will be exactly the same, with the exception of the first step with warming up the fingers.
If you don’t do a trimmed manicure on principle, it’s still worth steaming the cuticle - so that it’s easier to push it back with a spatula. Even with this method of dealing with cuticles, the skin may be slightly damaged, so keep peroxide and nourishing cream on hand.
After removing or pushing back the cuticle, you should proceed to giving the nails the desired shape. The most popular one is square on short nails, but if the nail plate is set quite low, choose an oval shape - it will visually “stretch” your fingers. Everyone knows how to shape nails - using a file. But opt for a glass instrument. Do not cut your nails with clippers or scissors if they are prone to splitting - carefully file the plate to the required length.
After shaping, polish the surface of the nail with a buff, then remove dust with a brush and apply nourishing oil or cream to your fingers. Before applying gel polish to your nails, make sure that their shape is uniform and that there are no burrs or cuticle particles left around.
Varnish coating
What do you need to do a gel manicure? The basic necessary tool is an LED or UF lamp. Without it, the coating will not adhere to the nail properly, and the drying process will take much longer.
The gel polish firmly settles on the nail, therefore, to facilitate the removal process in the future, it is necessary to apply a primer to the plate - it will smooth the surface of the nail and will not allow the polish to be firmly “absorbed.” You'll thank yourself for taking this step before you remove the gel polish.
After applying the gel, you need to paint your nails with a topcoat, which will give the varnish shine and durability.
Now let's move on to the procedure.
First, coat your nails with primer, then proceed to applying the gel itself. Make single and confident movements with the brush, do not smear the polish on the surface of the nail. Place your hands into the LED lamp, being careful not to smear the gel, repeat the process if necessary. If the color saturation seems insufficient to you, apply a second coat of varnish.
After the gel, fix the result with a top coat - a protective glossy coating that will provide the varnish with greater durability.
List of sources
- vokrug-nas.ru
- ufologov.net
- salon-nagorkogo.ru
- nails-health.ru
- jawoman.ru
- idealnyi-manikur.ru
- ameno.ru