A cooler bag will help keep food fresh during long trips. It is designed like a thermos, holding heat or cold inside. In the summer, this allows you to transport perishable products, such as meat or dairy, over long distances, or enjoy the refreshing coolness of drinks. In winter, such a bag is indispensable if you need to keep cooked food warm.
Pictured is a cooler bag that allows you to keep food fresh (or warm) during a short trip.
A quality cooler bag is not cheap. There are various models on sale, they can be divided into three large groups:
- shopping bags;
- mobile bags for transporting products;
- bags for car trunk.
These varieties differ from each other only in shape (the size of the base bag and the materials from which it is made), and the principle of preserving cold or heat is the same. Today we will present to your attention a master class on making a cooler bag with your own hands.
We make it from improvised materials
You can make a cooler bag with your own hands from:
- an ordinary plastic bucket with a lid,
- a lot of foil,
- tape,
- dry ice.
To make a cooler bag from such improvised materials, you need:
- Wash the plastic bucket and its lid and dry thoroughly.
- Cut regular cooking foil into strips and use them to line the inside of the bucket so that a little foil sticks out at the edges.
- Dry ice should be glued inside the bucket using tape. When gluing, it is advisable to follow a checkerboard pattern so that the ice consumption is not too large. Just 5-7 pharmaceutical packs are enough.
- Glue foil on top of the dry ice, fold the edges inward and glue it to the inside of the bucket.
- The lid of the bucket is simply covered with foil from the inside, possibly in several layers.
Such a cooler bag will be able to cool food for an hour and keep it cool inside for three to four hours, after which the temperature will begin to rise.
Foam Cooler Bag
Polystyrene foam is a fairly common material that is usually thrown away as unnecessary. Nevertheless, as many master classes on creating cooler bags show, you can make a bag that cools food from polystyrene foam, which you got absolutely free when purchasing household appliances.
Let's prepare:
- Styrofoam;
- cardboard;
- scotch;
- If desired, you can sew a cover for the container.
Styrofoam box
A box of convenient dimensions, a lid for it, another lid and a divider for the compartments are cut out of polystyrene foam. Accordingly, you need to cut:
- Bottom.
- A lid matching the size of the bottom.
- Four walls that can fold into a square or a rectangle, it all depends on personal desire. At the same time, all the walls should be level on the bottom and nothing should stick out on the sides.
- One more lid, which should fit inside the box, folded from the bottom and walls, or two lids if a separator is provided. Then both lids should fit inward between the three walls and the separator, fitting tightly so that no coolness is released outside.
- Delimiter. It should fit inside the drawer without moving.
All elements, except the lids, are glued together with tape. Cardboard is glued to the sides, which should strengthen the structure. If desired, you can put a hand-sewn cover over the structure to make the portable refrigerator look like a bag.
In this case, the pattern of a cooler bag with your own hands is made according to the dimensions of the device made. You can make a carrier that will completely cover the refrigerator box, or you can make one that will only cover the bottom, lid, and two more walls.
Since there is no refrigerant in this option for creating a bag, it is worth placing already chilled products inside the foam box that need to be kept cool.
Upgrading a regular bag into a cooler
It also happens that you already have a bag that is quite convenient in size, so there is no need to look for patterns to sew a new one. Then you need to have in stock:
- bag;
- glue;
- foamed polyethylene with foil;
- scissors;
- pencil.
Operating instructions:
- You need to trace the bag on the insulating material: bottom, lid, straps, sides.
- Then cut out the elements using the resulting patterns.
- Place the resulting parts on glue inside the bag.
You can see in the photo exactly how to make the patterns.
It is worth paying attention to the fact that in some master classes they advise placing a refrigerant connected to a battery under the polyethylene foam in order not only to keep the coolness inside the bag, but also to cool the food
By your own standards
Often the bags that are available are not suitable. Then you should study a master class on a cooler bag with your own hands and sew the bag yourself.
You will need:
- thick fabric;
- pattern with suitable dimensions;
- refrigerant;
- insulating material, you can use the same foamed polyethylene;
- batteries to keep the refrigerator running;
- Velcro.
You need to pay attention to the refrigerant that will be placed in the bottom of the bag. One day the batteries will fail and will need to be replaced.
It’s simply inconvenient to rip everything apart, so the lower insulating element and the bottom of the bag need to be sewn with Velcro, after which these two parts should not be sewn together, but glued together with Velcro.
Making a portable version of a cooler bag
The quality of a portable thermal bag can be ensured with the help of properly selected materials.
Selecting a base
When making a portable refrigerator, we will take into account that it should be a product that is convenient to carry. Therefore, as an external case you will need a spacious bag with reliable handles. Shopping, sports, travel and even beach bags are well suited for this.
Important! When choosing a base for a cooler bag, give preference to bags made of durable, water-repellent materials. It is imperative to check the reliability and strength of the zipper: the cooler bag must be tightly fastened
It is imperative to check the reliability and strength of the zipper: the cooler bag must be tightly fastened.
Taking measurements and making patterns
Having selected a bag suitable for the case, we begin manufacturing. The inside of the container should follow the shape of the selected bag, but not match its dimensions, but be smaller. Then it can be conveniently placed in the case. A pattern helps to avoid errors with sizes. Measure all the components of the existing bag: bottom and top, front and back, sides. The quality of the entire product depends on the accuracy of measurement.
Attention! The inner surface is made smaller than the outer one. To do this, subtract 5–7 cm from the external measurements of each part.
Then they draw up a diagram, which in finished form should have the shape of a cross. All pattern blocks are made in the shape of rectangles.
- Center - 1 rectangle: bottom.
- To the right and left of the center - 1 rectangle: sides.
- Above the center - 1 rectangle: front part.
- Below from the center there are 2 rectangles: the back and the lid.
Selection of materials
The correct selection of materials for making a cooler bag with your own hands helps ensure reliable cold retention.
To work you will need:
Foil-isolon has proven itself well as an affordable and high-quality insulation material. It consists of special foamed polyethylene, on the surface of which foil is applied on one or each side. Any type is suitable for a bag, but a double-sided one will perform the task of keeping the cold better.
You can connect the internal parts of the bag using any tape. It is more convenient if it is double-sided. And the use of metallized tape, which has an additional layer of foil, will not only hold the parts of the bag together, but will also act as a heat reflector.
Zipper or Velcro
Think in advance about how your bag will close. The best way to do this is to use a zipper.
You can also make an extra flap on the top of the bag to overlap the front and secure with Velcro. The valve must be added to the pattern in the form of an additional rectangle that connects to the lid of the bag.
Connecting the parts of the bag
Having prepared the materials and the pattern for the inner container of the cooler bag, we move on to the main part of the work.
- Using the pattern, we cut out the bag blank from isolon.
- We transfer to the isolon the inner sides of the rectangles indicating where the parts of the bag are connected: the center with the side, the back with the top, etc.
- We bend the cut material along the internal lines applied to it.
Important! When using one-sided foil, make sure that its surface with foil becomes the inner surface of the container
- When using a zipper, sew it to the insulation.
- We connect the parts of the resulting isolon box. It is best to “baste” them first: fasten them with sewing pins and give the product a shape. Then fasten the joints with tape.
- We strengthen the joints. To strengthen and give shape, each joint can be additionally glued with a layer of tape on the inside and outside. You can also pre-reinforce the joints with strips of insulation that were left after cutting out the pattern. They are secured with double-sided tape. Additionally, you can once again glue these strips on top with tape.
- We insert the inner unit into the outer case and carefully straighten it out. The resulting portable refrigerator can already be used!
- Finally, you can fill the available free space between the cover and the container with material: padding polyester or batting, or you can even use pieces of an old blanket.
- The finished look of the product will be given by fastening the external and internal parts. They can be sewn or tightly connected using double-sided tape.
How to use a mobile refrigerator and extend its service life
Typically, portable refrigerators in the form of bags are used mainly in the summer season, when it is time for food to spoil quickly. But even after several uses, if the operating rules are not followed, difficulties may arise with the function of the device:
- Do not store sharp, pointed objects, especially cutlery, inside the refrigerator.
- Avoid using glass or metal utensils inside the bag. Such containers can easily damage the side walls of the device.
- Don't pack too much into your cooler bag. This will lead to a violation of the integrity of the thermal insulation, after which it is extremely dangerous to store products in such conditions.
- Do not keep foods open, especially those that have a characteristic odor: fish, smoked meats, sausage and others. They eat into the polystyrene foam.
- Periodically wash the cooler bag and treat it with kitchen antiseptics.
What it is?
A refrigerator bag is an item that will help keep food fresh for 12 hours. Externally, the bag is no different from its other “brothers”. However, this product still has a little trick.
This is interesting: How long before you can turn on the refrigerator after transportation?
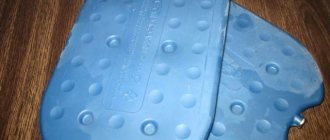
Cold accumulators
Cold accumulators can be in liquid or gel form.
To create a “liquid” cold accumulator, simply freeze water to a solid state and place pieces of ice in a durable Zip-Lock bag. The main advantage of such devices is that they do not take up much space and can change shape, “adjusting” to the contents of the thermal bag. However, over time the ice will melt and if the bag is not sealed, the food will become soggy. Instead of a ziplock bag, you can use plastic bottles. They definitely won't let water through, but their main drawback is their size; they take up a lot of space.
Batteries for a cooler bag are similar in appearance to small-sized containers with a flat configuration.
There is a little trick: to make the water melt more slowly, you need to add salt to it, at a rate of at least 6 tablespoons per 1 liter.
Salted ice melts slowly, which means your food will stay at the right temperature for quite a long time.
Gel batteries are more reliable and practical, and they are also easy to make. There are two ways to make gel cold accumulators:
- Using diapers. Pour water into a new diaper, then take out the resulting gel, place it in a ziplock bag and put it in the freezer. Once the gel freezes, your battery is ready.
- From gelatin or wallpaper glue. Gelatin or wallpaper glue is diluted according to the instructions, but salt water is used for this. The resulting gel-like mass is placed in bags or plastic bottles and placed in the freezer of the refrigerator.
These batteries can be used to line the inside of a bag on all sides, and several bags can also be placed between products.
Important nuances
Special cooling elements help make your car cooler bag more practical and keep it cold longer. You can also make them yourself. Frozen bottles of salt water can serve as cold accumulators. Saturated salt solution can be frozen not only in bottles, but also in special freezing bags. Or you can freeze water-swollen gel taken from an unused baby diaper. It is placed in a special bag and also frozen.- Proper loading of the cooler bag is also important for its longevity. It is recommended that pre-frozen items be individually wrapped in food foil before placing in the bag. Products must be alternated with cooling elements.
- It is important to use the full capacity of the refrigerator: densely packed frozen food better maintains the temperature inside the container. Be sure to fill the empty space with drinks or just paper.
Making a cooler bag with your own hands is easy and inexpensive. And a homemade bag brings a lot of benefits!
How to make a camping refrigerator at home
For lovers of outdoor activities, a cooler bag is an indispensable item, especially in the summer. You don’t have to buy it, you can do it yourself, especially since you don’t need any special skills for this.
To work you will need:
- bag;
- foil polyethylene;
- lightning;
- foil or stationery tape;
- needle;
- threads
To make a portable refrigerator, you can use any roomy bag: shopping bag, sports bag, beach bag. It is desirable that it fastens tightly, holds its shape and is made of durable, water-repellent material.
As for foiled polyethylene, it will be used as a heat-insulating element. Its properties depend on the thickness and whether it is covered on one side with foil or on both. It's better to take the last option. You can purchase such foamed polyethylene at any hardware store.
Once everything you need is prepared, you can proceed directly to creating a camping refrigerator with your own hands.
- Measure all parts of the bag: bottom, sides, top.
- Make a pattern on polyethylene according to these dimensions, subtracting 3-5 cm.
- Carefully cut out the parts.
- Assemble the resulting structure. To do this, you can connect the parts first with pins and then secure with tape. Do this as tightly as possible so that there are no gaps, otherwise the portable refrigerator will not be able to cool food for a long time.
- Sew a zipper to the top parts of the polyethylene so that when fastened, it connects all parts of the structure into one.
- Insert the resulting bag into the main one.
- Sew one to the other by hand or using a sewing machine.
Stage of work
When all the materials are prepared, you can proceed directly to the task at hand, such as sewing a refrigerator bag.
Regardless of the purpose and size, all work is carried out in the following sequence:
- Cut double-sided foil polyethylene to the shape of the bag. The result should be a solid cross, the sides of which will have dimensions proportional to the future refrigerator. The central part is placed at the bottom of the bag. The sides of the cross will cover the side walls of the bag.
- Carefully tape the sides of the cross with tape. The result should be a box. The joints must be carefully taped. The insulating properties of the product will depend on this.
- Carefully place the box in the bag so as not to damage its integrity. Connect the walls using double-sided tape. The fastening must be reliable. The main thing is that the insulating box is in close contact with the bottom and walls.
- Attach the cover. It is prepared separately in advance. The disadvantage of insulation is that it bends easily, and therefore is not suitable for creating a structural element that would have the required rigidity. Therefore, to create a cover, a more dense material is made, which is eventually sheathed with insulation. After that, it is attached to the refrigerator itself.
- Make a battery. For the refrigerator, ready-made or home-made elements are used to maintain temperature. Ready-made batteries are available in specialized stores. They have a certain volume, which determines the duration of cooling. To create homemade batteries, plastic containers or medical heating pads are used. Filled with saline or alcohol solution.
The process of making a bag will not take much time (no more than an hour). The main thing is to perform all actions correctly. If desired, the refrigerator can be equipped with a temperature sensor. It is used to control the situation inside the container.
The sensor is necessary for cases when you need to transport medicines or perishable products. It is installed in bags with reliable and high-quality refrigerant, which provides a low temperature inside the portable refrigerator for up to 10 hours.
Increasing efficiency
Taking into account the recommendations, you can make a cooler bag at home without any problems.
However, few people know how to multiply the efficiency of a portable refrigerator:
- The first tip will be useful for those who travel a lot by car. The blanket will be an excellent helper in maintaining the desired temperature in the bag. Just wrap your portable cooler in it.
- Direct sunlight will reduce the effectiveness of the bag. It should be kept away from sunlight.
- The best place for batteries is the bottom of the bag. If, with this position of the batteries, the food does not fit into the bag, then there is a backup option: you can surround the food with it.
- It’s great if the products are chilled.
- The closer the food is placed to each other, the slower the temperature inside the refrigerator will rise. The empty space in the bag should be filled with any container of water or a folded blanket.
- Before arriving at your holiday destination, it is better not to open your bag often (if this is not possible, then this should be done as rarely as possible).
This is interesting: Is it possible to wash laminate flooring with a vacuum cleaner? Expert answer
What types of cooler bags are there?
The operating instructions for the cooler bag are standard, but according to the design of the product there are several types:
- Thermal bag. This device consists of several layers of dense synthetic fabric and thermal insulation made of foamed polyethylene and PVC film. Standard capacity ranges from 300 ml to 3 liters, the product is suitable for storing and transporting small quantities of food.
- Thermal container. The product is made of plastic, the role of the insulating layer is performed by polyurethane foam or polystyrene foam. Thermal containers are characterized by increased rigidity; they are often used as a camp table or seat. When using cold accumulators, the products retain a low temperature inside for up to a week.
- Car refrigerator. The unit is designed specifically for use in a car during a long trip. Equipped with built-in cooling elements, can be connected to an external power source or car battery via the cigarette lighter.
The most popular are thermal bags and thermal containers. Their capabilities are limited, but they are quite cheap, small in size and very easy to use.
What is
An ordinary-looking bag made of two layers of nylon fabric, the inside is lined with a thermal insulator - foamed polyurethane or polyethylene. Pre-frozen products are used as cold accumulators. A simple concept gives the desired effect. Such a portable refrigerator will be useful and not burdensome:
- when working at remote sites where there are no conditions for preparing hot food;
- on long trips by car or train;
- on the beach, picnics, summer cottages, on hikes.
The main advantage of a thermos bag compared to a container is the ability to compactly fold the container after it is empty. Some models of such bags can be additionally equipped with cold or heat accumulators - special plastic containers filled with gel, saline solution or dry ice. Such devices are capable of maintaining the required temperature for up to several days.
Features of isothermal bags
An insulated bag is more often called a cooler bag in everyday life. This compact and capacious container, made in the form of a bag, container or plastic box with handles for carrying, unlike a stationary refrigerator, is unable to constantly lower the temperature inside its volume, but only maintains it at a certain level.
The bag is used to store food and drinks on vacation, during long trips and travel, as well as to preserve the quality of products during their delivery from the point of purchase to the home refrigerator.
Maintaining a low temperature inside the thermal bag is ensured by special materials. Additionally, they are equipped with cold accumulators, allowing you to maintain a reduced temperature for 24 hours.
Varieties
Conventionally, such bags can be divided into three groups:
- For shopping trips;
- Mobile bags for transporting products;
- Car trunk bags.
It will keep your food warm in winter and cold in summer.
The listed options differ from each other in shape, size, and materials that are used for the base bag and to maintain temperature conditions. The degree of preservation of heat or cold in any of these bags is the same.
The bag can be used to keep food warm or cold for several hours.
Making cold storage batteries with your own hands
From the above, it becomes clear that it is not difficult to make elements with ice with your own hands. Obviously, small plastic bottles are suitable as containers. Depending on the required shelf life of meat, ice cream and juices, bottles can be filled with an aqueous solution of table salt or Glauber's salt, gelatin and even wallpaper glue can be used. The gel mixture from the diapers is placed in plastic bags. Let's take a closer look at the recipes and technology of homemade elements.
With regular salt
Everyone knows that salt water freezes at a lower temperature than fresh water. Thus, more cold will be required to form ice, which means that the heat capacity of the composition increases. To prepare the solution, salt is added to water to half the weight of water. To speed up the dissolution of the mixture, heat it slightly and stir. You can use either a plastic bottle or a bag as a container.
The finished element is placed in the freezer compartment of the refrigerator, set to maximum cold and left overnight. The elements charged in this way can be wrapped in cloth and placed in plastic bags if we want to avoid condensation getting on the food. Elements with salted ice, placed in a cooler bag along with frozen meat, will provide the product with a negative temperature for up to half a day.
We use Glauber's salt
The so-called mirabilite has long been used for refrigerated storage of food. In this case, a saline solution is prepared in a ratio of 1:5. To speed up the dissolution of the mixture, heat it slightly and stir. Then gelatin or wallpaper glue is added to the solution in a ratio of 10 g of the substance per liter of water.
As a result, the composition acquires a relatively thick consistency. The liquid is poured into plastic bottles. Subsequent steps are similar to those outlined above. The effectiveness of the elements is approximately the same as with table salt.
Add gelatin
Another type of element can be made with your own hands using gelatin and table salt. Sequencing:
- add 300 grams to a liter of water. table salt and dissolve, slightly heating and stirring;
- add 10 grams to 3 liters of water. gelatin and mix the composition;
- the solutions are poured together and mixed;
- Next, the cold accumulators are prepared for operation, as in the case of elements based on table salt.
Apply wallpaper glue
It turns out that you can make a cold storage battery yourself using wallpaper glue. In this case, only 40 grams should be dissolved. wallpaper glue in a liter of water. The liquid needs to be poured into containers, and we already know what to do next from previous examples.
Elements with wallpaper glue, placed in a cooler bag along with frozen meat, will provide products with a negative temperature for up to half a day.
We use diaper components
Diapers contain a very useful gel-like substance, which makes excellent cold storage batteries. For one diaper you will additionally need a glass of water and a couple of teaspoons of salt. Sequence of operations:
- First, dissolve the salt in a glass of water;
- then gradually pour the solution into the diaper so that it is absorbed;
- Now we cut off the top of the diaper and extract the gel-like mixture from it;
- place the mass in a plastic bag with a zipper and knead it, ensuring the uniformity of the filler;
- We place the finished element in the freezer compartment of the refrigerator, set it to maximum cold mode and leave it for several hours.
Elements placed in a cooler bag along with frozen foods will provide them with a negative temperature for up to half a day.
How can you replace batteries in cooler bags?
Temperature accumulators can be made at home using improvised materials. The simplest temperature accumulator is a regular ice pack or a frozen plastic bottle of water. It is better to use a saline solution rather than pure water; it is more effective. This solution is prepared in the following proportion: three tablespoons of salt per 0.5 liters of water.
There is a more complicated recipe, it will require Glauber's salt and gelatin. Per liter of water use 200 grams of salt and 10 grams of gelatin. Gelatin can be replaced with wallpaper glue. First, salt is dissolved in water, then gelatin, which acts as a thickener. A battery with this composition is more efficient.
Another option for a cold accumulator is the use of granular filler for baby diapers. Granules from one diaper and two teaspoons of table salt are used for 250 ml of water. Let us describe the stages of the preparation process:
First you need to dissolve the salt in water. Then the prepared solution must be carefully poured onto the inside of the diaper, so that all the liquid is absorbed into it. Next, you will need to cut the diaper and remove the filling from it. The extracted filler must be placed in a bag and kneaded with your hands. It is better to use a bag with a fastener, such as a Zip Lock.
Step-by-step instruction
Believe me, it is only at first glance that it seems very difficult to make a cooler bag yourself. In fact, by strictly following the instructions, you will be able to create such a “masterpiece” with your own hands.
First you need to prepare the base bag. All pockets, partitions and other elements are removed from the inside. We leave only the “body”.
Rectangular bags are especially convenient.
Now you need to make a pattern that exactly repeats all sides of the base, but about 0.5 cm smaller (so that nothing puffs up inside). Don't forget the lid. If you decide to make a tab with Velcro, then the lid should be larger in size so that it can be tucked inside. The process of creating a pattern is extremely simple: apply all sides to the paper one by one, and with minor adjustments, trace with a pencil.
In this case, the white part should remain on the outside, the shiny part on the inside.
Using the resulting pattern, parts are cut out of foil polyethylene and glued with tape to create something like a box with a lid. To make gluing more convenient, the parts are first connected using tailor's pins.
It is preferable to fasten the box with a stapler or simply sew the parts together.
The resulting container is inserted into the base and the thermal bag is ready. An important point: if there is space between the base and the “container”, this is not a problem, but it must be filled with foam rubber or cotton wool.
Thus, we received an option that is medium in size and very versatile in its method of application.
The picnic accessory is already ready, all that remains is to “charge” it with heat or cold.
To make a bag for shopping, you will need a base slightly smaller than in the first case (in principle, it can even be a very thick plastic bag) and foil polyethylene, also in a smaller volume. But the manufacturing process remains the same.
You need to put the “batteries” inside, right next to the food. This way they will stay cold (or hot) much longer.
To make a “thermal storage” for transporting food in the trunk of a car, you will have to find a larger base. Often a box made of plywood or thick cardboard is used for this purpose. To enhance the thermal insulation properties, the inside of the box is lined with thin foam plastic, and only then with a layer of foil foam rubber. The latter is secured along the upper perimeter of the box with tape. The same approach is used to make the lid. Well, since it’s extremely inconvenient to just carry the box, a case with handles made of durable fabric is often made separately for such “thermal storage.”
If you have plywood or wood panels, put together a base box.
So, the bag is ready, but it cannot store cold on its own; special batteries are needed. These “devices” can be purchased in stores, or you can make them yourself.
Useful tips
- The thickness of the thermal layer - the greater, the better. When you come to a hardware store, buy foil insulation from 0.5-0.8 cm, and foam plastic from 2-3 cm.
- You can buy foil-isolon at a large hardware store, and the price will not put a dent in your pocket. Material consumption – from 1 – 1.5 m.
- It is better to choose a bag for a portable refrigerator from dense, water-repellent materials that are highly durable and at the same time easily washable from dirt.
- Make sure that the handles and pockets are sewn tightly, and that the fasteners close the thermal bag tightly. In good production models, the outer zipper is covered with a special Velcro flap to reduce heat transfer.
- For ease of use of the car refrigerator, you can sew a cover with handles onto a plywood box. Don’t forget to place pieces of padding polyester, a cut blanket or any other insulation between the plywood and the cover - this way you will protect the contents of the thermal container from rapid heating.
- It is better to transport any thermal container in a large bag with other things or in the trunk of a car. Keep your portable cooler out of direct sunlight and try to open it as little as possible.
- When thawing frozen cold storage batteries that you made yourself, condensation may appear - take this fact into account and take care that moisture does not spoil the food. For example, wrap everything in separate sheets of newspaper.
- When loading food into a self-contained refrigerator, remember that there should be as few gaps and voids inside the thermal container as possible. Do not forget to transfer food with cold accumulators or regular ice packs.
If manufactured correctly, with care and following our simple recommendations, your thermal bag or car refrigerator will pleasantly surprise you with its efficiency, reliability and durability. At the same time, it’s nice to know that you were able to save a tidy sum, because in a store such a purchase would cost a significant amount. You can make several thermal containers of different sizes - small boxes for an individual snack at school, in the office or at training, 4-5 liter travel bags for shopping or modest picnics, spacious backpacks from 10 liters for large companies and impressive preparations, etc. . Now, knowing how to make a cooler bag with your own hands, it will not be difficult for you!
- 7 best Bosch refrigerators according to customer reviews
- 8 best Samsung refrigerators according to customers
- 9 best inexpensive refrigerators according to buyers
- 10 best LG refrigerators according to customer reviews
Car refrigerators
Not every thermal bag or thermal box can withstand the test of traveling for 2-3 days. Car refrigerators, which are a type of isothermal containers, have proven themselves well in this regard, but they do not operate using cold accumulators, but according to a different principle.
They are rigid boxes made of plywood or plastic, with a thick isothermal layer of foamed plastic. And their inner chamber is foil-lined. For their operation, it is not batteries that are needed, but other devices. There are the following types of auto-refrigerators:
- thermoelectric (works from a standard socket or car socket in the cabin at 12 V);
- absorption (works on liquefied propane or butane);
- compressor (runs on freon).
Modern technologies make a person’s daily life comfortable, regardless of the conditions in which he finds himself. For frequent trips to nature, lasting 1 day, it is enough to purchase a thermal bag or thermal box. The first device is quite possible to carry on yourself, and the second is convenient to carry in a car. The larger the company, the more spacious the product should be. And if the trip takes 10 hours or more, then a car refrigerator would be the best option.
Video: cooler bag - how to use it correctly, where to buy batteries
Cooler bag/How to use it correctly/where to buy batteries
Watch this video on YouTube Watch this video on YouTube
Video: car refrigerators - how to choose and how they differ?
Car refrigerators. How to choose and how do they differ?
Watch this video on YouTube Watch this video on YouTube
Do you want to understand better than others?
How a cooler bag works – For lovers of picnics and long-distance trips, a cooler thermal bag is an indispensable accessory. But not all consumers fully understand what it looks like and how...
Cold accumulator for refrigerator bag. From refilling to making it yourself - Cold accumulator for a thermal bag - cooling components of devices that can maintain low and high temperatures in a special bag or container. These coolers...
How to use LG Smart Thinq - Find LG Smart ThinQ app in Google Play Store & Apple App Store using your smartphone. Follow the instructions to download and install the application
To connect to...
What is a cooler bag and how to use it – When purchasing a cooler bag, also pay attention to the warranty. For most inexpensive products it is 2-3 months, but for some models the duration…
How long does a cooler bag keep cold - We offer you a comparison of several parameters of three types of cooler bags available for sale
Capacity, l Temperature retention time,…