When it’s hot summer outside, and a picnic is planned for the weekend, the issue of keeping food fresh and drinks cool becomes acute. An excellent solution would be a thermal bag filled with refrigerants that will increase its functionality. If you don’t have a device manufactured industrially at home, you can easily create a cold accumulator with your own hands - it will easily keep salads fresh, cool drinks and prevent ice cream from melting. Also, with the help of homemade refrigerant, you can significantly save your family budget. The main rule when making it is to do everything according to the instructions.
Principle of operation
Cold accumulators are a plastic, necessarily sealed, rectangular flat container containing a special liquid inside – usually a solution of carboxymethylcellulose. The weight of one container is approximately 0.5 kg, it is designed for 6-10 liters of thermal bag volume, allowing you to maintain a constant temperature for up to 10 hours. In fact, the device resembles ice, but has special properties - it freezes quickly and melts slowly.
Devices that accumulate cold are multifunctional: they will be useful for tourists, summer residents, and motorists on the road . In addition, they extend the life of a stationary refrigerator, reducing the load on the compressor, and become a real salvation during a power outage when the contents of the freezer begin to melt. Refrigerants are also used in medicine - for the transportation of a number of drugs, vaccines, biological tissues and other things.
The operating principle of such a device is simple: the container is placed in the freezer, where it completely freezes in 6-8 hours. After this, the battery is ready for use - cover the sides and bottom of the thermal bag with the required number of bags, and then tightly load the products into it. The lifespan of the refrigerant is unlimited; after use, it can be rinsed with water, wiped dry and re-frozen.
Batteries should not be placed in regular travel bags - their contents may damage the lining and fabric from the inside.
Where and how to store cold batteries for a cooler bag
A video about how to use cold batteries for a thermal bag recommends charging and storing the devices in the freezer compartment of the refrigerator. However, this is not the only option. Good places to store cold storage batteries are:
- Open balcony. You can leave devices on the loggia in winter when the air temperature is below freezing. It is better not to keep containers on a closed balcony.
- Window. In frosty weather, coolers can be placed in a string bag or bag and simply hung outside the apartment. At the same time, it is important to better secure the bag on the window so that it does not get thrown off by a gust of wind.
In a country house, you can keep cold batteries on the roof, on an open terrace or outdoors in the garden.
Attention! All additional refrigerant container storage options are suitable for winter conditions. In summer, you can only keep devices in the refrigerator.
Shelf life of cold storage batteries
Reviews of cold storage batteries note that if the operating rules are followed, the devices have an almost unlimited shelf life. They can be frozen and thawed many times; the filling inside the containers does not lose its valuable properties. To prevent refrigeration generators from becoming unusable ahead of time, it is only recommended to regularly wash the outside of them to remove dirt and condensation.
Cold batteries should not be left in the heat for a long time, much less exposed to direct sunlight.
Varieties
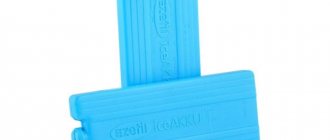
There are several types of cold batteries: silicone, gel, water-salt. Having understood their differences, you will be able to understand which is more effective and choose the best option for yourself:
- Silicone. This type of cold accumulator maintains a low temperature for the longest time - from 0 to +5 degrees throughout the week. It looks like a rectangular film package. Inside it is a special silicone mixture that freezes quickly and melts slowly.
- Gel. This type of cold storage battery is the most common. It looks like a dense, sealed, rectangular bag. It contains a gel-like substance inside that keeps the inside of the bag cool. It can also be used as a heat accumulator. It supports a wide temperature range and operates for up to 16 hours. If the filler leaks, you don’t have to worry - simply wipe the surface with a napkin or rinse with water. The gel will not spoil the products, it is completely safe and does not harm the body.
- Salt cold accumulator. Appearance: rectangular plastic box. It contains a water-salt solution inside, which can be added if necessary (but not all manufacturers provide this possibility). The battery maintains low temperatures, down to approximately -10°, throughout the day.
The most efficient battery is silicone. It keeps the temperature for about a week. You can cross the Sahara Desert with it and the ice cream will remain cold. There is a downside: the manufacturer does not guarantee that silicone is safe. If it gets on food without packaging, it can cause poisoning.
Silicone cold accumulator
Silicone cold accumulator
Gel cold accumulator
Salt cold accumulator
Salt cold accumulator PM0941
Alternative to factory batteries
Do-it-yourself cold storage devices are, of course, inferior in properties to factory-made devices. But, if the planned trip does not take much time, they may be quite useful.
The simplest option for a cold source at home is frozen water in a bottle (both plastic and glass will do). This type of battery has a big drawback: the ice melts quickly, as a result of which the low temperature in the insulated bag does not last long. The best performance of a homemade invention can be achieved by adding salt or alcohol to the water.
So, the materials at hand needed to make a cold storage tank:
- plastic bottle;
- water;
- salt or alcohol.
The approximate ratio of the last two is 10:3 (for example, 100 g of water and 30 g of salt). The freezing point of such a liquid is about -20 degrees. If it does not freeze for a long time, you need to drain a little of the solution and add clean water.
Stages of self-production
Many people create cold storage batteries with their own hands. The advantages of this solution are obvious:
- devices are made from improvised materials available in every home - their cost is extremely low;
- manufacturing requires a minimum of time and effort - preparation will take no more than 10-15 minutes, the rest of the time is freezing the homemade refrigerant.
First you need to collect a basic set of raw materials and supplies - 0.5 and 1 liter plastic bottles, table or Glauber's salt, wallpaper glue or gelatin. The manufacturing nuances in each option will be slightly different.
With table salt
You will need: 1 liter of ordinary water, 450 g of table salt, plastic containers of the required volume.
Step-by-step algorithm:
- The components for a strong solution are mixed and slightly heated so that the salt crystals dissolve faster.
- The resulting liquid is poured into a juice container, bottle or durable plastic bag.
- Freeze at minus 18 degrees.
- After 8-10 hours, the finished refrigerant is wrapped in a terry towel to create proper thermal insulation, and a bag is put on top so that the condensation that forms does not fall on the food.
This cold accumulator will keep food at a temperature of -15° for 11-13 hours.
With Glauber's salt
Mirabilite is widely used in refrigeration, so it is perfect for making homemade refrigerant. You will need: 1 liter of water, 200 g of salt itself, 10 g of gelatin or wallpaper glue.
The step-by-step algorithm is not much different from the first option:
- A saline solution is prepared, then it is thickened with gelatin (glue).
- The finished mixture is poured into a bag or bottle and placed in the freezer for 6-9 hours.
- The container is wrapped in terry cloth and placed in a bag that will collect condensation.
In the thermal bag, Glauber's salt coolant maintains a temperature of -10° for about 8-10 hours.
With wallpaper glue
To prepare, you will need a plastic container, 1 liter of water, 40 g of dry wallpaper glue. Step-by-step preparation:
- Combine water and dry mixture and stir well until a gel-like consistency is obtained.
- The solution is poured into a prepared container and frozen in the freezer.
The refrigerant will keep food in the thermal bag for up to 11 hours at temperatures below 0.
The approximate ratio of wallpaper glue and water to create a cold storage device is 4:100.
With gelatin
To create a gelatin refrigerant, prepare 4 liters of water, table salt, 10 g of gelatin, and a plastic container.
- Pour salt into 1 liter of water in a ratio of 10:3 and stir thoroughly. The sodium chloride should be completely dissolved.
- Then dilute the mixture with the remaining 3 liters of water and add gelatin. Stir well again - the liquid should thicken a little.
- The solution is poured into a plastic container and placed in the freezer until completely frozen.
The gel substance melts more slowly than the options described above, so it will keep the cold inside the thermal bag for 8-10 hours.
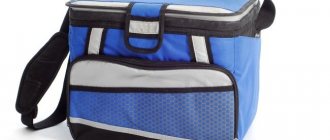
Basic criteria for choosing a thermal bag
When choosing a cooler bag, you can see that the range of these products on the market is enormously different from each other. To ensure that your choice does not become a disappointment, you need to be guided by several important criteria:
- Capacity. It may be different. If you use the bag every day, for example, to take soft drinks with you, it is better to choose a small capacity of up to 10 liters. When you need to go outdoors with a company, a bag with a capacity of 25 liters or more will come in handy. Also on sale you can find products with a capacity of 100 liters or more, which is far from the limit. It should be noted that for large volumes, the use of load-resistant materials is required, because if the bag holds more than a hundred liters, then it should not burst when you try to lift it when full.
- Materials. Thermal insulating bags are made from artificial materials that do not transmit ultraviolet radiation and are moisture-repellent. Typically PVC, polyester or nylon are used. These types of fabrics provide the ability to clean stains and dirt. Often it is enough to wipe the stained area with a wet cloth.
- Wall thickness. The vast majority of bags are made waterproof and three-layer. The face layer takes on decorative effects and also provides rigidity. After this there is a layer usually made of polyurethane. Often its thickness is 3 mm or more. After this comes the last inner layer with a reflective effect. It helps to reflect heat rays, preventing them from escaping and entering, which prevents external factors from affecting the contents of the bag.
- Auxiliary accessories. A cooler bag can have various auxiliary accessories that make it more functional or convenient to use. In an attempt to improve their product range, many manufacturers are coming up with a lot of ways to make their products more interesting for customers. For example, large bags that are difficult to lift are equipped with wheels. You can also find containers with locks on sale. They are an effective deterrent for pets, particularly cats and dogs, who can easily learn to open regular bags.
- The quality of the internal reflective layer.
- Cooling duration. A cooler bag can keep food cold for a certain period of time, which primarily depends on the ambient temperature. An important factor affecting efficiency is the thickness of the walls, as well as the number of cold accumulators. With high-quality performance, the bag can keep food cold for 6 hours even in the absence of a battery, of course at normal ambient temperatures. With a battery, even in the summer heat, the cold is retained for 12-24 hours or longer.
- The difference is in the price category. A cooler bag can have a different price, which depends on the presence of auxiliary accessories in its design. The most budget-friendly ones are ordinary thermal bags, which provide only a cold accumulator. In addition, there are devices with a built-in compressor or fan. They provide a more uniform and efficient distribution of cold. Thanks to this, all products placed inside have the same temperature. Air circulation makes it possible to adjust the temperature of the container. For this purpose, a screen may be provided on which the set temperature is displayed. It is used to adjust the cooling parameters.
- Cooler bag dimensions. Everything is simple here: what are the needs, so is the demand:
- For a large group - a large bag with a volume of 26 liters or more. It's roomy. The straps and handles are soft and do not rub your palms and shoulders, making them comfortable to wear.
- Lunch bag is a mini-fridge designed for home lunches and snacks in the office, at school, or on the go.
- The thermal backpack won’t weigh on your hand, put it on your shoulders and you’re in order. Depending on the model, the volume varies between 16-25 liters. Looks like a city backpack, but roomy.
- Thermal boxes, like bags, maintain temperature, but they can be washed. Plastic dries faster than PVC materials.
Do you want to understand better than others?
- Cold accumulator for refrigerator bag. From refilling to making it yourself - a cold accumulator for a thermal bag - cooling components of devices that can maintain low and high temperatures in a special bag or container. These coolers...
- How to make a cold accumulator with your own hands - There is almost no alternative to modern refrigeration equipment in stationary conditions. But there are power outages or you need cold weather in camping conditions. In these cases...
- How long does a cooler bag keep cold - We offer you a comparison of several parameters of three types of cooler bags available for sale. Capacity, l Temperature retention time,…
- Cooler bag for insulin - how to choose - Every insulin-dependent person is familiar with the strict rules for storing the drug, which is essentially a natural protein. To meet storage and transportation conditions...
- Using and purchasing small freezers - how to choose the right one - For those who are not satisfied with the size of the refrigerator, the most convenient option is a small freezer. This category includes devices with a height of up to 1 m. They are relevant for…
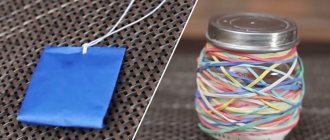
Homemade coolant from diapers
The refrigerant from baby diapers is strange at first glance, but in fact it is an effective cold accumulator. It will perfectly replace an industrial device and will maintain the desired temperature throughout the day. There is no need to put the diaper directly into the thermal bag to keep it cold; just remove the inner gel-like mixture from it.
To make an unusual coolant for a cooler bag with your own hands, you need to take:
- diaper – 1 piece;
- salt – 2 teaspoons;
- water – 250 ml;
- plastic sealed bag - 1 piece.
Preparation method:
- Pour 2 teaspoons of salt into 250 ml of water and stir until completely dissolved.
- The resulting mixture is gradually poured onto the inside of the diaper, waiting for the water to be absorbed.
- The upper part of the diaper is cut and the gel mass is taken out, which forms immediately after water is absorbed.
- It is sent into a sealed Zip Lock bag and kneaded there for even distribution.
To increase the efficiency of the cold accumulator, it is additionally frozen for several hours.
When making a refrigerant, you can add any food coloring to the water, resulting in not only a useful, but also an aesthetically attractive cold accumulator.
Reviews on how to use a cold accumulator for a thermal bag
Grishin Alexey Danilovich, 37 years old, Omsk
In the summer, the whole family often goes on a trip by car for several days. Previously, perishable products had to be purchased on the road. But this year I purchased a thermal bag for the car and cold storage batteries. Now we take both meat and milk with us on the road, so you don’t have to worry about their freshness for at least 12 hours.
Petrenko Maria Alexandrovna, 31 years old, Moscow
My husband and I love to go hiking, so we have been using thermal bags and cold storage batteries for a long time. But recently, the benefits of refrigeration generators have also been appreciated at home. Due to construction in the neighborhood, our electricity was often cut off for half a day. Batteries prevent food from spoiling and the temperature in the refrigerator does not change.
Terms of use
The principle of operation of a heat or cold accumulator is the same - the refrigerant must be charged before use. The cooling device is placed in the freezer for 8 hours. The heat accumulator is charged in a microwave oven; 4 minutes and a power of 280 W are enough.
Do not heat the heat accumulator with hot water - this may lead to deformation of the packaging.
After charging, heat or cold generators are placed in special pockets of a thermal bag or between food items. This way, the devices maintain temperature better without harming the food itself. After each use, you need to clean the drive from condensation, which often leads to contamination of the surface of the container.
When the device is not needed, the batteries are stored in a cool and dry place. Generators do not tolerate temperature fluctuations, but constant coolness extends their service life. Before each new use, the battery should be rinsed with plain water, and after drying, placed in the freezer or microwave. If you follow these simple rules, even a self-made refrigerant can be used for an unlimited period of time.
How to choose a device
Cold storage tanks differ in design features, type of refrigerant and its volume in a sealed container. These parameters must be taken into account when choosing a refrigeration device. The color of the refrigerant does not in any way affect the characteristics of the battery and does not carry a functional load, unless otherwise specified by the manufacturer on the packaging.
Some factory cold storage batteries can not only be frozen, but also heated. The substance inside the container is capable of keeping food warm. When it is necessary to use a cold accumulator as a heater, it is charged in the microwave. The heating time should not exceed that specified by the manufacturer.
Attention! Heating in a microwave oven is only possible in the case of purchased drives, the manufacturer of which allows their use with heating.