Ventilation in a bathroom, toilet or combined bathroom inevitably becomes dirty during operation. This leads to a deterioration in draft, to the point that in just a few minutes, with the door closed, it becomes impossible to breathe in the room. Cleaning the ventilation helps solve this problem.
How to check ventilation draft
Open the windows in the apartment and the door in the bathroom.
Place a piece of napkin against the ventilation mesh. Let go. If the napkin remains in place, the traction is fine. The method is suitable for hoods without a check valve. You can also determine the draft by the steam settling on the mirror - after opening the door it should disappear instantly. Ventilation is an air duct in the wall that leads from the apartment to the general building system. Cleaning the ventilation in a bathroom, toilet or combined bathroom can be done independently or with the help of SES specialists, but only in the territory of your own apartment. If a problem occurs in the general building ventilation system, you must report it by calling the unified dispatch service of the housing and communal services of your city/settlement. All necessary work in the house is organized by the management company.
Why clean the ventilation?
It is necessary to maintain the correct operation of the ventilation system for purely hygienic reasons. After all, weakening the hood leads primarily to a decrease in air exchange, which is legalized by sanitary standards of residence. The exhaust air released into the ventilation shaft takes with it dust particles, excess humidity, as well as various kinds of microorganisms that negatively affect human health.
Therefore, there is a special attitude towards cleaning the ventilation in the apartment. But, as practice shows, apartment owners practically do not deal with this. Rarely does anyone try to do anything to increase air flow. But this doesn’t help much either. Therefore, you need to understand the process of cleaning ventilation, and if possible, carry it out regularly. If not on your own, then call a specialist at least once every two to three years.
When to clean
It is clear that few people open the ventilation grille to look into the ventilation duct of the building. Therefore, it is worth paying attention to some signs that the ventilation duct has become smaller than its original size. Here are a few such signs that are very noticeable.
- Dust and dirt accumulate around the ventilation grille and on it, and cobwebs appear.
- After wet cleaning, dust immediately settles on the surface of the floor and furniture.
- In the summer, even when it’s hot, the apartment doesn’t get cool.
- If drafts with open windows or the front door have become significantly weaker or disappeared altogether.
It will definitely tell you that cleaning the ventilation in the apartment is necessary. Especially if it has been in use for many years. Holding a paper napkin to the ventilation opening will help determine the need. If the napkin remains near the ventilation duct, it means the ventilation is working well. If the napkin does not hold, then you need to sound the alarm. The duct is clogged and the ventilation is not working.
You can check in the same way by placing a piece of toilet paper or newspaper on the opening. If it sticks to the grille, it means that the ventilation is working according to its parameters. If you fall, then the problem is serious, and it must be solved urgently.
In general, it is impossible to bring the ventilation system of an apartment building to this state. After all, this network has several levels equal to the number of floors. And channels extend into each apartment from the vertical shaft. Therefore, a situation also happens when the horizontal channel from the apartment seems to be clean, but the air outflow is weak. The reason is that the vertical common channel is clogged. And here everyone will not be able to help themselves, because cleaning of the general ventilation shaft is required, for which the management company is responsible. And for her, exact standards have been established for how often to clean the ventilation of an apartment building, which, unfortunately, she does not comply with.
Disinfection measures
The hood in the bathroom needs to be disinfected. Ventilation is the source of 40% of bacteria entering the home. It would be a mistake to clean the ventilation without disinfection.
Once a year is the minimum frequency of checking the dirtiness of the hood and cleaning it.
It is forbidden to scrub the walls from plaque with solvents or aggressive chemical solutions: this can reduce the level of fire hazard during operation.
Causes of clogged ventilation ducts
The main cause of clogging is a large accumulation of dust, dirt and grease on the walls of channels and shafts. Unfortunately, this is how the ventilation of an apartment building is designed, and it is difficult to get into. These are narrow channels through which exhaust air from apartments, especially from the kitchen and bathroom, goes outside. Moving through the system, the particles located in it settle on the walls of the channels, increasing in thickness over the years in the form of a mud layer. Hence the reduction in the cross-section of the air ducts.
Another reason is the collapse of brickwork, from which the ventilation shaft is constructed in many houses. Repairing masonry is very difficult, and sometimes possible, so you have to live with such incorrectly functioning ventilation.
The third reason is small animals and birds that got inside the ventilation and died. Some birds build nests in canals that cover part of the opening.
The fourth reason is the installed kitchen hood, the air duct of which is cut into the ventilation duct. The reason is quite serious, because the ventilation of an apartment building itself must ensure air exchange inside the apartment at the rate of 90 m³/hour. And this is 5-10 times less than the performance of modern hoods. That is, when a household appliance is turned on, excess pressure is formed in the ventilation shaft, which pushes the air in it through the channels into neighboring apartments. That is, we can no longer talk about ventilation of an apartment building.
Basic Rules
Private individuals cannot clean the main ventilation shaft of a building on their own, since it belongs to common property (it is better to complain about poor ventilation to the management company and entrust all the work to their specialists). When the specialists arrive, notify all the neighbors whose apartments are located above you so that they are not surprised by the suddenly “activated” ventilation, pouring out black dust.
But the ventilation duct leading from your apartment to the common building shaft can (and even should) be cleaned yourself:
- Move kitchen furniture aside (if you are cleaning a kitchen drain) and move a stepladder to the wall. It is better to put a layer of newspapers on the floor, as something may fall out of the ventilation.
- Attach a sheet of newspaper to the bottom of the ventilation duct using masking tape (so that you don’t have to wash the wallpaper or ceramic tiles later).
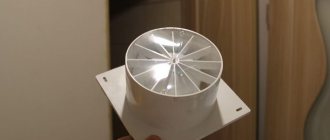
- Remove the grill covering the ventilation. Rinse it and wipe it (you can replace it with a new one if you wish).
- Wear gloves for construction work and carefully scoop out everything you find in the ventilation duct, since you will not be able to clean the ventilation in your apartment in any other way. Be careful, glass or nails may get caught, so it is better to arm yourself with a small spatula. If the ventilation duct is made in a panel or brick wall, it may contain a lot of “interesting” things, ranging from pieces of hardened mortar to the corpses of mice and birds.
- Remaining dirt can be removed from the channel with a vacuum cleaner.
- Reinstall the grille and check the draft again with the window open. If the situation does not improve, contact the management company for help.
Ventilation of an apartment building is a complex system of ventilation ducts that permeate the entire building, entering each apartment. It is through this that air is removed from the premises. But over time, ventilation ducts and shafts become smaller in cross-section due to debris, fat and oil deposits, which leads to a weakening of the outflow of air masses. This means that the ventilation of the house begins to work incorrectly. That is, the time has come to think about the question of how to clean the ventilation in the house.
How to clean the ventilation in an apartment with your own hands
Let's move on to the main question of the article, which has always been relevant, and today many owners of city apartments ask it: how to clean the ventilation in the apartment with your own hands. As mentioned above, if management companies fulfilled their duties exactly, then there would be no need to clean the ventilation yourself. But the situation is such that no one wants to deal with your apartments except you. Therefore, you will have to carry out all activities without a specialist.
Although it should be noted that cleaning the horizontal channel is an ineffective operation, because without cleaning the vertical riser, these are just cosmetic measures. But even they can slightly increase air draft. So what you need to do:
- the ventilation grill is removed, which must be washed with household detergent, because grease and oil deposits are unlikely to come off with clean or soapy water;
- remove the cobwebs with a broom or rag, try to do this by completely inserting them into the canal;
- arm yourself with a spatula and scrape off dirt deposits from the walls of the canal, under no circumstances use chemicals, they will not help;
- take a long wire and insert it as far as possible, that is, this way the arm lengthens, additionally tie a pipe cleaner to it;
- After this, you need to insert the hose from the vacuum cleaner into the channel and turn on the latter to remove accumulated and collected debris.
There are no other options to clean the ventilation duct from your apartment. Of course, if you don’t invite specialists armed with special equipment. When carrying out this work, you must be careful. Caution in this matter comes first, because inside the ventilation passages there may be wasp nests, homes of lizards and other small rodents.
Examination
Before taking active measures, you need to check for blockages in the ventilation and find out the location of the ducts.
Old-timers advise using a flame from a lighter or match. If you bring it under the ventilation grille in the bathroom, it will be attracted towards it if the hood is working properly.
The hood attracts the flame of a lit match.
A safe check can be carried out using a thin strip of paper 30 x 3 centimeters. Make sure all doors and windows are closed, bring the paper closer to the grille. If it attracts, it means that communications do not need cleaning. It doesn’t move, the attraction is weak - you need to take action.
A working hood pulls in a sheet of paper.
Where to go if you can’t clean it yourself
It should be noted right away that cleaning the ventilation in an apartment building is the responsibility of a special organization that has entered into an agreement with the management company. It is prohibited to clean the vertical ventilation shaft yourself. And it is impossible to do this qualitatively with improvised tools and devices.
Therefore, you need to come to the office of the management company and leave a written statement, indicating the entrance number and house number. The thing is that one vertical ventilation shaft is often installed per entrance. Therefore, it will be easy to search for it if the entrance number is indicated.
Specialists who arrive on call must first take measurements of the air speed in the ventilation system. One froze from the side of the apartment, the other from inside the mineshaft. After which it is determined what activities will be carried out. By the way, in addition to cleaning, it is proposed to carry out disinfection or repair.
Please note that the question of who should clean precisely determines the responsibilities of the parties. That is, the management company does not do this itself. She simply monitors the requirements of the residents of the apartment building and their implementation by her employees or persons with whom there is an agreement to carry out certain events. But residents must demand the work be completed from the management company.
Maintenance Features
Technologies allow video inspection of the condition of the air duct. Thanks to these devices, a specialist analyzes the degree of contamination of the system. In order to determine the level of harmfulness of the circulated air due to the content of dust, bacteria and fungal spores, a chemical analysis is additionally performed. Cleaning the ventilation and air conditioning system also involves disinfection. This is explained by the design features of the air conditioner.
Condensation regularly falls on the surface of the evaporator (one of the main components of cooling technology), which causes constant moisture in the mechanism. Taking into account the fact that air flows of varying degrees of contamination pass through it, some of the dust from the air settles on the evaporator.
As a result, favorable conditions are created to support the vital activity of various bacteria and fungal spores. In this case, the ventilation systems are cleaned and disinfected.
In addition to the use of special equipment, other methods are used to clean ventilation ducts, for example, the use of dry ice. This is the most gentle method, removing almost any contaminant. Dry ice can be used in systems with air ducts made of different materials, and after evaporation it does not leave condensation.
Ventilation cleaning in apartment buildings and other large objects is carried out using this method due to its effectiveness. Along with it, other cleaning equipment may be used in certain areas of particular complexity.
Firstly, the kitchen (the first ventilation hole is located there) will not leave the smells and combustion products of household gas if you have a gas stove. A poor exhaust hood from a gas boiler or water heater can lead to an almost complete lack of draft, which in some cases causes carbon monoxide poisoning for residents, but it is generally not advisable to clean it yourself.
Secondly, non-functioning ventilation in the bathroom will increase the time required for the room to dry (reducing the amount of water vapor in the air), which will subsequently become the main reason for the appearance of black spots of mold and mildew on the walls and ceiling of the room.
Thirdly, a clogged ventilation in the toilet (if the duct is common to several apartments) may start to work “in the opposite direction” and you will be able to fully feel all the odors from the neighboring bathroom.
Useful tips and tricks
Let's start by giving the main advice - you cannot clean the ventilation in the apartment yourself. But if there is no other way out, then do not climb into the vertical riser. Your options are limited, so you can only clean the horizontal ventilation duct that connects the shaft to the apartment. Now you know how to do this.
Sometimes apartment owners themselves are to blame for the fact that internal air exchange is reduced or completely absent. During the repair process, they cover the ventilation openings with finishing materials. Firstly, this cannot be done. Secondly, if this does happen, then try to correct the situation and bring it back to normal. Otherwise, you cannot avoid high humidity, unpleasant odors, mold and fungi.
If you nevertheless decide to clean the air ducts yourself, then try to prepare thoroughly for this event. To do this, you will need the tools and accessories described above, as well as a reliable stepladder.
Removing contaminants from the inside
Each of the ventilation vents in the apartment must be checked separately. If you are testing using a lighter, apply it to each hole one at a time and check to see if the direction of the flame or the angle of the newspaper is different if a strip of newspaper is used. Deviations may indicate that there is a blockage in the middle of the room. Here a dish brush or a thin steel cable will come to your aid; place it in the vent and thoroughly clean everything from the inside. You can use thin aluminum wire. The cleaning procedure should be carried out along the entire channel. The remaining debris can be removed with a vacuum cleaner. Place his hose in the shaft and try to cover as much space as possible, moving it in different directions.
The industrial method of cleaning air ducts involves the use of professional equipment. It will not only allow you to clearly see the dirt, but also clean the channels more thoroughly and also allow you to disinfect. This cleaning method makes it possible to remove any debris, whatever its origin.
If it is not possible to use professional equipment and you decide to carry out the cleaning yourself, you must take precautions. Sometimes there are wasp nests with live insects or other equally dangerous creatures inside the ventilation ducts. But, when taking on such work, we must remember that cleaning the ventilation of an apartment building is the responsibility of the owners of the building or the organization that services it. The average resident should not work inside the main duct. The relevant authorities must promptly clean the central air ducts, and if they neglect their duties, a complaint must be filed against them.
Tsugunov Anton Valerievich
Reading time: 4 minutes
Residents of apartments rarely remember properly functioning ventilation. But if the windows in the rooms begin to fog up, the smell of dishes being prepared in the kitchen spreads freely throughout the apartment, water constantly appears on the walls in the bathroom, the air feels musty and stuffy, then the ventilation system has stopped working normally. In order not to risk the health of the people living in the apartment, the condition of the furniture and other interior items, it is better to eliminate the causes of these problems as quickly as possible. This may require cleaning.
Rules for removing the device
The first stage of work on replacing or cleaning the fan begins with removing the device. To do this you need to do the following:
- Remove the fan grille, which is usually attached with four self-tapping screws, less often with glue.
Fan with grille removed
- Carefully remove the device (the electricity should already be turned off) and disconnect it from the electrical network - as a rule, in the bathroom it is connected to the light switch.
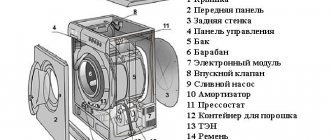
- Disassemble the device by removing the impeller secured to the shaft using a collet clamp - to do this, simply unscrew the fastening nut clockwise.
- Remove the electric motor of the equipment - to do this, turn the fan face down and disconnect the wires from the terminals. The motor is usually secured with 2 screws and can be easily removed.
When removing the engine, it must be supported. If you are disassembling a recently used device, it is advisable to wear gloves. Although it is easier to wait a while, letting the engine cool down.
Fan disassembly: features of different types and disassembly instructions
Today we will look at the features, main malfunctions, process and algorithm for disassembling exhaust, duct and floor fans.
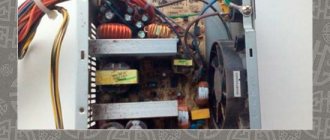
These devices are installed inside the exhaust openings. Most often, the exhaust mechanism fails due to the blown fuses located on the motor inside the fan. And for repair, the fuse must be replaced. To do this you need to get to the engine itself, located in the middle. For disassembly you only need a screwdriver.
The parsing algorithm is as follows:
- Remove the mechanism from the wall. Disassembling the device is quite a delicate job, so getting to the motor without removing the fan from the wall will be very difficult, plus there is the possibility of causing even more damage during disassembly.
Bathroom fan assembled
- Remove the protective plate. The front protective part is attached to the mechanism, most often with bolts, so removing it will not be difficult. You just need to choose the appropriate screwdriver.
- After removing the front plate, turn the fan over. It is necessary to remove the protective plate from the back. Unfortunately, the back side is most often soldered to the body, so it will have to be torn off. To assemble the mechanism, you must prepare “Moment” type glue.
- Remove the working unit with blades. This element is not attached to the body in any way, since it requires torsion. Therefore, it is very easy to remove it.
- Turn the device over. Remove engine protection. This is an ellipsoidal-shaped element located immediately behind the front plate. Unfortunately, it is also, most often, soldered to the body, so it also needs to be torn off and glued when reassembled.
- Remove the power cables. When the protection is removed, you can already see the target - the engine. Power cables pass from it through special holes and are connected to the rear of the case. These cables need to be removed through those same holes.
- Turn the mechanism over again. On the back side, in the place where the working blade element was, you can see several bolts (usually there are 2 of them). These bolts secure the engine to the housing. They need to be unscrewed, and the goal will be achieved.
Having reached the engine, you can find the same fuse next to the winding. It can be easily removed and replaced with a new one.
READ MORE: Installation of fans on the roof, features of installation and fastening of roof fans
How to Remove the Cover From a Vents Fan
Cleaning the exhaust fan. extend the life of the exhaust fan
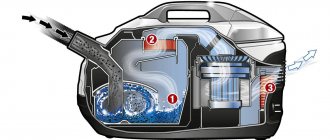
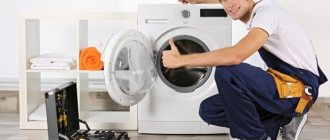
Installing a fan in the bathroom is a very good idea. Thanks to this, you can ventilate the room in a matter of minutes. Thanks to the fan installed in the exhaust pipe, the draft itself increases, which is useful for increasing the humidity in the bathroom or after a smoke break.
However, over time, especially if you go to the bathroom or smoke in the toilet, the hood becomes very dirty. As a result, traction weakens. In addition, over time, the lubricant in the motor bearings runs out, and the fan begins to work poorly and may even burn out. Therefore, it should be prevented periodically.
If your fan starts squeaking and changing speed through the wedge, don't rush to throw it away, it can still extend its life. First remove the fan. Usually secured with four screws. It is connected to the power supply using a regular two-wire terminal. It is convenient to connect the fan to a switch so that it can be turned on and off if necessary.
Installing an exhaust fan in the bathroom
First of all, when installing the fan, you need to disassemble it - remove the front protective panel. To do this, you need to press the round lock located on the bottom edge of the fan, and then pull the front panel towards you.
Next, we throw the power cable inside. There is a rubber round plug in the lower left part of the fan specifically designed for this purpose. Channels also go to it on the back side, when the power cable is routed externally.
Checking the operation of the air duct
The operating status of the channels is checked in the following order:
- the gratings on the vents are dismantled;
- dust, dirt deposits, and fatty deposits are washed off from them;
- the gratings are put in place;
- a transom or window opens in the kitchen;
- a paper sheet measuring 10x10cm is applied to the vent;
- the situation is assessed: sticky paper held by the natural force of air is an indicator of good system performance.
- similar manipulations, but with the doors open, are carried out with ventilation ducts in the toilet and bathroom.
Knowing how to clean the ventilation in an apartment yourself, you can avoid unnecessary work. First, all existing vents are inspected, one after another, each separately. The degree of deviation of the paper sheet in each case is analyzed. If, as you move, the angle of its deflection begins to change, the blockage is in the middle of the ventilation duct.
Using laundry soap
With the help of laundry soap you can get rid of even the most stubborn dirt on the hood, inside it. Experts advise using standard soap with 72% fatty acids, brown in color. Dilute 0.5 pieces in 2-3 liters of water. To quickly dissolve, the product bar is ground and the water is heated to a boil.
This folk remedy can effectively clean a kitchen hood of grease in just a few minutes. If scale does not leave the surface, it makes sense to soak the part in the mixture for 20-40 minutes, having previously increased its concentration.
Cleaning the kitchen hood hood
- First, open the windows in the room, as alcohol has a specific smell.
- Dilute 100 milliliters of ammonia into 3.5 liters of heated water.
- Leave for 3-4 hours, depending on the degree of contamination.
- Remove any remaining dirt with a coarse brush and rinse the grille under water.
One of the most serious reasons that lead to negative consequences. The ventilation shaft of many houses is built on the basis of brick. Cleaning and repairing the shaft itself is what needs to be done to eliminate the problem. It is difficult to cope with this on your own; it is recommended to invite specialists.
Method 1. Dishwashing liquid
If you are looking for something to clean your hood from grease, but the dirt has not yet hardened and become dark in color, any dishwashing detergent can help.
- Take a container and place a wire rack in it.
- Pour warm water so that the mesh is not visible.
- Add funds.
- Leave to stand for about half an hour.
- Next, take out the grate and scrub it with a rough sponge to remove everything as much as possible.
- If it doesn't work right away, try again.
- Rinse off the detergent with clean water.
- Dry the mesh and put it back in place.
This recipe is suitable if you want to clean your hood quickly, but do it regularly. Please note that it is better not to keep aluminum grates in water for a long time.
Method 7. Lemon or citric acid
- The appearance of allergens and fungi in large quantities.
- Poor air circulation worsens the indoor microclimate. The humidity level rises, and the same thing happens with the normal temperature.
- Subsequently, dirt collects on the surface faster.
- Motors and working units begin to warm up and experience increased load. Therefore, the mechanisms wear out faster.
- The inflow and outflow of air is no longer as efficient as before.
- The fire danger level is increasing.
Upon completion of the cleaning process, it is advisable to apply a disinfectant to all walls, fan blades and other parts and mechanisms. To do this, you can use preparations for disinfecting household air conditioners. 3% hydrogen peroxide will also cope well with this task.